标签:authorize loader shang ice work tag ln -s har local
PXE+kickstart无人值守安装centos7所谓的PXE是Preboot Execution Environment的缩写,字面上的意思是开机前的执行环境。
要达成PXE必须要有两个环节:
(1)一个是客户端的网卡必须要支持PXE用户端功能,并且开机时选择从网卡启动,这样系统才会以网卡进入PXE客户端的程序;
(2)一个是PXE服务器必须要提供至少含有DHCP以及TFTP的服务!
且其中:
? · DHCP服务必须要能够提供客户端的网络参数,还要告知客户端TFTP所在的位置;
? · TFTP则提供客户端的boot loader及kernel file下载路径。
还要加上NFS/FTP/HTTP(选择一样即可)等提供安装文件(安装镜像的解压文件),才算是比较完整的PXE服务器。一般TFTP和DHCP服务都由同一台服务器提供,且大多数时候还提供NFS/FTP/HTTP服务,所以PXE服务器一般是提供3合一的服务。
如下图:图片来源于网络,虽不易理解,但细节描述的很好。
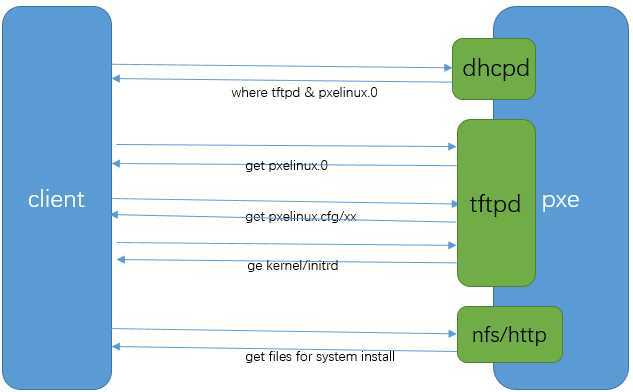
(1).Client向PXE Server上的DHCP发送IP地址请求消息,DHCP检测Client是否合法(主要是检测Client的网卡MAC地址),如果合法则返回Client的IP地址,同时将pxe环境下的Boot loader文件pxelinux.0的位置信息传送给Client。
(2).Client向PXE Server上的TFTP请求pxelinux.0,TFTP接收到消息之后再向Client发送pxelinux.0大小信息,试探Client是否满意,当TFTP收到Client发回的同意大小信息之后,正式向Client发送pxelinux.0。
(3).Client执行接收到的pxelinux.0文件。
(4).Client向TFTP请求pxelinux.cfg文件(其实它是目录,里面放置的是是启动菜单,即grub的配置文件),TFTP将配置文件发回Client,继而Client根据配置文件执行后续操作。
(5).Client向TFTP发送Linux内核请求信息,TFTP接收到消息之后将内核文件发送给Client。
(6).Client向TFTP发送根文件请求信息,TFTP接收到消息之后返回Linux根文件系统。
(7).Client加载Linux内核(启动参数已经在4中的配置文件中设置好了)。
(8).Client通过nfs/ftp/http下载系统安装文件进行安装。如果在4中的配置文件指定了kickstart路径,则会根据此文件自动应答安装系统。
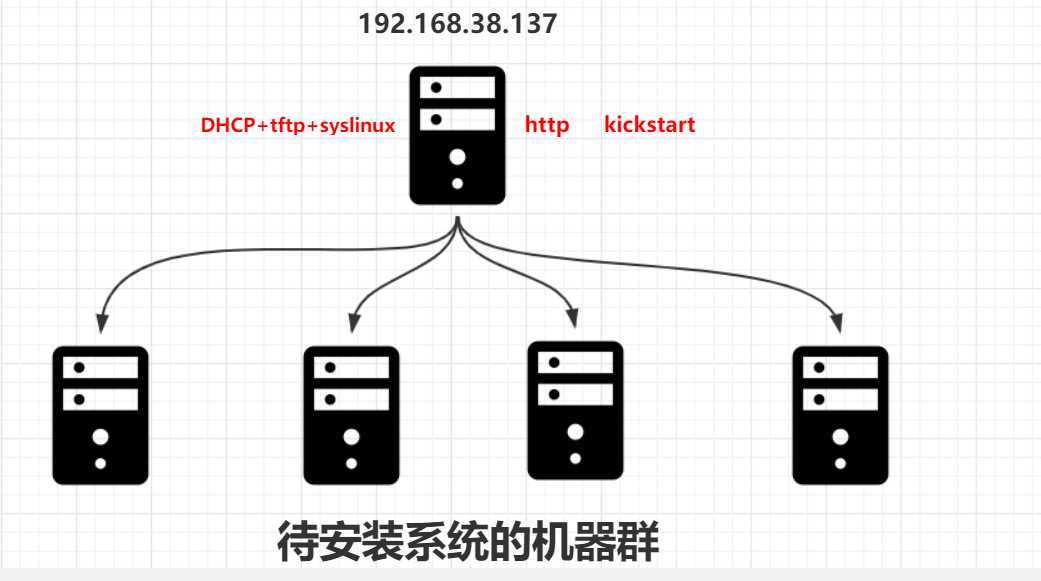
如下图,192.168.38.137是PXE服务器,提供dhcp+tftp+http服务。其他该网段内的主机为待安装系统的主机群。
首先安装dhcp服务端程序。
yum -y install dhcpDHCP主要是提供客户端网络参数与TFTP的位置,以及boot loader的文件名。同时,我们仅针对内网来告知TFTP的相关位置,所以可以编辑/etc/dhcp/dhcpd.conf在subnet的区块内加入两个参数即可。其中PXE上专门为PXE客户端下载的boot loader文件名称为pxelinux.0。
[root@server ~]# cat /etc/dhcp/dhcpd.conf
ddns-update-style none;
default-lease-time 259200;
max-lease-time 518400;
option routers 192.168.38.2;
option domain-name-servers 192.168.38.2;
subnet 192.168.38.0 netmask 255.255.255.0 {
        range 192.168.38.200 192.168.38.220;
        option subnet-mask 255.255.255.0;
        next-server 192.168.38.137;             # 就是TFTP的位置
        filename "pxelinux.0";                  # 告知得从TFTP根目录下载的boot loader文件名
}
重启dhcp
systemctl restart dhcpd从流程图中可以看出,boot loader文件pxelinux.0以及内核相关的配置文件(目录pxelinux.cfg下)主要都是由TFTP来提供的!
TFTP的安装很简单,直接使用yum即可。不过要告诉客户端TFTP的根目录在哪里,这样客户端才能找到相关文件。另外要注意,TFTP是由xinetd这个super daemon所管理的,因此设定好TFTP之后,要启动的是xinetd。
yum install tftp-server默认TFTP服务的根目录是/var/lib/tftpboot/,默认就这个吧,然后disable改为no即可
sed -ri ‘/disable/s/yes/no/‘ /etc/xinetd.d/tftp
cat /etc/xinetd.d/tftp

service tftp
{
        socket_type     = dgram
        protocol        = udp
        wait            = yes
        user            = root
        server          = /usr/sbin/in.tftpd
        server_args     = -s /var/lib/tftpboot
        disable         = no
        per_source      = 11
        cps             = 100 2
        flags           = IPv4
}
启动TFTP并观察之:
systemctl start tftp

ss -ltnup | grep tftp
udp    UNCONN     0      0        :::69                   :::*                   users:(("in.tftpd",pid=8425,fd=0),("systemd",pid=1,fd=28))
接下来的文件必须要放置于/var/lib/tftpboot/目录下。
如果要使用PXE的开机引导的话,需要使用CentOS提供的syslinux包,从中copy两个文件到tftp的根目录/var/lib/tftpboot/下即可。整个过程如下:
yum -y install syslinux
cp -a /usr/share/syslinux/{menu.c32,vesamenu.c32,pxelinux.0} /var/lib/tftpboot/
mkdir /var/lib/tftpboot/pxelinux.cfg
ls -l /var/lib/tftpboot/
-rw-r--r--. 1 root root  55140 Oct 31  2018 menu.c32        # 提供图形化菜单功能
-rw-r--r--. 1 root root  26759 Oct 31  2018 pxelinux.0      # bootloader文件
drwxr-xr-x. 2 root root      6 Sep  8 14:02 pxelinux.cfg    # 开机的菜单设定在这里
-rw-r--r--. 1 root root 153104 Oct 31  2018 vesamenu.c32    # 也是提供图形化菜单功能,但界面和menu.c32不同
pxelinux.cfg是个目录,可以放置默认的开机选项,也可以针对不同的客户端主机提供不同的开机选项。一般来说,可以在pxelinux.cfg目录内建立一个名为default的文件来提供默认选项。
如果没有menu.c32或vesamenu.c32时,菜单会以纯文字模式一行一行显示。如果使用menu.c32或vesamenu.c32,就会有类似反白效果出现,此时可以使用上下键来选择选项,而不需要看着屏幕去输入数字键来选择开机选项。经过测试,使用vesamenu.c32比menu.c32更加好看些。
这部分设定完毕后,就是内核相关的设定了。
要安装Linux系统,必须提供Linux内核文件和initrd文件,这里以64位版本的CentOS 7.2为例。
这里计划将内核相关文件放在/tftpboot/CentOS7.2/目录下。既然要从安装镜像中获取内核相关文件,首先得要挂载镜像。
mount /dev/cdrom /mnt
mkdir /var/lib/tftpboot/CentOS7.6
cp /mnt/isolinux/{initrd.img,vmlinuz} /var/lib/tftpboot/CentOS7.6/
cp /mnt/isolinux/isolinux.cfg /var/lib/tftpboot/pxelinux.cfg/default
其实仅需要vmlinuz和initrd.img两个文件即可,不过这里还将isolinux.cfg这个文件拷贝出来了,这个文件里提供了开机选项,可以以它作为修改开机选项和菜单的模板,这样修改起来比较容易,也更便捷!
以下是CentOS 7.6中syslinux包中提供的isolinux.cfg中提供的默认内容。
[root@server ~]# cat /mnt/isolinux/isolinux.cfg
default vesamenu.c32    # 这是必须项,或者使用menu.c32
timeout 600             # 超时等待时间,60秒内不操作将自动选择默认的菜单来加载

display boot.msg        # 这是为选项提供一些说明的文件

# Clear the screen when exiting the menu, instead of leaving the menu displayed.
# For vesamenu, this means the graphical background is still displayed without
# the menu itself for as long as the screen remains in graphics mode.
menu clear
menu background splash.png  # 背景图片
menu title CentOS 7         # 大标题
menu vshift 8
menu rows 18
menu margin 8
#menu hidden
menu helpmsgrow 15
menu tabmsgrow 13

# Border Area
menu color border * #00000000 #00000000 none

# Selected item
menu color sel 0 #ffffffff #00000000 none

# Title bar
menu color title 0 #ff7ba3d0 #00000000 none

# Press [Tab] message
menu color tabmsg 0 #ff3a6496 #00000000 none

# Unselected menu item
menu color unsel 0 #84b8ffff #00000000 none

# Selected hotkey
menu color hotsel 0 #84b8ffff #00000000 none

# Unselected hotkey
menu color hotkey 0 #ffffffff #00000000 none

# Help text
menu color help 0 #ffffffff #00000000 none

# A scrollbar of some type? Not sure.
menu color scrollbar 0 #ffffffff #ff355594 none

# Timeout msg
menu color timeout 0 #ffffffff #00000000 none
menu color timeout_msg 0 #ffffffff #00000000 none

# Command prompt text
menu color cmdmark 0 #84b8ffff #00000000 none
menu color cmdline 0 #ffffffff #00000000 none

# Do not display the actual menu unless the user presses a key. All that is displayed is a timeout message.

menu tabmsg Press Tab for full configuration options on menu items.

menu separator # insert an empty line
menu separator # insert an empty line

label linux
  menu label ^Install CentOS 7  # 菜单文字
  kernel vmlinuz        # 内核文件路径,注意相对路径是从tftp的根路径/tftpboot开始的,所以要改为"./CentOS7.2/vmlinuz"
  append initrd=initrd.img inst.stage2=hd:LABEL=CentOS\x207\x20x86_64 quiet
                        # 内核启动选项,其中包括initrd的路径,同样要改为"./CentOS7.6/initrd.img"
                        # stage2文件的搜索路径,搜索的文件一般是".treeinfo",找不到该文件则找
label check
  menu label Test this ^media & install CentOS 7
  menu default          # menu default表示开机时光标一开始默认停留在此label上
  kernel vmlinuz
  append initrd=initrd.img inst.stage2=hd:LABEL=CentOS\x207\x20x86_64 rd.live.check quiet

menu separator # insert an empty line

# utilities submenu     # 子菜单项的设置方法
menu begin ^Troubleshooting
  menu title Troubleshooting

label vesa
  menu indent count 5
  menu label Install CentOS 7 in ^basic graphics mode
  text help
    Try this option out if you‘re having trouble installing
    CentOS 7.
  endtext
  kernel vmlinuz
  append initrd=initrd.img inst.stage2=hd:LABEL=CentOS\x207\x20x86_64 xdriver=vesa nomodeset quiet

label rescue
  menu indent count 5
  menu label ^Rescue a CentOS system
  text help
    If the system will not boot, this lets you access files
    and edit config files to try to get it booting again.
  endtext
  kernel vmlinuz
  append initrd=initrd.img inst.stage2=hd:LABEL=CentOS\x207\x20x86_64 rescue quiet

label memtest
  menu label Run a ^memory test
  text help
    If your system is having issues, a problem with your
    system‘s memory may be the cause. Use this utility to
    see if the memory is working correctly.
  endtext
  kernel memtest

menu separator # insert an empty line

label local
  menu label Boot from ^local drive
  localboot 0xffff

menu separator # insert an empty line
menu separator # insert an empty line

label returntomain
  menu label Return to ^main menu
  menu exit

menu end
所以,将其稍作修改,使其适合做pxe的菜单配置文件。
[root@server ~]# cat /var/lib/tftpboot/pxelinux.cfg/default
default vesamenu.c32
timeout 600

display boot.msg

menu clear
menu background splash.png
menu title CentOS 7
menu vshift 8
menu rows 18
menu margin 8
#menu hidden
menu helpmsgrow 15
menu tabmsgrow 13

menu color border * #00000000 #00000000 none
menu color sel 0 #ffffffff #00000000 none
menu color title 0 #ff7ba3d0 #00000000 none
menu color tabmsg 0 #ff3a6496 #00000000 none
menu color unsel 0 #84b8ffff #00000000 none
menu color hotsel 0 #84b8ffff #00000000 none
menu color hotkey 0 #ffffffff #00000000 none
menu color help 0 #ffffffff #00000000 none
menu color scrollbar 0 #ffffffff #ff355594 none
menu color timeout 0 #ffffffff #00000000 none
menu color timeout_msg 0 #ffffffff #00000000 none
menu color cmdmark 0 #84b8ffff #00000000 none
menu color cmdline 0 #ffffffff #00000000 none

label linux
  menu label ^Install CentOS 7 through pxe
  menu default
  kernel ./CentOS7.6/vmlinuz
  append initrd=./CentOS7.6/initrd.img inst.stage2=https://mirrors.huaweicloud.com/centos/7.6.1810/os/x86_64/ quiet net.ifnames=0 biosdevname=0
其中"net.ifnames=0 biosdevname=0"这两个内核启动参数是为了让网卡名称为ethN,而不是默认的eno16777728这样的随机名称。
注意示例中stage2的路径是使用了网络源,最好本地搭建http,我偷懒了,当然ftp也可以
http的话直接把镜像挂载到相应目录即可
yum install httpd -y
systemctl start httpd
mkdir /var/www/html/CentOS7.6
mount /dev/cdrom  /var/www/html/CentOS7.6/
新开一个虚拟机,进入bios界面设置从网卡启动。将首先搜索DHCP服务器,找到DHCP后搜索bootloader文件,启动菜单设置文件等,然后进入启动菜单等待选择要启动的项。如下:

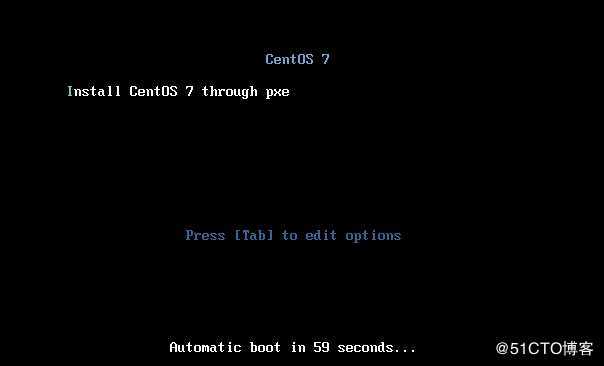
因为只设置了一个启动项,所以菜单中只有一项。启动它,将加载一系列文件,直到出现安装操作界面。
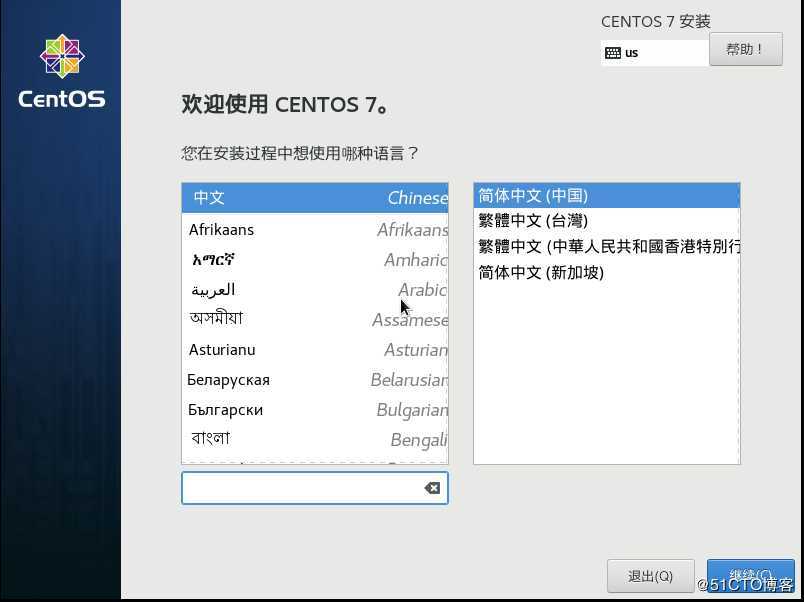
然后就可以直接操作安装系统了。但这样毕竟是手动操作,无法实现批量系统安装,所以要提供一个自动应答文件,每一次的手动操作步骤都由自动应答文件中给定的项来应答,这样就能实现自动安装操作系统,也就能实现批量系统安装。
所谓的无人值守,就是自动应答,当安装过程中需要人机交互提供某些选项的答案时(如如何分区),自动应答文件可以根据对应项自动提供答案。但是,无人值守并不完全是无人值守,至少设置bios从网卡启动是必须人为设置的,且安装完系统后设置不从网卡启动也是需要人为设置的。除此之外,其他的基本上都可以实现无人值守安装。
要配置无人值守的系统安装环境,需要提供安装过程中需要的各种答案,这些答案在kickstart的配置文件中设置,一般正常安装完Linux系统在root用户的家目录下有一个anaconda-ks.cfg
参考:https://blog.csdn.net/yanghua1012/article/details/80426659
参考:http://ju.outofmemory.cn/entry/194801
也可以使用图形化工具:system-config-kickstart
以下是修改后该文件中的内容,将用来做kickstart应答文件。并设置由ftp服务来提供该文件,所以将kickstart文件保存到ftp的pub目录中。
mkdir /var/www/html/ks_file
cp ~/anaconda-ks.cfg /var/www/html/ks_file/ks7_mini.cfg
chmod +r /var/www/html/ks_file/ -R      # 必须要保证ks.cfg是全局可读的

[root@server ~]# cat /var/www/html/ks_file/ks7_mini.cfg
install
keyboard ‘us‘
rootpw  --iscrypted $6$TwMc7kHxAYSdICBU$yUVPcTo.SWi6FpWrZsx3.X.yjbrvqvgMxu0Jvqims55ZU6hQKPaR5DeQISwhcMBkmyVK/UJ1SFnpmu9E3S/Wu0
url --url="https://mirrors.huaweicloud.com/centos/7.6.1810/os/x86_64/"
# url --url="http://192.168.38.137/CentOS7.6/"
lang en_US
auth  --useshadow  --passalgo=sha512
text
firstboot --disable
selinux --disabled
firewall --disabled
network  --bootproto=dhcp --device=eth0
reboot
timezone Asia/Shanghai
user --name=qqq --password=$6$Vfzluz2el5OucNGd$oXvo557fWOVXnJVbaUBRUG25UDudEK9y0FaTHoVhyoWJju4EeiSsirf74dxQqphl10Yuc12MoiGsfqC0vJzVl/ --iscrypted --gecos="qqq"
bootloader --append="net.ifnames=0" --location=mbr
zerombr
clearpart --all --initlabel
part / --fstype="xfs" --size=10000
part /boot --fstype="xfs" --size=1000
part swap --fstype="swap" --size=1024

%post
sed ‘/^server/d‘ /etc/chrony.conf -i
sed ‘1a server ntp.aliyun.com iburst‘ /etc/chrony.conf -i
sed ‘1a server 0.cn.pool.ntp.org iburst‘ /etc/chrony.conf -i
sed ‘1a server ntp1.aliyun.com iburst‘ /etc/chrony.conf -i
systemctl enable chronyd
echo ‘*/30 * * * * /usr/sbin/ntpdate ntp.aliyun.com &>/dev/null‘ >> /var/spool/cron/root
sed ‘/^GSSAPIAuthentication/d‘ /etc/ssh/sshd_config -i
sed ‘/^UseDNS/d‘ /etc/ssh/sshd_config -i
echo "GSSAPIAuthentication no" >> /etc/ssh/sshd_config
echo "UseDNS no" >> /etc/ssh/sshd_config
ln -sf  /usr/share/zoneinfo/Asia/Shanghai /etc/localtime
mkdir /root/.ssh
cd /root/.ssh
cat > authorized_keys <<EOF
ssh-rsa AAAAB3NzaC1yc2EAAAABIwAAAIEArAgRomkl40uKp+Dz13prEbBf31cJGqVMqSir/zaxMyTZyTjd3BJc5qokWi6mBBsJ0TPEbciFAbnroy1BX/qsfSLWLAdzipp+3wsubx6gSkedT5s1G+xAOUUFoUiQMuwYwIjbAo8c+HKfDPHpzRVZ1d2vp0MbZjw6m87KftKUQvs=
EOF
chmod 700 /root/.ssh
chmod 600 /root/.ssh/authorized_keys
rm -f /etc/yum.repos.d/*
cat >>/etc/yum.repos.d/my.repo<<eof
[base]
name=sohu
baseurl=http://mirrors.sohu.com/centos/7/os/x86_64/
gpgcheck=0
enable=1
[epel]
name=epel
baseurl=http://mirrors.aliyun.com/epel/7Server/x86_64/
enable=1
gpgcheck=0
eof
%end
%packages
chrony
tree
vim-enhanced
%end
设置后,修改/var/lib/tftpboot/pxelinux.cfg/default 文件,在其中的内核启动参数上加上一项kickstart文件的寻找路径。
vim /var/lib/tftpboot/pxelinux.cfg/default

label linux
  menu label ^Install CentOS 7 through pxe
  menu default
  kernel ./CentOS7.6/vmlinuz
  append initrd=./CentOS7.6/initrd.img  ks=http://192.168.38.137/ks_file/ks7_mini.cfg quiet net.ifnames=0 biosdevname=0

#  append initrd=./CentOS7.6/initrd.img inst.stage2=http://192.168.38.137/CentOS7.6/ quiet net.ifnames=0 biosdevname=0
回归正题,现在已经设置好/var/lib/tftpboot/pxelinux.cfg/default 和/var/www/html/ks_file/ks7_mini.cfg,所以可以进行无人值守安装Linux了。
标签:authorize loader shang ice work tag ln -s har local
原文地址:https://blog.51cto.com/14012942/2436542