标签:ane div ini github db_name 存储 资料 port uil
当前官方暂时还没有使用docker-compose 运行kuma 的demo(太复杂没必要),但是做为一个本地的测试环境使用
docker-compose 运行下通用模式的kuma 还有比较有意义的,可以了解下通信的原理。
kuma 在通用模式运行,需要以下几个组件:
version: "3"
services:
postgres:
image: postgres
ports:
- "5432:5432"
environment:
- "POSTGRES_PASSWORD=dalong"
- "POSTGRES_DB=kuma"
kuma-cp:
image: kong-docker-kuma-docker.bintray.io/kuma-cp:0.1.1
command: run --log-level=info
environment:
- "KUMA_STORE_TYPE=postgres"
- "KUMA_STORE_POSTGRES_HOST=postgres"
- "KUMA_BOOTSTRAP_SERVER_PARAMS_XDS_HOST=kuma-cp"
- "KUMA_STORE_POSTGRES_PORT=5432"
- "KUMA_STORE_POSTGRES_USER=postgres"
- "KUMA_STORE_POSTGRES_PASSWORD=dalong"
- "KUMA_STORE_POSTGRES_DB_NAME=kuma"
kuma-dp-echo:
build: ./
image: dalongrong/kuma-tcp-echo
volumes:
- "./service.yaml:/opt/service.yaml"
- "./config2:/tmp/kuma.io/envoy"
environment:
- "KUMA_DATAPLANE_ADMIN_PORT=9901"
- "KUMA_CONTROL_PLANE_BOOTSTRAP_SERVER_URL=http://kuma-cp:5682"
- "KUMA_DATAPLANE_MESH=default"
- "KUMA_DATAPLANE_NAME=dp-echo-1"
ports:
- "8000:8000"
- "10000:10000"
kuma-dp-echo2:
build: ./
image: dalongrong/kuma-tcp-echo
volumes:
- "./service2.yaml:/opt/service.yaml"
- "./config3:/tmp/kuma.io/envoy"
environment:
- "KUMA_DATAPLANE_ADMIN_PORT=9901"
- "KUMA_CONTROL_PLANE_BOOTSTRAP_SERVER_URL=http://kuma-cp:5682"
- "KUMA_DATAPLANE_MESH=default"
- "KUMA_DATAPLANE_NAME=dp-echo-2"
ports:
- "8001:8000"
- "10001:10000"
FROM kong-docker-kuma-docker.bintray.io/kuma-dp:0.1.1
COPY kuma-tcp-echo /usr/bin/kuma-tcp-echo
COPY envoy /usr/bin/envoy
COPY kumactl /usr/bin/kumactl
RUN chmod +x /usr/bin/kuma-tcp-echo && chmod +x /usr/bin/envoy && chmod +x /usr/bin/kumactl
COPY entrypoint.sh /entrypoint.sh
RUN chmod +x /entrypoint.sh
COPY config /config
ENTRYPOINT [ "/entrypoint.sh" ]
kumactl 需要一个配置文件 (类似kubectl),用来指定kuma-cp 的地址,内容如下:
contexts:
- controlPlane: local
name: local
controlPlanes:
- coordinates:
apiServer:
url: http://kuma-cp:5681
name: local
currentContext: local
entrypoint 容器入口:
为了启动方便,我们在entrypoint 中进行数据面板实体的注册,以及启动数据控制面板(有先后顺序的)
#!/bin/sh
cat /config
kumactl --config-file /config apply -f /opt/service.yaml
echo "run dp"
nohup kuma-tcp-echo &
kuma-dp run --log-level=debug
数据面板实体格式:
type 必须为Dataplane 当前mesh 为default(应该是为了支持多租户的),name 必须唯一,tags 指定角色
type: Dataplane
mesh: default
name: dp-echo-1
networking:
inbound:
- interface: 0.0.0.0:10000:8000
tags:
service: echo
- "KUMA_STORE_TYPE=postgres"
- "KUMA_STORE_POSTGRES_HOST=postgres"
- "KUMA_BOOTSTRAP_SERVER_PARAMS_XDS_HOST=kuma-cp"
- "KUMA_STORE_POSTGRES_PORT=5432"
- "KUMA_STORE_POSTGRES_USER=postgres"
- "KUMA_STORE_POSTGRES_PASSWORD=dalong"
- "KUMA_STORE_POSTGRES_DB_NAME=kuma"
kuma-dp, 需要配置数据面板实体,xds 服务地址.envoy admin 端口
- "KUMA_DATAPLANE_ADMIN_PORT=9901"
- "KUMA_CONTROL_PLANE_BOOTSTRAP_SERVER_URL=http://kuma-cp:5682"
- "KUMA_DATAPLANE_MESH=default"
- "KUMA_DATAPLANE_NAME=dp-echo-1"
可通过docker-entrypoint-initdb.d进行数据库数据库
docker-compose up -d postgres
创建数据库
CREATE TABLE IF NOT EXISTS resources (
name varchar(100) NOT NULL,
namespace varchar(100) NOT NULL,
mesh varchar(100) NOT NULL,
type varchar(100) NOT NULL,
version integer NOT NULL,
spec text,
PRIMARY KEY (name, namespace, mesh, type)
);
dcoker-compose up -d kuma-cp
docker-compose up -d kuma-dp-echo kuma-dp-echo2
curl http://localhost:8000
效果:
curl http://localhost:8000
GET / HTTP/1.1
Host: localhost:10000
User-Agent: curl/7.54.0
Accept: */*
通过sidecar 访问的服务
curl http://localhost:10000
效果:
curl http://localhost:10000
GET / HTTP/1.1
Host: localhost:10000
User-Agent: curl/7.54.0
Accept: */*
数据库内容: 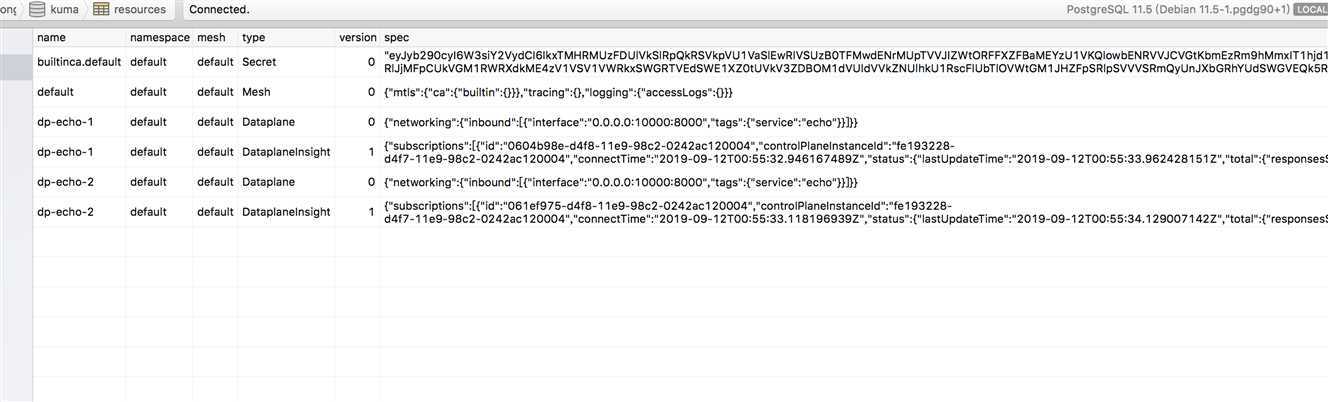
https://kuma.io/docs/0.1.1/documentation/#dataplane-specification
https://kuma.io/install/0.1.1/
https://github.com/rongfengliang/kuma-service-mesh-docker-compose
https://github.com/Kong/kuma/blob/master/install/postgres/resource.sql
标签:ane div ini github db_name 存储 资料 port uil
原文地址:https://www.cnblogs.com/rongfengliang/p/11510003.html