标签:one 两台 建立 路由协议 子网掩码 back loopback 没有 info
虚链路的含义指一条通过一个非骨干区域连接到骨干区域的链路(OSPF协议中只有连接到骨干区域,才能获取到路由信息)
通过一个非骨干区域连接一个区域到骨干区域;
通过一个非骨干区域连接一个分段的骨干区域。
Router(config-router)#area area-id vritual-link router-id //“area-id”为需要跨越的区域ID;“router-id”为其邻居的路由ID实验拓扑图如下:

打开GNS3
1、从图标栏拖出四台路由、两台PC机;
2、使用网线相连并开启。
R1#conf t                                                //进入全局模式
R1(config)#int f 0/1                                     //进入f0/1接口
R1(config-if)#ip add 192.168.10.1 255.255.255.0          //设置IP与子网掩码
R1(config-if)#no shut
R1(config-if)# int f 0/0
R1(config-if)#ip add 10.10.10.10 255.0.0.0
R1(config-if)#no shut
R1(config-if)#ex
R1(config)#int lo 0                                       //进入loopback网卡
R1(config-if)#ip add 1.1.1.1 255.255.255.255              //指定Router ID
R1(config-if)#no shut
R1(config-if)#ex
R1(config)#router ospf 1                                  //建立OSPF协议1号进程
R1(config-router)#router-id 1.1.1.1
R1(config-router)#net 192.168.10.0 0.0.0.255 area 2       //宣告自身网段
R1(config-router)#net 10.0.0.0 0.255.255.255 area 2       //宣告自身网段
R1(config-router)#ex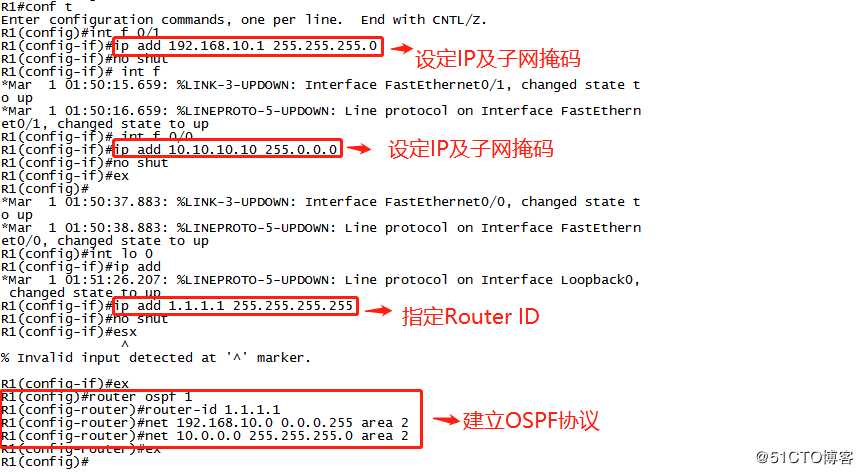
R2#conf t
R2(config)#int f 0/1
R2(config-if)#ip add 10.10.10.20 255.0.0.0
R2(config-if)#no shut
R2(config-if)#int f 0/0
R2(config-if)#ip add 20.20.20.20 255.0.0.0
R2(config-if)#no shut
R2(config-if)#int lo 0
R2(config-if)#ip add 2.2.2.2 255.255.255.255
R2(config-if)#no shut
R2(config-if)#ex
R2(config)#router ospf 1
R2(config-router)#router-id 2.2.2.2
R2(config-router)#net 10.0.0.0 0.255.255.255 area 2
R2(config-router)#net 20.0.0.0 0.255.255.255 area 1
R2(config-router)#ex 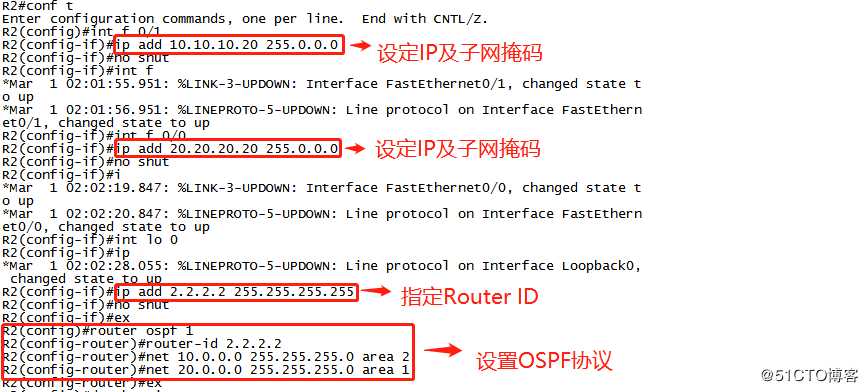
R3#conf t
R3(config)#int f0/0
R3(config-if)#ip add 20.20.20.30 255.0.0.0
R3(config-if)#no shut
R3(config-if)#int f 0/1
R3(config-if)#ip add 30.30.30.30 255.0.0.0
R3(config-if)#no shut
R3(config-if)#int lo 0
R3(config-if)#ip add 3.3.3.3 255.255.255.255
R3(config-if)#no shut
R3(config-if)#ex
R3(config)#router ospf 1
R3(config-router)#router-id 3.3.3.3
R3(config-router)#net 20.0.0.0 0.255.255.255 area 1
*Mar  1 00:02:05.795: %OSPF-5-ADJCHG: Process 1, Nbr 2.2.2.2 on FastEthernet0/0 from LOADING to FULL, Loading Done
R3(config-router)#net 30.0.0.0 0.255.255.255 area 0
R3(config-router)#ex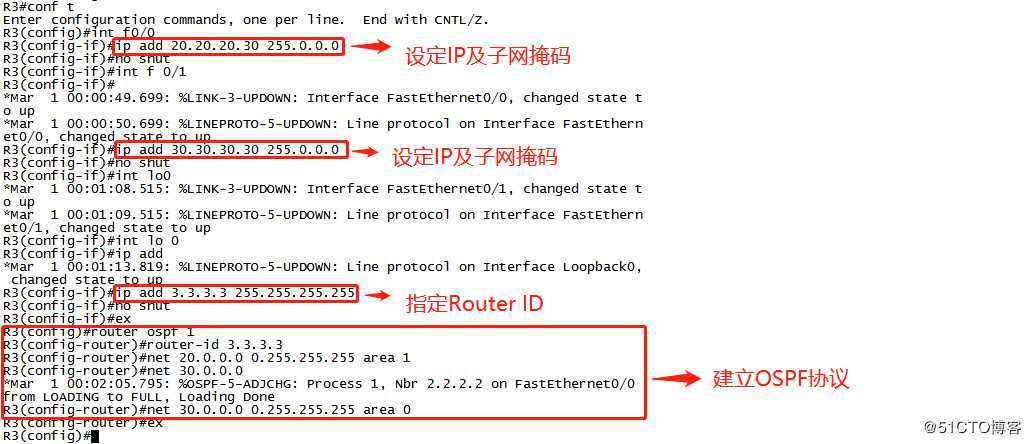
R4#conf t
R4(config)#int f0/1
R4(config-if)#ip add 30.30.30.40 255.0.0.0
R4(config-if)#no shut
R4(config-if)#int f0/0
R4(config-if)#ip add 192.168.20.1 255.255.255.0
R4(config-if)#no shut
R4(config-if)#int lo 0
R4(config-if)#ip add 4.4.4.4 255.255.255.255
R4(config-if)#no shut
R4(config-if)#ex
R4(config)#router ospf 1
R4(config-router)#router-id 4.4.4.4
R4(config-router)#net 30.0.0.0 0.255.255.255 area 0
*Mar  1 02:34:26.647: %OSPF-5-ADJCHG: Process 1, Nbr 3.3.3.3 on FastEthernet0/1 from LOADING to FULL, Loading Done
R4(config-router)#net 192.168.20.0 0.0.0.255 area 0
R4(config-router)#ex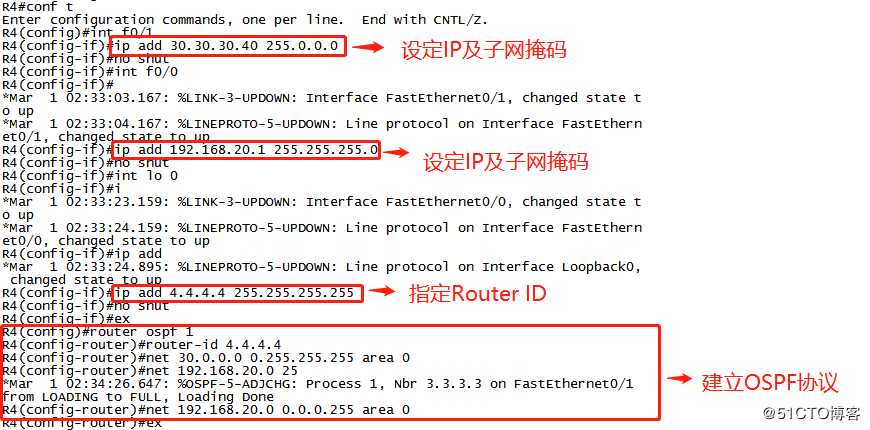
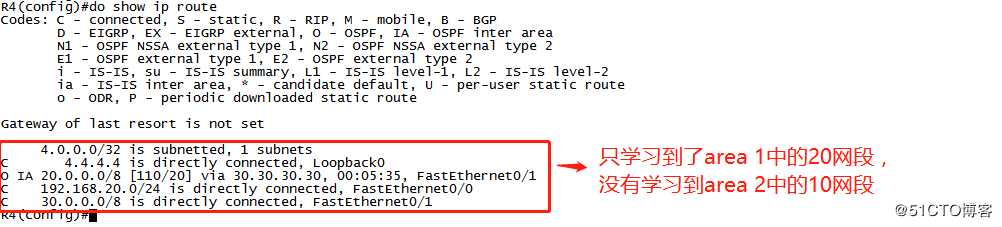
此时,虽然已经将各个路由设备设置完毕。但实际上area 0骨干区域中的路由只学习到了与之相连的area 1中的网段,并没有学习到相隔的area 2中的网段,路由表学习不全,自然也不可能联通。
下面,就是在area 1区域下悄悄的“挖”隧道,建立虚链路,连接到area 0骨干区域上。
R2(config)#router ospf 1                          //进入ospf协议1号进程中
R2(config-router)#area 1 virtual-link 3.3.3.3 //建立虚连接R3(config)#router ospf 1
R3(config-router)#area 1 virtual-link 2.2.2.2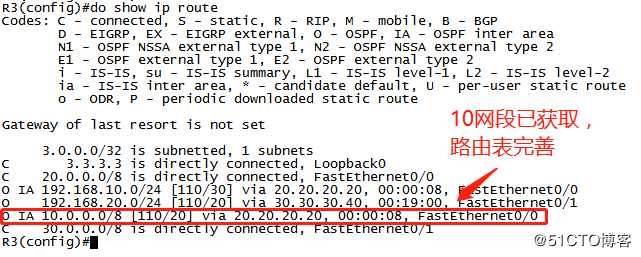
PC1>
PC1> ip 192.168.10.10 192.168.10.1
Checking for duplicate address...
PC1 : 192.168.10.10 255.255.255.0 gateway 192.168.10.1

PC1> PC2>
PC2> ip 192.168.20.20 192.168.20.1
Checking for duplicate address...
PC1 : 192.168.20.20 255.255.255.0 gateway 192.168.20.1
PC2> 
标签:one 两台 建立 路由协议 子网掩码 back loopback 没有 info
原文地址:https://blog.51cto.com/14484404/2437919