标签:pack style ade txt relative amp roo 生成 atom
这里给出一个经典的词频统计的案例:统计如下样本数据中每个单词出现的次数。
SparkHBase
HiveFlinkStormHadoopHBaseSpark
Flink
HBaseStorm
HBaseHadoopHiveFlink
HBaseFlinkHiveStorm
HiveFlinkHadoop
HBaseHive
HadoopSparkHBaseStorm
HBaseHadoopHiveFlink
HBaseFlinkHiveStorm
HiveFlinkHadoop
HBaseHiveSparkHBase
HiveFlinkStormHadoopHBaseSpark
Flink
HBaseStorm
HBaseHadoopHiveFlink
HBaseFlinkHiveStorm
HiveFlinkHadoop
HBaseHive
HadoopSparkHBaseStorm
HBaseHadoopHiveFlink
HBaseFlinkHiveStorm
HiveFlinkHadoop
HBaseHive
想要进行 MapReduce 编程,需要导入 hadoop-client 依赖:
<dependency>
   <groupId>org.apache.hadoop</groupId>
   <artifactId>hadoop-client</artifactId>
   <version>${hadoop.version}</version>
</dependency><dependency>
<groupId>org.apache.hadoop</groupId>
<artifactId>hadoop-client</artifactId>
<version>${hadoop.version}</version>
</dependency>
将每行数据按照指定分隔符进行拆分。这里需要注意在 MapReduce 中必须使用 Hadoop 定义的类型,因为 Hadoop 预定义的类型都是可序列化,可比较的,所有类型均实现了 WritableComparable接口。
public class WordCountMapper extends Mapper<LongWritable, Text, Text, IntWritable> {

   @Override
   protected void map(LongWritable key, Text value, Context context) throws IOException,
                                                                     InterruptedException {
       String[] words = value.toString().split("\t");
       for (String word : words) {
           context.write(new Text(word), new IntWritable(1));
      }
  }
}public class WordCountMapper extends Mapper<LongWritable, Text, Text, IntWritable> {
protected void map(LongWritable key, Text value, Context context) throws IOException,
InterruptedException {
String[] words = value.toString().split("\t");
for (String word : words) {
context.write(new Text(word), new IntWritable(1));
}
}
}
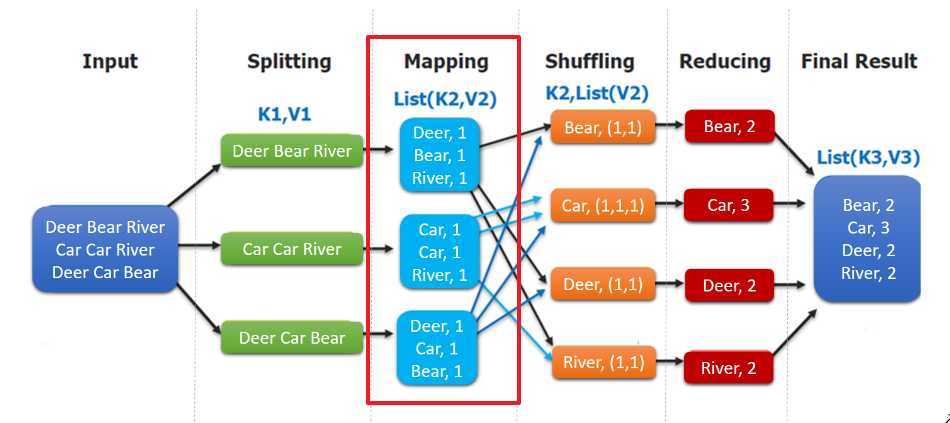
WordCountMapper 对应下图的 Mapping 操作:

WordCountMapper继承自 Mappe类,这是一个泛型类,定义如下:
WordCountMapper extends Mapper<LongWritable, Text, Text, IntWritable>

public class Mapper<KEYIN, VALUEIN, KEYOUT, VALUEOUT> {

}WordCountMapper extends Mapper<LongWritable, Text, Text, IntWritable>
public class Mapper<KEYIN, VALUEIN, KEYOUT, VALUEOUT> {
}
mapping输入 key 的类型,即每行的偏移量 (每行第一个字符在整个文本中的位置),Long类型,对应 Hadoop 中的 LongWritable类型;mapping输入 value 的类型,即每行数据;String类型,对应 Hadoop 中 Text类型;mapping输出的 key 的类型,即每个单词;String类型,对应 Hadoop 中 Text类型;mapping输出 value 的类型,即每个单词出现的次数;这里用 int 类型,对应 IntWritable类型。
在 Reduce 中进行单词出现次数的统计:
public class WordCountReducer extends Reducer<Text, IntWritable, Text, IntWritable> {

   @Override
   protected void reduce(Text key, Iterable<IntWritable> values, Context context) throws IOException,
                                                                                 InterruptedException {
       int count = 0;
       for (IntWritable value : values) {
           count += value.get();
      }
       context.write(key, new IntWritable(count));
  }
}public class WordCountReducer extends Reducer<Text, IntWritable, Text, IntWritable> {
protected void reduce(Text key, Iterable<IntWritable> values, Context context) throws IOException,
InterruptedException {
int count = 0;
for (IntWritable value : values) {
count += value.get();
}
context.write(key, new IntWritable(count));
}
}
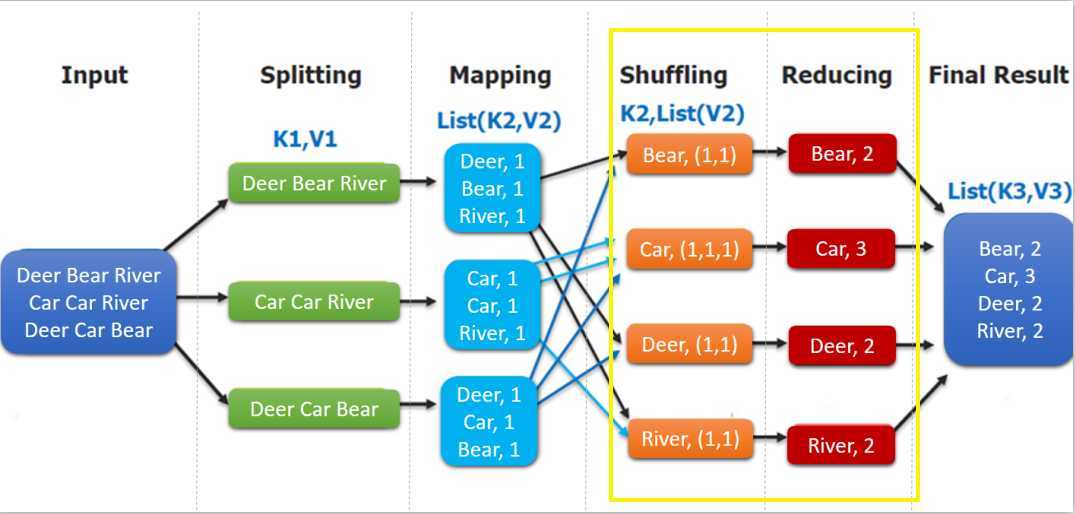
如下图,shuffling 的输出是 reduce 的输入。这里的 key 是每个单词,values 是一个可迭代的数据类型,类似 (1,1,1,...)。

组装 MapReduce 作业,并提交到服务器运行,代码如下:
/**
* 组装作业 并提交到集群运行
*/
public class WordCountApp {
   // 这里为了直观显示参数 使用了硬编码,实际开发中可以通过外部传参
   private static final String HDFS_URL = "hdfs://192.168.100.1";
   private static final String HADOOP_USER_NAME = "root";

   public static void main(String[] args) throws Exception {

       // 文件输入路径和输出路径由外部传参指定
       if (args.length < 2) {
           System.out.println("Input and output paths are necessary!");
           return;
      }

       // 需要指明 hadoop 用户名,否则在 HDFS 上创建目录时可能会抛出权限不足的异常
       System.setProperty("HADOOP_USER_NAME", HADOOP_USER_NAME);

       Configuration configuration = new Configuration();
       // 指明 HDFS 的地址
       configuration.set("fs.defaultFS", HDFS_URL);

       // 创建一个 Job
       Job job = Job.getInstance(configuration);

       // 设置运行的主类
       job.setJarByClass(WordCountApp.class);

       // 设置 Mapper 和 Reducer
       job.setMapperClass(WordCountMapper.class);
       job.setReducerClass(WordCountReducer.class);

       // 设置 Mapper 输出 key 和 value 的类型
       job.setMapOutputKeyClass(Text.class);
       job.setMapOutputValueClass(IntWritable.class);

       // 设置 Reducer 输出 key 和 value 的类型
       job.setOutputKeyClass(Text.class);
       job.setOutputValueClass(IntWritable.class);

       // 如果输出目录已经存在,则必须先删除,否则重复运行程序时会抛出异常
       FileSystem fileSystem = FileSystem.get(new URI(HDFS_URL), configuration, HADOOP_USER_NAME);
       Path outputPath = new Path(args[1]);
       if (fileSystem.exists(outputPath)) {
           fileSystem.delete(outputPath, true);
      }

       // 设置作业输入文件和输出文件的路径
       FileInputFormat.setInputPaths(job, new Path(args[0]));
       FileOutputFormat.setOutputPath(job, outputPath);

       // 将作业提交到群集并等待它完成,参数设置为 true 代表打印显示对应的进度
       boolean result = job.waitForCompletion(true);

       // 关闭之前创建的 fileSystem
       fileSystem.close();

       // 根据作业结果,终止当前运行的 Java 虚拟机,退出程序
       System.exit(result ? 0 : -1);

  }
}/**
* 组装作业 并提交到集群运行
*/
public class WordCountApp {
// 这里为了直观显示参数 使用了硬编码,实际开发中可以通过外部传参
private static final String HDFS_URL = "hdfs://192.168.100.1";
private static final String HADOOP_USER_NAME = "root";
public static void main(String[] args) throws Exception {
// 文件输入路径和输出路径由外部传参指定
if (args.length < 2) {
System.out.println("Input and output paths are necessary!");
return;
}
// 需要指明 hadoop 用户名,否则在 HDFS 上创建目录时可能会抛出权限不足的异常
System.setProperty("HADOOP_USER_NAME", HADOOP_USER_NAME);
Configuration configuration = new Configuration();
// 指明 HDFS 的地址
configuration.set("fs.defaultFS", HDFS_URL);
// 创建一个 Job
Job job = Job.getInstance(configuration);
// 设置运行的主类
job.setJarByClass(WordCountApp.class);
// 设置 Mapper 和 Reducer
job.setMapperClass(WordCountMapper.class);
job.setReducerClass(WordCountReducer.class);
// 设置 Mapper 输出 key 和 value 的类型
job.setMapOutputKeyClass(Text.class);
job.setMapOutputValueClass(IntWritable.class);
// 设置 Reducer 输出 key 和 value 的类型
job.setOutputKeyClass(Text.class);
job.setOutputValueClass(IntWritable.class);
// 如果输出目录已经存在,则必须先删除,否则重复运行程序时会抛出异常
FileSystem fileSystem = FileSystem.get(new URI(HDFS_URL), configuration, HADOOP_USER_NAME);
Path outputPath = new Path(args[1]);
if (fileSystem.exists(outputPath)) {
fileSystem.delete(outputPath, true);
}
// 设置作业输入文件和输出文件的路径
FileInputFormat.setInputPaths(job, new Path(args[0]));
FileOutputFormat.setOutputPath(job, outputPath);
// 将作业提交到群集并等待它完成,参数设置为 true 代表打印显示对应的进度
boolean result = job.waitForCompletion(true);
// 关闭之前创建的 fileSystem
fileSystem.close();
// 根据作业结果,终止当前运行的 Java 虚拟机,退出程序
System.exit(result ? 0 : -1);
}
}
需要注意的是:如果不设置 Mapper 操作的输出类型,则程序默认它和 Reducer操作输出的类型相同。
在实际开发中,可以在本机配置 hadoop 开发环境,直接在 IDE 中启动进行测试。这里主要介绍一下打包提交到服务器运行。由于本项目没有使用除 Hadoop 外的第三方依赖,直接打包即可:
# mvn clean package# mvn clean package
使用以下命令提交作业:
hadoop jar /usr/appjar/hadoop-word-count-1.0.jar com.heibaiying.WordCountApp /wordcount/input.txt /wordcount/output/WordCountApphadoop jar /usr/appjar/hadoop-word-count-1.0.jar \
com.heibaiying.WordCountApp \
/wordcount/input.txt /wordcount/output/WordCountApp
作业完成后查看 HDFS 上生成目录:
# 查看目录
hadoop fs -ls /wordcount/output/WordCountApp

# 查看统计结果
hadoop fs -cat /wordcount/output/WordCountApp/part-r-00000# 查看目录
hadoop fs -ls /wordcount/output/WordCountApp
# 查看统计结果
hadoop fs -cat /wordcount/output/WordCountApp/part-r-00000

这里假设有个需求:将不同单词的统计结果输出到不同文件。这种需求实际上比较常见,比如统计产品的销量时,需要将结果按照产品种类进行拆分。要实现这个功能,就需要用到自定义 Partitioner。
这里先介绍下 MapReduce 默认的分类规则:在构建 job 时候,如果不指定,默认的使用的是 HashPartitioner:对 key 值进行哈希散列并对 numReduceTasks取余。其实现如下:
public class HashPartitioner<K, V> extends Partitioner<K, V> {

  public int getPartition(K key, V value,
                          int numReduceTasks) {
    return (key.hashCode() & Integer.MAX_VALUE) % numReduceTasks;
}
}public class HashPartitioner<K, V> extends Partitioner<K, V> {
public int getPartition(K key, V value,
int numReduceTasks) {
return (key.hashCode() & Integer.MAX_VALUE) % numReduceTasks;
}
}
这里我们继承 Partitioner自定义分类规则,这里按照单词进行分类:
public class CustomPartitioner extends Partitioner<Text, IntWritable> {

   public int getPartition(Text text, IntWritable intWritable, int numPartitions) {
       return WordCountDataUtils.WORD_LIST.indexOf(text.toString());
  }
}public class CustomPartitioner extends Partitioner<Text, IntWritable> {
public int getPartition(Text text, IntWritable intWritable, int numPartitions) {
return WordCountDataUtils.WORD_LIST.indexOf(text.toString());
}
}
在构建 job时候指定使用我们自己的分类规则,并设置 reduce的个数:
执行结果
执行结果如下,分别生成 6 个文件,每个文件中为对应单词的统计结果:

标签:pack style ade txt relative amp roo 生成 atom
原文地址:https://www.cnblogs.com/TiePiHeTao/p/a04e4beefea19a0825097a42eab6878f.html