标签:创建 min 链接 加密 master some tor run mysql
安装:Harbor 官方地址:官方地址:https://github.com/vmware/harbor/releases
tar xvf harbor-offline-installer-<version>.tgz https://github.com/vmware/harbor/releases/download/v1.2.0/harbor-offline-installer-v1.2.0.tgz
必选参数
openssl genrsa -des3 -out server.key 2048
openssl req -new -key server.key -out server.csr
cp server.key server.key.org
ope nssl rsa -in server.key.org -out server.key
ope nssl x509 -req -days 365 -in server.csr -signkey server.key -out server.crt
mkdir /data/cert
chmod -R 777 /data/cert
./install.sh
https://reg.yourdomain.com 的管理员门户(将的管理员门户(将reg.yourdomain.com更改为您的主机名更改为您的主机名harbor.cfg)
请注意,默认管理员用户名认管理员用户名/密码为密码为admin / Harbor12345
a、指定镜像仓库地址、指定镜像仓库地址
vim /etc/docker/daemon.json

{

"insecure-registries": ["serverip"]

}
b、下载测试镜像
docker pull hello-world
c、给镜像重新打标签
docker tag hello-world serverip/hello-world:latest
d、登录进行上传
docker login serverip
a、指定镜像仓库地址(serverip指自身设置的地址,如我的:hub.lqz.com)
vim /etc/docker/daemon.json

{

"insecure-registries": ["serverip"]

}
b、下载测试镜像
docker pull serverip/hello-world:latest
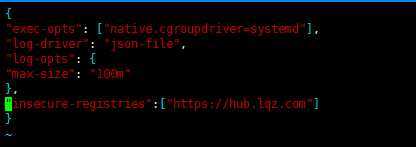
vim /etc/docker/daemon.json
添加字符串:"insecure-registries":["https://hub.lqz.com"]

开启docker:
systemctl restart docker


vim harbor.cfg
创建证书
① 生成私钥: openssl genrsa -des3 -out server.key 2048
密码:root123
② 创建证书的请求csr:
openssl req -new -key server.key -out server.csr

③ 备份私钥
cp server.key server.key.org
④ 转换成自己的证书(退出密码)
openssl rsa -in server.key.org -out server.key
⑤ 拿证书请求去签名
openssl x509 -req -days 365 -in server.csr -signkey server.key -out server.crt

echo "192.168.100.168 hub.lqz.com" >> /etc/hosts
⑥ 在计算机里修改hosts文件
C:\Windows\System32\drivers\etc hosts文件
用管理员权限向文件添加 192.168.100.168 hub.lqz.com
⑦ 用浏览器访问 hub.lqz.com
默认账号:admin;密码:Harbor12345
可在vim harbor.cfg 文件中查看

cd /usr/local/harbor/
./install.sh

docker pull nginx

docker login hub.lqz.com
其中hub.lqz.com为自己企业镜像仓库的域名


docker tag docker.io/nginx:latest hub.lqz.com/library/nginx:latest

docker push hub.lqz.com/library/nginx:latest


docker pull hub.lqz.com/library/nginx:latest
docker rmi -f hub.lqz.com/library/nginx:latest

参照链接:https://jingyan.baidu.com/article/4b52d702e62167fc5c774b3b.html
|
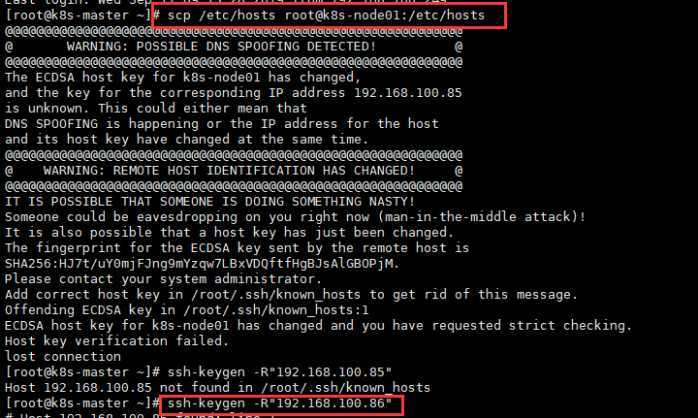
@@@@@@@@@@@@@@@@@@@@@@@@@@@@@@@@@@@@@@@@@@@@@@@@@@@@@@@@@@@ @ WARNING: POSSIBLE DNS SPOOFING DETECTED! @ @@@@@@@@@@@@@@@@@@@@@@@@@@@@@@@@@@@@@@@@@@@@@@@@@@@@@@@@@@@ The ECDSA host key for k8s-node01 has changed, and the key for the corresponding IP address 192.168.100.85 is unknown. This could either mean that DNS SPOOFING is happening or the IP address for the host and its host key have changed at the same time. @@@@@@@@@@@@@@@@@@@@@@@@@@@@@@@@@@@@@@@@@@@@@@@@@@@@@@@@@@@ @ WARNING: REMOTE HOST IDENTIFICATION HAS CHANGED! @ @@@@@@@@@@@@@@@@@@@@@@@@@@@@@@@@@@@@@@@@@@@@@@@@@@@@@@@@@@@ IT IS POSSIBLE THAT SOMEONE IS DOING SOMETHING NASTY! Someone could be eavesdropping on you right now (man-in-the-middle attack)! It is also possible that a host key has just been changed. The fingerprint for the ECDSA key sent by the remote host is SHA256:HJ7t/uY0mjFJng9mYzqw7LBxVDQftfHgBJsAlGBOPjM. Please contact your system administrator. Add correct host key in /root/.ssh/known_hosts to get rid of this message. Offending ECDSA key in /root/.ssh/known_hosts:1 ECDSA host key for k8s-node01 has changed and you have requested strict checking. Host key verification failed. lost connection |

问题产生原因:
设置node节点为同一台主机(系统重装)IP地址不一样,master连接时再次访问此ip服务器时,因为ssh会自动匹配之前ssh保存的信息,由于我们的服务器做了更改,会导致本地保存的ssh信息失效,于是再次连接时就会出现上述错误。
解决方案:
删除本地known_hosts里面的缓存信息即可。命令:ssh-keygen -R "你的远程服务器ip地址"
注意:R是大写!
链接:https://blog.csdn.net/yunweifun/article/details/78763026
ssh: connect to host k8s-node01 port 22: No route to host
lost connection

vim修改/etc/hosts下对应的IP地址就恢复了
这篇随笔有很多重复的东西,但我没选择删除,因为我觉得知识就是一个不短重复积累的过程,加油啦!
链接:https://www.bilibili.com/video/av66617940/?p=14
标签:创建 min 链接 加密 master some tor run mysql
原文地址:https://www.cnblogs.com/LiuQizhong/p/11528894.html