标签:com ant info cut key res work 端口 for
根据官网的介绍,ApacheKafka®是一个分布式流媒体平台,它主要有3种功能:
1:It lets you publish and subscribe to streams of records.发布和订阅消息流,这个功能类似于消息队列,这也是kafka归类为消息队列框架的原因
2:It lets you store streams of records in a fault-tolerant way.以容错的方式记录消息流,kafka以文件的方式来存储消息流
3:It lets you process streams of records as they occur.可以再消息发布的时候进行处理
1:Building real-time streaming data pipelines that reliably get data between systems or applications.在系统或应用程序之间构建可靠的用于传输实时数据的管道,消息队列功能
2:Building real-time streaming applications that transform or react to the streams of data。构建实时的流数据处理程序来变换或处理数据流,数据处理功能
Kafka目前主要作为一个分布式的发布订阅式的消息系统使用,下面简单介绍一下kafka的基本机制
1.3.1 消息传输流程
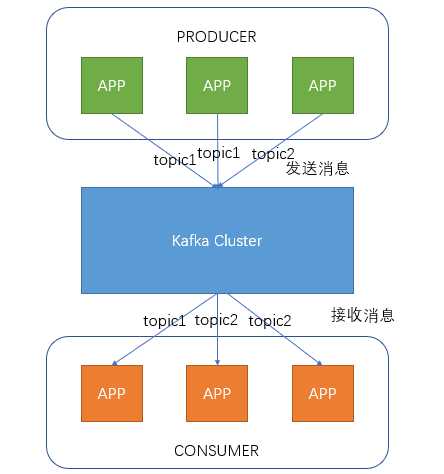
Producer即生产者,向Kafka集群发送消息,在发送消息之前,会对消息进行分类,即Topic,上图展示了两个producer发送了分类为topic1的消息,另外一个发送了topic2的消息。
Topic即主题,通过对消息指定主题可以将消息分类,消费者可以只关注自己需要的Topic中的消息
Consumer即消费者,消费者通过与kafka集群建立长连接的方式,不断地从集群中拉取消息,然后可以对这些消息进行处理。
从上图中就可以看出同一个Topic下的消费者和生产者的数量并不是对应的。
1.3.2 kafka服务器消息存储策略
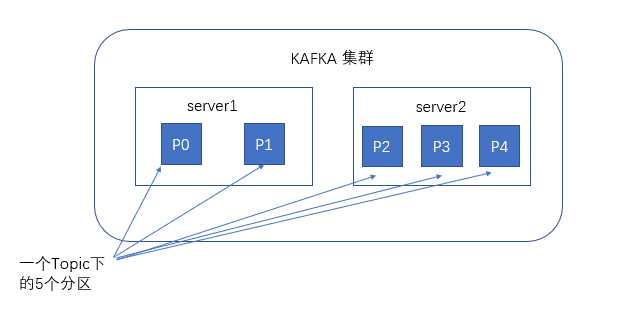
谈到kafka的存储,就不得不提到分区,即partitions,创建一个topic时,同时可以指定分区数目,分区数越多,其吞吐量也越大,但是需要的资源也越多,同时也会导致更高的不可用性,kafka在接收到生产者发送的消息之后,会根据均衡策略将消息存储到不同的分区中。

在每个分区中,消息以顺序存储,最晚接收的的消息会最后被消费。
1.3.3 与生产者的交互
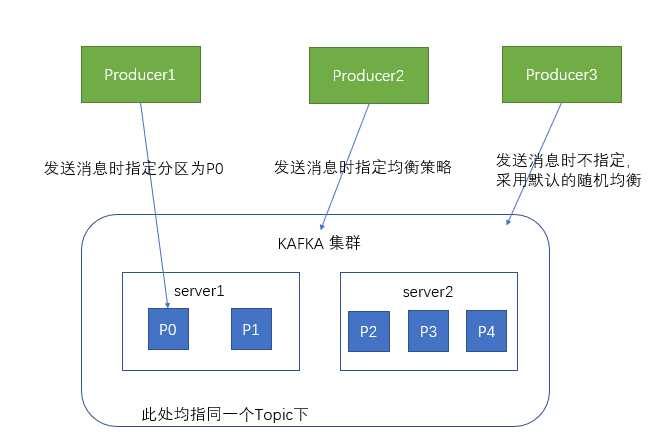
生产者在向kafka集群发送消息的时候,可以通过指定分区来发送到指定的分区中
也可以通过指定均衡策略来将消息发送到不同的分区中
如果不指定,就会采用默认的随机均衡策略,将消息随机的存储到不同的分区中
1.3.4 与消费者的交互
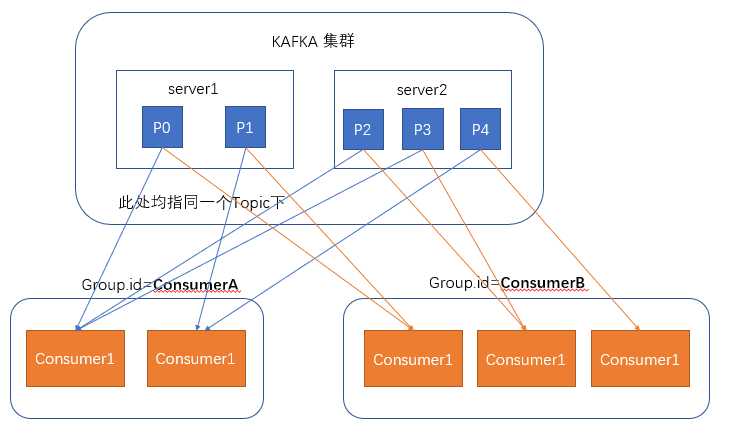
在消费者消费消息时,kafka使用offset来记录当前消费的位置
在kafka的设计中,可以有多个不同的group来同时消费同一个topic下的消息,如图,我们有两个不同的group同时消费,他们的的消费的记录位置offset各不项目,不互相干扰。
对于一个group而言,消费者的数量不应该多余分区的数量,因为在一个group中,每个分区至多只能绑定到一个消费者上,即一个消费者可以消费多个分区,一个分区只能给一个消费者消费
因此,若一个group中的消费者数量大于分区数量的话,多余的消费者将不会收到任何消息。
你可以在kafka官网 http://kafka.apache.org/downloads下载到最新的kafka安装包,选择下载二进制版本的tgz文件,根据网络状态可能需要fq,这里我们选择的版本是0.11.0.1,目前的最新版
Kafka是使用scala编写的运行与jvm虚拟机上的程序,虽然也可以在windows上使用,但是kafka基本上是运行在linux服务器上,因此我们这里也使用linux来开始今天的实战。
首先确保你的机器上安装了jdk,kafka需要java运行环境,以前的kafka还需要zookeeper,新版的kafka已经内置了一个zookeeper环境,所以我们可以直接使用
说是安装,如果只需要进行最简单的尝试的话我们只需要解压到任意目录即可,这里我们将kafka压缩包解压到/home目录
在kafka解压目录下下有一个config的文件夹,里面放置的是我们的配置文件
consumer.properites 消费者配置,这个配置文件用于配置于2.5节中开启的消费者,此处我们使用默认的即可
producer.properties 生产者配置,这个配置文件用于配置于2.5节中开启的生产者,此处我们使用默认的即可
server.properties kafka服务器的配置,此配置文件用来配置kafka服务器,目前仅介绍几个最基础的配置
listeners=PLAINTEXT:// 192.168.180.128:9092。并确保服务器的9092端口能够访问
3.zookeeper.connect 申明kafka所连接的zookeeper的地址 ,需配置为zookeeper的地址,由于本次使用的是kafka高版本中自带zookeeper,使用默认配置即可
zookeeper.connect=localhost:2181
cd进入kafka解压目录,输入
bin/zookeeper-server-start.sh config/zookeeper.properties
启动zookeeper成功后会看到如下的输出

2.启动kafka
cd进入kafka解压目录,输入
bin/kafka-server-start.sh config/server.properties
启动kafka成功后会看到如下的输出

2.5.1 创建一个topic
Kafka通过topic对同一类的数据进行管理,同一类的数据使用同一个topic可以在处理数据时更加的便捷
在kafka解压目录打开终端,输入
bin/kafka-topics.sh --create --zookeeper localhost:2181 --replication-factor 1 --partitions 1 --topic test
创建一个名为test的topic

在创建topic后可以通过输入
bin/kafka-topics.sh --list --zookeeper localhost:2181
来查看已经创建的topic
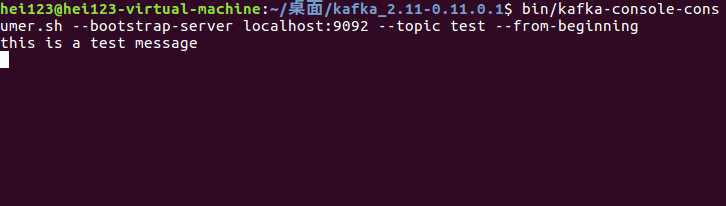
2.4.2 创建一个消息消费者
在kafka解压目录打开终端,输入
bin/kafka-console-consumer.sh --bootstrap-server localhost:9092 --topic test --from-beginning
可以创建一个用于消费topic为test的消费者

消费者创建完成之后,因为还没有发送任何数据,因此这里在执行后没有打印出任何数据
不过别着急,不要关闭这个终端,打开一个新的终端,接下来我们创建第一个消息生产者
2.4.3 创建一个消息生产者
在kafka解压目录打开一个新的终端,输入
bin/kafka-console-producer.sh --broker-list localhost:9092 --topictest
在执行完毕后会进入的编辑器页面
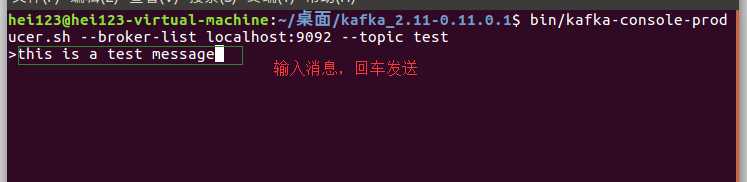
在发送完消息之后,可以回到我们的消息消费者终端中,可以看到,终端中已经打印出了我们刚才发送的消息
跟上节中一样,我们现在在java程序中尝试使用kafka
3.1 创建Topic
public static void main(String[] args) {
//创建topic
Properties props = new Properties();
props.put("bootstrap.servers", "192.168.180.128:9092");
AdminClient adminClient = AdminClient.create(props);
ArrayList<NewTopic> topics = new ArrayList<NewTopic>();
NewTopic newTopic = new NewTopic("topic-test", 1, (short) 1);
topics.add(newTopic);
CreateTopicsResult result = adminClient.createTopics(topics);
try {
result.all().get();
} catch (InterruptedException e) {
e.printStackTrace();
} catch (ExecutionException e) {
e.printStackTrace();
}
}
使用AdminClient API可以来控制对kafka服务器进行配置,我们这里使用NewTopic(String name, int numPartitions, short replicationFactor)的构造方法来创建了一个名为“topic-test”,分区数为1,复制因子为1的Topic.
3.2 Producer生产者发送消息
public static void main(String[] args){
Properties props = new Properties();
props.put("bootstrap.servers", "192.168.180.128:9092");
props.put("acks", "all");
props.put("retries", 0);
props.put("batch.size", 16384);
props.put("linger.ms", 1);
props.put("buffer.memory", 33554432);
props.put("key.serializer", "org.apache.kafka.common.serialization.StringSerializer");
props.put("value.serializer", "org.apache.kafka.common.serialization.StringSerializer");
Producer<String, String> producer = new KafkaProducer<String, String>(props);
for (int i = 0; i < 100; i++)
producer.send(new ProducerRecord<String, String>("topic-test", Integer.toString(i), Integer.toString(i)));
producer.close();
}
使用producer发送完消息可以通过2.5中提到的服务器端消费者监听到消息。也可以使用接下来介绍的java消费者程序来消费消息
3.3 Consumer消费者消费消息
public static void main(String[] args){
Properties props = new Properties();
props.put("bootstrap.servers", "192.168.12.65:9092");
props.put("group.id", "test");
props.put("enable.auto.commit", "true");
props.put("auto.commit.interval.ms", "1000");
props.put("key.deserializer", "org.apache.kafka.common.serialization.StringDeserializer");
props.put("value.deserializer", "org.apache.kafka.common.serialization.StringDeserializer");
final KafkaConsumer<String, String> consumer = new KafkaConsumer<String,String>(props);
consumer.subscribe(Arrays.asList("topic-test"),new ConsumerRebalanceListener() {
public void onPartitionsRevoked(Collection<TopicPartition> collection) {
}
public void onPartitionsAssigned(Collection<TopicPartition> collection) {
//将偏移设置到最开始
consumer.seekToBeginning(collection);
}
});
while (true) {
ConsumerRecords<String, String> records = consumer.poll(100);
for (ConsumerRecord<String, String> record : records)
System.out.printf("offset = %d, key = %s, value = %s%n", record.offset(), record.key(), record.value());
}
}
这里我们使用Consume API 来创建了一个普通的java消费者程序来监听名为“topic-test”的Topic,每当有生产者向kafka服务器发送消息,我们的消费者就能收到发送的消息。
Spring-kafka是正处于孵化阶段的一个spring子项目,能够使用spring的特性来让我们更方便的使用kafka
4.1 基本配置信息
与其他spring的项目一样,总是离不开配置,这里我们使用java配置来配置我们的kafka消费者和生产者。
<!--kafka start-->
<dependency>
<groupId>org.apache.kafka</groupId>
<artifactId>kafka-clients</artifactId>
<version>0.11.0.1</version>
</dependency>
<dependency>
<groupId>org.apache.kafka</groupId>
<artifactId>kafka-streams</artifactId>
<version>0.11.0.1</version>
</dependency>
<dependency>
<groupId>org.springframework.kafka</groupId>
<artifactId>spring-kafka</artifactId>
<version>1.3.0.RELEASE</version>
</dependency>
我们在主目录下新建名为KafkaConfig的类
@Configuration
@EnableKafka
public class KafkaConfig {
}
在kafkaConfig类中添加配置
//topic config Topic的配置开始
@Bean
public KafkaAdmin admin() {
Map<String, Object> configs = new HashMap<String, Object>();
configs.put(AdminClientConfig.BOOTSTRAP_SERVERS_CONFIG,"192.168.180.128:9092");
return new KafkaAdmin(configs);
}
@Bean
public NewTopic topic1() {
return new NewTopic("foo", 10, (short) 2);
}
//topic的配置结束
//producer config start
@Bean
public ProducerFactory<Integer, String> producerFactory() {
return new DefaultKafkaProducerFactory<Integer,String>(producerConfigs());
}
@Bean
public Map<String, Object> producerConfigs() {
Map<String, Object> props = new HashMap<String,Object>();
props.put(ProducerConfig.BOOTSTRAP_SERVERS_CONFIG, "192.168.180.128:9092");
props.put("acks", "all");
props.put("retries", 0);
props.put("batch.size", 16384);
props.put("linger.ms", 1);
props.put("buffer.memory", 33554432);
props.put("key.serializer", "org.apache.kafka.common.serialization.IntegerSerializer");
props.put("value.serializer", "org.apache.kafka.common.serialization.StringSerializer");
return props;
}
@Bean
public KafkaTemplate<Integer, String> kafkaTemplate() {
return new KafkaTemplate<Integer, String>(producerFactory());
}
//producer config end
5.配置ConsumerFactory
//consumer config start
@Bean
public ConcurrentKafkaListenerContainerFactory<Integer,String> kafkaListenerContainerFactory(){
ConcurrentKafkaListenerContainerFactory<Integer, String> factory = new ConcurrentKafkaListenerContainerFactory<Integer, String>();
factory.setConsumerFactory(consumerFactory());
return factory;
}
@Bean
public ConsumerFactory<Integer,String> consumerFactory(){
return new DefaultKafkaConsumerFactory<Integer, String>(consumerConfigs());
}
@Bean
public Map<String,Object> consumerConfigs(){
HashMap<String, Object> props = new HashMap<String, Object>();
props.put("bootstrap.servers", "192.168.180.128:9092");
props.put("group.id", "test");
props.put("enable.auto.commit", "true");
props.put("auto.commit.interval.ms", "1000");
props.put("key.deserializer", "org.apache.kafka.common.serialization.IntegerDeserializer");
props.put("value.deserializer", "org.apache.kafka.common.serialization.StringDeserializer");
return props;
}
//consumer config end
4.2 创建消息生产者
//使用spring-kafka的template发送一条消息 发送多条消息只需要循环多次即可
public static void main(String[] args) throws ExecutionException, InterruptedException {
AnnotationConfigApplicationContext ctx = new AnnotationConfigApplicationContext(KafkaConfig.class);
KafkaTemplate<Integer, String> kafkaTemplate = (KafkaTemplate<Integer, String>) ctx.getBean("kafkaTemplate");
String data="this is a test message";
ListenableFuture<SendResult<Integer, String>> send = kafkaTemplate.send("topic-test", 1, data);
send.addCallback(new ListenableFutureCallback<SendResult<Integer, String>>() {
public void onFailure(Throwable throwable) {
}
public void onSuccess(SendResult<Integer, String> integerStringSendResult) {
}
});
}
4.3 创建消息消费者
我们首先创建一个一个用于消息监听的类,当名为”topic-test”的topic接收到消息之后,我们的这个listen方法就会调用。
public class SimpleConsumerListener {
private final static Logger logger = LoggerFactory.getLogger(SimpleConsumerListener.class);
private final CountDownLatch latch1 = new CountDownLatch(1);
@KafkaListener(id = "foo", topics = "topic-test")
public void listen(byte[] records) {
//do something here
this.latch1.countDown();
}
}
我们同时也需要将这个类作为一个Bean配置到KafkaConfig中
@Bean
public SimpleConsumerListener simpleConsumerListener(){
return new SimpleConsumerListener();
}
默认spring-kafka会为每一个监听方法创建一个线程来向kafka服务器拉取消息
标签:com ant info cut key res work 端口 for
原文地址:https://www.cnblogs.com/momoyan/p/11616377.html