标签:des android style blog http io color ar sp
通过将两个textview 一个checkbox,一个view,组合成一个自定义控件,并能够实现对其属性的自定义
1首先给出布局文件set_item_view.xml:
<?xml version="1.0" encoding="utf-8"?>
<RelativeLayout xmlns:android="http://schemas.android.com/apk/res/android"
android:layout_width="fill_parent"
android:layout_height="65dip" >
<TextView
android:id="@+id/tv_tittle"
android:layout_width="wrap_content"
android:layout_height="wrap_content"
android:layout_marginLeft="10dip"
android:layout_marginTop="10dip"
android:textColor="#000000"
android:textSize="20sp" />
<TextView
android:id="@+id/tv_des"
android:layout_width="wrap_content"
android:layout_height="wrap_content"
android:layout_below="@id/tv_tittle"
android:layout_marginLeft="10dip"
android:textColor="#88000000"
android:textSize="18sp" />
<CheckBox
android:clickable="false"
android:id="@+id/cb_status"
android:layout_width="wrap_content"
android:layout_height="wrap_content"
android:layout_alignParentRight="true"
android:layout_centerVertical="true"
android:layout_marginRight="10dip" />
<View
android:layout_width="fill_parent"
android:layout_height="0.2dip"
android:layout_alignParentBottom="true"
android:layout_marginLeft="5dip"
android:layout_marginRight="5dip"
android:background="#000000" />
</RelativeLayout>
2 自定义一个类,并集成RelativeLayout,并实现其中的一些方法
public class SetItemView extends RelativeLayout {
    private CheckBox cb_status;
    private TextView tv_tittle;
    private TextView tv_des;
    private String deson;
    private String desoff;

    private void initview(Context context) {
        View.inflate(context, R.layout.set_item_view, SetItemView.this);
        cb_status = (CheckBox) findViewById(R.id.cb_status);
        tv_tittle = (TextView) findViewById(R.id.tv_tittle);
        tv_des = (TextView) findViewById(R.id.tv_des);
    }

    public SetItemView(Context context, AttributeSet attrs, int defStyle) {
        super(context, attrs, defStyle);
        initview(context);
    }

    public SetItemView(Context context, AttributeSet attrs) {
        super(context, attrs);
        initview(context);
        String tittle = attrs.getAttributeValue(
                "http://schemas.android.com/apk/res/com.djf.mobilesafty",
                "tittle");
        deson = attrs.getAttributeValue(
                "http://schemas.android.com/apk/res/com.djf.mobilesafty",
                "deson");
        desoff = attrs.getAttributeValue(
                "http://schemas.android.com/apk/res/com.djf.mobilesafty",
                "desoff");
        tv_tittle.setText(tittle);
        SetDesc(desoff);
    }

    public SetItemView(Context context) {
        super(context);
        initview(context);
    }

    // 判断组件是否被选中
    public boolean isChecked() {
        return cb_status.isChecked();
    }

    // 设置组件状态
    public void SetChecked(boolean checked) {
        if (checked) {
            tv_des.setText(deson);
        }
        else {
            tv_des.setText(desoff);
        }
        cb_status.setChecked(checked);
    }

    // 设置描述信息
    public void SetDesc(String string) {
        tv_des.setText(string);
    }

}
3 实现自定义组合控件的属性
先定义一个自定义的命名空间xmlns:djf="http://schemas.android.com/apk/res/com.djf.mobilesafty"
红色字体需要特别注意,一个为命名控件,一个为包名
然后就可以自定义属性
<com.djf.mobilesafty.ui.SetItemView
android:id="@+id/siv_update"
android:layout_width="wrap_content"
android:layout_height="wrap_content"
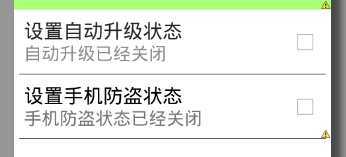
djf:desoff="自动升级已经关闭"
djf:deson="自动升级已经开启"
djf:tittle="设置自动升级状态" >
</com.djf.mobilesafty.ui.SetItemView>
<com.djf.mobilesafty.ui.SetItemView
android:id="@+id/siv_update"
android:layout_width="wrap_content"
android:layout_height="wrap_content"
djf:desoff="手机防盗状态已经关闭"
djf:deson="手机防盗状态已经开启"
djf:tittle="设置手机防盗状态" >
</com.djf.mobilesafty.ui.SetItemView>
其中上面红色字体为上面自定义类的包名~~~~
至此一个简单的自定义组件及其属性介绍完毕,还可以为该自定义组件定义单击属性等~~~~
标签:des android style blog http io color ar sp
原文地址:http://www.cnblogs.com/jiefeiduan/p/4055015.html