标签:new include print 遍历 node c语言版 code style c++
基础(c语言版)
 1 #include <stdio.h>
 2 struct ListNode {
 3     int val;
 4     struct ListNode* next;
 5 };
 6
 7 int main() {
 8     struct ListNode node1;
 9     struct ListNode node2;
10     struct ListNode node3;
11     struct ListNode node4;
12     struct ListNode node5;
13
14     node1.val = 10;
15     node2.val = 20;
16     node3.val = 30;
17     node4.val = 40;
18     node5.val = 50;
19
20     node1.next = &node2;
21     node2.next = &node3;
22     node3.next = &node4;
23     node4.next = &node5;
24     node5.next = NULL;
25
26     struct ListNode *pCurrent = &node1;
27     while (pCurrent != NULL) {
28         printf("%d \n", pCurrent->val);
29         pCurrent = pCurrent->next;
30     }
31     return 0;
32 }
33 /*
34 10
35 20
36 30
37 40
38 50
39
40
41 */
基础(c++版)
 1 #include <stdio.h>
 2 struct ListNode {
 3     int val;
 4     struct ListNode * next;
 5 };
 6
 7 int main(){
 8
 9     ListNode node1;
10     ListNode node2;
11     ListNode node3;
12     ListNode node4;
13     ListNode node5;
14
15     node1.val = 10;
16     node2.val = 20;
17     node3.val = 30;
18     node4.val = 40;
19     node5.val = 50;
20
21     node1.next = &node2;
22     node2.next = &node3;
23     node3.next = &node4;
24     node4.next = &node5;
25     node5.next = NULL;
26
27     ListNode * pCurrent = &node1;
28     while(pCurrent != NULL){
29         printf("%d \n",pCurrent->val);
30         pCurrent = pCurrent->next ;
31     }
32     return 0;
33 }
二者的主要区别是:c++ 可以没有 struct !

 1 #include <iostream>
 2 using namespace std;
 3
 4 //链表相关的基础
 5 struct ListNode {
 6     int val;
 7     struct ListNode * next;
 8 };
 9
10 struct ListNode * ListInit(){
11     struct ListNode * head =(struct ListNode *)malloc(sizeof(struct ListNode));
12     head->val = 0;
13     head->next = NULL;
14
15     return head;
16 }
17 void printList(struct ListNode * head){
18     while(head != NULL){
19         printf("Val: %d\n",head->val,head->next);
20         head = head->next;
21     }
22 }
23 void addOneNode(struct ListNode * head,int val){
24     struct ListNode * newNode  =(struct ListNode *)malloc(sizeof(struct ListNode));
25     newNode->val = val;
26     newNode->next = NULL;
27
28     //遍历链表到 尾部
29     struct ListNode * temp = head;
30     while(temp->next !=NULL){
31         temp = temp->next;
32     }
33     temp->next = newNode;
34 }
35
36 int main(){
37
38     struct ListNode * head = ListInit();  //head存数据(默认存的值为0)
39     head->val = 1; //这里将默认的head.val =0 变为1
40     for(int i =2;i<10;++i){
41         addOneNode(head,i);
42     }
43     printList(head);
44     return 0;
45 }
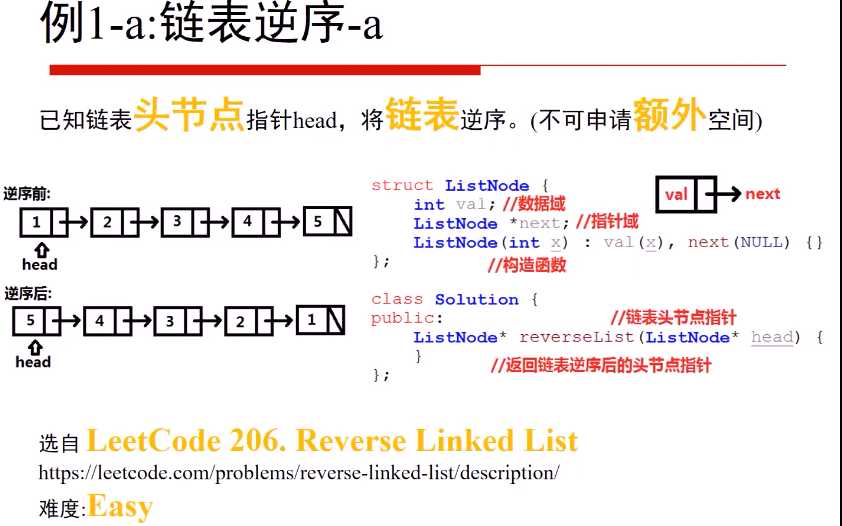
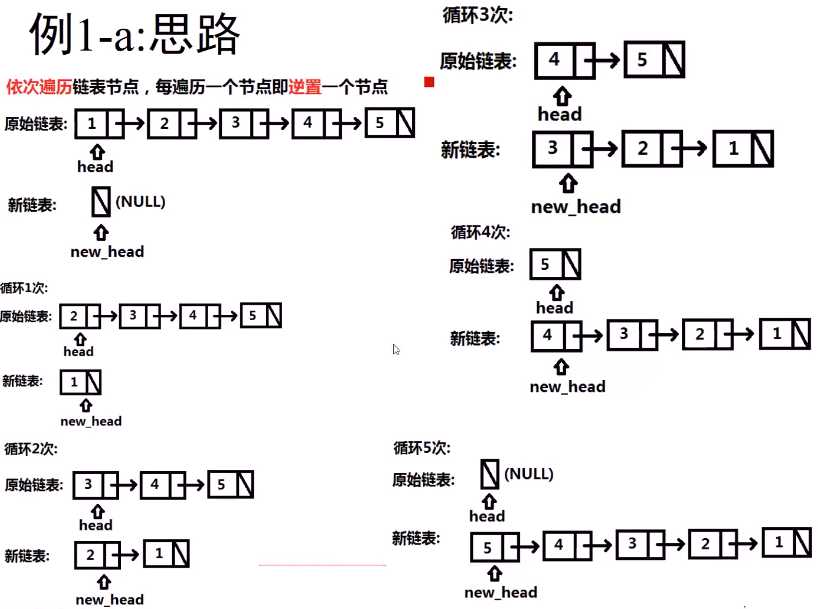
注:不允许申请额外的空间。
自己的代码:(缺点是:当head 为空的时候不能通过, 而且最后一个还要在循环外另外写一下!!! 优点是:它没有在循环中重复声明pNext变量)

 1 #include <iostream>
 2 using namespace std;
 3
 4 //链表相关的基础
 5 struct ListNode {
 6     int val;
 7     struct ListNode * next;
 8 };
 9
10 struct ListNode * ListInit(){
11     struct ListNode * head =(struct ListNode *)malloc(sizeof(struct ListNode));
12     head->val = 0;
13     head->next = NULL;
14
15     return head;
16 }
17 void printList(struct ListNode * head){
18     while(head != NULL){
19         printf("Val: %d ",head->val,head->next);
20         head = head->next;
21     }
22 }
23 void addOneNode(struct ListNode * head,int val){
24     struct ListNode * newNode  =(struct ListNode *)malloc(sizeof(struct ListNode));
25     newNode->val = val;
26     newNode->next = NULL;
27
28     //遍历链表到 尾部
29     struct ListNode * temp = head;
30     while(temp->next !=NULL){
31         temp = temp->next;
32     }
33     temp->next = newNode;
34 }
35
36 //链表逆序 (Leetcode 代码)
37 struct ListNode * reverseList(struct ListNode * head){
38     struct ListNode * pPre = NULL; //保存前一个地址
39     struct ListNode * pNext = head->next; //保存下一个地址
40     while(pNext != NULL){
41         head->next = pPre; //主
42         pPre = head;
43
44         head = pNext; //主
45         pNext = head->next;
46     }
47     head->next = pPre;  //这个是因为最后一个连不上,所以最后要自己连上!
48     return head;
49 }
50
51
52 int main(){
53
54     struct ListNode * head = ListInit();  //head存数据(默认存的值为0)
55     head->val = 1; //这里将默认的head.val =0 变为1
56     for(int i =2;i<10;++i){
57         addOneNode(head,i);
58     }
59     printList(head);
60     head = reverseList(head);
61     printList(head);
62
63     return 0;
64 }
下面是老师的代码:
 1 class Solution {
 2 public:
 3     ListNode* reverseList(ListNode* head) {
 4         ListNode * newHead =NULL;
 5         while(head){
 6             ListNode *temp = head->next;
 7             head->next =newHead;
 8             newHead = head;
 9
10             head = temp;
11         }
12         return newHead;
13
14     }
15 };
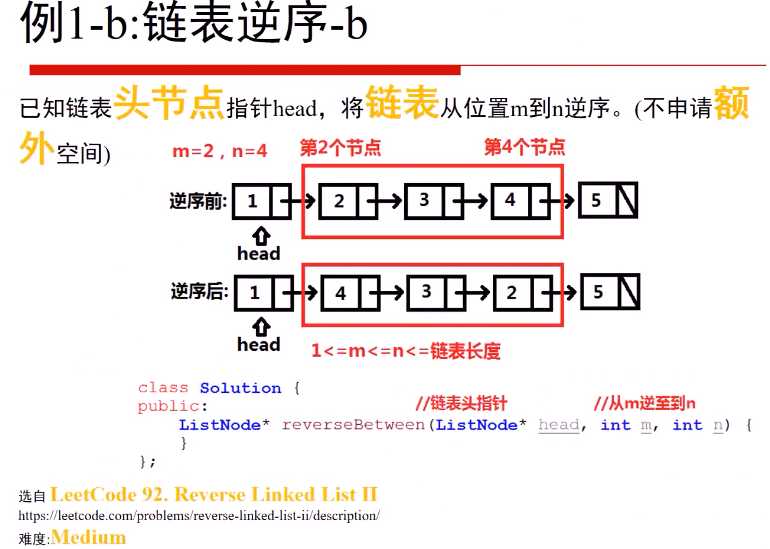
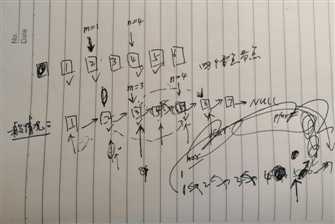
重要的四个结点:
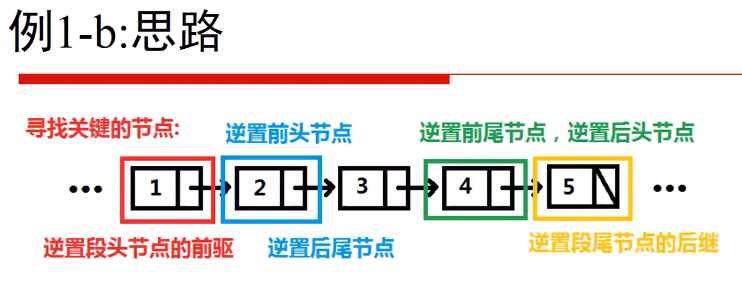
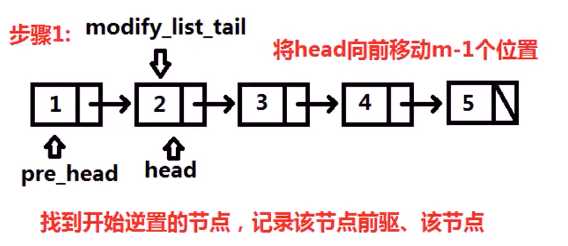
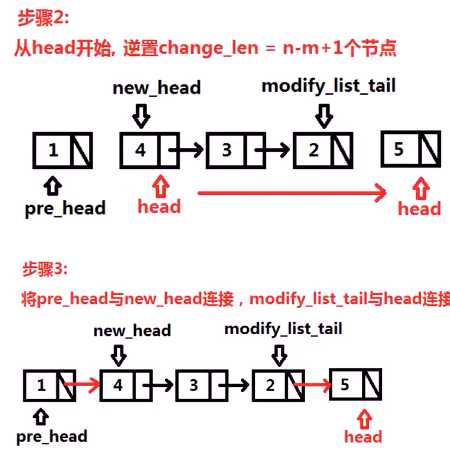

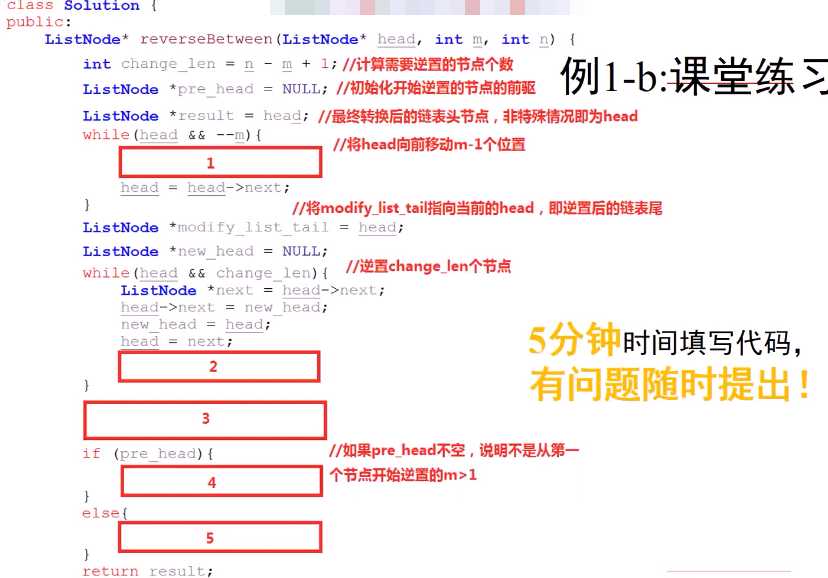
个人的思路:

 1 ListNode * reverseBetween(ListNode * head,int m,int n){
 2     if(head ==NULL || m==n) return head;
 3     int flag = 0;
 4     if(m==1)  flag = 1;
 5     ListNode* pCur = head;
 6     for(int i =0;i<m-2;++i){
 7         pCur = pCur->next;
 8     }//将pCur 遍历到 m前一个节点
 9
10     ListNode* pBackWard = pCur;  //记录
11     ListNode* pM = pCur->next; //记录
12     //开始逆序
13     pCur = pM;
14     if(flag) pCur = pBackWard; //特殊情景时修正下
15     ListNode * pPre = NULL;
16     for(int i =0;i<n-m;++i){
17         ListNode * pNext = pCur->next;//本次
18         pCur->next = pPre;//主
19         pPre = pCur; //下次
20         pCur = pNext; //主
21     }
22     if(!flag){
23         pBackWard->next = pCur;
24         ListNode * temp = pCur->next;
25         pCur->next = pPre;
26         pM->next = temp;
27     }else{
28         head = pCur;
29         ListNode * temp = pCur->next;
30         pBackWard->next = temp;
31         head->next = pPre;
32     }
33     return head;
34 }
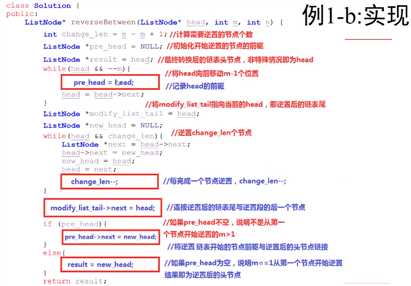
下面是老师的代码:
 1 #include <stdio.h>
 2 struct ListNode{
 3     int val;
 4     struct ListNode *next;
 5 };
 6
 7 class Solution {
 8 public:
 9     ListNode* reverseBetween(ListNode* head, int m, int n) {
10         ListNode * pre_head = NULL;
11         ListNode * result = head; //最终返回的头节点
12         // 向前移动m-1 个位置 ,pre_head  和 head 一起移动
13         for (int i = 0; i < m - 1; ++i) {
14             pre_head = head;
15             head = head->next;
16         }
17
18         ListNode * modified_list_tail =head;
19         ListNode * new_head  = NULL; //新的逆序链表的头
20         int change_node_num = n-m+1;
21         while(head &&change_node_num){
22             ListNode * temp = head->next;
23             head->next = new_head;
24             new_head = head;
25             head = temp;
26
27             change_node_num--;
28         }
29         modified_list_tail->next = head;
30
31         if(pre_head){
32             pre_head->next = new_head;
33         }
34         else{  //如果是从第一个开始就逆序的话, 特殊情况!
35             result = new_head;
36         }
37         return result;
38     }
39 };
标签:new include print 遍历 node c语言版 code style c++
原文地址:https://www.cnblogs.com/zach0812/p/11480529.html