标签:详情 dex close head rtc 说明 charset sch elf
为了实现项目中的搜索功能,我们使用的是全文检索框架haystack+搜索引擎whoosh+中文分词包jieba
安装所需包
pip install django-haystack
pip install whoosh
pip install jieba
去settings文件注册haystack应用
INSTALLED_APPS = [
    ‘haystack‘,  # 注册全文检索框架
]
在settings文件中配置全文检索框架
# 全文检索框架的配置
HAYSTACK_CONNECTIONS = {
    ‘default‘: {
        # 使用whoosh引擎
        ‘ENGINE‘: ‘haystack.backends.whoosh_backend.WhooshEngine‘,
        # 索引文件路径
        ‘PATH‘: os.path.join(BASE_DIR, ‘whoosh_index‘),
    }
}

# 当添加、修改、删除数据时,自动生成索引
HAYSTACK_SIGNAL_PROCESSOR = ‘haystack.signals.RealtimeSignalProcessor‘
要生成索引文件,首先你要配置,对哪些内容进行索引,比如商品名称,简介和详情;为了配置对数据库指定内容进行索引,我们要做如下步骤:
配置search_indexes.py文件
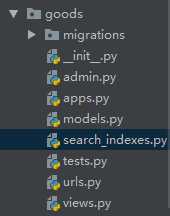
因为在django中数据库一般都是通过ORM生成的,首先我们在要在数据表对应的应用中创建一个 search_indexes.py 文件,例如,我现在要检索商品对应的表就是GoodsSKU表,而表是在goods应用下的,所以我在goods应用下新建 search_indexes.py 文件,截图如下:

在 search_indexes.py 文件中加入以下内容
# 定义索引类
from haystack import indexes
# 导入你的模型类
from goods.models import GoodsSKU


# 指定对于某个类的某些数据建立索引
# 索引类名格式:模型类名+Index
class GoodsSKUIndex(indexes.SearchIndex, indexes.Indexable):
    # 索引字段 use_template=True指定根据表中的哪些字段建立索引文件的说明放在一个文件中
    text = indexes.CharField(document=True, use_template=True)

    def get_model(self):
        # 返回你的模型类
        return GoodsSKU

    # 建立索引的数据
    def index_queryset(self, using=None):
        return self.get_model().objects.all()
指定要检索的内容
在templates文件夹下面新建search文件夹,在search文件夹下面新建indexes文件夹,在indexes文件夹下面新建要检索应用名的文件夹比如goods文件夹,在goods文件夹下面新建 表名_text.txt,表名小写,所以目前的目录结构是这样的 templates/search/indexes/goods/goodssku_text.txt ,截图如下:

在goodssku_text.txt 文件中指定你要根据表中的哪些字段建立索引数据,现在我们要根据商品的名称,简介,详情来建立索引,如下配置
# 指定根据表中的哪些字段建立索引数据
{{ object.name }} # 根据商品的名称建立索引
{{ object.desc }} # 根据商品的简介建立索引
{{ object.goods.detail }} # 根据商品的详情建立索引
其中的objects可以理解为数据表对应的商品对象。
生成索引文件
使用pycharm自带的命令行terminal运行以下命令生成索引文件:
python manage.py rebuild_index
运行成功后,你可以在项目下看到类似如下索引文件

通过如上的配置,我们的数据索引已经建立了,现在我们要在项目中使用全文检索。
在需要使用检索的地方进行 form 表单改造
<form action="/search" method="get">
    <input type="text" class="input_text fl" name="q" placeholder="搜索商品">
    <input type="submit" class="input_btn fr" name="" value="搜索">
</form>
如上所示,其中要注意的是:
配置检索对应的url
在项目下的urls.py文件中添加如下url配置
urlpatterns = [
    url(r‘^search/‘, include(‘haystack.urls‘)),  # 全文检索框架
]
检索成功后生成的参数
当haystack自动检索成功后,会给我们返回三个参数;
可以通过如下代码测试参数

<!DOCTYPE html>
<html lang="en">
<head>
    <meta charset="UTF-8">
    <title>Title</title>
</head>
<body>
搜索的关键字:{{ query }}<br/>
当前页的Page对象:{{ page }}<br/>
<ul>
    {% for item in page %}
        <li>{{ item.object }}</li>
    {% endfor %}
</ul>
分页paginator对象:{{ paginator }}<br/>
</body>
</html>
注意,位置和文件名都是固定的,并且这只是测试文件,后面使用全文检索时记得不能使用search.html,改成其他名字。
数据+search.html返回渲染后页面
当haystack全文检索后会返回数据,现在我们需要一个页面来接收这些数据,并且在页面渲染后返回这个页面给用户观看,渲染并返回页面的工作haystack已经帮我们做了,那么我们现在只需要准备一个页面容纳数据即可。
在templates文件夹下的indexes文件夹下新建一个search.html,注意路径和文件名是固定的,如下图

利用检索返回的参数在search.html中定义要渲染出的模板和样式,我的页面如下

<div class="breadcrumb">
    <a href="#">{{ query }}</a>
    <span>></span>
    <a href="#">搜索结果如下:</a>
</div>

<div class="main_wrap clearfix">
    <ul class="goods_type_list clearfix">
        {% for item in page %}
        <li>
            <a href="{% url ‘goods:detail‘ item.object.id %}"><img src="{{ item.object.image.url }}"></a>
            <h4><a href="{% url ‘goods:detail‘ item.object.id %}">{{ item.object.name }}</a></h4>
            <div class="operate">
                <span class="prize">¥{{ item.object.price }}</span>
                <span class="unit">{{ item.object.price}}/{{ item.object.unite }}</span>
                <a href="#" class="add_goods" title="加入购物车"></a>
            </div>
        </li>
        {% endfor %}
    </ul>
    <div class="pagenation">
            {% if page.has_previous %}
            <a href="/search?q={{ query }}&page={{ page.previous_page_number }}"><上一页</a>
            {% endif %}
            {% for pindex in paginator.page_range %}
                {% if pindex == page.number %}
                    <a href="/search?q={{ query }}&page={{ pindex }}" class="active">{{ pindex }}</a>
                {% else %}
                    <a href="/search?q={{ query }}&page={{ pindex }}">{{ pindex }}</a>
                {% endif %}
            {% endfor %}
            {% if page.has_next %}
            <a href="/search?q={{ query }}&page={{ page.next_page_number }}">下一页></a>
            {% endif %}
        </div>
</div>
至此,我们可以在页面上搜索一下内容,应该是能成功的,但也有可能不会返回任何数据就算name就是你搜索的内容,这是因为我们现在使用的主要还是为英语服务的分词包,接下来我们要配置使用中文分词包了。
在前面的配置中我们已经安装了jieba;
创建 ChineseAnalyzer.py 文件
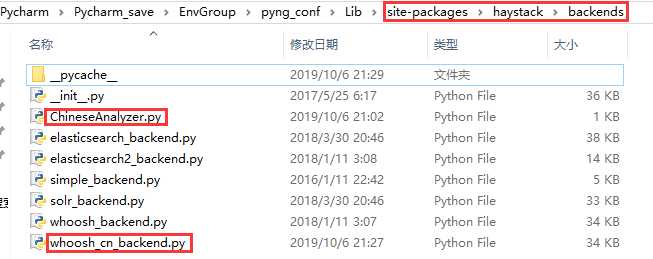
进入虚拟环境下的 Lib\site-packages\haystack\backends 目录下新建 ChineseAnalyzer.py 文件
目录如下图

在文件中添加如下内容

import jieba
from whoosh.analysis import Tokenizer, Token

class ChineseTokenizer(Tokenizer):
    def __call__(self, value, positions=False, chars=False,
                 keeporiginal=False, removestops=True,
                 start_pos=0, start_char=0, mode=‘‘, **kwargs):
        t = Token(positions, chars, removestops=removestops, mode=mode,
                  **kwargs)
        seglist = jieba.cut(value, cut_all=True)
        for w in seglist:
            t.original = t.text = w
            t.boost = 1.0
            if positions:
                t.pos = start_pos + value.find(w)
            if chars:
                t.startchar = start_char + value.find(w)
                t.endchar = start_char + value.find(w) + len(w)
            yield t

def ChineseAnalyzer():
    return ChineseTokenizer()
编写haystack可使用的 whoosh_cn_backend.py 文件
直接在 虚拟环境下的 Lib\site-packages\haystack\backends 目录下复制一份 whoosh_backend.py 文件 并且重命名复制文件为 whoosh_cn_backend.py;
在 whoosh_cn_backend.py 中导入我们编写的 ChineseAnalyzer 类
from .ChineseAnalyzer import ChineseAnalyzer
更改haystack使用的分词包为 jieba 编写的中文分词类,大概在第160行左右
# schema_fields[field_class.index_fieldname] = TEXT(stored=True, analyzer=StemmingAnalyzer(), field_boost=field_class.boost, sortable=True)
schema_fields[field_class.index_fieldname] = TEXT(stored=True, analyzer=ChineseAnalyzer(), field_boost=field_class.boost, sortable=True)
配置whoosh引擎使用 whoosh_cn_backend.py
在settings文件中更改原来的配置如下
# 全文检索框架的配置
HAYSTACK_CONNECTIONS = {
    ‘default‘: {
        # 使用whoosh引擎
        # ‘ENGINE‘: ‘haystack.backends.whoosh_backend.WhooshEngine‘,
        ‘ENGINE‘: ‘haystack.backends.whoosh_cn_backend.WhooshEngine‘,
        # 索引文件路径
        ‘PATH‘: os.path.join(BASE_DIR, ‘whoosh_index‘),
    }
}

# 当添加、修改、删除数据时,自动生成索引
HAYSTACK_SIGNAL_PROCESSOR = ‘haystack.signals.RealtimeSignalProcessor‘
重新生成索引文件
python manage.py rebuild_index
至此,就可以放心的使用搜索功能了,如图,搜索成功的显示页面

可以通过如下配置控制每个分页显示的搜索出来对象的数目
# 指定搜索结果每页显示的条数
HAYSTACK_SEARCH_RESULTS_PER_PAGE = 1
Django之使用haystack+whoosh实现搜索功能
标签:详情 dex close head rtc 说明 charset sch elf
原文地址:https://www.cnblogs.com/yifchan/p/python-1-36.html