标签:exce orm hdfs name pst dal 文件中 相同 指定
个人感觉学习Flink其实最不应该错过的博文是Flink社区的博文系列,里面的文章是不会让人失望的。强烈安利:https://ververica.cn/developers-resources/。
本文是自己第一次尝试写源码阅读的文章,会努力将原理和源码实现流程结合起来。文中有几个点目前也是没有弄清楚,若是写在一篇博客里,时间跨度太大,但又怕后期遗忘,所以先记下来,后期进一步阅读源码后再添上,若是看到不完整版博文的看官,对不住!
文中若是写的不准确的地方欢迎留言指出。
源码系列基于Flink 1.9
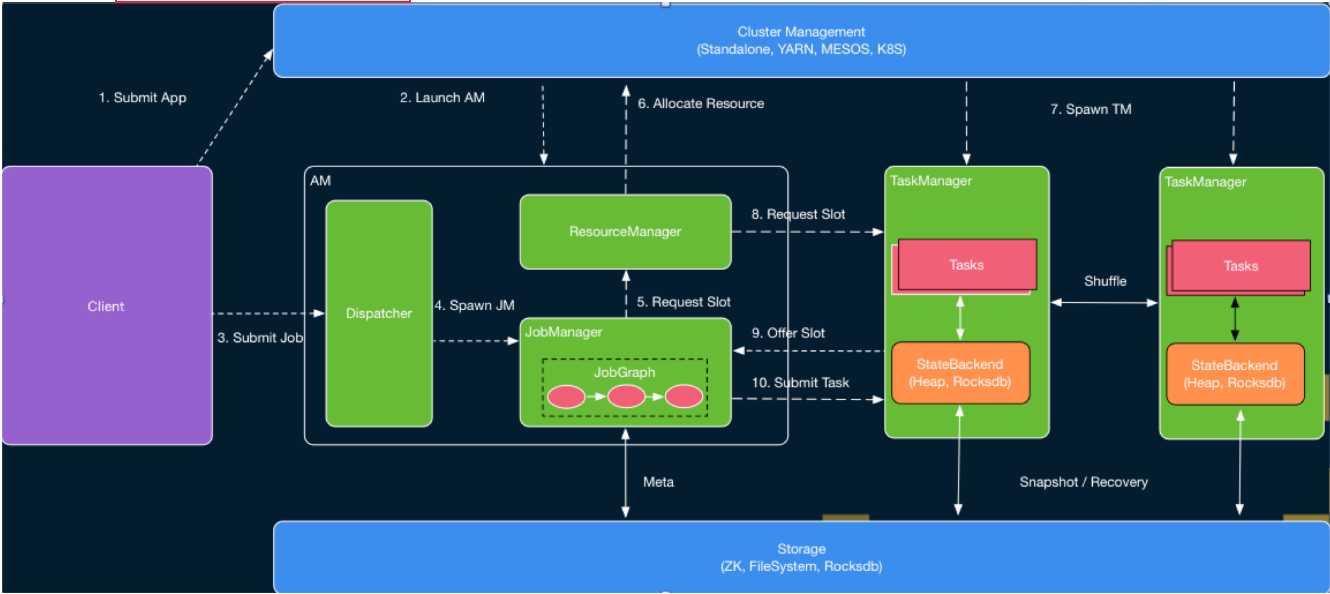
Flink on Yarn模式下提交任务整体流程图如下(图源自Flink社区,链接见Ref [1])

图1 Flink Runtime层架构图
Flink采取的是经典的master-salve模式,图中的AM(ApplicationMater)为master,TaskManager是salve。
AM中的Dispatcher用于接收client提交的任务和启动相应的JobManager ;JobManager用于任务的接收,task的分配、管理task manager等;ResourceManager主要用于资源的申请和分配。
这里有点需要注意:Flink本身也是具有ResourceManager和TaskManager的,这里虽然是on Yarn模式,但Flink本身也是拥有一套资源管理架构,虽然各个组件的名字一样,但这里yarn只是一个资源的提供者,若是standalone模式,资源的提供者就是物理机或者虚拟机了。
1)执行Flink程序,就类似client,主要是将代码进行优化形成JobGraph,向yarn的ResourceManager中的ApplicationManager申请资源启动AM(ApplicationMater),AM所在节点是Yarn上的NodeManager上;
2)当AM起来之后会启动Dispatcher、ResourceManager,其中Dispatcher会启动JobManager,ResourceManager会启动slotManager用于slot的管理和分配;
3)JobManager向ResourceManager(RM)申请资源用于任务的执行,最初TaskManager还没有启动,此时,RM会向yarn去申请资源,获得资源后,会在资源中启动TaskManager,相应启动的slot会向slotManager中注册,然后slotManager会将slot分配给只需资源的task,即向JobManager注册信息,然后JobManager就会将任务提交到对应的slot中执行。其实Flink on yarn的session模式和Per-job模式最大的区别是,提交任务时RM已向Yarn申请了固定大小的资源,其TaskManager是已经启动的。
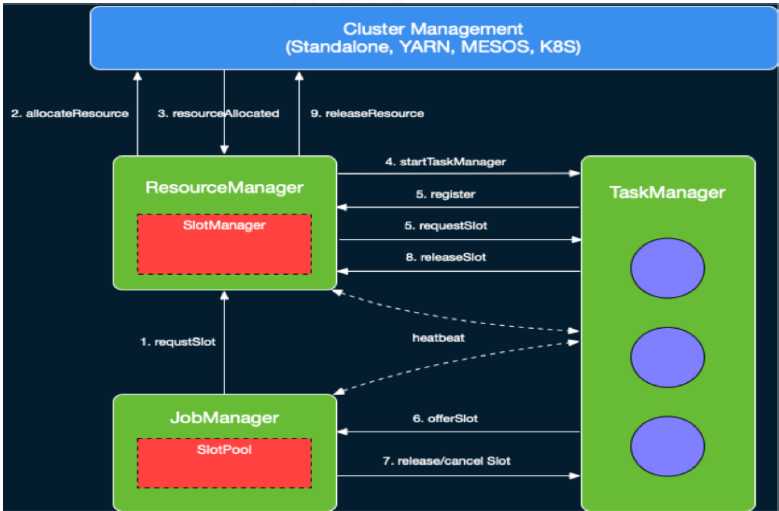
资源分配如详细过程图下:

图2 slot管理图,源自Ref[1]
更详细的过程解析,强烈推荐Ref [2],是阿里Flink大牛写的,本博客在后期的源码分析过程也多依据此博客。
提交任务语句
./flink run -m yarn-cluster ./flinkExample.jar
flink脚本的入口类是org.apache.flink.client.cli.CliFrontend。
1)在CliFronted类的main()方法中,会加载flnk以及一些全局的配置项之后,根据命令行参数run,调用run()->runProgram()->deployJobCluster(),具体的代码如下:
private <T> void runProgram(
            CustomCommandLine<T> customCommandLine,
            CommandLine commandLine,
            RunOptions runOptions,
            PackagedProgram program) throws ProgramInvocationException, FlinkException {
        final ClusterDescriptor<T> clusterDescriptor = customCommandLine.createClusterDescriptor(commandLine);

        try {
            final T clusterId = customCommandLine.getClusterId(commandLine);

            final ClusterClient<T> client;

            // directly deploy the job if the cluster is started in job mode and detached
            if (clusterId == null && runOptions.getDetachedMode()) {
                int parallelism = runOptions.getParallelism() == -1 ? defaultParallelism : runOptions.getParallelism();
          //构建JobGraph
                final JobGraph jobGraph = PackagedProgramUtils.createJobGraph(program, configuration, parallelism);

                final ClusterSpecification clusterSpecification = customCommandLine.getClusterSpecification(commandLine);
          //将任务提交到yarn上
                client = clusterDescriptor.deployJobCluster(
                    clusterSpecification,
                    jobGraph,
                    runOptions.getDetachedMode());

                logAndSysout("Job has been submitted with JobID " + jobGraph.getJobID());

                ......................
            } else{........}
2)提交任务会调用YarnClusterDescriptor 类中deployJobCluster()->AbstractYarnClusterDescriptor类中deployInteral(),该方法会一直阻塞直到ApplicationMaster/JobManager在yarn上部署成功,其中最关键的调用是对startAppMaster()方法的调用,代码如下:
 1 protected ClusterClient<ApplicationId>     deployInternal(
 2             ClusterSpecification clusterSpecification,
 3             String applicationName,
 4             String yarnClusterEntrypoint,
 5             @Nullable JobGraph jobGraph,
 6             boolean detached) throws Exception {
 7
 8         //1、验证集群是否可以访问
 9         //2、若用户组是否开启安全认证
10         //3、检查配置以及vcore是否满足flink集群申请的需求
11         //4、指定的对列是否存在
12         //5、检查内存是否满足flink JobManager、NodeManager所需
13         //....................................
14
15         //Entry
16         ApplicationReport report = startAppMaster(
17                 flinkConfiguration,
18                 applicationName,
19                 yarnClusterEntrypoint,
20                 jobGraph,
21                 yarnClient,
22                 yarnApplication,
23                 validClusterSpecification);
24
25         //6、获取flink集群端口、地址信息
26         //..........................................
27     }
3)startAppMaster()方法的所在类是AbstractYarnClutserDescriptor,该方法主要是将配置文件和相关文件上传至分布式存储如HDFS,以及向Yarn上提交任务等,源码分析如下:
 1 public ApplicationReport startAppMaster(
 2             Configuration configuration,
 3             String applicationName,
 4             String yarnClusterEntrypoint,
 5             JobGraph jobGraph,
 6             YarnClient yarnClient,
 7             YarnClientApplication yarnApplication,
 8             ClusterSpecification clusterSpecification) throws Exception {
 9
10         // .......................
11
12         //1、上传conf目录下logback.xml、log4j.properties
13
14         //2、上传环境变量中FLINK_PLUGINS_DIR ,FLINK_LIB_DIR包含的jar
15         addEnvironmentFoldersToShipFiles(systemShipFiles);
16         //...........
17         //3、设置applications的高可用的方案,通过设置AM重启次数,默认为1
18         //4、上传ship files、user jars、
19         //5、为TaskManager设置slots、heap memory
20         //6、上传flink-conf.yaml
21         //7、序列化JobGraph后上传
22         //8、登录权限检查
23
24         //.................
25
26         //获得启动AM container的Java命令
27         final ContainerLaunchContext amContainer = setupApplicationMasterContainer(
28                 yarnClusterEntrypoint,
29                 hasLogback,
30                 hasLog4j,
31                 hasKrb5,
32                 clusterSpecification.getMasterMemoryMB());
33
34         //9、为aAM启动绑定环境参数以及classpath和环境变量
35
36         //..........................
37
38         final String customApplicationName = customName != null ? customName : applicationName;
39         //10、应用名称、应用类型、用户提交的应用ContainerLaunchContext
40         appContext.setApplicationName(customApplicationName);
41         appContext.setApplicationType(applicationType != null ? applicationType : "Apache Flink");
42         appContext.setAMContainerSpec(amContainer);
43         appContext.setResource(capability);
44
45         if (yarnQueue != null) {
46             appContext.setQueue(yarnQueue);
47         }
48
49         setApplicationNodeLabel(appContext);
50
51         setApplicationTags(appContext);
52
53         //11、部署失败删除yarnFilesDir
54         // add a hook to clean up in case deployment fails
55         Thread deploymentFailureHook = new DeploymentFailureHook(yarnClient, yarnApplication, yarnFilesDir);
56         Runtime.getRuntime().addShutdownHook(deploymentFailureHook);
57
58         LOG.info("Submitting application master " + appId);
59
60         //Entry
61         yarnClient.submitApplication(appContext);
62
63         LOG.info("Waiting for the  cluster to be allocated");
64         final long startTime = System.currentTimeMillis();
65         ApplicationReport report;
66         YarnApplicationState lastAppState = YarnApplicationState.NEW;
67         //12、阻塞等待直到running
68         loop: while (true) {
69             //...................
70             //每隔250ms通过YarnClient获取应用报告
71             Thread.sleep(250);
72         }
73         //...........................
74         //13、部署成功删除shutdown回调
75         // since deployment was successful, remove the hook
76         ShutdownHookUtil.removeShutdownHook(deploymentFailureHook, getClass().getSimpleName(), LOG);
77         return report;
78     }
4)应用提交的Entry是YarnClientImpl中submitApplication()方法,主要是通过ClientRMService的实例调用方法submitApplication将应用请求提交到Yarn上,之后,程序会循环等待应用任务提交成功(不是NEW和NEW_SAVING即认为成功)。该方法代码量较少,就不详细展开了。
至此,client端的流程就走完了,应用请求已提交到Yarn的ResourceManager上了,下面着重分析Flink Cluster启动流程。
1)在ClientRMService类的submitApplication()方法中,会先检查任务是否已经提交(通过applicationID)、Yarn的queue是否为空等,然后将请求提交到RMAppManager(ARN RM内部管理应用生命周期的组件),若提交成功会输出Application with id {applicationId.getId()} submitted by user {user}的信息,具体分析如下:
 1 public SubmitApplicationResponse submitApplication(
 2             SubmitApplicationRequest request) throws YarnException {
 3         ApplicationSubmissionContext submissionContext = request
 4                 .getApplicationSubmissionContext();
 5         ApplicationId applicationId = submissionContext.getApplicationId();
 6
 7         // ApplicationSubmissionContext needs to be validated for safety - only
 8         // those fields that are independent of the RM‘s configuration will be
 9         // checked here, those that are dependent on RM configuration are validated
10         // in RMAppManager.
11         //这里仅验证不属于RM的配置,属于RM的配置将在RMAppManager验证
12
13         //1、检查application是否已提交
14         //2、检查提交的queue是否为null,是,则设置为默认queue(default)
15         //3、检查是否设置application名,否,则为默认(N/A)
16         //4、检查是否设置application类型,否,则为默认(YARN);是,若名字长度大于给定的长度(20),则会截断
17         //.............................
18
19         try {
20             // call RMAppManager to submit application directly
21             //直接submit任务
22             rmAppManager.submitApplication(submissionContext,
23                     System.currentTimeMillis(), user);
24
25             //submit成功
26             LOG.info("Application with id " + applicationId.getId() +
27                     " submitted by user " + user);
28             RMAuditLogger.logSuccess(user, AuditConstants.SUBMIT_APP_REQUEST,
29                     "ClientRMService", applicationId);
30         } catch (YarnException e) {
31             //失败会抛出异常
32         }
33         //..................
34     }
2)RMAppManager类的submitApplication()方法主要是创建RMApp和向ResourceScheduler申请AM container,该部分直到在NodeManager上启动AM container都是Yarn本身所为,其中具体过程在这里不详细分析,详细过程后期会分析,这里仅给出入口,代码如下:
 1 protected void submitApplication(
 2             ApplicationSubmissionContext submissionContext, long submitTime,
 3             String user) throws YarnException {
 4         ApplicationId applicationId = submissionContext.getApplicationId();
 5
 6         //1、创建RMApp,若具有相同的applicationId会抛出异常
 7         RMAppImpl application =
 8                 createAndPopulateNewRMApp(submissionContext, submitTime, user);
 9         ApplicationId appId = submissionContext.getApplicationId();
10
11         //security模式有simple和kerberos,在配置文件中配置
12         //开始kerberos
13         if (UserGroupInformation.isSecurityEnabled()) {
14             //..................
15         } else {
16             //simple模式
17             // Dispatcher is not yet started at this time, so these START events
18             // enqueued should be guaranteed to be first processed when dispatcher
19             // gets started.
20             //2、向ResourceScheduler(可插拔的资源调度器)提交任务??????????
21             this.rmContext.getDispatcher().getEventHandler()
22                     .handle(new RMAppEvent(applicationId, RMAppEventType.START));
23         }
24     }
3)Flink在Per-job模式下,AM container加载运行的入口是YarnJobClusterEntryPoint中的main()方法,源码分析如下:
 1 public static void main(String[] args) {
 2         // startup checks and logging
 3         //1、输出环境信息如用户、环境变量、Java版本等,以及JVM参数
 4         EnvironmentInformation.logEnvironmentInfo(LOG, YarnJobClusterEntrypoint.class.getSimpleName(), args);
 5         //2、注册处理各种SIGNAL的handler:记录到日志
 6         SignalHandler.register(LOG);
 7         //3、注册JVM关闭保障的shutdown hook:避免JVM退出时被其他shutdown hook阻塞
 8         JvmShutdownSafeguard.installAsShutdownHook(LOG);
 9
10         Map<String, String> env = System.getenv();
11
12         final String workingDirectory = env.get(ApplicationConstants.Environment.PWD.key());
13         Preconditions.checkArgument(
14                 workingDirectory != null,
15                 "Working directory variable (%s) not set",
16                 ApplicationConstants.Environment.PWD.key());
17
18         try {
19             //4、输出Yarn运行的用户信息
20             YarnEntrypointUtils.logYarnEnvironmentInformation(env, LOG);
21         } catch (IOException e) {
22             LOG.warn("Could not log YARN environment information.", e);
23         }
24         //5、加载flink的配置
25         Configuration configuration = YarnEntrypointUtils.loadConfiguration(workingDirectory, env, LOG);
26
27         YarnJobClusterEntrypoint yarnJobClusterEntrypoint = new YarnJobClusterEntrypoint(
28                 configuration,
29                 workingDirectory);
30         //6、Entry  创建并启动各类内部服务
31         ClusterEntrypoint.runClusterEntrypoint(yarnJobClusterEntrypoint);
32     }
4)后续的调用过程:ClusterEntrypoint类中runClusterEntrypoint()->startCluster()->runCluster(),该过程比较简单,这里着实分析runCluster()方法,如下:
 1 //#ClusterEntrypint.java
 2     private void runCluster(Configuration configuration) throws Exception {
 3         synchronized (lock) {
 4             initializeServices(configuration);
 5
 6             // write host information into configuration
 7             configuration.setString(JobManagerOptions.ADDRESS, commonRpcService.getAddress());
 8             configuration.setInteger(JobManagerOptions.PORT, commonRpcService.getPort());
 9             //1、创建dispatcherResour、esourceManager对象,其中有从本地重新创建JobGraph的过程
10             final DispatcherResourceManagerComponentFactory<?> dispatcherResourceManagerComponentFactory = createDispatcherResourceManagerComponentFactory(configuration);
11             //2、Entry 启动RpcService、HAService、BlobServer、HeartbeatServices、MetricRegistry、ExecutionGraphStore等
12             clusterComponent = dispatcherResourceManagerComponentFactory.create(
13                     configuration,
14                     commonRpcService,
15                     haServices,
16                     blobServer,
17                     heartbeatServices,
18                     metricRegistry,
19                     archivedExecutionGraphStore,
20                     new RpcMetricQueryServiceRetriever(metricRegistry.getMetricQueryServiceRpcService()),
21                     this);
22
23             //............
24         }
25     }
4)在create()方法中,会启动Flink的诸多组件,其中与提交任务强相关的是Dispatcher、ResourceManager,具体代码如下:
  1 public DispatcherResourceManagerComponent<T> create(
  2             Configuration configuration,
  3             RpcService rpcService,
  4             HighAvailabilityServices highAvailabilityServices,
  5             BlobServer blobServer,
  6             HeartbeatServices heartbeatServices,
  7             MetricRegistry metricRegistry,
  8             ArchivedExecutionGraphStore archivedExecutionGraphStore,
  9             MetricQueryServiceRetriever metricQueryServiceRetriever,
 10             FatalErrorHandler fatalErrorHandler) throws Exception {
 11
 12         LeaderRetrievalService dispatcherLeaderRetrievalService = null;
 13         LeaderRetrievalService resourceManagerRetrievalService = null;
 14         WebMonitorEndpoint<U> webMonitorEndpoint = null;
 15         ResourceManager<?> resourceManager = null;
 16         JobManagerMetricGroup jobManagerMetricGroup = null;
 17         T dispatcher = null;
 18
 19         try {
 20             dispatcherLeaderRetrievalService = highAvailabilityServices.getDispatcherLeaderRetriever();
 21
 22             resourceManagerRetrievalService = highAvailabilityServices.getResourceManagerLeaderRetriever();
 23
 24             final LeaderGatewayRetriever<DispatcherGateway> dispatcherGatewayRetriever = new RpcGatewayRetriever<>(
 25                     rpcService,
 26                     DispatcherGateway.class,
 27                     DispatcherId::fromUuid,
 28                     10,
 29                     Time.milliseconds(50L));
 30
 31             final LeaderGatewayRetriever<ResourceManagerGateway> resourceManagerGatewayRetriever = new RpcGatewayRetriever<>(
 32                     rpcService,
 33                     ResourceManagerGateway.class,
 34                     ResourceManagerId::fromUuid,
 35                     10,
 36                     Time.milliseconds(50L));
 37
 38             final ExecutorService executor = WebMonitorEndpoint.createExecutorService(
 39                     configuration.getInteger(RestOptions.SERVER_NUM_THREADS),
 40                     configuration.getInteger(RestOptions.SERVER_THREAD_PRIORITY),
 41                     "DispatcherRestEndpoint");
 42
 43             final long updateInterval = configuration.getLong(MetricOptions.METRIC_FETCHER_UPDATE_INTERVAL);
 44             final MetricFetcher metricFetcher = updateInterval == 0
 45                     ? VoidMetricFetcher.INSTANCE
 46                     : MetricFetcherImpl.fromConfiguration(
 47                     configuration,
 48                     metricQueryServiceRetriever,
 49                     dispatcherGatewayRetriever,
 50                     executor);
 51
 52             webMonitorEndpoint = restEndpointFactory.createRestEndpoint(
 53                     configuration,
 54                     dispatcherGatewayRetriever,
 55                     resourceManagerGatewayRetriever,
 56                     blobServer,
 57                     executor,
 58                     metricFetcher,
 59                     highAvailabilityServices.getWebMonitorLeaderElectionService(),
 60                     fatalErrorHandler);
 61
 62             log.debug("Starting Dispatcher REST endpoint.");
 63             webMonitorEndpoint.start();
 64
 65             final String hostname = getHostname(rpcService);
 66
 67             jobManagerMetricGroup = MetricUtils.instantiateJobManagerMetricGroup(
 68                     metricRegistry,
 69                     hostname,
 70                     ConfigurationUtils.getSystemResourceMetricsProbingInterval(configuration));
 71             //1、返回的是new YarnResourceManager
 72             /*调度过程:AbstractDispatcherResourceManagerComponentFactory
 73                         ->ActiveResourceManagerFactory
 74                         ->YarnResourceManagerFactory
 75              */
 76             ResourceManager<?> resourceManager1 = resourceManagerFactory.createResourceManager(
 77                     configuration,
 78                     ResourceID.generate(),
 79                     rpcService,
 80                     highAvailabilityServices,
 81                     heartbeatServices,
 82                     metricRegistry,
 83                     fatalErrorHandler,
 84                     new ClusterInformation(hostname, blobServer.getPort()),
 85                     webMonitorEndpoint.getRestBaseUrl(),
 86                     jobManagerMetricGroup);
 87             resourceManager = resourceManager1;
 88
 89             final HistoryServerArchivist historyServerArchivist = HistoryServerArchivist.createHistoryServerArchivist(configuration, webMonitorEndpoint);
 90             //2、在此反序列化获取JobGraph实例;返回new MiniDispatcher
 91             dispatcher = dispatcherFactory.createDispatcher(
 92                     configuration,
 93                     rpcService,
 94                     highAvailabilityServices,
 95                     resourceManagerGatewayRetriever,
 96                     blobServer,
 97                     heartbeatServices,
 98                     jobManagerMetricGroup,
 99                     metricRegistry.getMetricQueryServiceGatewayRpcAddress(),
100                     archivedExecutionGraphStore,
101                     fatalErrorHandler,
102                     historyServerArchivist);
103
104             log.debug("Starting ResourceManager.");
105             //启动resourceManager,此过程中会经历以下阶段
106             //leader选举->(ResourceManager.java中)
107             // ->grantLeadership(...)
108             // ->tryAcceptLeadership(...)
109             // ->slotManager的启动
110             resourceManager.start();
111             resourceManagerRetrievalService.start(resourceManagerGatewayRetriever);
112
113             log.debug("Starting Dispatcher.");
114
115             //启动Dispatcher,经历以下阶段:
116             //leader选举->(Dispatcher.java中)grantLeadership->tryAcceptLeadershipAndRunJobs
117             // ->createJobManagerRunner->startJobManagerRunner->jobManagerRunner.start()
118             //
119             //->(JobManagerRunner.java中)start()->leaderElectionService.start(...)
120             //->grantLeadership(...)->verifyJobSchedulingStatusAndStartJobManager(...)
121             //->startJobMaster(leaderSessionId)这里的startJobmaster应该是启动的JobManager
122             //
123             //->(JobManagerRunner.java中)jobMasterService.start(...)
124             //->(JobMaster.java)startJobExecution(...)
125             // ->{startJobMasterServices()在该方法中会启动slotPool->resourceManagerLeaderRetriever.start(...)}
126             //->startJobExecution(...)->
127             dispatcher.start();
128             dispatcherLeaderRetrievalService.start(dispatcherGatewayRetriever);
129
130             return createDispatcherResourceManagerComponent(
131                     dispatcher,
132                     resourceManager,
133                     dispatcherLeaderRetrievalService,
134                     resourceManagerRetrievalService,
135                     webMonitorEndpoint,
136                     jobManagerMetricGroup);
137
138         } catch (Exception exception) {
139             // clean up all started components
140             //失败会清除已启动的组件
141             //..............
142         }
143     }
5)此后,JobManager中的slotPool会向SlotManager申请资源,而SlotManager则向Yarn的ResourceManager申请,申请到后会启动TaskManager,然后将slot信息注册到slotManager和slotPool中,详细过程在此就不展开分析了,留作后面分析。
该博客中还有诸多不完善的地方,需要自己后进一步的阅读源码、弄清设计架构后等一系列之后才能有更好的完善,此外,后期也会对照着Flink 的Per-job模式下任务提交的详细日志进一步验证。
若是文中有描述不清的,非常建议参考以下博文;若是存在不对的地方,非常欢迎大伙留言指出,谢谢了!
Ref
[1]https://files.alicdn.com/tpsservice/7bb8f513c765b97ab65401a1b78c8cb8.pdf
[2]https://yq.aliyun.com/articles/719262?spm=a2c4e.11153940.0.0.3ea9469ei7H3Wx#
[3]https://www.jianshu.com/p/52da8b2e4ccc
Flink源码阅读(一)——Flink on Yarn的Per-job模式源码简析
标签:exce orm hdfs name pst dal 文件中 相同 指定
原文地址:https://www.cnblogs.com/love-yh/p/11657791.html