标签:第一个 一个 img 函数 通过 add get height com


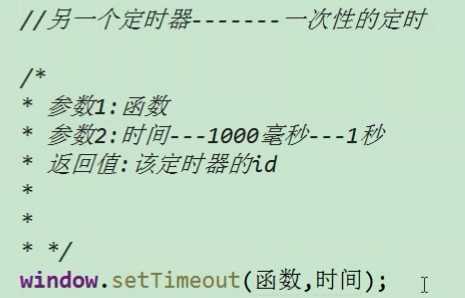
下面会说第二种定时器。
第一种的定时器回顾:

另一个定时器 setTimeout() 它是一个一次性的定时器:


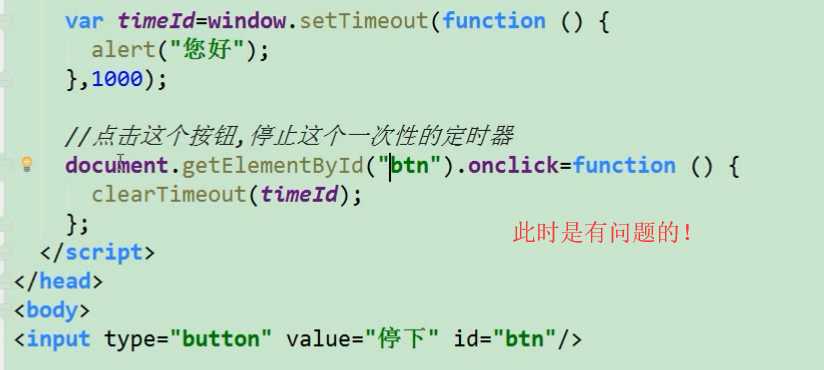
因为,代码是从上往下执行的,btn 还没有生成,所以getElementById("btn").onclick = 肯定是会报错的。
它是一次性的定时器,如果没有取消的话,它会一直占着空间,所以一般都要写按钮btn 去取消timeId .

 1 <!DOCTYPE>
 2 <html lang="en">
 3     <head>
 4         <meta charset="UTF-8">
 5         <title>这是网页标题</title>
 6     </head>
 7     <body>
 8         <input type="button" value="停止" id="btn">
 9
10         <script src="js/common.js"></script>
11         <script>
12             //注册定时器(一次性的)
13             var timeId = window.setTimeout(function () {
14                 console.log("hehhehe");
15             },5000); //5s 之后调用
16
17             //注册点击事件 (点击之后取消定时器)
18             getId$("btn").onclick = function () {
19                 window.clearTimeout(timeId);
20             };
21         </script>
22     </body>
23 </html>
注:定时器一般还是使用第一种定时器。一次性的定时器用的比较少。

 1 <!DOCTYPE>
 2 <html lang="en">
 3     <head>
 4         <meta charset="UTF-8">
 5         <title>这是网页标题</title>
 6     </head>
 7     <body>
 8         <textarea name="texta" id="" cols="30" rows="10">必须看完,fasdf进度款sea大姐夫会计法大水坑借方考虑将大家开始的加法,发的空间风口浪尖反倒是咖啡加快。你必须同意才可以注册。
 9
10         </textarea>
11         <input type="button" value="请仔细阅读协议(5)" id="btn" disabled >
12
13         <script src="js/common.js"></script>
14         <script>
15             //注册定时器
16             var sec =5;
17             var timeId = window.setInterval(function () {
18                 sec--;
19                 if(sec<0){
20                     window.clearInterval(timeId);  //当sec <0 时,就取消定时器。
21                     getId$("btn").value="同意";
22                     getId$("btn").disabled=false;
23                 }else{
24                     getId$("btn").value="请仔细阅读协议("+sec+")";
25                 }
26             },1000);
27
28         </script>
29     </body>
30 </html>

 1 <!DOCTYPE>
 2 <html lang="en">
 3     <head>
 4         <meta charset="UTF-8">
 5         <title>这是网页标题</title>
 6     </head>
 7     <body>
 8         <textarea name="texta" id="" cols="30" rows="10">必须看完,fasdf进度款sea大姐夫会计法大水坑借方考虑将大家开始的加法,发的空间风口浪尖反倒是咖啡加快。你必须同意才可以注册。
 9
10         </textarea>
11         <input type="button" value="请仔细阅读协议(5)" id="btn" disabled >
12
13         <script src="js/common.js"></script>
14         <script>
15             //注册定时器
16             var sec =5;
17             var timeId = window.setInterval(function () {
18                 sec--;
19                 getId$("btn").value="请仔细阅读协议("+sec+")";
20                 if(sec<0){
21                     window.clearInterval(timeId);  //当sec <0 时,就取消定时器。
22                     getId$("btn").value="同意";
23                     getId$("btn").disabled=false;
24                 }
25             },1000);
26
27         </script>
28     </body>
29 </html>
透明度的设置是通过 style.opacity 来设置的。
opacity 是不透明的意思。
所以 1 代表不透明 0 代表完全透明。

 1 <!DOCTYPE>
 2 <html lang="en">
 3     <head>
 4         <meta charset="UTF-8">
 5         <title>这是网页标题</title>
 6
 7         <style>
 8             div{
 9                 width: 300px;
10                 height: 300px;
11                 background-color: darkred;
12             }
13         </style>
14
15     </head>
16     <body>
17         <div id="dv"></div>
18         <input type="button" value="开始渐变" id="btn">
19
20
21         <script src="js/common.js"></script>
22         <script>
23             getId$("btn").onclick = function () {
24                 //其实 渐变是假的, 它真实改变的是透明度
25                 var opacity =10;
26                 var timeId = window.setInterval(function () {
27                     opacity --;
28                     getId$("dv").style.opacity = opacity/10;  //不透明度  (之所以用10是因为整数比小数更精确。)
29
30                     if(opacity <=0){
31                         window.clearInterval(timeId);
32                     }
33                 },1000); //1 s变一次
34             };
35         </script>
36     </body>
37 </html>

 1 <!DOCTYPE>
 2 <html lang="en">
 3     <head>
 4         <meta charset="UTF-8">
 5         <title>这是网页标题</title>
 6
 7         <style>
 8             *{
 9                 margin:0;
10                 padding:0;
11             }
12             div{
13                 width: 200px;
14                 height: 100px;
15                 background-color: darkred;
16                 border-radius: 50px;
17             }
18         </style>
19     </head>
20     <body>
21         <div id="dv"></div>
22         <input type="button" value="变宽" id="btn">
23         <script src="js/common.js"></script>
24         <script>
25             getId$("btn").onclick = function () {
26                 var width = 200;
27
28                 var timeId = window.setInterval(function () {
29                     width +=10;
30                     getId$("dv").style.width = width;
31                     if(width>=800){
32                         window.clearInterval(timeId);  //如果大于 等于800 就取消定时器
33                     }
34                 },200);  //0.2s 变宽一次
35             };
36         </script>
37     </body>
38 </html>
这里需要注意的是:对于style中的设置,如果再上面的style中写设置,Js无法直接通过属性名获取到。
但是如果是使用style属性设置的,可以通过js获取。

也不是没办法获取,只是不能直接获取,获取方法如下:
offset+首字母大写的属性名 进行获取。例如(offsetLeft)但是就不用再用style了,即getId("dv").offsetLeft; 而不是getId("dv").style.offsetLeft;

 1 <!DOCTYPE>
 2 <html lang="en">
 3     <head>
 4         <meta charset="UTF-8">
 5         <title>这是网页标题</title>
 6
 7         <style>
 8             *{
 9                 margin:0;
10                 padding:0;
11             }
12             input{
13                 margin-top: 20px;
14             }
15             div{
16                 width:100px;
17                 height: 50px;
18                 background-color: green;
19                 margin-top: 30px;
20             /*    div要移动,所以要脱离文档流*/
21                 position: absolute;
22                 left: 50px;
23             }
24
25         </style>
26     </head>
27     <body>
28         <input type="button" value="移动到400" id="btn1">
29         <input type="button" value="移动到800" id="btn2">
30         <div id="dv"></div>
31
32
33         <script src="js/common.js"></script>
34         <script>
35             // 点击第一个按钮 移动到400px
36             getId$("btn1").onclick = function(){
37                 var timeId = setInterval(function () {
38                     //获取div 的当前位置
39                     var current = getId$("dv").offsetLeft; //数字类型   没有 px
40                     //速度  每次移动多少px
41                     var step = 10;
42                     current += step;
43                     //将每次移动后的位置 设置上去
44                     getId$("dv").style.left = current +"px";
45                     if(current == 400){
46                         window.clearInterval(timeId);
47                     }
48                 },20); //0.02s
49             };
50             // 点击第二个按钮 移动到800px
51
52
53
54
55         </script>
56     </body>
57 </html>
它是有问题的,每点击一次按钮就会创建一个定时器,所以如果点击多次按钮就会创建多个定时器,div移动的速度也就越来越快了。
我们现在要做的是无论点击多少次按钮,只开启一个定时器。

 1 <!DOCTYPE>
 2 <html lang="en">
 3     <head>
 4         <meta charset="UTF-8">
 5         <title>这是网页标题</title>
 6
 7         <style>
 8             *{
 9                 margin:0;
10                 padding:0;
11             }
12             input{
13                 margin-top: 20px;
14             }
15             div{
16                 width:100px;
17                 height: 50px;
18                 background-color: green;
19                 margin-top: 30px;
20             /*    div要移动,所以要脱离文档流*/
21                 position: absolute;
22                 left: 50px;
23             }
24
25         </style>
26     </head>
27     <body>
28         <input type="button" value="移动到400" id="btn1">
29         <input type="button" value="移动到800" id="btn2">
30         <div id="dv"></div>
31
32
33         <script src="js/common.js"></script>
34         <script>
35             // 点击第一个按钮 移动到400px
36             getId$("btn1").onclick = function(){
37                 var timeId = setInterval(function () {
38                     //获取div 的当前位置
39                     var current = getId$("dv").offsetLeft; //数字类型   没有 px
40                     //速度  每次移动多少px
41                     var step = 10;
42                     current = current<400?current+step:current-step;
43                     //将每次移动后的位置 设置上去
44                     getId$("dv").style.left = current +"px";
45                     if(current == 400){
46                         window.clearInterval(timeId);
47                     }
48                 },20); //0.02s
49             };
50             // 点击第二个按钮 移动到800px
51             getId$("btn2").onclick = function(){
52                 var timeId = setInterval(function () {
53                     //获取div 的当前位置
54                     var current = getId$("dv").offsetLeft; //数字类型   没有 px
55                     //速度  每次移动多少px
56                     var step = 10;
57                     current += step;
58                     //将每次移动后的位置 设置上去
59                     getId$("dv").style.left = current +"px";
60                     if(current == 800){
61                         window.clearInterval(timeId);
62                     }
63                 },20); //0.02s
64             };
65         </script>
66     </body>
67 </html>
上面代码有很多bug ,下面解决。
标签:第一个 一个 img 函数 通过 add get height com
原文地址:https://www.cnblogs.com/zach0812/p/11749284.html