标签:sha 图片 文件的 tor imu statistic roo sys stat
Nginx虚拟主机
- 基于域名的虚拟主机
- 基于IP地址的虚拟主机
- 基于端口的虚拟主机
[root@localhost ~]# yum install bind -y[root@localhost ~]# vim /etc/named.conf
options {
listen-on port 53 { any; }; ##监听所有
listen-on-v6 port 53 { ::1; };
directory "/var/named";
dump-file "/var/named/data/cache_dump.db";
statistics-file "/var/named/data/named_stats.txt";
memstatistics-file "/var/named/data/named_mem_stats.txt";
recursing-file "/var/named/data/named.recursing";
secroots-file "/var/named/data/named.secroots";
allow-query { any; }; ##允许所有[root@localhost ~]# vim /etc/named.rfc1912.zones ##配置区域配置文件
zone "kgc.com" IN {
type master;
file "kgc.com.zone"; ##kgc区域数据配置文件
allow-update { none; };
};
zone "accp.com" IN {
type master;
file "accp.com.zone"; ##accp区域数据配置文件
allow-update { none; };
};[root@localhost ~]# cd /var/named/
[root@localhost named]# cp -p named.localhost kgc.com.zone ##复制模板
[root@localhost named]# vim kgc.com.zone ##修改区域配置文件
$TTL 1D
@ IN SOA @ rname.invalid. (
0 ; serial
1D ; refresh
1H ; retry
1W ; expire
3H ) ; minimum
NS @
A 127.0.0.1
www IN A 192.168.13.128 ##本机地址
[root@localhost named]# cp -p kgc.com.zone accp.com.zone ##复制文件为accp区域数据配置文件
[root@localhost named]# systemctl start named ##开启dns服务
[root@localhost named]# systemctl stop firewalld.service ##关闭防火墙
[root@localhost named]# setenforce 0[root@localhost ~]# mkdir -p /var/www/html/accp ##创建accp站点
[root@localhost ~]# mkdir -p /var/www/html/kgc ##创建kgc站点
[root@localhost ~]# cd /var/www/html/
[root@localhost html]# ls
accp kgc
[root@localhost html]# echo "this a accp web" > accp/index.html ##创建首页内容
[root@localhost html]# echo "this a kgc web" > kgc/index.html ##创建首页内容
[root@localhost ~]# smbclient -L //192.168.100.3/   ##远程共享访问
Enter SAMBA\root‘s password:

                Sharename       Type      Comment
                ---------       ----      -------
                LNMP-C7         Disk
[root@localhost ~]# mount.cifs //192.168.100.3/LNMP-C7 /mnt ##挂载到/mnt目录下[root@localhost ~]# cd /mnt ##切换到挂载点目录
[root@localhost mnt]# ls
Discuz_X3.4_SC_UTF8.zip nginx-1.12.2.tar.gz
mysql-boost-5.7.20.tar.gz php-7.1.20.tar.gz
[root@localhost mnt]# tar zxvf nginx-1.12.2.tar.gz -C /opt ##解压Nginx源码包到/opt下
[root@localhost mnt]# cd /opt/ ##切换到解压的目录下
[root@localhost opt]# ls
nginx-1.12.2 rh[root@localhost opt]# yum -y install gcc \ //c语言
gcc-c++ \ //c++语言
pcre-devel \ //pcre语言工具
zlib-devel //数据压缩用的函式库[root@localhost opt]# useradd -M -s /sbin/nologin nginx ##创建程序用户,安全不可登陆状态
[root@localhost opt]# id nginx
uid=1001(nginx) gid=1001(nginx) 组=1001(nginx)
[root@localhost opt]# cd nginx-1.12.0/ ##切换到nginx目录下
[root@localhost nginx-1.12.0]# ./configure \ ##配置nginx
> --prefix=/usr/local/nginx \ ##安装路径
> --user=nginx \ ##用户名
> --group=nginx \ ##用户组
> --with-http_stub_status_module ##状态统计模块[root@localhost nginx-1.12.0]# make ##编译
...
[root@localhost nginx-1.12.0]# make install ##安装
...[root@localhost nginx]# ln -s /usr/local/nginx/sbin/nginx /usr/local/sbin/
##创建软连接让系统识别nginx启动脚本
[root@localhost nginx]# nginx -t ##检查配置文件的语法问题
nginx: the configuration file /usr/local/nginx/conf/nginx.conf syntax is ok
nginx: configuration file /usr/local/nginx/conf/nginx.conf test is successful
[root@localhost nginx]# nginx ##开启ngnix
[root@localhost nginx]# netstat -ntap | grep 80 ##查看端口,nginx已经开启
tcp 0 0 0.0.0.0:80 0.0.0.0:* LISTEN 39620/nginx: master
[root@localhost nginx]# systemctl stop firewalld.service ##关闭防火墙
[root@localhost nginx]# setenforce 0
[root@localhost nginx]# nginx ##开启[root@localhost nginx]# cd /etc/init.d/ ##切换到启动配置文件目录
[root@localhost init.d]# ls
functions netconsole network README
[root@localhost init.d]# vim nginx ##编辑启动脚本文件
#!/bin/bash
# chkconfig: - 99 20 ##注释信息
# description: Nginx Service Control Script
PROG="/usr/local/nginx/sbin/nginx" ##设置变量为nginx命令文件
PIDF="/usr/local/nginx/logs/nginx.pid" ##设置变量PID文件 进程号为5346
case "$1" in
start)
$PROG ##开启服务
;;
stop)
kill -s QUIT $(cat $PIDF) ##关闭服务
;;
restart) ##重启服务
$0 stop
$0 start
;;
reload) ##重载服务
kill -s HUP $(cat $PIDF)
;;
*) ##错误输入提示
echo "Usage: $0 {start|stop|restart|reload}"
exit 1
esac
exit 0
[root@localhost init.d]# chmod +x /etc/init.d/nginx ##给启动脚本执行权限
[root@localhost init.d]# chkconfig --add nginx ##添加到service管理器中
[root@localhost init.d]# service nginx stop ##就可以使用service控制nginx
[root@localhost init.d]# service nginx start[root@localhost ~]# vim /lib/systemd/system/nginx.service ##创建配置文件
[Unit]
Description=nginx ##描述
After=network.target ##描述服务类型
[Service]
Type=forking ##后台运行形式
PIDFile=/usr/local/nginx/logs/nginx.pid ##PID文件位置
ExecStart=/usr/local/nginx/sbin/nginx ##启动服务
ExecReload=/usr/bin/kill -s HUP $MAINPID ##根据PID重载配置
ExecStop=/usr/bin/kill -s QUIT $MAINPID ##根据PID终止进程
PrivateTmp=true
[Install]
WantedBy=multi-user.target
[root@localhost ~]# chmod 754 /lib/systemd/system/nginx.service ##设置执行权限
[root@localhost ~]# systemctl stop nginx.service ##关闭
[root@localhost ~]# systemctl start nginx.service ##开启[root@localhost ~]# cd /usr/local/nginx/conf
[root@localhost conf]# vim nginx.conf ##修改Nginx配置文件
server {
listen 80;
server_name www.kgc.com; ##kgc网站
charset utf-8;
access_log logs/www.kgc.com.access.log; ##日志文件
location / {
root /var/www/html/kgc; ##站点目录
index index.html index.htm;
}
error_page 500 502 503 504 /50x.html;
location = /50x.html {
root html;
}
}
server {
listen 80;
server_name www.accp.com; ##accp网站
charset utf-8;
access_log logs/www.accp.com.access.log; ##日志文件
location / {
root /var/www/html/accp; ##站点目录
index index.html index.htm;
}
error_page 500 502 503 504 /50x.html;
location = /50x.html {
root html;
}
}
[root@localhost conf]# service nginx restart ##重启nginx服务

[root@localhost ~]# cd /usr/local/nginx/conf
[root@localhost conf]# vim nginx.conf     ##修改Nginx配置文件

server {
    listen      80;
    server_name  www.accp.com;
    charset utf-8;
    access_log  logs/www.accp.com.access.log;
    location / {
        root   /var/www/html/accp;
        index  index.html index.htm;
    }
    error_page   500 502 503 504  /50x.html;
    location = /50x.html {
        root   html;
    }
}

server {
    listen     192.168.13.138:8080;                                  ##修改监听端口为8080
    server_name  www.accp.com;
    charset utf-8;
    access_log  logs/www.accp8080.com.access.log;    ##日志文件修改为8080
    location / {
        root   /var/www/html/accp8080;                             ##8080端口的站点目录
        index  index.html index.htm;
    }
    error_page   500 502 503 504  /50x.html;
    location = /50x.html {
        root   html;
    }
}[root@localhost conf]# cd /var/www/html/ ##切换到站点目录中
[root@localhost html]# mkdir accp8080 ##创建站点目录
[root@localhost html]# cd accp8080/
[root@localhost accp8080]# echo "this is accp8080 web" > index.html ##创建首页内容
[root@localhost accp8080]# service nginx restart ##重启Nginx服务

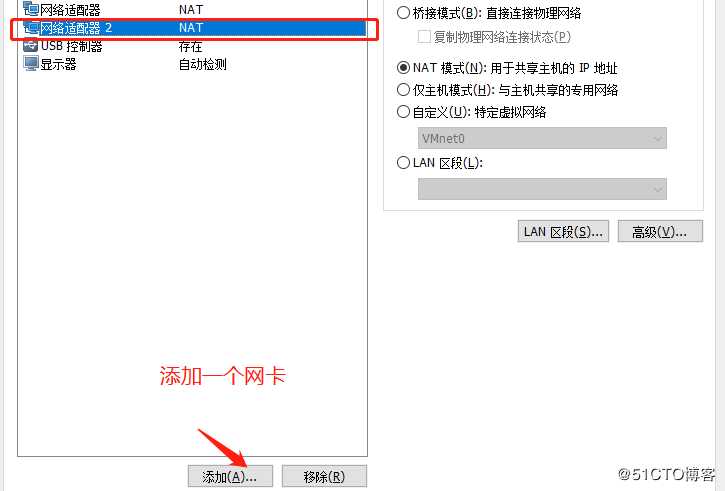
192.168.13.138
192.168.13.133
[root@localhost ~]# cd var/named/
[root@localhost named]# vim kgc.com.zone    ##修改kgc的区域数据配置文件
$TTL 1D
@       IN SOA  @ rname.invalid. (
                                                        0       ; serial
                                                        1D      ; refresh
                                                        1H      ; retry
                                                        1W      ; expire
                                                    3H )    ; minimum
                NS      @
                A       127.0.0.1
www IN  A       192.168.13.133                   ##地址为133
[root@localhost named]# vim accp.com.zone  ##修改accp的区域数据配置文件
$TTL 1D
@       IN SOA  @ rname.invalid. (
                                                            0       ; serial
                                                            1D      ; refresh
                                                            1H      ; retry
                                                            1W      ; expire
                                                            3H )    ; minimum
                NS      @
                A       127.0.0.1
www IN  A       192.168.13.138       ##地址为138
[root@localhost named]# systemctl restart named ##重启dns服务[root@localhost ~]# cd /usr/local/nginx/conf
[root@localhost conf]# vim nginx.conf ##修改Nginx配置文件
server {
listen 192.168.13.133:80; ##指定IP地址
server_name www.kgc.com;
charset utf-8;
access_log logs/www.kgc.com.access.log;
location / {
root /var/www/html/kgc;
index index.html index.htm;
}
error_page 500 502 503 504 /50x.html;
location = /50x.html {
root html;
}
}
server {
listen 192.168.13.138:80; ##指定IP地址
server_name www.accp.com;
charset utf-8;
access_log logs/www.accp.com.access.log;
location / {
root /var/www/html/accp;
index index.html index.htm;
}
error_page 500 502 503 504 /50x.html;
location = /50x.html {
root html;
}
}
[root@localhost conf]# service nginx restart ##重启Nginx服务

标签:sha 图片 文件的 tor imu statistic roo sys stat
原文地址:https://blog.51cto.com/14469918/2448022