标签:des android style blog http io color os ar
Fragments 设计理念
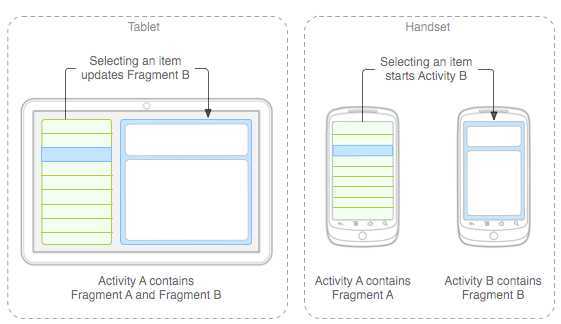
在设计应用时特别是Android 应用 ,有众多的分辨率要去适应,而fragments 可以让你在屏幕不同的屏幕上动态管理UI。例如:通讯应用程序(QQ),用户列表可以在左边,消息窗口在右边的设计。而在手机屏幕用户列表填充屏幕当点击某一用户时,则弹出对话窗口的设计,如下图:

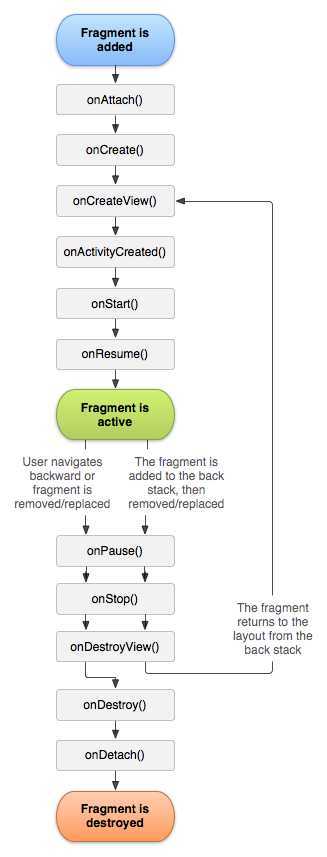
每一个fragments 都有自己的一套生命周期回调方法和处理自己的用户输入事件。 对应生命周期可参考下图:

其中大多数程序必须使用Fragments 必须实现的三个回调方法分别为:
onCreate
系统创建Fragments 时调用,可做执行初始化工作或者当程序被暂停或停止时用来恢复状态,跟Activity 中的onCreate相当。
onCreateView
用于首次绘制用户界面的回调方法,必须返回要创建的Fragments 视图UI。假如你不希望提供Fragments 用户界面则可以返回NULL。
onPause
当用户离开这个Fragments 的时候调用,这时你要提交任何应该持久的变化,因为用户可能不会回来。更多的事件可以参考上图的生命周期关系图。
系统内置了三种Fragments ,这三种Fragments 分别有不同的应用场景分别为:
DialogFragment
对话框式的Fragments,可以将一个fragments 对话框并到activity 管理的fragments back stack 中,允许用户回到一个前曾摒弃fragments.
ListFragments
类似于ListActivity 的效果,并且还提供了ListActivity 类似的onListItemCLick和setListAdapter等功能。
PreferenceFragments
类似于PreferenceActivity .可以创建类似IPAD的设置界面。
布局文件:
<?xml version="1.0" encoding="utf-8"?>
<LinearLayout xmlns:android="http://schemas.android.com/apk/res/android"
android:layout_width="match_parent"
android:layout_height="match_parent"
android:orientation="horizontal" >
<fragment class="com.xuzhi.fragment.FragmentDemoActivity$TitlesFragment" android:id="@+id/titles" android:layout_weight="1"
android:layout_width="0px" android:layout_height="match_parent"
/>
<FrameLayout android:id="@+id/details" android:layout_weight="1" android:layout_width="0px" android:layout_height="match_parent"
android:background="?android:attr/detailsElementBackground"
></FrameLayout>
</LinearLayout>
主界面代码(己做注释):
package com.xuzhi.fragment;
import android.app.Activity;
import android.app.AlertDialog;
import android.app.Fragment;
import android.app.FragmentTransaction;
import android.app.ListFragment;
import android.os.Bundle;
import android.util.TypedValue;
import android.view.LayoutInflater;
import android.view.View;
import android.view.ViewGroup;
import android.widget.ArrayAdapter;
import android.widget.ListView;
import android.widget.ScrollView;
import android.widget.TextView;
public class FragmentDemoActivity extends Activity {
public static String[] array = { "text1,", "text2", "text3", "text4",
"text5,", "text6", "text7", "text8" };
/** Called when the activity is first created. */
@Override
public void onCreate(Bundle savedInstanceState) {
super.onCreate(savedInstanceState);
setContentView(R.layout.main);
}
public static class TitlesFragment extends ListFragment {
boolean mDualPane;
int mCurCheckPosition = 0;
@Override
public void onCreate(Bundle savedInstanceState) {
// TODO Auto-generated method stub
super.onCreate(savedInstanceState);
System.out.println("Fragment-->onCreate");
}
@Override
public View onCreateView(LayoutInflater inflater, ViewGroup container,
Bundle savedInstanceState) {
// TODO Auto-generated method stub
System.out.println("Fragment-->onCreateView");
return super.onCreateView(inflater, container, savedInstanceState);
}
@Override
public void onPause() {
// TODO Auto-generated method stub
super.onPause();
System.out.println("Fragment-->onPause");
}
@Override
public void onStop() {
// TODO Auto-generated method stub
super.onStop();
System.out.println("Fragment-->onStop");
}
@Override
public void onAttach(Activity activity) {
// TODO Auto-generated method stub
super.onAttach(activity);
System.out.println("Fragment-->onAttach");
}
@Override
public void onStart() {
// TODO Auto-generated method stub
super.onStart();
System.out.println("Fragment-->onStart");
}
@Override
public void onResume() {
// TODO Auto-generated method stub
super.onResume();
System.out.println("Fragment-->onResume");
}
@Override
public void onDestroy() {
// TODO Auto-generated method stub
super.onDestroy();
System.out.println("Fragment-->onDestroy");
}
@Override
public void onActivityCreated(Bundle savedInstanceState) {
// TODO Auto-generated method stub
super.onActivityCreated(savedInstanceState);
System.out.println("Fragment-->onActivityCreted");
setListAdapter(new ArrayAdapter<String>(getActivity(),
android.R.layout.simple_list_item_1, array));
View detailsFrame = getActivity().findViewById(R.id.details);
mDualPane = detailsFrame != null
&& detailsFrame.getVisibility() == View.VISIBLE;
if (savedInstanceState != null) {
mCurCheckPosition = savedInstanceState.getInt("curChoice", 0); //从保存的状态中取出数据
}
if (mDualPane) {
getListView().setChoiceMode(ListView.CHOICE_MODE_SINGLE);
showDetails(mCurCheckPosition);
}
}
@Override
public void onSaveInstanceState(Bundle outState) {
// TODO Auto-generated method stub
super.onSaveInstanceState(outState);
outState.putInt("curChoice", mCurCheckPosition);//保存当前的下标
}
@Override
public void onListItemClick(ListView l, View v, int position, long id) {
// TODO Auto-generated method stub
super.onListItemClick(l, v, position, id);
showDetails(position);
}
void showDetails(int index) {
mCurCheckPosition = index;
if (mDualPane) {
getListView().setItemChecked(index, true);
DetailsFragment details = (DetailsFragment) getFragmentManager()
.findFragmentById(R.id.details);
if (details == null || details.getShownIndex() != index) {
details = DetailsFragment.newInstance(mCurCheckPosition);
//得到一个fragment 事务(类似sqlite的操作)
FragmentTransaction ft = getFragmentManager()
.beginTransaction();
ft.replace(R.id.details, details);//将得到的fragment 替换当前的viewGroup内容,add则不替换会依次累加
ft.setTransition(FragmentTransaction.TRANSIT_FRAGMENT_FADE);//设置动画效果
ft.commit();//提交
}
} else {
new AlertDialog.Builder(getActivity()).setTitle(
android.R.string.dialog_alert_title).setMessage(
array[index]).setPositiveButton(android.R.string.ok,
null).show();
}
}
}
/**
* 作为界面的一部分,为fragment 提供一个layout
* @author terry
*
*/
public static class DetailsFragment extends Fragment {
public static DetailsFragment newInstance(int index) {
DetailsFragment details = new DetailsFragment();
Bundle args = new Bundle();
args.putInt("index", index);
details.setArguments(args);
return details;
}
public int getShownIndex() {
return getArguments().getInt("index", 0);
}
@Override
public View onCreateView(LayoutInflater inflater, ViewGroup container,
Bundle savedInstanceState) {
// TODO Auto-generated method stub
if (container == null)
return null;
ScrollView scroller = new ScrollView(getActivity());
TextView text = new TextView(getActivity());
int padding = (int) TypedValue.applyDimension(
TypedValue.COMPLEX_UNIT_DIP, 4, getActivity()
.getResources().getDisplayMetrics());
text.setPadding(padding, padding, padding, padding);
scroller.addView(text);
text.setText(array[getShownIndex()]);
return scroller;
}
}
}
标签:des android style blog http io color os ar
原文地址:http://www.cnblogs.com/qingchen1984/p/4059914.html