标签:窗口 unit 图像 false 的区别 pil net 常见 变量
GAN由论文《Ian Goodfellow et al., “Generative Adversarial Networks,” arXiv (2014)》提出。
GANs require differentiation through the visible units, and thus cannot model discrete data,
while VAEs require differentiation through the hidden units, and thus cannot have discrete latent variables.
即GAN不能处理离散数据,VAEs不能处理离散隐空间变量。
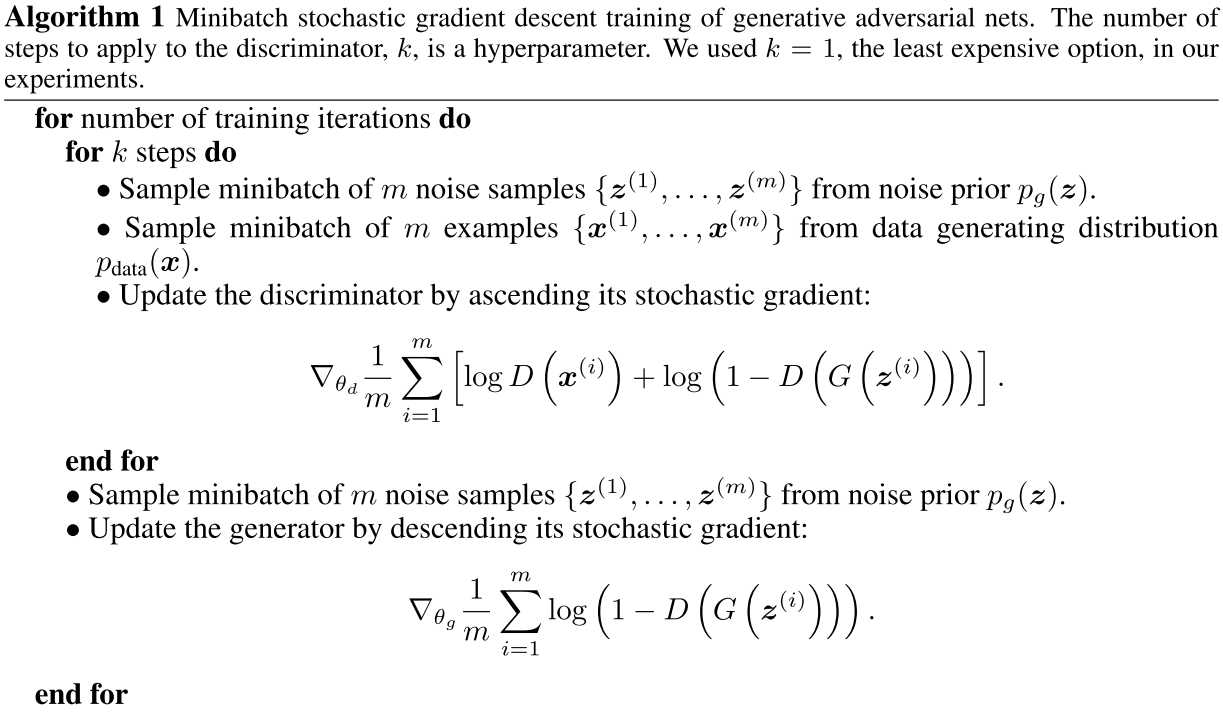
常见模型是最小化一个loss,GAN里的生成器和鉴别器则是一个minmax操作,即

同时,生成器更新一次后,鉴别器应该更新多次,这样保证鉴别器可以维持在最优解附近。
如果生成器连续多次更新,而鉴别器不更新,则生成器倾向于生成那些“为难”鉴别器的同一批样本,这样生成器就缺乏多样性。
论文中给出的算法流程(简单的一次生成器更新对应多次鉴别器更新):

生成器使用relu和sigmoid激活函数,鉴别器使用maxout激活函数,Dropout只添加于鉴别器。
数据集为cifar10
定义生成器网络,输入为隐空间中一个矢量,输出为一个图片。
定义鉴别器网络,输入为生成器网络采样所得的图片和真实图片(以及标签),输出为sigmoid激活函数的标量值,即判断图片为真实还是伪造。
定义生成对抗网络,为D(G(x))即生成网络与鉴别网络的嵌套形式。输入为生成网络的输入,输出为鉴别器网络的输出。
训练时,使用高斯分布从隐空间中采样,经过生成网络得到生成的图片,与真实图片混合后(以及标签)作为鉴别器网络的输入。
先训练鉴别器。然后重新采样生成图片,此时需将这些图片的标签置为真实图片的标签(固定标签后,训练生成器,即让其参数调整到鉴别器都以为确实是真实图片)。再训练GAN(此时冻结鉴别器参数,训练的只是生成器)。
可以看到,定义了3个模型,只是因为生成器网络的训练要基于鉴别器网络进行。
代码如下
import numpy as np
from keras.datasets import cifar10
from keras.models import Model
from keras.layers import Input,Dense,LeakyReLU,Reshape,Conv2D,Conv2DTranspose,Flatten,Dropout
from keras.optimizers import RMSprop
from keras.preprocessing import image
import os

latent_dim=32
# Cifar10图片尺寸
height,width=(32,32)
channels=3
3个网络定义
# 生成网络:将隐空间中矢量生成图片,使用Conv2DTranspose
generator_input=Input((latent_dim,))
x=Dense(128*16*16)(generator_input)
# 只添加了一个alpha参数,其他地方跟书上一致,alpha默认0.3
x=LeakyReLU(alpha=0.1)(x)
x=Reshape((16,16,128))(x)
x=Conv2D(256,5,padding=‘same‘)(x)
x=LeakyReLU(alpha=0.1)(x)
# 结果为32*32*256,为避免生成图片呈现棋盘的点阵格式,凡是使用strides的地方,窗口大小为strides的整数倍
x=Conv2DTranspose(256,4,strides=2,padding=‘same‘)(x)
x=LeakyReLU(alpha=0.1)(x)

x=Conv2D(256,5,padding=‘same‘)(x)
x=LeakyReLU(alpha=0.1)(x)
x=Conv2D(256,5,padding=‘same‘)(x)
x=LeakyReLU(alpha=0.1)(x)

# 结果为32*32*3,即一个图片正确格式。使用tanh代替sigmoid
x=Conv2D(channels,7,activation=‘tanh‘,padding=‘same‘)(x)
generator=Model(generator_input,x)#它在包含在GAN里训练的,所以这里不用编译
# generator.summary()

# 鉴别网络
discriminator_input=Input((height,width,channels))
x=Conv2D(128,3)(discriminator_input)
x=LeakyReLU(alpha=0.1)(x)

x=Conv2D(128,4,strides=2)(x)
x=LeakyReLU(alpha=0.1)(x)
x=Conv2D(128,4,strides=2)(x)
x=LeakyReLU(alpha=0.1)(x)
# 2*2*128
x=Conv2D(128,4,strides=2)(x)
x=LeakyReLU(alpha=0.1)(x)
x=Flatten()(x)
# Dropout和给标签添加噪声,可以避免GAN卡住
x=Dropout(0.4)(x)
x=Dense(1,activation=‘sigmoid‘)(x)

discriminator=Model(discriminator_input,x)
# discriminator.summary()

# clipvalue,梯度超过这个值就截断,decay,衰减,使得训练稳定
discriminator_optimizer=RMSprop(lr=0.0003,clipvalue=1.0,decay=1e-8)
discriminator.compile(optimizer=discriminator_optimizer,loss=‘binary_crossentropy‘)

# 最后的生成对抗网络,由生成网络与对抗网络组合而成,此时冻结鉴别网络,训练的只是生成网络
discriminator.trainable=False
# 组成整个生成对抗网络
gan_input=Input((latent_dim,))
# 最终网络形式为鉴别网络作用于生成网络,故生成器也不用compile
gan_output=discriminator(generator(gan_input))
gan_optimizer=RMSprop(lr=0.0004,clipvalue=1.0,decay=1e-8)
gan=Model(gan_input,gan_output)
gan.compile(optimizer=gan_optimizer,loss=‘binary_crossentropy‘)
训练过程,此处并未使用多次鉴别器更新一次生成器更新,你可以自己调整(即循环里面开头添加个循环,训练鉴别器)。
(x_train,y_train),(x_test,y_test)=cifar10.load_data()
# 选择frog类别,总共10个类
x_train=x_train[y_train.flatten()==6]
# reshape到输入格式 nums*height*width*channels,像素归一化
x_train=x_train.reshape((x_train.shape[0],)+(height,width,channels)).astype(‘float32‘)/255.
iters=10000
batch_size=20
save_dir=‘frog‘

start=0
for step in range(iters):
#     选取潜空间中随机矢量(正态分布)
    random_latent_vec=np.random.normal(size=(batch_size,latent_dim))
#     生成网络产生图片
    generated_images=generator.predict(random_latent_vec)
    stop=start+batch_size
#     真实原始图片
    real_images=x_train[start:stop]
#     mix生成和真实图片
    combined_images=np.concatenate([generated_images,real_images])
#     mix labels
    labels=np.concatenate([np.ones((batch_size,1)),np.zeros((batch_size,1))])
#     trick:标签添加随机噪声
    labels+=0.05*np.random.random(labels.shape)
#     鉴别loss,可能为负,因为使用的是LeakyReLU
    d_loss=discriminator.train_on_batch(combined_images,labels)
#     重新生成随机矢量
    random_latent_vec=np.random.normal(size=(batch_size,latent_dim))
#     故意设置标签为真实
    misleading_targets=np.zeros((batch_size,1))
    a_loss=gan.train_on_batch(random_latent_vec,misleading_targets)
    start+=batch_size
    if start>len(x_train)-batch_size:
        start=0
    if step%100==0:
#         gan.save_weights(‘gan.h5‘)
        print(‘discriminator loss:‘,d_loss)
        print(‘adversarial loss:‘,a_loss)
#         保存一个batch里的第一个图片,之前像素归一化了,这里乘以255还原
        img=image.array_to_img(generated_images[0]*255.,scale=False)
        img.save(os.path.join(save_dir,‘generated_frog‘+str(step)+‘.png‘))
#         保存一个对比图片
        img=image.array_to_img(real_images[0]*255.,scale=False)
        img.save(os.path.join(save_dir,‘real_frog‘+str(step)+‘.png‘))
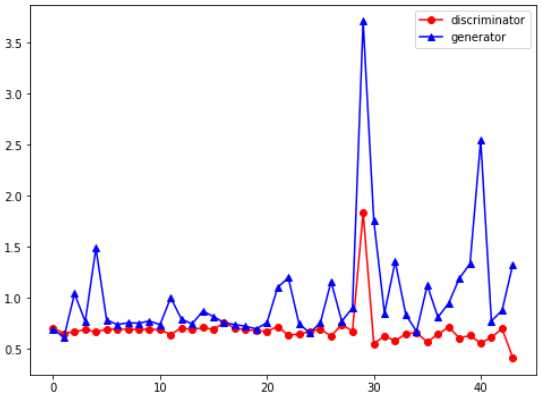
loss变化趋势,可以看到是不稳定的

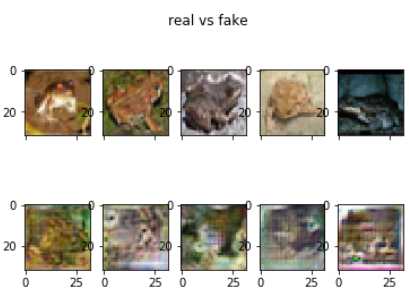
看真实图和生成图片对比,上下2行图片只是同一批保存的,没有相关性。这是训练4000步,也即80000个训练样本后的结果。看起来比较丑陋吧。

标签:窗口 unit 图像 false 的区别 pil net 常见 变量
原文地址:https://www.cnblogs.com/lunge-blog/p/11906242.html