标签:view ali end ram image slam plot not stand
https://github.com/stevenlovegrove/Pangolin
cmake_minimum_required(VERSION 2.8)
project(chapter3)


set(CMAKE_CXX_STANDARD 11)
include_directories("/usr/include/eigen3")


find_package(Pangolin REQUIRED)
include_directories(${Pangolin_INCLUDE_DIRS})
add_executable(plotTrajectory plotTrajectory.cpp)
target_link_libraries(plotTrajectory ${Pangolin_LIBRARIES})
#include <pangolin/pangolin.h>
#include <Eigen/Core>
#include <unistd.h>
#include <fstream>
// 本例演示了如何画出一个预先存储的轨迹

using namespace std;
using namespace Eigen;

// path to trajectory file
string trajectory_file = "/home/qian/slambook2/ch3/examples/trajectory.txt";

void DrawTrajectory(vector<Isometry3d, Eigen::aligned_allocator<Isometry3d>>);

int main(int argc, char **argv) {

  vector<Isometry3d, Eigen::aligned_allocator<Isometry3d>> poses;
  ifstream fin(trajectory_file);
  if (!fin) {
    cout << "cannot find trajectory file at " << trajectory_file << endl;
    return 1;
  }

  while (!fin.eof()) {  //fin.eof()判断文件是否为空
    double time, tx, ty, tz, qx, qy, qz, qw;
    fin >> time >> tx >> ty >> tz >> qx >> qy >> qz >> qw;
    Isometry3d Twr(Quaterniond(qw, qx, qy, qz));  //变换矩阵的旋转部分
    Twr.pretranslate(Vector3d(tx, ty, tz));//变换矩阵的平移部分
    poses.push_back(Twr);
  }
  cout << "read total " << poses.size() << " pose entries" << endl;

  // draw trajectory in pangolin
  DrawTrajectory(poses);
  return 0;
}

/*******************************************************************************************/
void DrawTrajectory(vector<Isometry3d, Eigen::aligned_allocator<Isometry3d>> poses) {
  // create pangolin window and plot the trajectory
  pangolin::CreateWindowAndBind("Trajectory Viewer", 1024, 768);
  glEnable(GL_DEPTH_TEST);
  glEnable(GL_BLEND);
  glBlendFunc(GL_SRC_ALPHA, GL_ONE_MINUS_SRC_ALPHA);

  pangolin::OpenGlRenderState s_cam(
    pangolin::ProjectionMatrix(1024, 768, 500, 500, 512, 389, 0.1, 1000),
    pangolin::ModelViewLookAt(0, -0.1, -1.8, 0, 0, 0, 0.0, -1.0, 0.0)
  );

  pangolin::View &d_cam = pangolin::CreateDisplay()
    .SetBounds(0.0, 1.0, 0.0, 1.0, -1024.0f / 768.0f)
    .SetHandler(new pangolin::Handler3D(s_cam));

  while (pangolin::ShouldQuit() == false) {
    glClear(GL_COLOR_BUFFER_BIT | GL_DEPTH_BUFFER_BIT);
    d_cam.Activate(s_cam);
    glClearColor(1.0f, 1.0f, 1.0f, 1.0f);
    glLineWidth(2);
    for (size_t i = 0; i < poses.size(); i++) {
      // 画每个位姿的三个坐标轴
      Vector3d Ow = poses[i].translation();
      Vector3d Xw = poses[i] * (0.1 * Vector3d(1, 0, 0));
      Vector3d Yw = poses[i] * (0.1 * Vector3d(0, 1, 0));
      Vector3d Zw = poses[i] * (0.1 * Vector3d(0, 0, 1));
      glBegin(GL_LINES);
      glColor3f(1.0, 0.0, 0.0);
      glVertex3d(Ow[0], Ow[1], Ow[2]);
      glVertex3d(Xw[0], Xw[1], Xw[2]);
      glColor3f(0.0, 1.0, 0.0);
      glVertex3d(Ow[0], Ow[1], Ow[2]);
      glVertex3d(Yw[0], Yw[1], Yw[2]);
      glColor3f(0.0, 0.0, 1.0);
      glVertex3d(Ow[0], Ow[1], Ow[2]);
      glVertex3d(Zw[0], Zw[1], Zw[2]);
      glEnd();
    }
    // 画出连线
    for (size_t i = 0; i < poses.size(); i++) {
      glColor3f(0.0, 0.0, 0.0);
      glBegin(GL_LINES);
      auto p1 = poses[i], p2 = poses[i + 1];
      glVertex3d(p1.translation()[0], p1.translation()[1], p1.translation()[2]);
      glVertex3d(p2.translation()[0], p2.translation()[1], p2.translation()[2]);
      glEnd();
    }
    pangolin::FinishFrame();
    usleep(5000);   // sleep 5 ms
  }
}
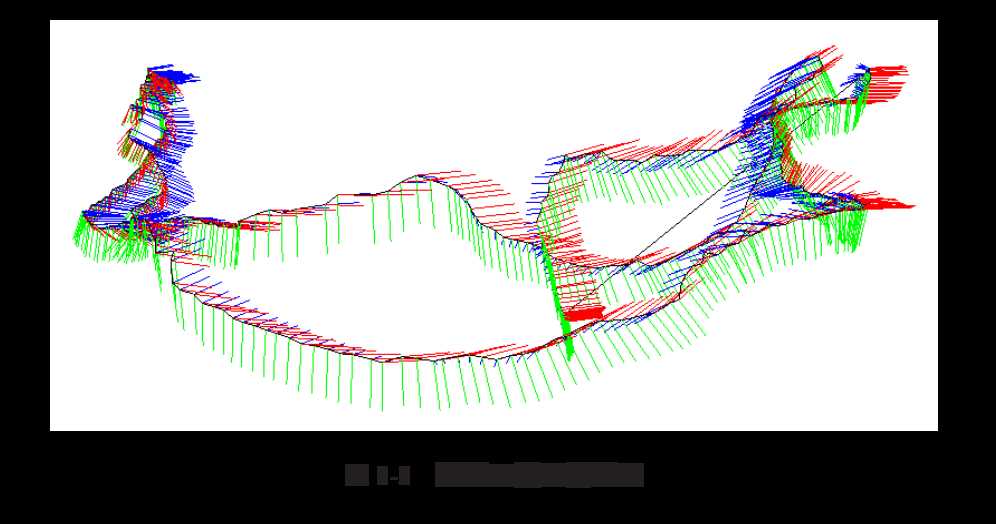
该程序演示了如何在 Panglin 中画出 3D 的位姿。我们用红、绿、蓝三种颜色画出每个位姿的三 个坐标轴(实际上我们计算了各坐标轴的世界坐标),然后用黑色线将轨迹连起来。

标签:view ali end ram image slam plot not stand
原文地址:https://www.cnblogs.com/long5683/p/11988220.html