标签:简单的 node 它的 现在 class 软件的安装 apach 格式 命令行
ZooKeeper安装模式主要有3种:
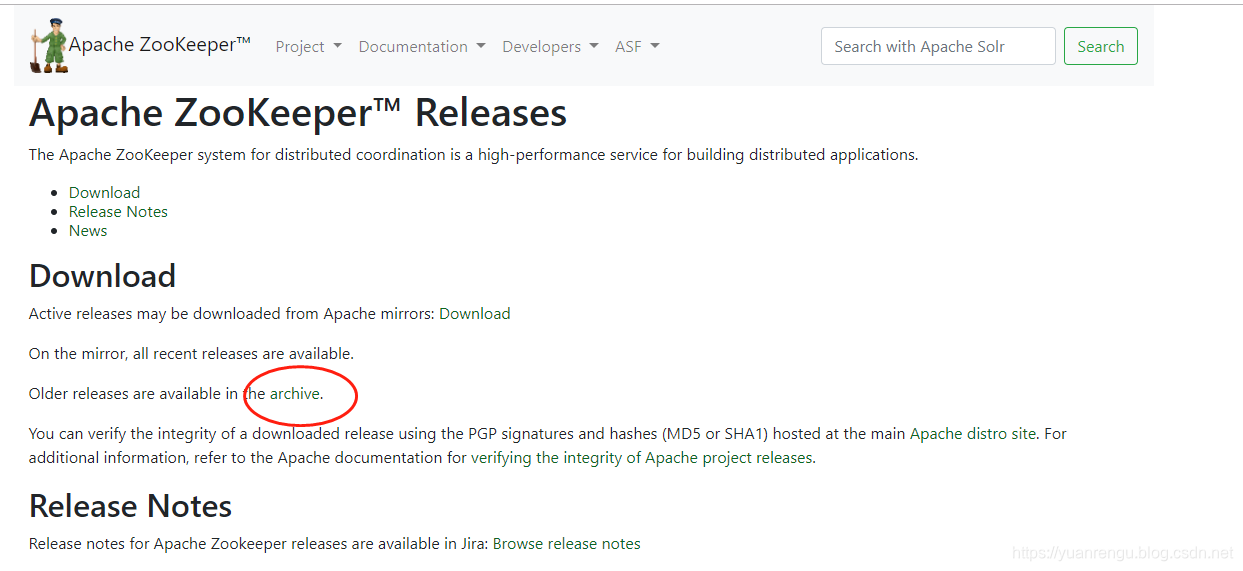
ZooKeeper官网下载地址:http://zookeeper.apache.org/releases.html#download
如图所示进行操作:

注意一点,如果不想当小白鼠,请务必下稳定版(stable release),非稳定版安装时可能出各种未知的异常。

以3.4.14版本为例,在Centos系统下进行安装,之前写一些软件的安装教程时,有人留言说希望把安装的步骤尽量详细化,包括安装路径也要带上,做到可以照着教程复制操作。这个要求有点,呵呵,满足你!
输入如下命令:
wget https://archive.apache.org/dist/zookeeper/zookeeper-3.4.14/zookeeper-3.4.14.tar.gz如下图:

tar -zxvf apache-zookeeper-3.4.14.tar.gz解压完成后,将解压包移动到/usr目录:
mv apache-zookeeper-3.4.14 /usr/并将apache-zookeeper-3.4.14重命名为zookeeper-3.4.14。
至此可以看到ZooKeeper的目录结构如下:
[root@instance-e5cf5719 zookeeper-3.4.14]# ls
bin        data             ivy.xml      logs        README.md             zookeeper-3.4.14.jar      zookeeper-3.4.14.jar.sha1  zookeeper-docs  zookeeper-recipes
build.xml  dist-maven       lib          NOTICE.txt  README_packaging.txt  zookeeper-3.4.14.jar.asc  zookeeper-client           zookeeper-it    zookeeper-server
conf ivysettings.xml LICENSE.txt pom.xml src zookeeper-3.4.14.jar.md5 zookeeper-contrib zookeeper-jute进入/usr/zookeeper-3.4.14/conf目录,可以看到zoo_sample.cfg,这是样例配置文件,需要修改为自己的,一般命令为zoo.cfg 。
cp zoo_sample.cfg zoo.cfg可以看看zoo.cfg文件里的内容:
# The number of milliseconds of each tick
tickTime=2000
# The number of ticks that the initial
# synchronization phase can take
initLimit=10
# The number of ticks that can pass between
# sending a request and getting an acknowledgement
syncLimit=5
# the directory where the snapshot is stored.
# do not use /tmp for storage, /tmp here is just
# example sakes.
dataDir=/tmp/zookeeper
# the port at which the clients will connect
clientPort=2181
# the maximum number of client connections.
# increase this if you need to handle more clients
#maxClientCnxns=60
#
# Be sure to read the maintenance section of the
# administrator guide before turning on autopurge.
#
# http://zookeeper.apache.org/doc/current/zookeeperAdmin.html#sc_maintenance
#
# The number of snapshots to retain in dataDir
#autopurge.snapRetainCount=3
# Purge task interval in hours
# Set to "0" to disable auto purge feature
#autopurge.purgeInterval=1
看着好复杂的感觉,其实去掉注释后,就只有几行而已:
tickTime=2000
initLimit=10
syncLimit=5
dataDir=/tmp/zookeeper
clientPort=2181滴答时间,就是心跳间隔,默认是2000毫秒,即每隔两秒心跳一次。
温馨提示:大家一定要学会看官方文档,去接收第一手资料。虽然是英文,但用词和语法都比较简单,很容易看懂。
官网介绍如下:
- tickTime : the basic time unit in milliseconds used by ZooKeeper. It is used to do heartbeats and the minimum session timeout will be twice the tickTime.
- dataDir : the location to store the in-memory database snapshots and, unless specified otherwise, the transaction log of updates to the database.
- clientPort : the port to listen for client connections
在zookeeper-3.4.14目录下创建data和logs文件,如下:
[root@instance-e5cf5719 zookeeper-3.4.14]# mkdir data
[root@instance-e5cf5719 zookeeper-3.4.14]# mkdir logs官方文档也有对此进行说明,指出在生产环境中ZooKeeper是会长期运行的,ZooKeeper的存储就需要专门的文件位置进行存储dataDir和logs。data文件夹用于存放内存数据库快照,集群的myid文件也是存放在这个文件夹下。
For long running production systems ZooKeeper storage must be managed externally (dataDir and logs).
修改后的zoo.cfg如下:
# The number of milliseconds of each tick
tickTime=2000
# The number of ticks that the initial
# synchronization phase can take
initLimit=10
# The number of ticks that can pass between
# sending a request and getting an acknowledgement
syncLimit=5
# the directory where the snapshot is stored.
# do not use /tmp for storage, /tmp here is just
# example sakes.
# dataDir=/tmp/zookeeper
# 数据文件夹
dataDir=/usr/zookeeper-3.4.14/data
# 日志文件夹
dataLogDir=/usr/zookeeper-3.4.14/logs
# the port at which the clients will connect
clientPort=2181
# the maximum number of client connections.
# increase this if you need to handle more clients
#maxClientCnxns=60
#
# Be sure to read the maintenance section of the
# administrator guide before turning on autopurge.
#
# http://zookeeper.apache.org/doc/current/zookeeperAdmin.html#sc_maintenance
#
# The number of snapshots to retain in dataDir
#autopurge.snapRetainCount=3
# Purge task interval in hours
# Set to "0" to disable auto purge feature
#autopurge.purgeInterval=1进入ZooKeeper的bin目录:
[root@instance-e5cf5719 zookeeper-3.4.14]# cd bin/
[root@instance-e5cf5719 bin]# ls
README.txt zkCleanup.sh zkCli.cmd zkCli.sh zkEnv.cmd zkEnv.sh zkServer.cmd zkServer.sh zkTxnLogToolkit.cmd zkTxnLogToolkit.sh zookeeper.out启动ZooKeeper:
./zkServer.sh start成功启动如下图所示:

可以查看ZooKeeper的状态:
./zkServer.sh status状态信息如下图所示:

可以通过help看看./zkServer.sh下的命令
[root@instance-e5cf5719 bin]# ./zkServer.sh help
ZooKeeper JMX enabled by default
Using config: /usr/zookeeper-3.4.14/bin/../conf/zoo.cfg
Usage: ./zkServer.sh {start|start-foreground|stop|restart|status|upgrade|print-cmd}进行连接:
./zkCli.sh -server 127.0.0.1:2181即
./zkCli.sh -server <ip>:<port>结果如下:

可以通过help获取更多的相关命令:
[zk: 127.0.0.1:2181(CONNECTED) 0] help
ZooKeeper -server host:port cmd args
    stat path [watch]
    set path data [version]
    ls path [watch]
    delquota [-n|-b] path
    ls2 path [watch]
    setAcl path acl
    setquota -n|-b val path
    history
    redo cmdno
    printwatches on|off
    delete path [version]
    sync path
    listquota path
    rmr path
    get path [watch]
    create [-s] [-e] path data acl
    addauth scheme auth
    quit
    getAcl path
    close
connect host:port| 命令 | 描述 |
|---|---|
| help | 显示所有操作命令 |
| stat | 查看节点状态,即判断节点是否存在 |
| set | 更新节点数据 |
| get | 获取节点数据 |
| ls path [watch] | 使用 ls 命令来查看当前znode的内容 |
| create | 普通创建 ; -s 含有序列;-e 临时(重启或者超时消失) |
| delete | 删除节点 |
| rmr | 递归删除节点 |
可以对相关的命令进行一些简单的测试,先创建一个新znode(运行create /zk_test my_data ),里面附带的信息为“my_data”.
[zk: 127.0.0.1:2181(CONNECTED) 1] create /zk_test my_data
Created /zk_test
[zk: 127.0.0.1:2181(CONNECTED) 2] ls /
[zookeeper, zk_test]可以看到zk_test创建成功了。可以通过get命令看看zk_test节点里的信息:
[zk: 127.0.0.1:2181(CONNECTED) 3] get /zk_test
my_data
cZxid = 0x7
ctime = Thu Dec 05 16:32:20 CST 2019
mZxid = 0x7
mtime = Thu Dec 05 16:32:20 CST 2019
pZxid = 0x7
cversion = 0
dataVersion = 0
aclVersion = 0
ephemeralOwner = 0x0
dataLength = 7
numChildren = 0通过set可以修改zk_test里的信息。
[zk: 127.0.0.1:2181(CONNECTED) 4] set /zk_test junk
cZxid = 0x7
ctime = Thu Dec 05 16:32:20 CST 2019
mZxid = 0x8
mtime = Thu Dec 05 16:37:03 CST 2019
pZxid = 0x7
cversion = 0
dataVersion = 1
aclVersion = 0
ephemeralOwner = 0x0
dataLength = 4
numChildren = 0
[zk: 127.0.0.1:2181(CONNECTED) 5] get /zk_test
junk
cZxid = 0x7
ctime = Thu Dec 05 16:32:20 CST 2019
mZxid = 0x8
mtime = Thu Dec 05 16:37:03 CST 2019
pZxid = 0x7
cversion = 0
dataVersion = 1
aclVersion = 0
ephemeralOwner = 0x0
dataLength = 4
numChildren = 0通过delete可以删除节点。
[zk: 127.0.0.1:2181(CONNECTED) 6] delete /zk_test
[zk: 127.0.0.1:2181(CONNECTED) 7] ls /
[zookeeper]我们搭建3个ZooKeeper来构建伪集群。上面我们已经搭建了zookeeper-3.4.14,现在将它复制两份,命名为zookeeper-3.4.14-1,zookeeper-3.4.14-2。
[root@instance-e5cf5719 usr]# cp -r zookeeper-3.4.14 zookeeper-3.4.14-1
[root@instance-e5cf5719 usr]# cp -r zookeeper-3.4.14 zookeeper-3.4.14-2此时3个ZooKeeper文件是一模一样的,构建伪集群需要对每个ZooKeeper的配置文件做一点小修改。
对3个ZooKeeper中/conf/zoo.cfg进行修改,主要是修改3个位置:端口号、日志路径、集群配置。


在zoo.cfg配置中,添加了一组server配置,表示ZooKeeper集群中有3个节点,server的配置格式如下:
server.<myid>=<IP>:<Port1>:<Port2>myid:是节点的编号,该编号的取值范围是1-255之间的整数,且在集群中必须唯一。IP:表示节点所在的IP地址,如在本地环境为127.0.0.1或localhost。Port1:leader节点与follower节点进行心跳检测与数据同步时所使用的端口。Port2:在进行leader选举的过程中,用于投票通信的端口。如果是伪集群的配置方式,由于 ip 都是一样,所以不同的 Zookeeper 实例通信端口号不能一样,要给它们分配不同的端口号。
在每个ZooKeeper文件的/data目录下分别创建一个myid文件,myid文件里只需有服务器编号(如1,2, 3)。
分别启动三个ZooKeeper服务(开启3个窗口来启动服务)。
结果如下:
[root@instance-e5cf5719 bin]# ./zkServer.sh start
ZooKeeper JMX enabled by default
Using config: /usr/zookeeper-3.4.14/bin/../conf/zoo.cfg
Starting zookeeper ... STARTED
[root@instance-e5cf5719 bin]# ./zkServer.sh status
ZooKeeper JMX enabled by default
Using config: /usr/zookeeper-3.4.14/bin/../conf/zoo.cfg
Mode: follower[root@instance-e5cf5719 bin]# ./zkServer.sh start
ZooKeeper JMX enabled by default
Using config: /usr/zookeeper-3.4.14-1/bin/../conf/zoo.cfg
Starting zookeeper ... STARTED
[root@instance-e5cf5719 bin]# ./zkServer.sh status
ZooKeeper JMX enabled by default
Using config: /usr/zookeeper-3.4.14-1/bin/../conf/zoo.cfg
Mode: leader[root@instance-e5cf5719 bin]# ./zkServer.sh start
ZooKeeper JMX enabled by default
Using config: /usr/zookeeper-3.4.14-2/bin/../conf/zoo.cfg
Starting zookeeper ... STARTED
[root@instance-e5cf5719 bin]# ./zkServer.sh status
ZooKeeper JMX enabled by default
Using config: /usr/zookeeper-3.4.14-2/bin/../conf/zoo.cfg
Mode: follower通过查看状态可以看到zookeeper-3.4.14-1是leader,zookeeper-3.4.14和zookeeper-3.4.14-2是follower。
可以参考官网的架构图来辅助理解。

将zookeeper-3.4.14-1停掉,来观察下leader的重新选举。
[root@instance-e5cf5719 bin]# ./zkServer.sh stop
ZooKeeper JMX enabled by default
Using config: /usr/zookeeper-3.4.14-1/bin/../conf/zoo.cfg
Stopping zookeeper ... STOPPED
分别查看zookeeper-3.4.14和zookeeper-3.4.14-2的状态。
[root@instance-e5cf5719 bin]# ./zkServer.sh status
ZooKeeper JMX enabled by default
Using config: /usr/zookeeper-3.4.14/bin/../conf/zoo.cfg
Mode: follower
[root@instance-e5cf5719 bin]# ./zkServer.sh status
ZooKeeper JMX enabled by default
Using config: /usr/zookeeper-3.4.14-2/bin/../conf/zoo.cfg
Mode: leader可以看到zookeeper-3.4.14-2成为了leader。
集群模式搭建跟伪集群非常相似,只是集群的ZooKeeper是部署在不同的机器,伪集群的ZooKeeper是部署在同一台机器,在对/conf/zoo.cfg进行修改时,因为是不同的机器(ip不同),可以不用修改端口号。除了这一点差别外,其它的搭建方式跟伪集群一模一样,就不做多介绍了。
至此我们完成ZooKeeper单机版、伪集群和集群环境的搭建。在生产环境上为了确保ZooKeeper的高可用,务必要搭建集群环境。
【ZooKeeper系列】1.ZooKeeper单机版、伪集群和集群环境搭建
标签:简单的 node 它的 现在 class 软件的安装 apach 格式 命令行
原文地址:https://www.cnblogs.com/heyonggang/p/12048060.html