标签:调试 jpeg 信号 cte 开发人员 rlimit val one 正则表达式
1、ls /apps/nginx/: html是测试页,sbin是主程序
2、ls /apps/nginx/sbin/: nginx 只有一个程序文件
3、ls /apps/nginx/html/: 50x.html index.html 测试网页
?nginx:默认为启动nginx
-h 查看帮助选项
-V 查看版本和配置选项
-t 测试nginx语法错误
-c filename 指定配置文件(default: /etc/nginx/nginx.conf)
-s signal 发送信号给master进程,signal:stop, quit, reopen, reload
示例: nginx -s stop 停止nginx
nginx -s reload 加载配置文件
-g directives 在命令行中指明全局指令
配置文件的组成部分:
主配置文件:nginx.conf
子配置文件 include conf.d/*.conf
fastcgi, uwsgi,scgi等协议相关的配置文件
mime.types:支持的mime类型
主配置文件的配置指令:
directive value [value2 ...];
注意:
(1) 指令必须以分号结尾
(2) 支持使用配置变量
       内建变量:由Nginx模块引入,可直接引用
       自定义变量:由用户使用set命令定义
          set variable_name value;
       引用变量:$variable_name
?主配置文件结构:四部
?main block:主配置段,即全局配置段,对http,mail都有效
event {
...
} 事件驱动相关的配置
?http {
...
} http/https 协议相关配置段
?mail {
...
} mail 协议相关配置段
?stream {
...
} stream 服务器相关配置段
Main 全局配置段常见的配置指令分类
正常运行必备的配置
优化性能相关的配置
用于调试及定位问题相关的配置
事件驱动相关的配置
帮助文档
http://nginx.org/en/docs/
http://tengine.taobao.org/nginx_docs/cn/docs/
正常运行必备的配置:
user nginx
指定worker进程的运行身份,如组不指定,默认和用户名同名
Default: user nobody nobody;默认值是nobody,yum源安装过程中会自动指定--user=ngxin,--group=nginx。
模块加载配置文件: /usr/share/nginx/modules/*.conf
指明要装载的动态模块路径: /usr/lib64/nginx/modules
1、worker_processes 4(根据进程数修改数字) | auto; 启动work工作进程数量,worker进程的数量;通常应该为当前主机的cpu的物理核心数
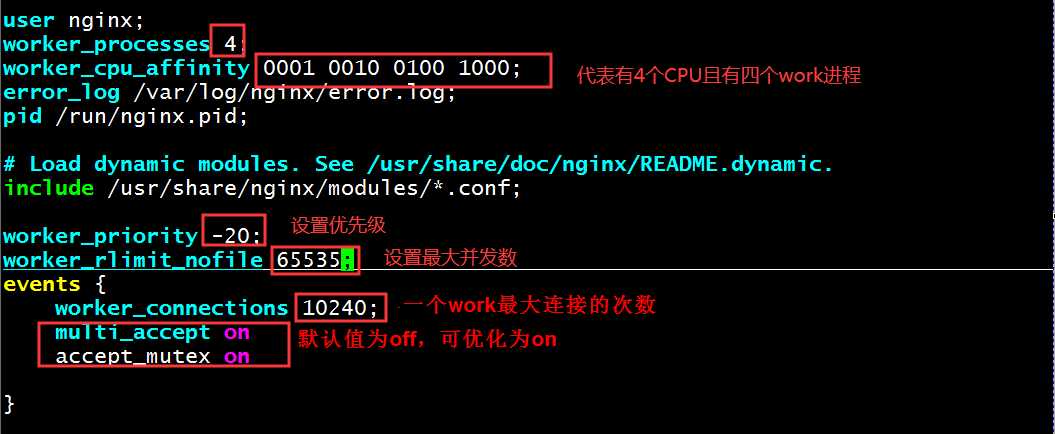
2、worker_cpu_affinity 00000001 00000010 00000100 00001000; #将Nginx工作进程绑定到指定的CPU核心(当前代表的是8个CPU,4个work的意思),默认Nginx是不进行进程绑定的,绑定并不是意味着当前nginx进程独占用一核心CPU,但是可以保证此进程不会运行在其他核心上,这就极大减少了nginx的工作进程在不同的cpu核心上的来回跳转,减少了CPU对进程的资源分配与回收以及内存管理等,因此可以有效的提升nginx服务器的性能。简单来说就是提高缓存命中率。
CPU MASK:
00000001:0号CPU
00000010:1号CPU
10000000:7号CPU
3、worker_priority 0;指定worker进程的nice值,设定worker进程优先级:[-20,19],默认值是0。
4、worker_rlimit_nofile 65535; 这个数字包括Nginx的所有连接(例如与代理服务器的连接等),而不仅仅是与客户端的连接,另一个考虑因素是实际的并发连接数不能超过系统级别的最大打开文件数的限制。
注意:所有worker进程能打开的文件数量上限,最好与ulimit -n 的值保持一致,如65535
示例:
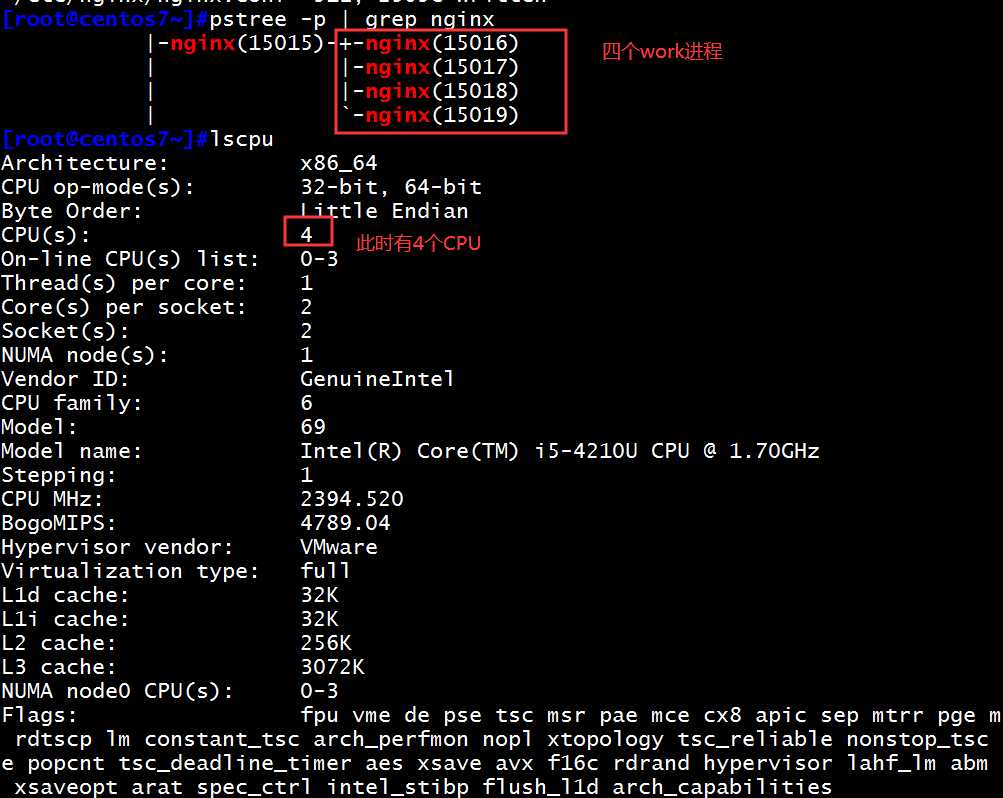
查看当前有多少个CPU,和多少个work进程。
将nginx绑定在指定的CPU核心上,此配置在全局配置处修改。
查看此时CPU绑定效果,此时一个nginx进程绑定一个CPU。
[root@centos7~]#ps axo pid,cmd,psr |grep nginx
 14190 vim nginx.conf                0
 15015 nginx: master process nginx   3
 15016 nginx: worker process         2
 15017 nginx: worker process         0
 15018 nginx: worker process         1
 15019 nginx: worker process         0
 15202 grep --color=auto nginx       3

events {
...
}
?worker_connections #;
每个worker进程所能够打开的最大并发连接数,如10240,总最大并发数:worker_processes * worker_connections,如果此时设置过大,服务器无法承受用户访问的并发量,会导致服务器瘫痪,用户无法访问,如果限制并发数,起到限流作用。
use method;指明并发连接请求的处理方法,默认自动选择最优方法,默认就是epoll的IO模型,windows只支持select。
示例:use epoll;指定使用什么类型的IO模型
处理新的连接请求的方法;on指由各个worker轮流处理新请求,Off指每个新请求的到达都会通知(唤醒)所有的worker进程,但只有一个进程可获得连接,造成“惊群”,影响性能,默认值为off,可优化为on。
accept_mutex on;
此指令默认为off,即默认为一个worker进程只能一次接受一个新的网络连接, on表示每个woker进程可以同时接受所有新的网络连接,默认值是off,可以优化为on。
multi_accept on;
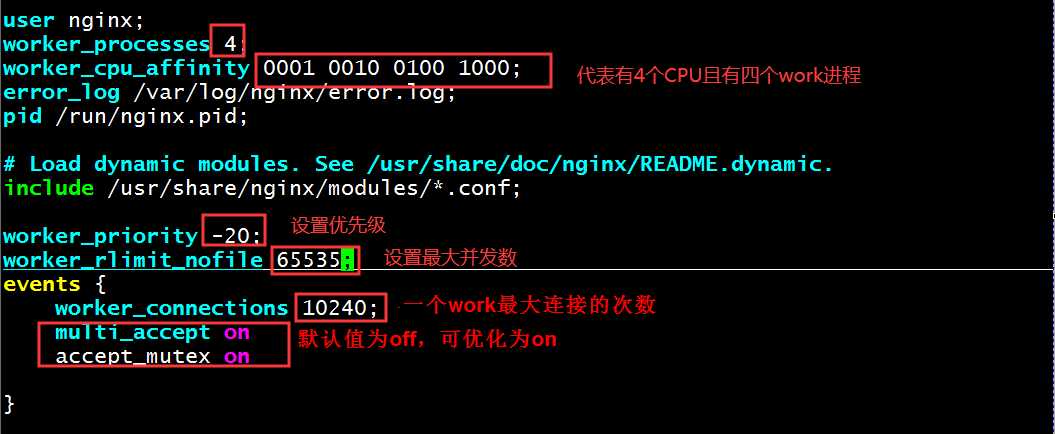
总结:对nginx参数可做优化的选项如下;
1、worker_processes number | auto;worker进程的数量;通常应该为当前主机的cpu的物理核心数。
2、worker_cpu_affinity auto [cpumask] 0001 0010 0100 1000 (目前是4个CPU) 提高缓存命中率,有几个物理CPU,将Nginx工作进程绑定到指定的CPU核心。
3、worker_connections #;每个worker进程所能够打开的最大并发连接数,如10240,总最大并发数:worker_processes * worker_connections
4、accept_mutex on | off;处理新的连接请求的方法;on指由各个worker轮流处理新请求,Off指每个新请求的到达都会通知(唤醒)所有的worker进程,但只有一个进程可获得连接,造成“惊群”,影响性能,默认值为off,可优化为on。
5、multi_accept on|off; 此指令默认为off,即默认为一个worker进程只能一次接受一个新的网络连接, on表示每个woker进程可以同时接受所有新的网络连接
?1、daemon on|off; 是否以守护进程方式运行,默认是on,即守护进程方式,off 用于调试或docker环境,如果设置为off,就是以前台方式运行,方便调试。
?2、master_process on|off;是否以master/worker模型运行nginx,默认为on,当指定off 将不启动worker
?3、error_log file [level] ;错误日志文件及其级别;出于调试需要,可设定为debug;但debug仅在编译时使用了“--with-debug”选项时才有效
错误日志默认在此路径下:error_log /var/log/nginx/error.log;
http协议的相关配置:
http {
... ...
server {
   ...
  server_name
  root
  location [OPERATOR] /uri/ {
   ...
    }
    }
   server {
   ...
  }
}
在响应报文中将指定的文件扩展名映射至MIME对应的类型
include /etc/nginx/mime.types;
除上面指定的类型外,就为默认的MIME类型,浏览器一般会提示下载
default_type application/octet-stream;
types {
text/html html;
image/gif gif;
image/jpeg jpg;
}
MIME参考文档:
https://developer.mozilla.org/zh-CN/docs/Web/HTTP/Basics_of_HTTP/MIME_Types
在keepalived模式下的连接是否启用TCP_NODELAY选项,即Nagle算法,当为off时,延迟发送,每发送一个包就需要确认ACK,才发送下一个包。推荐使用on选项,不进行延迟发送。
默认On时,不延迟发送,多个包才确认一次。
可用于:http, server, location
tcp_nodelay on | off;
在开启sendfile,on时合并响应头和数据体在一个包中一起发送
tcp_nopush on | off ;
是否启用sendfile功能,在内核中封装报文直接发送,默认Off
sendfile on | off;
是否在响应报文中的Content-Type显示指定的字符集,默认off不显示
charset | off;
是否在响应报文的Server首部显示nginx版本,默认是on,显示版本的所有信息,不安全,推荐设置为off,只显示报文头部信息。
server_tokens on | off | build | string;
如果想自定义响应报文的nginx版本信息,需要修改源码文件,重新编译。
如果server_tokens on,修改 src/core/nginx.h 修改第13-14行,如下示例
#define NGINX_VERSION "1.68.9"
#define NGINX_VER "wanginx/" NGINX_VERSION
如果server_tokens off,修改 src/http/ngx_http_header_filter_module.c
第49行,如下示例:
static char ngx_http_server_string[] = "Server: nginx" CRLF;
把其中的nginx改为自己想要的文字即可,如:wanginx
在源码编译中指定的版本中修改:vim /usr/local/src/nginx-1.16.1/src/core/nginx.h

ngx_http_core_module 所依赖的模块
与套接字相关的配置:
server { ... }
配置一个虚拟主机
server {
    listen address[:PORT]|PORT;
    server_name SERVER_NAME;
    root /PATH/TO/DOCUMENT_ROOT;
}
listen PORT|address[:port]|unix:/PATH/TO/SOCKET_FILE 监听端口
listen address[:port] [default_server] [ssl] [http2 | spdy] [backlog=number] [rcvbuf=size] [sndbuf=size]; 监听地址
default_server 设定为默认虚拟主机,无法匹配虚拟主机时使用
ssl 限制仅能够通过ssl连接提供服务
backlog=number 超过并发连接数后,新请求进入后援队列的长度
rcvbuf=size 接收缓冲区大小
sndbuf=size 发送缓冲区大小
注意:
(1) 基于port;
listen PORT; 指令监听在不同的端口
(2) 基于ip的虚拟主机
listen IP:PORT; IP 地址不同
(3) 基于hostname
server_name fqdn; 指令指向不同的主机名
server_name name ...;
虚拟主机的主机名称后可跟多个由空白字符分隔的字符串
支持*通配任意长度的任意字符
server_name *.magedu.com www.magedu.*
支持~起始的字符做正则表达式模式匹配,性能原因慎用
server_name ~^www\d+\.magedu\.com$
说明: \d 表示 [0-9]
匹配优先级机制从高到低
(1) 首先是字符串精确匹配 如:www.magedu.com
(2) 左侧*通配符 如:*.magedu.com
(3) 右侧*通配符 如:www.magedu.*
(4) 正则表达式 如: ~^.*\.magedu\.com$
(5) default_server
定义路径相关的配置
root
设置web资源的路径映射;用于指明请求的URL所对应的文档的目录路径,可用于http, server, location, if in location
server {
...
root /data/www/vhost1;
}
示例
http://www.magedu.com/images/logo.jpg  访问页面
    --> /data/www/vhosts/images/logo.jpg  实际访问的是此路径的文件
location [ = | ~ | ~* | ^~ ] uri { ... }
location @name { ... }
在一个server中location配置段可存在多个,用于实现从uri到文件系统的路径映射;ngnix会根据用户请求的URI来检查定义的所有location,并找出一个最佳匹配,而后应用其配置。
root:指定web的家目录,在定义location的时候,文件的绝对路径等于 root+location,如:
server {
listen 80;
server_name www.magedu.net;
  location / {
    root /data/nginx/html/pc;
  }
  location /about {
    root /data/nginx/html/pc; #必须要在pc目录中创建一个about目录才可以访问,否则报错。
    index index.html;
  }
}
[root@s2 ~]# mkdir /data/nginx/html/pc/about
[root@s2 ~]# echo about > /data/nginx/html/pc/about/index.html
在没有使用正则表达式的时候,nginx会先在server中的多个location选取匹配度最高的一个uri,uri是用户请求的字符串,即域名后面的web文件路径,然后使用该location模块中的正则url和字符串,如果匹配成功就结束搜索,并使用此location处理此请求。
语法规则: location [=|~|~*|^~] /uri/ { … }


= #用于标准uri前,需要请求字串与uri精确匹配,如果匹配成功就停止向下匹配并立即处理请求。
~ #表示包含正则表达式并且区分大小写
~* #表示包含正则表达式并且不区分大写
!~ #表示包含正则表达式并且区分大小写不匹配
!~* #表示包含正则表达式并且不区分大小写不匹配
^~ #表示包含正则表达式并且匹配以什么开头
$ #表示包含正则表达式并且匹配以什么结尾
\ #表示包含正则表达式并且转义字符。可以转. * ?等
* #表示包含正则表达式并且代表任意长度的任意字符
匹配优先级从高到低:
=, ^~, ~/~*, 不带符号
示例:各location对应的优先级:
location = / {                        A:http://www.magedu.com/  此行对应A选项
[ configuration A ]
}


location / {                          B:http://www.magedu.com/index.html  此行对应B选项
[ configuration B ]
}


location /documents/ {                E:http://www.magedu.com/documents/logo.jpg  此行对应E选项
[ configuration C ]
}


location ^~ /images/ {                C:http://www.magedu.com/documents/linux.txt   此行对应C选项
[ configuration D ]
}


location ~* \.(gif|jpg|jpeg)$ {       D: http://www.magedu.com/images/logo.jpeg    此行对应D选项
[ configuration E ]
}
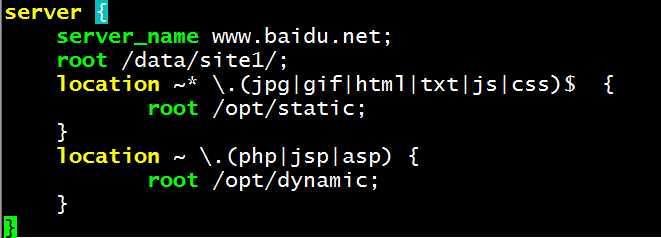
在配置文件中修改:vim /etc/nginx/conf.d/test.conf
server {
    server_name www.baidu.net;
    root /data/site1/;
    location ~* \.(jpg|gif|html|txt|js|css)$  {
           root /opt/static;
    }
    location ~ \.(php|jsp|asp) {
           root /opt/dynamic;
    }
}
路径别名,文档映射的另一种机制;仅能用于location上下文
http://www.magedu.com/bbs/index.html
location /bbs { 注意: /bbs 后建议不要加 /
    alias /web/forum;
} --> /web/forum/index.html  实际访问的此文件路径
location /bbs/ {
   root /web/forum/;
} --> /web/forum/bbs/index.html
注意:location中使用root指令和alias指令的意义不同
(a) root,给定的路径对应于location中的/uri 左侧的/
(b) alias,给定的路径对应于location中的/uri 的完整路径
alias定义路径别名,会把访问的路径重新定义到其指定的路径,如下示例:
server {
listen 80;
server_name www.magedu.net;
location / {
   root /data/nginx/html/pc;
}
#使用alias的时候uri后面如果加了斜杠则下面的路径配置必须加斜杠,否则403

location /about {
#当访问about时,访问alias定义的/opt/nginx/html/pc内容
alias /opt/nginx/html/pc;
   index index.html;
   }
}
A主机:192.168.37.27
B主机:192.168.37.17
1、在nginx服务器的目录下设置alias别名路径。
[root@centos27~]#vim /etc/nginx/conf.d/test.conf  在此目录下进行创建nginx别名
server {
    server_name www.baidu.net;
    location ~ \.(php|jsp|asp) {
           root /opt/dynamic;
    }
    location /about {
           alias /opt/testdir; 定义路径别名,对应about目录后面最都不要加/
    }
}
启动nginx服务:nginx或者systemctl start nginx
2、在nginx服务器上新建index.html文件
[root@centos27~]#mkdir /opt/testdir/about -pv   新建一个about目录
[root@centos27~]#echo /opt/testdir/about/index.html > /opt/testdir/about/index.html  在about目录下新建一个index.html文件
[root@centos27~]#echo /opt/testdir/index.html > /opt/testdir/index.html  在testdir目录下新建一个index.html文件
3、在客户端的hosts配置文件中加上域名解析。
[root@centos17~]#vim /etc/hosts
192.168.37.27 www.baidu.net

4、访问nginx服务器about目录下默认的index.html文件,此时实际访问的是别名目录下的index.html文件。
[root@centos17~]#curl www.baidu.net/about/  实际访问的是about目录下的文件
/opt/testdir/index.html   实际访问的是testdir目录下的文件
1、在nginx服务器上创建一个虚拟服务,并启动nginx服务。
[root@centos27~]#vim /etc/nginx/conf.d/test.conf
server {
    server_name www.baidu.net;
    location /about {
           root /opt/testdir/; 指定目录,寻找默认文件会在about目录下寻找。
           index test.html;
    }
}
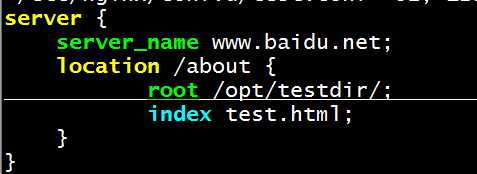
2、在nginx服务器上创建默认的test.html文件。
[root@centos27~]#echo /opt/testdir/about/test.html > /opt/testdir/about/test.html
3、在客户端访问about目录,此时就会访问创建的默认test.html文件。
[root@centos17~]#curl www.baidu.net/about/
/opt/testdir/about/test.html
1、在nginx服务器新建一个错误虚拟主机
[root@centos27site1]#vim /etc/nginx/conf.d/test.conf
server {
    server_name www.baidu.net;
    root /data/site1;
    error_page 500 502 503 404 /error.html;
           location = /error.html {
    }
}
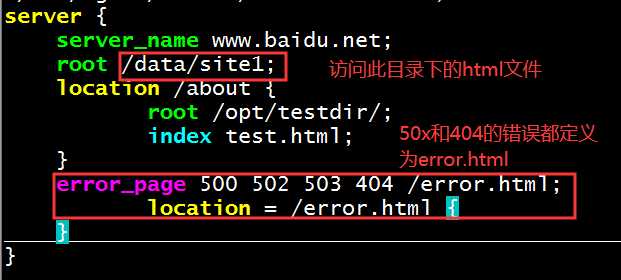
2、nginx的/data/site1目录下新建对应的错误文件。
[root@centos27site1]#cd /data/site1
[root@centos27site1]#echo baidu 500.html >  error.html
[root@centos27site1]#echo baidu 502.html >>  error.html
[root@centos27site1]#echo baidu 503.html >>  error.html
[root@centos27site1]#echo baidu 504.html >>  error.html
3、在客户端访问错误的html文件,就会显示对应的错误信息。
[root@centos17~]#curl www.baidu.net/xxx.html
baidu 500.html
baidu 502.html
baidu 503.html
baidu 504.html
我们可以将错误的404信息进行重定向为200 OK的响应,此时访问的网页就不会被拦截,只会提示报错。
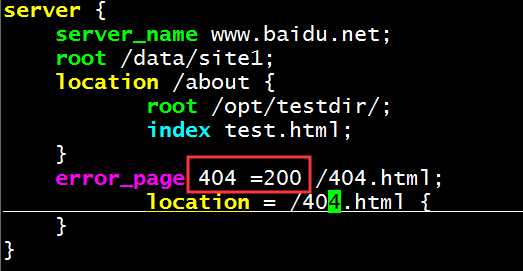
生产中案例:
listen 80;
server_name www.magedu.net;
error_page 500 502 503 504 404 /error.html;
    location = /error.html {
    root /data/nginx/html;
}
try_files file ... uri;
try_files file ... =code;
按顺序检查文件是否存在,返回第一个找到的文件或文件夹(结尾加斜线表示为文件夹),如果所有文件或文件夹都找不到,会进行一个内部重定向到最后一个参数。只有最后一个参数可以引起一个内部重定向,之前的参数只设置内部URI的指向。最后一个参数是回退URI且必须存在,否则会出现内部500错误。
location /images/ {
try_files $uri /images/default.jpg;
     } 说明:/images/default.jpg 为 URI
location / {
     try_files $uri $uri/index.html $uri.html =404;
}
1、在nginx服务端创建一个判断文件为空的虚拟机
vim /etc/nginx/conf.d/test.conf
server {
    server_name www.baidu.net;
    location /images {
           alias /data/images;
     try_files  $uri /images/default.jpg;  在指定的uri寻找文件,此时如果找不到就会默认寻找默认文件
     #try_files  $uri $uri/default.jpg;
    }
}
2、在nginx服务器端新建几个文件,作为测试,如果访问的页面不存在,就会返回指定的默认文件。
[root@centos27site1]#mkdir /data/images
[root@centos27site1]#echo www.a.jgp> /data/images/default.jpg
[root@centos27site1]#echo www.default.jgp> /data/images/default.jpg
[root@centos27site1]#echo www.a.jpg > /data/images/a.jpg
[root@centos27site1]#echo www.b.jpg > /data/images/b.jpg
3、在客户端进行测试效果。
[root@centos17~]#curl www.baidu.net/images/xxx.jpg  当输入不存在的文件时,就会返回默认的文件
www.default.jgp
[root@centos17~]#curl www.baidu.net/images/b.jpg
www.b.jpg
[root@centos17~]#curl www.baidu.net/images/a.jpg
www.a.jpg
[root@centos17~]#curl www.baidu.net/images/xxx.jpg
www.default.jgp
也可以自定义状态:
vim /etc/nginx/conf.d/test.conf
server {
    server_name www.baidu.net;
    location /images {
           alias /data/images;
     #try_files  $uri /images/default.jpg;   此处的uri对应的是/images/default.jpg路径
     try_files  $uri $uri/default.jpg =598;   自定义错误状态598,
    }
}
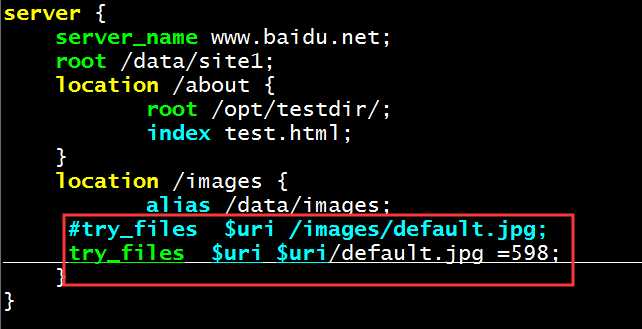
删除nginx服务端默认的default.jpg文件。
[root@centos27images]#rm -rf default.jpg
在客户端进行访问,此时由于没有默认的default.jpg文件,就会返回自定义的错误状态码。
[root@centos17~]#curl -I www.baidu.net/images/xxx.jpg
HTTP/1.1 598   错误状态码 598
Server: nginx/1.16.1
Date: Thu, 12 Dec 2019 04:31:37 GMT
Content-Length: 0
Connection: keep-alive
Keep-Alive: timeout=65
设定保持连接超时时长,0表示禁止长连接,默认为75s
?keepalive_timeout timeout [header_timeout];
示例:在响应头显示此首部字段
keepalive_timeout 60 60;
在一次长连接上所允许请求的资源的最大数量,默认为100
keepalive_requests number;
对哪种浏览器禁用长连接
keepalive_disable none | browser ...;
向客户端发送响应报文的超时时长,此处是指两次写操作之间的间隔时长,而非整个响应过程的传输时长
send_timeout time;
指定请求报文中实体的最大值,设为0,则不限制,默认1M,超过报413错误
client_max_body_size size;
用于接收每个客户端请求报文的body部分的缓冲区大小;默认为16k;超出此大小时,其将被暂存到磁盘上的由下面client_body_temp_path指令所定义的位置
client_body_buffer_size size;
设定存储客户端请求报文的body部分的临时存储路径及子目录结构和数量
?client_body_temp_path path [level1 [level2 [level3]]];
目录名为16进制的数字;用hash之后的值从后往前截取第1、2、3级作为文件名
client_body_emp_path /var/tmp/client_body 1 2 2
1 1级目录占1位16进制,即2^4=16个目录 0-f
2 2级目录占2位16进制,即2^8=256个目录 00-ff
2 3级目录占2位16进制,即2^8=256个目录 00-ff

配置示例:
client_max_body_size 10m;
client_body_buffer_size 16k;
client_body_temp_path /apps/nginx/temp 1 2 2; #reload Nginx会自动创建temp目录
对客户端进行限制的相关配置
limit_rate rate;
限制响应给客户端的传输速率,单位是bytes/second,默认值0表示无限制。
实战演示:
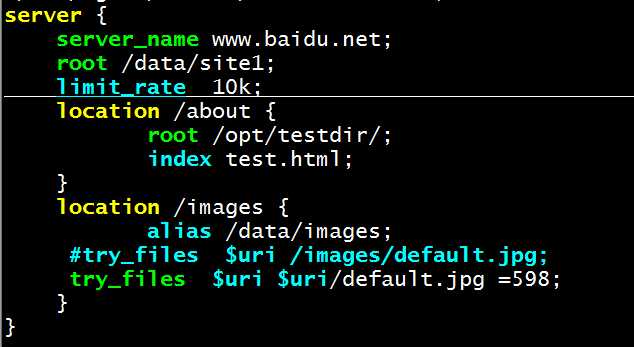
1、在nginx服务器上设置限速问题下载文件,并重启Nginx服务。
vim  /etc/nginx/conf.d/test.conf
server {
    server_name www.baidu.net;
    root /data/site1;
    limit_rate  10k;         限速下载为10kB每秒
    location /about {
           root /opt/testdir/;
           index test.html;
    }
    location /images {
           alias /data/images;
     #try_files  $uri /images/default.jpg;
     try_files  $uri $uri/default.jpg =598;
    }
}
2、在nginx服务端/data/site1目录下新建一个1G大文件。
[root@centos27~]#dd if=/dev/zero  of=/data/f1  bs=1M count=1024
1024+0 records in
1024+0 records out
1073741824 bytes (1.1 GB) copied, 26.4264 s, 40.6 MB/s
3、在客户端进行下载此文件, 此时可以看到文件的下载速度。

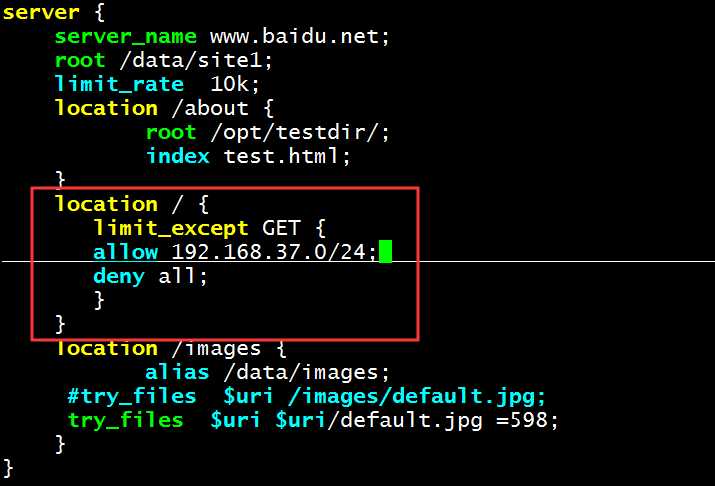
限制客户端使用除了指定的请求方法之外的其它方法
method:GET, HEAD, POST, PUT, DELETE,MKCOL, COPY, MOVE, OPTIONS, PROPFIND, PROPPATCH, LOCK, UNLOCK, PATCH
limit_except GET {
   allow 192.168.1.0/24;
   deny all;
}
除了GET和HEAD 之外其它方法仅允许192.168.1.0/24网段主机使用
示例:
NGINX服务器上配置指令信息。
客户端访问结果:
[root@centos17~]#curl -XOPTIONS -I www.baidu.net
HTTP/1.1 405 Not Allowed    nginx资源不支持此方式(OPTIONS)
Server: nginx/1.16.1
Date: Thu, 12 Dec 2019 07:10:16 GMT
Content-Type: text/html
Content-Length: 157
Connection: keep-alive
Keep-Alive: timeout=65
是否启用aio功能,默认off
aio on | off | threads[=pool];
当文件大于等于给定大小时,同步(直接)写磁盘,而非写缓存,默认off
directio size | off;
示例:
location /video/ {
  sendfile on;
  aio on;
  directio 8m;
}
open_file_cache off;
open_file_cache max=N [inactive=time];
1、nginx可以缓存以下三种信息:
(1) 文件元数据:文件的描述符、文件大小和最近一次的修改时间
(2) 打开的目录结构
(3) 没有找到的或者没有权限访问的文件的相关信息
2、max=N:可缓存的缓存项上限;达到上限后会使用LRU算法实现管理
3、inactive=time:缓存项的非活动时长,在此处指定的时长内未被命中的或命中的次数少于open_file_cache_min_uses指令所指定的次数的缓存项即为非活动项,将被删除
4、是否缓存查找时发生错误的文件一类的信息,默认值为off
open_file_cache_errors on | off;
5、open_file_cache指令的inactive参数指定的时长内,至少被命中此处指定的次数方可被归类为活动项,默认值为1
open_file_cache_min_uses number;
6、缓存项有效性的检查频率,默认值为60s
open_file_cache_valid time;
示例:
open_file_cache max=10000 inactive=6 0s;
open_file_cache_valid 30s;
open_file_cache_min_uses 5;
open_file_cache_errors on;
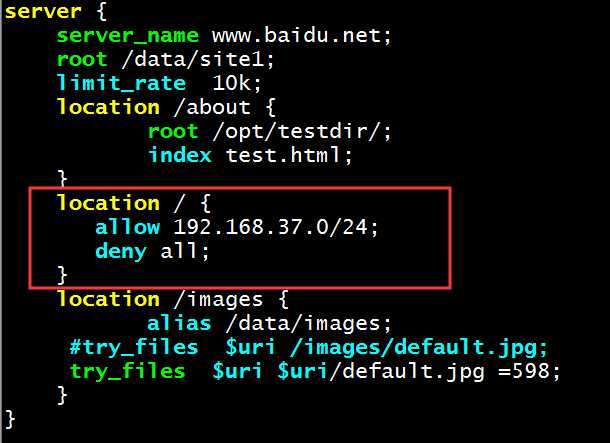
一、ngx_http_access_module模块:可实现基于ip的访问控制功能。
allow address | CIDR | unix: | all;
deny address | CIDR | unix: | all;
http, server, location, limit_except
自上而下检查,一旦匹配,将生效,条件严格的置前
示例:
location = /login/ {
root /data/nginx/html/pc;
}
location /about {
   alias /data/nginx/html/pc;
   index index.html;
   deny 192.168.1.1;
   allow 192.168.1.0/24;
   allow 10.1.1.0/16;
   allow 2001:0db8::/32;
   deny all; #先允许小部分,再拒绝大部分
}
二、ngx_http_auth_basic_module模块:实现基于用户的访问控制,使用basic机制进行用户认证
?auth_basic string | off;
?auth_basic_user_file file;
location /admin/ {
auth_basic "Admin Area";
auth_basic_user_file /etc/nginx/.ngxpasswd;
}
用户口令文件:
1、明文文本:格式name:password:comment
2、加密文本:由htpasswd命令实现
httpd-tools所提供
1、在nginx服务端安装httpd-tools包
[root@centos27~]#yum install httpd-tools -y
2、nginx服务端,创建文件的用户名和密码
[root@centos27~]#htpasswd -b -c  /etc/nginx/conf.d/.nginx_passwd alice centos  创建alice用户
Adding password for user alice
[root@centos27~]#htpasswd -b /etc/nginx/conf.d/.nginx_passwd bob centos  创建bob用户
Adding password for user bob
3、nginx服务端,创建指定的Index.html文件
[root@centos27~]#mkdir /data/admin
[root@centos27~]#echo /data/admin/index.html > /data/admin/index.html
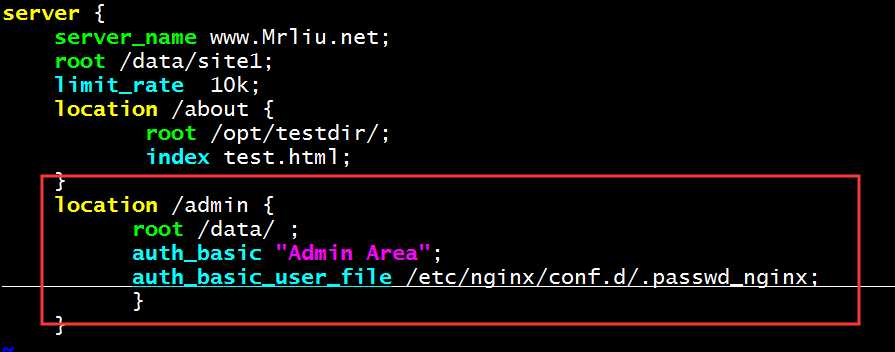
4、修改虚拟主机的配置文件
vim /etc/nginx/conf.d/test.conf
server {
    server_name www.Mrliu.net;
    root /data/site1;
    limit_rate  10k;
    location /about {
           root /opt/testdir/;
           index test.html;
    }
    location /admin {  指定目录文件
          root /data/ ;
          auth_basic "Admin Area";
          auth_basic_user_file /etc/nginx/conf.d/.passwd_nginx;   修改指定的加密文件路径
          }
    }
三、ngx_http_stub_status_module模块
用于输出nginx的基本状态信息, 输出信息示例:
Active connections: 291
server accepts handled requests #下面三个数分别对应accepts,handled,requests
16630948 16630948 31070465
Reading: 6 Writing: 179 Waiting: 106
Active connections:当前状态,活动状态的连接数
accepts:统计总值,已经接受的客户端请求的总数
handled:统计总值,已处理完成的客户端请求总数,一般和accepts相同,除非拒绝
requests:统计总值,客户端发来的总的请求数
Reading:当前状态,正在读取客户端请求报文首部的连接的连接数
Writing:当前状态,正在向客户端发送响应报文过程中的连接数
Waiting:当前状态,正在等待客户端发出请求的空闲连接数
实战演示:
1、在nginx服务端进行设置
vim /etc/nginx/conf.d/test.conf
    server_name www.baidu.net;
    root /data/site1;
    limit_rate  10k;
    location /about {
           root /opt/testdir/;
           index test.html;
    }
    location /admin {
          root /data/ ;
          auth_basic "Admin Area";
          auth_basic_user_file /etc/nginx/conf.d/.passwd_nginx;
          }
    location /nginx_status {
         stub_status;
         allow 127.0.0.1;
         allow 172.16.0.0/16;
         allow 192.168.37.0/24;
         deny all;
        }
}
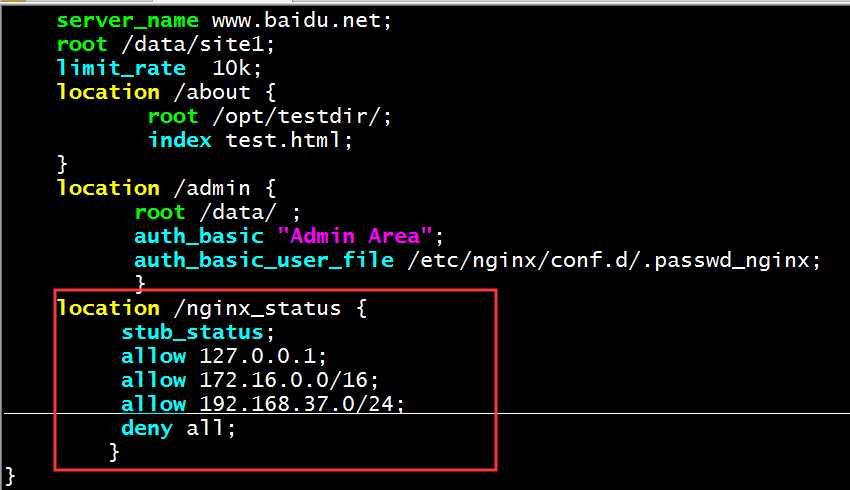
2、客户端访问效果:
[root@centos17~]#curl www.baidu.net/nginx_status
Active connections: 1
server accepts handled requests
 1 1 1
Reading: 0 Writing: 1 Waiting: 0
第三模块是对nginx 的功能扩展,第三方模块需要在编译安装nginx 的时候使用参数--add-module=PATH指定路径添加,有的模块是由公司的开发人员针对业务需求定制开发的,有的模块是开源爱好者开发好之后上传到github进行开源的模块,nginx支持第三方模块,需要重新编译源码才能支持。
开源的echo模块,实现输出变量等信息
https://github.com/openresty/echo-nginx-module
示例:编译安装nginx时,最好下载1.14.2版本,16版本暂时不兼容。
#yum install git –y
#cd /usr/local/src
#git clone https://github.com/openresty/echo-nginx-module.git
#cd nginx-1.14.0/
#useradd –r –s /sbin/nologin nginx
#yum install gcc pcre-devel openssl-devel zlib-devel perl-ExtUtils-Embed
1、安装git包
[root@centos17nginx-1.14.1]#yum install git
2、切换到/usr/loca/src目录下,并对网站进行克隆
[root@centos17src]#cd /usr/local/src
[root@centos17src]#git clone https://github.com/openresty/echo-nginx-module.git  克隆网站链接
Cloning into ‘echo-nginx-module‘...
remote: Enumerating objects: 15, done.
remote: Counting objects: 100% (15/15), done.
remote: Compressing objects: 100% (12/12), done.
remote: Total 3012 (delta 6), reused 7 (delta 3), pack-reused 2997
Receiving objects: 100% (3012/3012), 1.15 MiB | 171.00 KiB/s, done.
Resolving deltas: 100% (1617/1617), done.
[root@centos17src]#ls echo-nginx-module/
config  LICENSE  README.markdown  src  t  util  valgrind.suppress
3、安装依赖的包,并创建系统账号
cd nginx-1.14.0/
useradd –r –s /sbin/nologin nginx
yum install gcc pcre-devel openssl-devel zlib-devel perl-ExtUtils-Embed
4、在解压后的nginx目录下进行编译。
./configure --prefix=/apps/nginx --user=nginx --group=nginx --with-http_ssl_module --with-http_v2_module --with-http_realip_module --with-http_stub_status_module --with-http_gzip_static_module --with-http_perl_module --with-pcre --with-stream --with-stream_ssl_module --with-stream_realip_module --add-module=/usr/local/src/echo-nginx-module
5、最后安装指定的目录文件
[root@centos17nginx-1.14.1]#make -j 4 && make install
示例:
vim /apps/nginx/conf/conf.d/pc.conf
location /test {
index index.html;
  default_type text/html;
   echo "hello world,main-->";
   echo_reset_timer;
   echo_location /sub1;
   echo_location /sub2;
   echo "took $echo_timer_elapsed sec for total.";
}
location /sub1 {
  echo_sleep 1;
  echo sub1;
}
location /sub2 {
  echo_sleep 1;
  echo sub2;
}
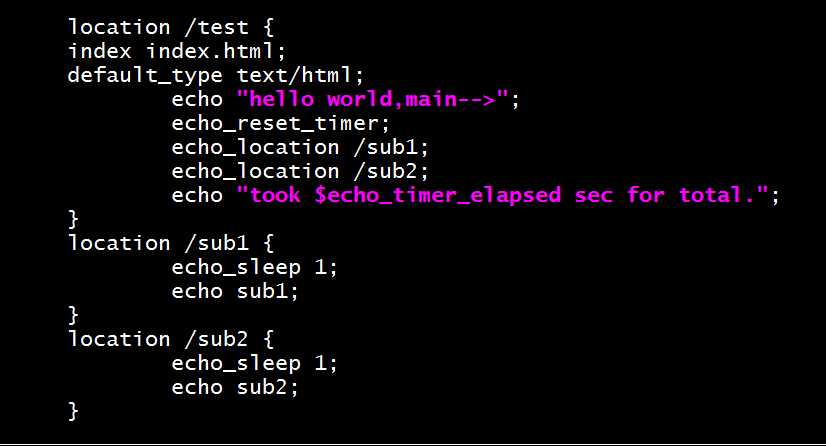
测试结果:

nginx的变量可以在配置文件中引用,作为功能判断或者日志等场景使用,变量可以分为内置变量和自定义变量,内置变量是由nginx模块自带,通过变量可以获取到众多的与客户端访问相关的值
常见内置变量
1、$remote_addr;#存放了客户端的地址,注意是客户端的公网IP
2、$args;#变量中存放了URL中的指令
   http://www.magedu.net/main/index.do?id=090&partner=search
   以上:id=090&partner=search 即为 $args
3、$document_root;#保存了针对当前资源的请求的系统根目录,如/apps/nginx/html
4、$cookie_name; #表示key为 name 的cookie值
5、$document_uri;#保存了当前请求中不包含指令的URI,注意是不包含请求的指令,如http://www.magedu.net/main/index.do?id=090&partner=search会被定义为/main/index.do
6、$host;#存放了请求的host名称
7、$http_user_agent;#客户端浏览器的详细信息
8、$http_cookie;#客户端的cookie信息
9、$limit_rate;#如果nginx服务器使用limit_rate配置了显示网络速率,则会显示,如果没有设置, 则显示0
10、$remote_port;#客户端请求Nginx服务器时客户端随机打开的端口
11、$remote_user;#已经经过Auth Basic Module验证的用户名
12、$request_body_file;#做反向代理时发给后端服务器的本地资源的名称
13、$request_method;#请求资源的方式,GET/PUT/DELETE等
14、$request_filename;#当前请求的资源文件的路径名称,由root或alias指令与URI请求生成的文件绝对路径,如/apps/nginx/html/main/index.html
15、$request_uri;#包含请求参数的原始URI,不包含主机名
   如:main/index.do?id=090&partner=search。
16、$scheme;#请求的协议,如ftp,https,http等
17、$server_protocol;#请求资源的协议版本,如HTTP/.0,HTTP/.,HTTP/.0等
18、$server_addr;#保存了服务器的IP地址
19、$server_name;#请求的服务器的主机名
20、$server_port;#请求的服务器的端口
1、在nginx服务端新建一个echo模块配合变量的文件,并启动nginx服务。
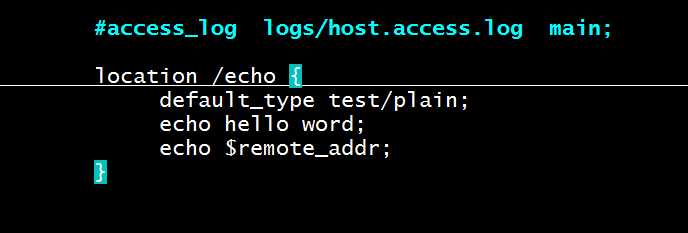
2、在nginx服务端新建一个echo目录,并在echo目录下新建一个test.html文件。
[root@centos17conf]#echo /apps/nginx/conf/echo/test.html > /apps/nginx/conf/echo/index.html
[root@centos17conf]#nginx  -s reload
3、在客户端访问nginx的IP地址,可以看到echo回显的结果,并在屏幕上打印index.html文件结果。
[root@centos27~]#curl 192.168.37.17/echo
hello word
192.168.37.27
挑选了几个自定义变量,就不在一一列举:
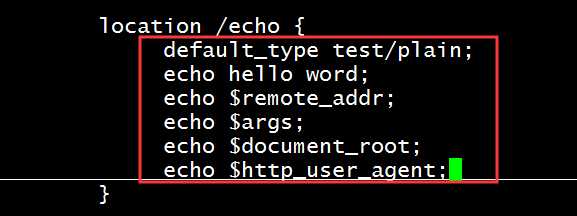
自定义变量名称和值,使用指令 set $variable value
格式如下:
set $variable value;
支持:server, location, if
示例:
set $name magedu;
echo $name;
set $my_port $server_port;
echo $my_port;
echo "$server_name:$server_port";
1、ngx_http_log_module模块:指定日志格式记录请求
2、log_format name string ...;string可以使用nginx核心模块及其它模块内嵌的变量
3、access_log path [format [buffer=size] [gzip[=level]] [flush=time] [if=condition]];
4、access_log off; #禁用访问日志
5、访问日志文件路径,格式及相关的缓冲的配置
buffer=size
flush=time
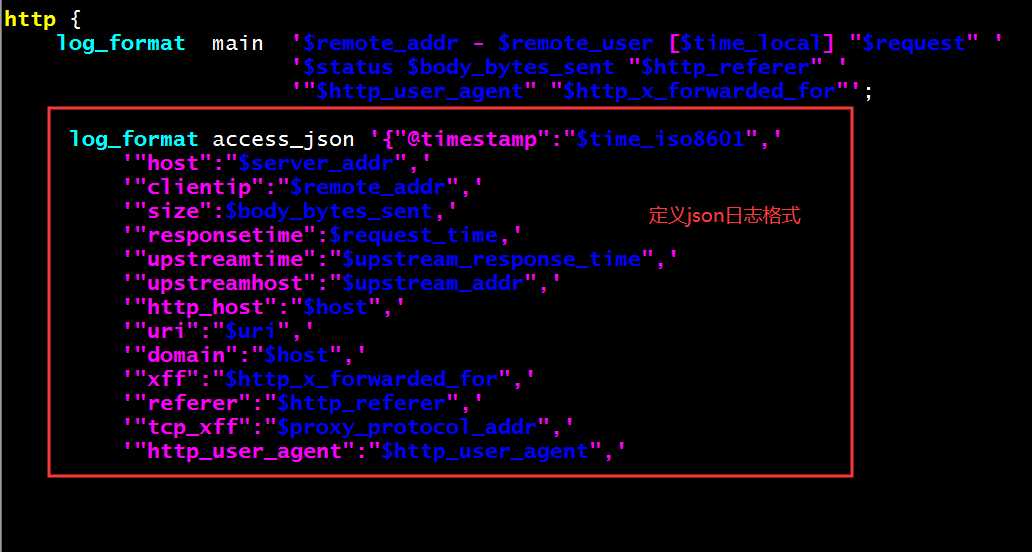
nginx 的默认访问日志记录内容相对比较单一,默认的格式也不方便后期做日志统计分析,生产环境中通常将nginx日志转换为json日志,然后配合使用ELK做日志收集-统计-分析。
1、在rpm包安装的nginx配置文件中定义json日志格式。
log_format access_json ‘{"@timestamp":"$time_iso8601",‘
‘"host":"$server_addr",‘
‘"clientip":"$remote_addr",‘
‘"size":$body_bytes_sent,‘
‘"responsetime":$request_time,‘
‘"upstreamtime":"$upstream_response_time",‘
‘"upstreamhost":"$upstream_addr",‘
‘"http_host":"$host",‘
‘"uri":"$uri",‘
‘"domain":"$host",‘
‘"xff":"$http_x_forwarded_for",‘
‘"referer":"$http_referer",‘
‘"tcp_xff":"$proxy_protocol_addr",‘
‘"http_user_agent":"$http_user_agent",‘
‘"status":"$status"}‘;
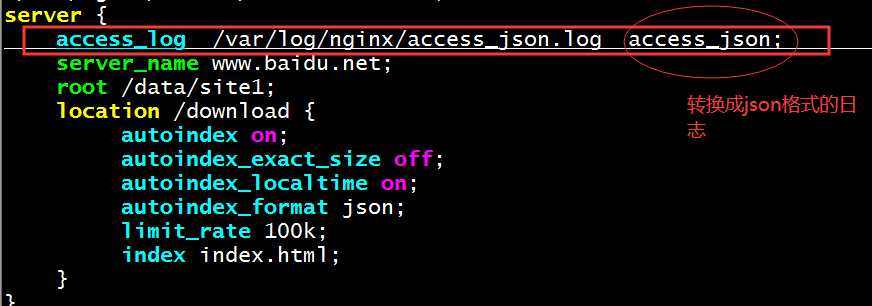
2、在nginx服务器的/etc/nginx/conf.d/test.conf配置文件中指定json日志文件路径。
源码编译安装后的路径:access_log /apps/nginx/logs/access_json.log access_json;
server {
    access_log  /var/log/nginx/access_json.log  access_json;
    server_name www.baidu.net;
    root /data/site1;
}
3、跟踪日志文件tail -f /var/log/nginx/access_json.log

4、当日志文件过大时,我们可以将有用的log日志文件进行备份,然后再进行清理日志,不要删除日志文件,删除的话就要重启nginx,而清空日志,不需要重启,还会继续跟踪日志文件。
[root@centos27site1]#> /var/log/nginx/access_json.log   可以直接重定向清空文件,有些shell类型不支持,那就用下面的方法也可以清空日志
[root@centos27site1]#cat /dev/null > /var/log/nginx/access_json.log  清空日志
cat nginx_json.py
#!/usr/bin/env python
#coding:utf-8
status_200= []
status_404= []
with open("access_json.log") as f:
        for line in f.readlines():
        line = eval(line)
        if line.get("status") == "200":
                status_200.append(line.get)
        elif line.get("status") == "404":
                status_404.append(line.get)
        else:
                print("状态码 ERROR")
f.close()
print "状态码200的有--:",len(status_200)
print "状态码404的有--:",len(status_404)
配置文件下载服务
1、autoindex on | off;自动文件索引功能,默为off
2、autoindex_exact_size on | off; 计算文件确切大小(单位bytes),off 显示大概大小(单位K、M),默认on
3、autoindex_localtime on | off ;显示本机时间而非GMT(格林威治)时间,默认off=
4、autoindex_format html | xml | json | jsonp;显示索引的页面文件风格,默认html
配置文件下载服务生产案例
vim /etc/nginx/conf.d/test.conf
location /download {
  autoindex on;
  autoindex_exact_size off;
  autoindex_localtime on;
  autoindex_format json;
  limit_rate 100k;
  index index.html;
}

2、在nginx服务端的光盘挂载downlaod目录,将光盘的文件挂载到download目录下,方便下载文件。
[root@centos27site1]#mount /dev/sr0 /data/site1/download/
3、此时在客户端上就可以访问www.baidu.net/download,就会访问放光盘挂载的文件信息。

favicon.ico 文件是浏览器收藏网址时显示的图标,当使用浏览器访问页面时,浏览器会自己主动发起请求获取页面的favicon.ico文件,但是当浏览器请求的favicon.ico文件不存在时,服务器会记录404日志,而且浏览器也会显示404报错
?解决方案:
?服务器不记录访问日志:
location = /favicon.ico {
log_not_found off; #文件没发现事件不记录error_log
access_log off; #不记录access_log
}


?将图标保存到指定目录访问:
#location ~ ^/favicon\.ico$ {
location = /favicon.ico {
root /data/nginx/html/pc/images;
}
标签:调试 jpeg 信号 cte 开发人员 rlimit val one 正则表达式
原文地址:https://www.cnblogs.com/struggle-1216/p/12023832.html