标签:pass com hat isa when should possible -name HERE
Data helpers are used to output data from your site. Use this reference list to discover what each handlebars helper can do when building a custom Ghost theme.
The @config property provides access to global data properties, which are available anywhere in your theme.
Specifically @config will pass through the special theme config that is added in the theme‘s package.json so that it can be used anywhere in handlebars.
At the moment, there is only one property which will be passed through:
{{@config.posts_per_page}} – the number of posts per pageStandard usage:
<a href="In the get helper limit field:
Config values can be provided by adding a config block to package.json
{
  "name": "my-theme",
  "version": 1.0.0,
  "author": {
    "email": "my@address.here"
  }
  "config": {
  }
}
Inside of the config block, there is currently a single supported property - posts_per_page.
{
  "name": "my-theme",
  "version": 1.0.0,
  "author": {
    "email": "my@address.here"
  }
  "config": {
    "posts_per_page": 10
  }
}
The @site property provides access to global settings, which are available anywhere in your theme:
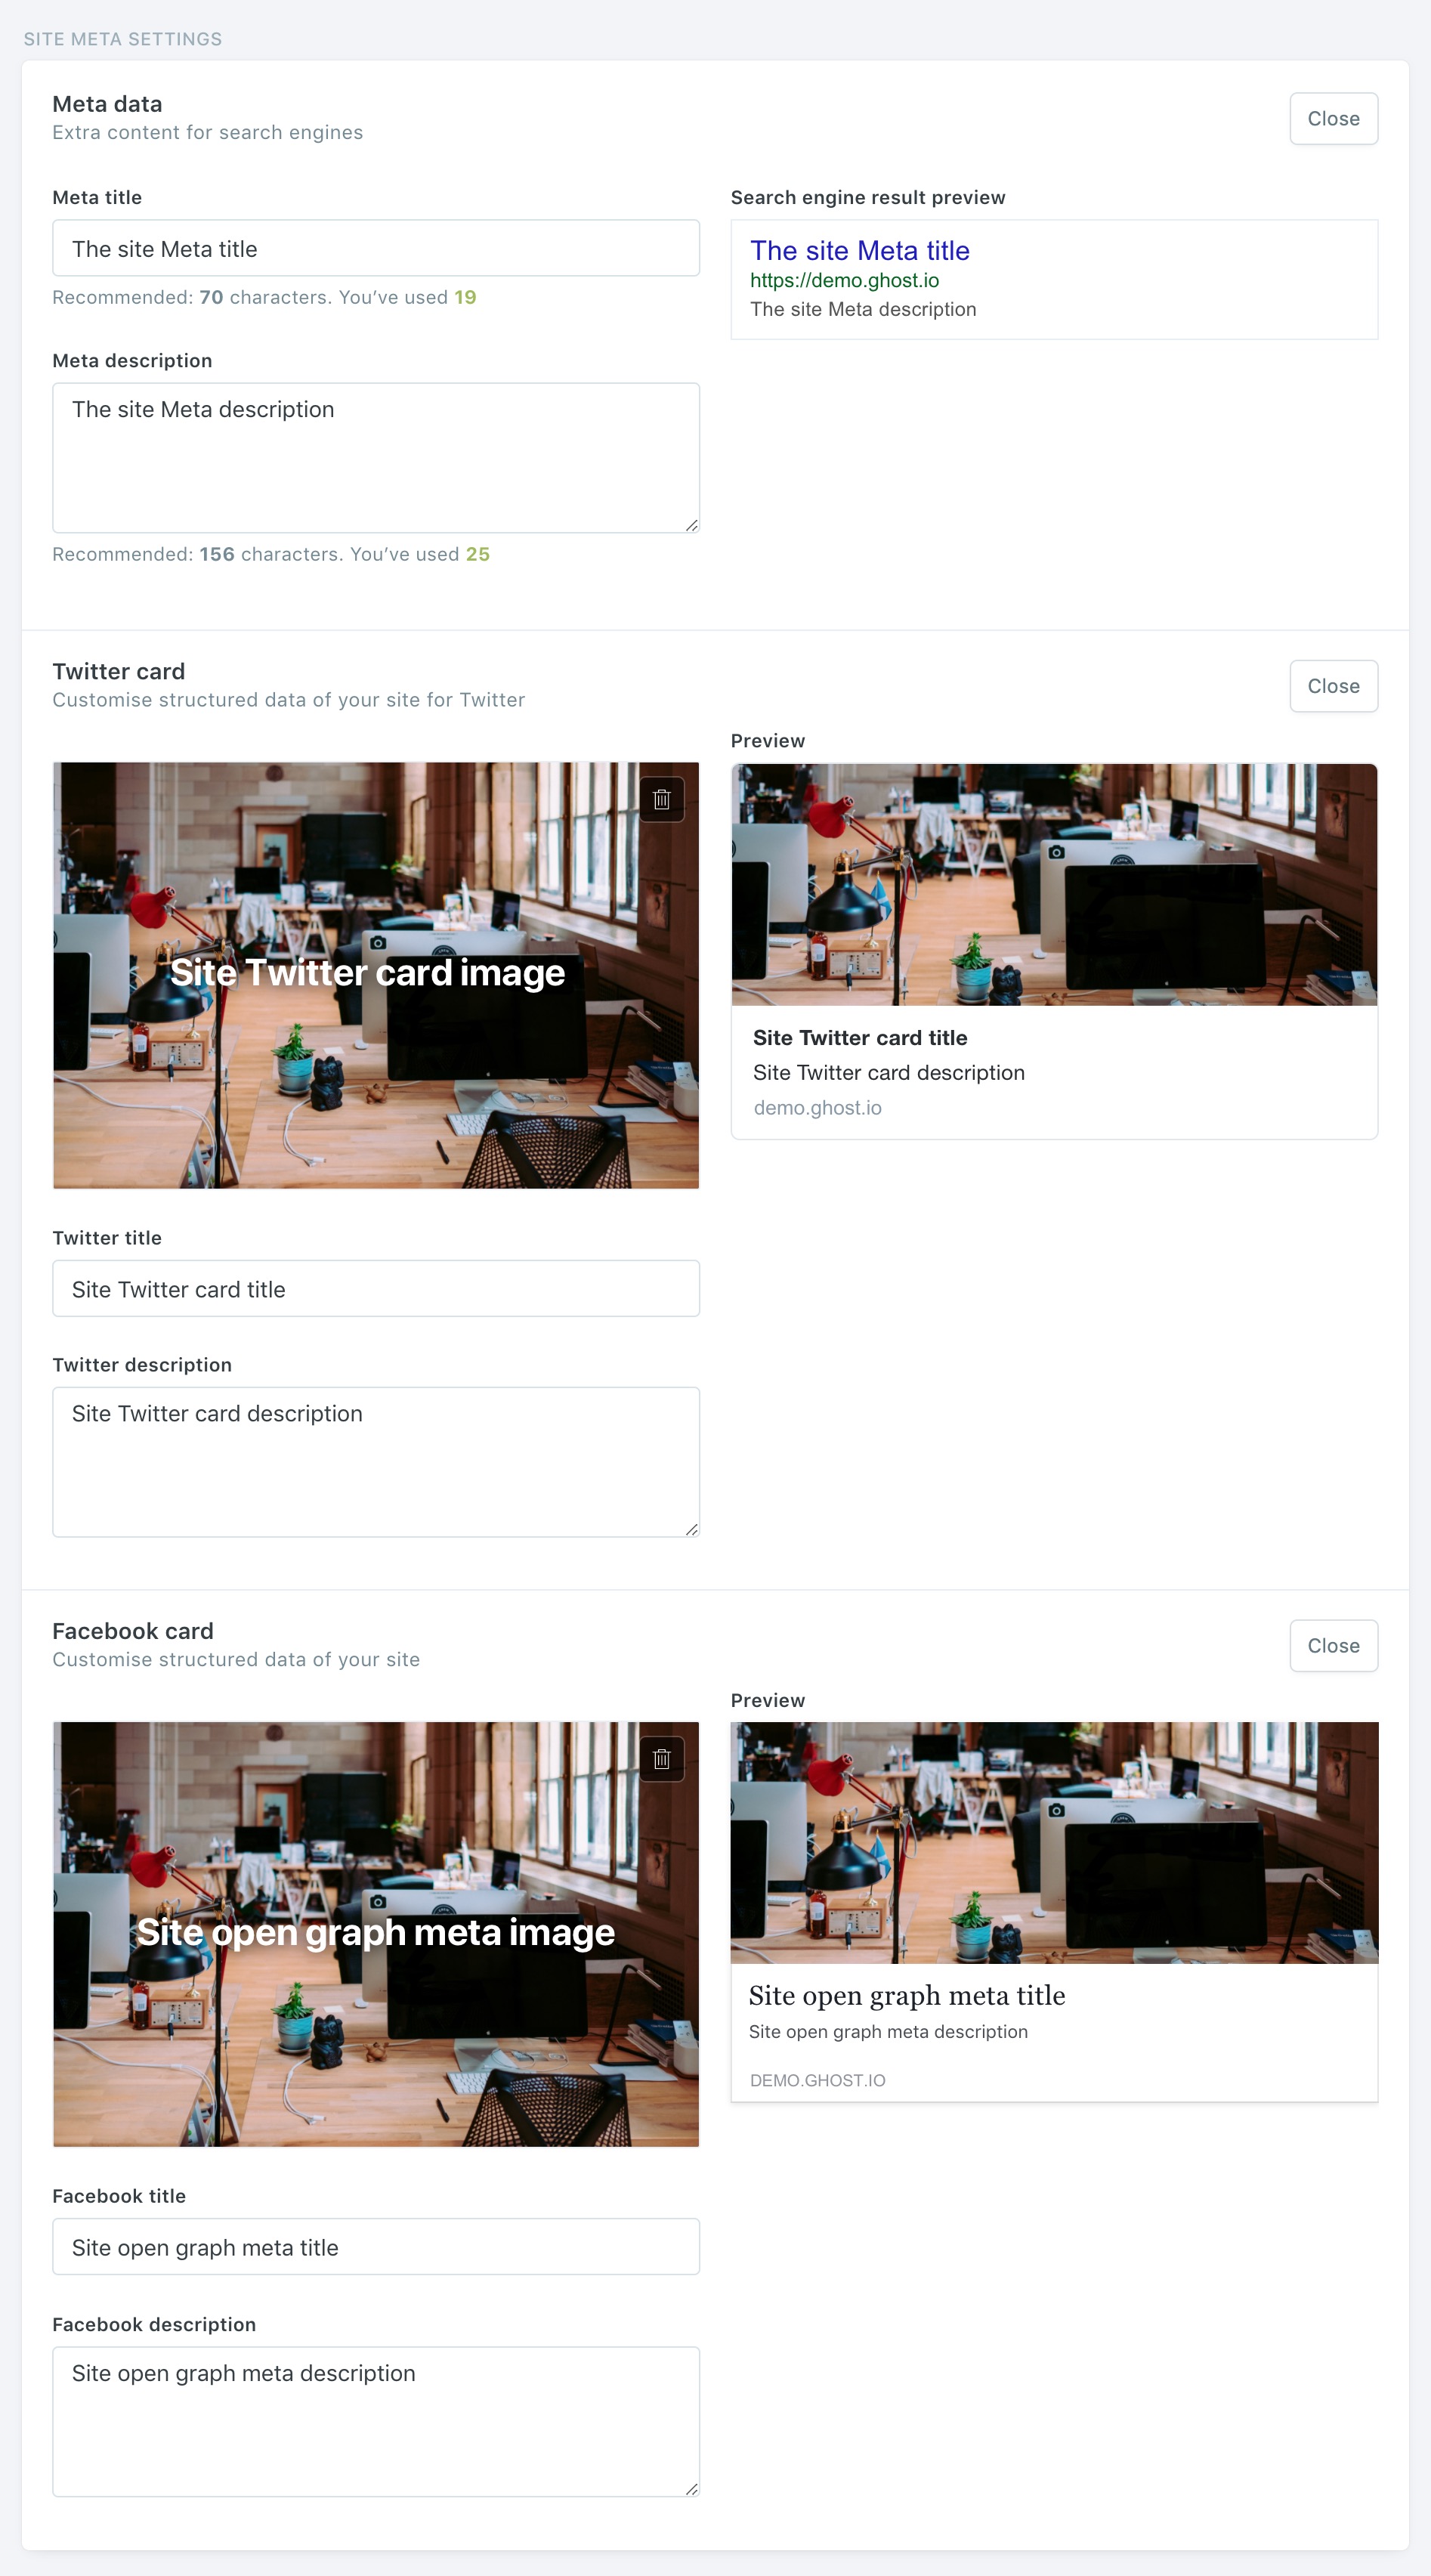
{{@site.url}} – the url specified for this site in your custom config file{{@site.title}} – the site title from general settings{{@site.description}} – the site description from general settings{{@site.icon}} - The publication icon from general settings{{@site.logo}} – the site logo from general settings{{@site.cover_image}} – the site cover image from general settings{{@site.twitter}} – the twitter URL from general settings{{@site.facebook}} – the facebook URL from general settings{{@site.navigation}} – the navigation information configured in settings/design{{@site.timezone}} – the timezone as configured in general settings{{@site.lang}} - the configured site language.<html lang="The @site helper provides more extensive attributes around site meta data as well. The @site meta data values can be set in the Ghost admin under Site Meta Settings within General Settings:
{{@site.meta_title}} – the site meta title{{@site.meta_description}} – the site meta description{{@site.twitter_image}} – the site Twitter card image{{@site.twitter_title}} – the site Twitter card title{{@site.twitter_description}} – the site Twitter card description{{@site.og_image}} – the site open graph image (used when shared on Facebook){{@site.og_title}} – the site open graph title (used when shared on Facebook){{@site.og_description}} – the site open graph description (used when shared on Facebook)Here‘s how these helpers correspond with the settings in the Ghost admin:
You may see @blog used in older themes, this is outdated. @site should always be used instead.
Usage: {{navigation}} and {{navigation type="secondary"}}
{{navigation}} is a template-driven helper which outputs formatted HTML of menu items defined in the Ghost admin panel (Settings > Design > Navigation). By default, the navigation is marked up using a preset template.
There are two types of navigation, primary and secondary, which you can access using {{navigation}} and {{navigation type="secondary"}}.
By default, the HTML output by including {{navigation}} in your theme, looks like the following:
<ul class="nav">
    <li class="nav-home nav-current"><a href="/">Home</a></li>
    <li class="nav-about"><a href="/about">About</a></li>
    <li class="nav-contact"><a href="/contact">Contact</a></li>
    ...
</ul>If you want to modify the default markup of the navigation helper, this can be achieved by creating a new file at ./partials/navigation.hbs. If this file exists, Ghost will load it instead of the default template. Example:
<div class="my-fancy-nav-wrapper">
<ul class="nav">
<!-- Loop through the navigation items -->
The up-to-date default template in Ghost is always available here.
A navigation item has the following attributes which can be used inside your ./partials/navigation.hbs template file...
about-us. Can be used as a class to target specific menu items with CSS or jQuery.These attributes can only be used inside the {{#foreach navigation}} loop inside ./partials/navigation.hbs. A navigation loop will not work in other partial templates or theme files.
The navigation helper doesn‘t output anything if there are no navigation items to output, so there‘s no need to wrap it in an {{#if}} statement to prevent an empty list. However, it‘s a common pattern to want to output a link to open the main menu, but only if there are items to show.
The data used by the {{navigation}} helper is also stored as a global variable called @site.navigation. You can use this global variable in any theme file to check if navigation items have been added by a user in the Ghost admin panel.
This is also possible with the secondary navigation:
Usage: {{#post}}{{/post}} or {{#foreach posts}}{{/foreach}}
When on a single post template such as post.hbs or page.hbs, outputting the details of your posts can be done with a block expression.
The block expression {{#post}}{{/post}} isn‘t strictly a ‘helper‘. You can do this with any object in a template to access the nested attributes e.g. you can also use {{#primary_author}}{{/primary_author}} inside of the post block to get to the primary author‘s name and other attributes.
When inside a post list such as index.hbs or tag.hbs where there is more than one post, it is common to use the {{#foreach post}}{{/foreach}} to iterate through the list.
When inside a {{#foreach posts}}{{/foreach}} or {{#post}}{{/post}} block (i.e. when inside the post scope), theme authors have access to all of the properties and helpers detailed on this page.
The full list of post attributes and more information about outputting posts can be found in the post context documentation.
When outputting a static page, you can use the same {{#post}}{{/post}} block expression, and all the same helpers you can use for a post.
Featured posts get an extra class so that they can be styled differently. They are not moved to the top of the post list or displayed separately to the normal post list.
Use {{#if featured}}{{/if}} to test if the current post is featured.
Usage: {{url}}
{{url}} outputs the relative url for a post when inside the post scope.
You can force the url helper to output an absolute url by using the absolute option, E.g. {{url absolute="true"}}
Usage: {{title}}
The title helper outputs a post title ensuring it displays correctly.
Usage: {{img_url value}}
The img url helper outputs the correctly calculated URL for the provided image property.
You must tell the {{img_url}} helper which image you would like to output. E.g. if you want to output a url for a post‘s feature image inside of post.hbs you might use {{img_url feature_image}}.
You can force the image helper to output an absolute url by using the absolute option, E.g. {{img_url profile_image absolute="true"}}. This is almost never needed.
You can pass in dynamic image sizes, if you would like to output the image in question at a resized resolution based on your theme config.
Below is a set of examples of how you might output various images that belong to posts, authors or keywords:
Usage: {{excerpt}}
{{excerpt}} outputs content but strips all HTML. This is useful for creating excerpts of posts.
If the post‘s custom_excerpt property is set, then the helper will always output the custom_excerpt content ignoring the words & characters attributes.
When both html and custom_excerpt properties are not set (for example, when member content gating strips the html) the output is generated from post‘s excerptproperty.
You can limit the amount of text to output by passing one of the options:
{{excerpt characters="140"}} will output 140 characters of text (rounding to the end of the current word).
Usage: {{meta_title}} and {{meta_description}} and {{canonical_url}}
Ghost generates automatic meta data by default, but it can be overridden with custom content in the post settings menu. Meta data is output by default in ghost_head, and can also be used in themes with the following helpers:
{{meta_title}} – the meta title specified for the post or page in the post settings{{meta_description}} – the meta description specified for the post or page in the post settings{{canonical_url}} – the custom canonical URL set for the post
Usage: {{content}}
{{content}} is a very simple helper used for outputting post content. It makes sure that your HTML gets output correctly.
You can limit the amount of HTML content to output by passing one of the options:
{{content words="100"}} will output just 100 words of HTML with correctly matched tags.
Usage: {{date value format="formatString"}}
{{date}} is a formatting helper for outputting dates in various format. You can either pass it a date and a format string to be used to output the date like so:
// outputs something like ‘July 11, 2016‘
Or you can pass it a date and the timeago flag:
// outputs something like ‘5 mins ago‘
If you call {{date}} without a format, it will default to “MMM Do, YYYY”.
If you call {{date}} without telling it which date to display, it will default to one of two things:
published_at property available (i.e. you‘re inside a post object) it will use thatdate uses moment.js for formatting dates. See their documentation for a full explanation of all the different format strings that can be used.
<main role="main">
Usage: {{tags}} or {{#foreach tags}}{{/foreach}} in tag.hbs you can use {{#tag}}{{/tag}} to access tag properties
{{tags}} is a formatting helper for outputting a linked list of tags for a particular post. It defaults to a comma-separated list (without list markup) but can be customised to use different separators, and the linking can be disabled. The tags are output in the order they appear on the post, these can be reordered by dragging and dropping.
The {{tags}} helper does not output internal tags. This can be changed by passing a different value to the visibility attribute.
You can use the translation helper for the prefix and suffix attribute.
The basic use of the tags helper will output something like ‘my-tag, my-other-tag, more-tagging‘ where each tag is linked to its own tag page:
You can customise the separator between tags. The following will output something like ‘my-tag | my-other-tag | more tagging‘
Additionally you can add an optional prefix or suffix. This example will output something like ‘Tagged in: my-tag | my-other-tag | more tagging‘
You can use HTML in the separator, prefix and suffix arguments. So you can achieve something like ‘my-tag • my-other-tag • more tagging‘.
If you don‘t want your list of tags to be automatically linked to their tag pages, you can turn this off:
If you want to output a fixed number of tags, you can add a limit to the helper. E.g. adding a limit of 1 will output just the first tag:
If you want to output a specific range of tags, you can use from and to either together or on their own. Using to will override the limit attribute.
E.g. using from="2" would output all tags, but starting from the second tag:
E.g. setting both from and to to 1 would do the same as limit="1"
{{tags from="1" to="1"}} is the same as {{tags limit="1"}}
visibility attributeAs of Ghost 0.9 posts, tags and users all have a concept of visibility, which defaults to public. The key feature build on this so far is Internal Tags, which are tags where the visibility is marked as internal instead of public. These tags will therefore not be output by the {{tags}} helper unless you specifically ask for them.
By default the visibility attribute is set to the string "public". This can be overridden to pass any other value, and if there is no matching value for visibility nothing will be output. E.g. you can set visibility to be "internal" to only output internal tags. You can also pass a comma-separated list of values, or the value "all" to output all items.
If you want to output your tags completely differently, you can fully customise the output by using the foreach helper, instead of the tags helper. Here‘s an example of how to output list markup:
To output just the singular, first tag, use the {{primary_tag.name}}. You can also access all the same attributes in the object as above if you need more custom output.
Usage: {{authors}}
{{authors}} is a formatting helper for outputting a linked list of authors for a particular post. It defaults to a comma-separated list (without list markup) but can be customised to use different separators, and the linking can be disabled. The authors are output in the order they appear on the post, these can be reordered by dragging and dropping.
You can use the translation helper for the prefix and suffix attribute.
The basic use of the authors helper will output something like ‘sam, carl, tobias‘ where each author is linked to its own author page:
You can customise the separator between authors. The following will output something like ‘sam | carl | tobias‘
Additionally you can add an optional prefix or suffix. This example will output something like ‘More about: sam, carl, tobias‘.
You can use HTML in the separator, prefix and suffix arguments. So you can achieve something like ‘sam • carl • tobias‘.
If you don‘t want your list of authors to be automatically linked to their author pages, you can turn this off:
If you want to output a fixed number of authors, you can add a limit to the helper. E.g. adding a limit of 1 will output just the first author:
If you want to output a specific range of authors, you can use from and to either together or on their own. Using to will override the limit attribute.
E.g. using from="2" would output all authors, but starting from the second author:
E.g. setting both from and to to 1 would do the same as limit="1"
{{authors from="1" to="1"}} is the same as {{authors limit="1"}}
visibility attributeAs of Ghost 0.9 posts, tags and users all have a concept of visibility, which defaults to public.
By default the visibility attribute is set to the string "public". This can be overridden to pass any other value, and if there is no matching value for visibility nothing will be output. You can also pass a comma-separated list of values, or the value "all" to output all items.
If you want to output your authors completely differently, you can fully customise the output by using the foreach helper, instead of the authors helper. Here‘s an example of how to output list markup:
To output just the singular, first author, use the {{primary_author}} helper to output a simple link. You can also access all the same attributes as above if you need more custom output.
Usage: {{twitter_url}} or {{twitter_url @blog.twitter}} or {{twitter_url "myfavouritepage"}}
This helper exists to make it easy to output a URL for a twitter page. Ghost has access to twitter page names/usernames for both users and for the site itself. When used without passing a username, the helper will look for a twitter username in the current template context, and then fallback to using @blog.twitter.
If there is no twitter username set, the helper will output nothing at all.
If you pass a variable or string to the helper, it will concatenate the value with the full url for a twitter page.
Output the author‘s twitter, using an author block:
Usage: {{facebook_url}} or {{facebook_url @blog.facebook}} or {{facebook_url "myfavouritepage"}}
This helper exists to make it easy to output a URL for a facebook page. Ghost has access two facebook page names/usernames for both users and for the site itself. When used without passing a username, the helper will look for a facebook username in the current template context, and then fallback to using @blog.facebook.
If there is no facebook username set, the helper will output nothing at all.
If you pass a variable or string to the helper, it will concatenate the value with the full url for a facebook page.
Output the author‘s facebook, using an author block:
标签:pass com hat isa when should possible -name HERE
原文地址:https://www.cnblogs.com/QDuck/p/12081499.html