标签:models mode min lis 神经网络 uil 图片 public mil
首先非常感谢 zhouzaihang:https://www.52pojie.cn/forum.php?mod=viewthread&tid=863608
环境:python、python-opencv、keras、tensorflow
其他库,可以安装anaconda,差不多的库都装好了的。
训练数据:fer2013.csv
下载地址:链接:https://pan.baidu.com/s/1Ac5XBue0ahLOkIXwa7W77g 提取码:qrue

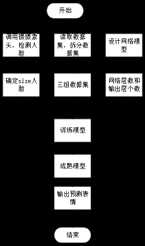
总流程:

第一步:数据预处理:fer2013.csv = train.csv +test.csv +val.csv ;同时还原出图像数据。
标签emotion_labels = [‘angry‘, ‘disgust‘, ‘fear‘, ‘happy‘, ‘sad‘, ‘surprise‘, ‘neutral‘]对应0-6命名的文件夹。
代码:
import csv
import os
from PIL import Image
import numpy as np

# 读、写数据的地址
data_path = os.getcwd() + "/data/"
csv_file = data_path + ‘fer2013.csv‘ # 读数据集地址
train_csv = data_path + ‘train.csv‘ # 拆数据集保存地址
val_csv = data_path + ‘val.csv‘
test_csv = data_path + ‘test.csv‘

# csv文件像素保存为图像的文件夹名称
train_set = os.path.join(data_path, ‘train‘)
val_set = os.path.join(data_path, ‘val‘)
test_set = os.path.join(data_path, ‘test‘)

# 开始整理数据集:读
with open(csv_file) as f:
    csv_r = csv.reader(f)
    header = next(csv_r)
    print(header)
    rows = [row for row in csv_r]

    trn = [row[:-1] for row in rows if row[-1] == ‘Training‘]
    csv.writer(open(train_csv, ‘w+‘), lineterminator=‘\n‘).writerows([header[:-1]] + trn)
    print(len(trn))

    val = [row[:-1] for row in rows if row[-1] == ‘PublicTest‘]
    csv.writer(open(val_csv, ‘w+‘), lineterminator=‘\n‘).writerows([header[:-1]] + val)
    print(len(val))

    tst = [row[:-1] for row in rows if row[-1] == ‘PrivateTest‘]
    csv.writer(open(test_csv, ‘w+‘), lineterminator=‘\n‘).writerows([header[:-1]] + tst)
    print(len(tst))

for save_path, csv_file in [(train_set, train_csv), (val_set, val_csv), (test_set, test_csv)]:
    if not os.path.exists(save_path):
        os.makedirs(save_path)

    num = 1
    with open(csv_file) as f:
        csv_r = csv.reader(f)
        header = next(csv_r)
        for i, (label, pixel) in enumerate(csv_r):
            # 0 - 6 文件夹分别label为:
            # angry ,disgust ,fear ,happy ,sad ,surprise ,neutral
            pixel = np.asarray([float(p) for p in pixel.split()]).reshape(48, 48)
            sub_folder = os.path.join(save_path, label)
            if not os.path.exists(sub_folder):
                os.makedirs(sub_folder)
            im = Image.fromarray(pixel).convert(‘L‘)
            image_name = os.path.join(sub_folder, ‘{:05d}.jpg‘.format(i))
            print(image_name)
            im.save(image_name)
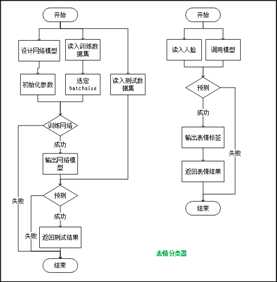
第二部:训练网络,得到分类器模型。
定义Model共20层:深度卷积神经网络的构建和训练。
卷积层conv2D +激活层activation-relu +conv2D + activation-relu +池化层MaxPooling2D +
conv2D + activation-relu + MaxPooling2D +
conv2D + activation-relu + MaxPooling2D +
扁平Flaten + 全连接层Dense + activation-relu +
丢失部分特征Dropout + Dense + activation-relu +
Dropout + Dense + activation-relu
保存网络.json和 模型.h5
流程:

train.py
from keras.layers import Dense, Dropout, Activation, Flatten, Conv2D, MaxPooling2D
from keras.models import Sequential
from keras.preprocessing.image import ImageDataGenerator
from keras.optimizers import SGD

batch_siz = 128
num_classes = 7
nb_epoch = 100
img_size = 48
data_path = ‘./data‘
model_path = ‘./model‘

class Model:
    def __init__(self):
        self.model = None

    def build_model(self):
        self.model = Sequential()

        self.model.add(Conv2D(32, (1, 1), strides=1, padding=‘same‘, input_shape=(img_size, img_size, 1)))
        self.model.add(Activation(‘relu‘))
        self.model.add(Conv2D(32, (5, 5), padding=‘same‘))
        self.model.add(Activation(‘relu‘))
        self.model.add(MaxPooling2D(pool_size=(2, 2)))     #池化,每个块只留下max

        self.model.add(Conv2D(32, (3, 3), padding=‘same‘))
        self.model.add(Activation(‘relu‘))
        self.model.add(MaxPooling2D(pool_size=(2, 2)))

        self.model.add(Conv2D(64, (5, 5), padding=‘same‘))
        self.model.add(Activation(‘relu‘))
        self.model.add(MaxPooling2D(pool_size=(2, 2)))

        self.model.add(Flatten())       # 扁平,折叠成一维的数组
        self.model.add(Dense(2048))     # 全连接神经网络层
        self.model.add(Activation(‘relu‘))
        self.model.add(Dropout(0.5))    # 忽略一半的特征检测器
        self.model.add(Dense(1024))
        self.model.add(Activation(‘relu‘))
        self.model.add(Dropout(0.5))
        self.model.add(Dense(num_classes))
        self.model.add(Activation(‘softmax‘))
        self.model.summary()            # 参数输出

    def train_model(self):
        sgd = SGD(lr=0.01, decay=1e-6, momentum=0.9, nesterov=True)  #随机梯度下降的方向训练权重
        self.model.compile(loss=‘categorical_crossentropy‘, optimizer=sgd, metrics=[‘accuracy‘])
        # 自动扩充训练样本
        train_datagen = ImageDataGenerator(
            rescale=1. / 255,
            shear_range=0.2,
            zoom_range=0.2,
            horizontal_flip=True)
        # 归一化验证集
        val_datagen = ImageDataGenerator(
            rescale=1. / 255)
        eval_datagen = ImageDataGenerator(
            rescale=1. / 255)
        # 以文件分类名划分label
        train_generator = train_datagen.flow_from_directory(
            data_path + ‘/train‘,
            target_size=(img_size, img_size),
            color_mode=‘grayscale‘,
            batch_size=batch_siz,
            class_mode=‘categorical‘)
        val_generator = val_datagen.flow_from_directory(
            data_path + ‘/val‘,
            target_size=(img_size, img_size),
            color_mode=‘grayscale‘,
            batch_size=batch_siz,
            class_mode=‘categorical‘)
        eval_generator = eval_datagen.flow_from_directory(
            data_path + ‘/test‘,
            target_size=(img_size, img_size),
            color_mode=‘grayscale‘,
            batch_size=batch_siz,
            class_mode=‘categorical‘)
        # early_stopping = EarlyStopping(monitor=‘loss‘, patience=3)
        history_fit = self.model.fit_generator(
            train_generator,
            steps_per_epoch=800 / (batch_siz / 32),  # 28709
            nb_epoch=nb_epoch,
            validation_data=val_generator,
            validation_steps=2000,
            # callbacks=[early_stopping]
        )
        #         history_eval=self.model.evaluate_generator(
        #                 eval_generator,
        #                 steps=2000)
        history_predict = self.model.predict_generator(
            eval_generator,
            steps=2000)
        with open(model_path + ‘/model_fit_log‘, ‘w‘) as f:
            f.write(str(history_fit.history))
        with open(model_path + ‘/model_predict_log‘, ‘w‘) as f:
            f.write(str(history_predict))

    # 保存训练的模型文件
    def save_model(self):
        model_json = self.model.to_json()
        with open(model_path + "/model_json.json", "w") as json_file:
            json_file.write(model_json)
        self.model.save_weights(model_path + ‘/model_weight.h5‘)
        self.model.save(model_path + ‘/model.h5‘)


if __name__ == ‘__main__‘:
    model = Model()
    model.build_model()
    print(‘model built‘)
    model.train_model()
    print(‘model trained‘)
    model.save_model()
    print(‘model saved‘)
第三步:使用模型,预测表情。
predictFER.py
#!/usr/bin/python
# -*- coding = utf-8 -*-
#author:thy
#date:20191230
#version:1.0
import cv2
import numpy as np
from keras.models import model_from_json

model_path = ‘./model/‘
img_size = 48
emotion_labels = [‘angry‘, ‘disgust‘, ‘fear‘, ‘happy‘, ‘sad‘, ‘surprise‘, ‘neutral‘]
num_class = len(emotion_labels)

# 从json中加载模型
json_file = open(model_path + ‘model_json.json‘)
loaded_model_json = json_file.read()
json_file.close()
model = model_from_json(loaded_model_json)

# 加载模型权重
model.load_weights(model_path + ‘model_weight.h5‘)

# 创建VideoCapture对象
capture = cv2.VideoCapture(0)

# 使用opencv的人脸分类器
cascade = cv2.CascadeClassifier(model_path + ‘haarcascade_frontalface_alt.xml‘)

while True:
    ret, frame = capture.read()

    # 灰度化处理
    gray = cv2.cvtColor(frame, cv2.COLOR_BGR2GRAY)

    # 呈现用emoji替代后的画面
    emoji_show = frame.copy()

    # 识别人脸位置
    faceLands = cascade.detectMultiScale(gray, scaleFactor=1.1,
                                         minNeighbors=1, minSize=(120, 120))

    if len(faceLands) > 0:
        for faceLand in faceLands:
            x, y, w, h = faceLand
            images = []
            result = np.array([0.0] * num_class)

            # 裁剪出脸部图像
            image = cv2.resize(gray[y:y + h, x:x + w], (img_size, img_size))
            image = image / 255.0
            image = image.reshape(1, img_size, img_size, 1)

            # 调用模型预测情绪
            predict_lists = model.predict_proba(image, batch_size=32, verbose=1)
            # print(predict_lists)
            result += np.array([predict for predict_list in predict_lists
                                for predict in predict_list])
            # print(result)
            emotion = emotion_labels[int(np.argmax(result))]
            print("Emotion:", emotion)

            # 框出脸部并且写上标签
            cv2.rectangle(frame, (x - 20, y - 20), (x + w + 20, y + h + 20),
                          (0, 255, 255), thickness=10)
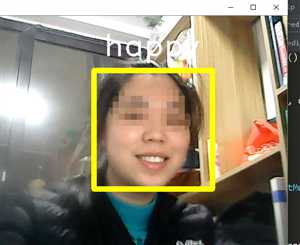
            cv2.putText(frame, ‘%s‘ % emotion, (x, y - 50),
                        cv2.FONT_HERSHEY_DUPLEX, 2, (255, 255, 255), 2, 30)
            cv2.imshow(‘Face‘, frame)

        if cv2.waitKey(60) == ord(‘q‘):
            break

# 释放摄像头并销毁所有窗口
capture.release()
cv2.destroyAllWindows()
结论:
实现摄像头检测到的人脸的表情标记。

标签:models mode min lis 神经网络 uil 图片 public mil
原文地址:https://www.cnblogs.com/philothypeipei/p/12122149.html