标签:template ESS director ams 而且 img ima path_info code
ossfs能让您在Linux系统中,将对象存储OSS的存储空间(Bucket)挂载到本地文件系统中,您能够像操作本地文件一样操作OSS的对象(Object),实现数据的共享。
ossfs基于s3fs构建,具有s3fs的全部功能。其中包括:
ossfs使用有以下限制:
由于低版本的Linux系统内核版本比较低,ossfs进程在运行过程中容易出现掉线或者其他问题。因此建议您将操作系统升级到CentOS 7.0或者Ubuntu 14.04及以上版本。
以下载CentOS 7.0 (x64)版本为例:
Wget http://gosspublic.alicdn.com/ossfs/ossfs_1.80.6_centos7.0_x86_64.rpm |
|
sudo yum localinstall your_ossfs_package |
说明?对于使用yum安装rpm包的客户端,如果客户端节点网络环境特殊,无法直接用yum下载依赖包。可以在网络正常的、相同版本操作系统的节点上,使用yum下载依赖包并拷贝到网络特殊的节点。例如,ossfs需要依赖fuse 2.8.4以上版本,可使用如下命令,下载yum源中最新的fuse到本地:
sudo yum install --downloadonly --downloaddir=./ fuse |
如果需要下载其他依赖包,则将fuse换成对应包的名称。
CentOS5系统版本的安装命令:
sudo yum localinstall your_ossfs_package --nogpgcheck |
将Bucket名称以及具有此Bucket访问权限的AccessKeyId/AccessKeySecret信息存放在/etc/passwd-ossfs文件中。注意这个文件的权限必须正确设置,建议设为640。
echo my-bucket:my-access-key-id:my-access-key-secret > /etc/passwd-ossfs chmod 640 /etc/passwd-ossfs |
ossfs my-bucket my-mount-point -ourl=my-oss-endpoint |
挂载示例:将杭州地域名称为bucket-test的Bucket挂载到/tmp/ossfs目录下。
echo bucket-test:LTAIbZcdVCmQ****:MOk8x0y9hxQ31coh7A5e2MZEUz**** > /etc/passwd-ossfs chmod 640 /etc/passwd-ossfs mkdir /tmp/ossfs ossfs bucket-test /tmp/ossfs -ourl=http://oss-cn-hangzhou.aliyuncs.com |
注意?如果您使用从阿里云购买的云服务器(ECS)来提供ossfs服务,您可以使用内网域名,在这个示例中您可以将OSS endpoint 改为oss-cn-hangzhou-internal.aliyuncs.com,这样可以节省流量费用
fusermount -u /tmp/ossfs |
几年前还百家争锋的国内网盘市场,如今只剩下百度网盘一枝独秀了。虽然还有一些稳定的国外网盘,如 OneDrive、DropBox、Google Drive 等,但国内访问并不友好。
私有云和 NAS 这种完全掌握在自己手中的云端存储方案就体现其优势了。本文就介绍下如何在 VPS 上快速使用 Nextcloud 搭建个人专属的私有云同步网盘。
Nextcloud 跨平台支持 Windows、Mac、Android、iOS、Linux?等平台,而且还提供了「网页版」以及 WebDAV 形式访问,因此你几乎可以在任何电脑、手机设备上都能轻松获取和访问你的文件文档
推荐的比较多的有三个:
适合个人和企业使用,基础版免费。都是成熟方案,主体功能上大同小异,且都支持在线查看/播放文件、插件扩展等功能。
yum install -y epel-release |
yum install http://rpms.remirepo.net/enterprise/remi-release-6.rpm |
yum install -y yum-utils |
yum-config-manager --enable remi-php72 |
yum -y install php-fpm php-cli php-gd php-mcrypt php-mysql php-pear php-xml php-mbstring php-pdo php-json php-pecl-apcu php-pecl-apcu-devel |
[root@oms cert]# php -v PHP 7.2.19 (cli) (built: May 29 2019 11:20:29) ( NTS ) Copyright (c) 1997-2018 The PHP Group Zend Engine v3.2.0, Copyright (c) 1998-2018 Zend Technologies with Zend OPcache v7.2.19, Copyright (c) 1999-2018, by Zend Technologies |
vim /etc/php-fpm.d/www.conf 修改内容如下: user = nginx ##将用户和组都改为nginx的用户 group = nginx env[HOSTNAME] = $HOSTNAME ##去掉下面几行注释 env[PATH] = /usr/local/bin:/usr/bin:/bin env[TMP] = /tmp env[TMPDIR] = /tmp env[TEMP] = /tmp |
在/var/lib目录下为session路径创建一个新的文件夹,并将用户名和组设为nginx
mkdir -p /var/lib/php/session chown nginx:nginx -R /var/lib/php/session/ |
systemctl start php-fpm systemctl start nginx systemctl enable php-fpm systemctl enable nginx |
MariaDB [(none)]> create database nextcloud; MariaDB [(none)]> create user nextcloud@localhost identified by ‘123456‘; MariaDB [(none)]> grant all privileges on nextcloud.* to nextcloud@localhost MariaDB [(none)]> flush privileges; |
nextcloud官方下载网址:https://download.nextcloud.com/server/releases/ |
下载
wget https://download.nextcloud.com/server/releases/nextcloud-16.0.1.tar.bz2 |
解压
tar jxvf nextcloud-16.0.1.tar.bz2 mv nextcloud /data/ |
mkdir -p nextcloud/data/ chown nginx:nginx -R nextcloud/ |
nginx主配置文件可以参考如下:
user nginx nginx; worker_processes 2; error_log /usr/local/nginx/logs/nginx_error.log crit; pid /usr/local/nginx/logs/nginx.pid; worker_rlimit_nofile 51200; ? events { use epoll; worker_connections 6000; } ? http { include mime.types; default_type application/octet-stream; server_names_hash_bucket_size 3526; server_names_hash_max_size 4096; log_format combined_realip ‘$remote_addr $http_x_forwarded_for [$time_local]‘ ‘ $host "$request_uri" $status‘ ‘ "$http_referer" "$http_user_agent"‘; sendfile on; tcp_nopush on; keepalive_timeout 30; client_header_timeout 3m; client_body_timeout 3m; send_timeout 3m; connection_pool_size 256; client_header_buffer_size 1k; large_client_header_buffers 8 4k; request_pool_size 4k; output_buffers 4 32k; postpone_output 1460; client_max_body_size 10m; client_body_buffer_size 256k; client_body_temp_path /usr/local/nginx/client_body_temp; proxy_temp_path /usr/local/nginx/proxy_temp; fastcgi_temp_path /usr/local/nginx/fastcgi_temp; fastcgi_intercept_errors on; tcp_nodelay on; gzip on; gzip_min_length 1k; gzip_buffers 4 8k; gzip_comp_level 5; gzip_http_version 1.1; gzip_types text/plain application/x-javascript text/css text/htm application/xml; include vhost/*.conf; } |
创建并添加nextcloud的配置文件
vim nginx/conf/vhost/nextcloud.conf |
内容如下:
upstream php-handler { server 127.0.0.1:9000; } server { listen 80; listen 443 ssl; server_name localhost; ssl_certificate /usr/local/nginx/cert/nextcloud.pem; ##证书文件路径,后缀自建为crt,此处为freessl申请的证书 ssl_certificate_key /usr/local/nginx/cert/nextcloud.key; add_header Strict-Transport-Security "max-age=15768000; includeSubDomains; preload;"; add_header X-Content-Type-Options nosniff; add_header X-Frame-Options "SAMEORIGIN"; add_header X-XSS-Protection "1; mode=block"; add_header X-Robots-Tag none; add_header X-Download-Options noopen; add_header X-Permitted-Cross-Domain-Policies none; ? root /data/nextcloud/; if ( $scheme != "https" ) { return 301 https://$host$request_uri; } ? location = /robots.txt { allow all; log_not_found off; access_log off; } ? location = /.well-known/carddav { location = /.well-known/caldav { return 301 $scheme://$host/remote.php/dav; } client_max_body_size 512M; fastcgi_buffers 64 4K; gzip off; ? error_page 403 /core/templates/403.php; error_page 404 /core/templates/404.php; ? location / { rewrite ^ /index.php$uri; } ? location ~ ^/(?:build|tests|config|lib|3rdparty|templates|data)/ { deny all; } location ~ ^/(?:\.|autotest|occ|issue|indie|db_|console) { deny all; } include fastcgi_params; fastcgi_split_path_info ^(.+\.php)(/.*)$; fastcgi_param SCRIPT_FILENAME $document_root$fastcgi_script_name; fastcgi_param PATH_INFO $fastcgi_path_info; fastcgi_param HTTPS on; fastcgi_param modHeadersAvailable true; fastcgi_param front_controller_active true; fastcgi_pass php-handler; fastcgi_intercept_errors on; fastcgi_request_buffering off; fastcgi_buffers 8 128k; fastcgi_buffer_size 128k; fastcgi_busy_buffers_size 256k; fastcgi_temp_file_write_size 256k; fastcgi_connect_timeout 300s; fastcgi_send_timeout 300s; fastcgi_read_timeout 300s; } location ~ ^/(?:updater|ocs-provider)(?:$|/) { try_files $uri/ =404; index index.php; } location ~* \.(?:css|js)$ { try_files $uri /index.php$uri$is_args$args; add_header Cache-Control "public, max-age=7200"; add_header Strict-Transport-Security "max-age=15768000;includeSubDomains; preload;"; add_header X-Content-Type-Options nosniff; add_header X-Frame-Options "SAMEORIGIN"; add_header X-XSS-Protection "1; mode=block"; add_header X-Robots-Tag none; add_header X-Download-Options noopen; add_header X-Permitted-Cross-Domain-Policies none; access_log off; } location ~* \.(?:svg|gif|png|html|ttf|woff|ico|jpg|jpeg)$ { try_files $uri /index.php$uri$is_args$args; access_log off; } } |
nginx -t && nginx -s reload |

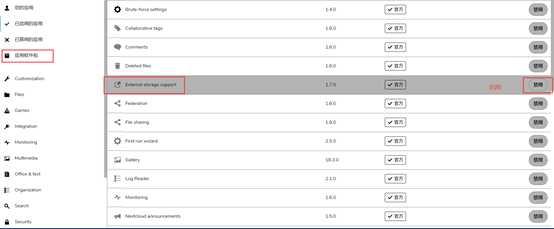

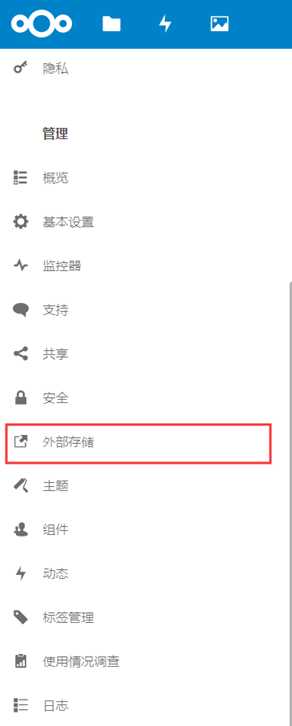
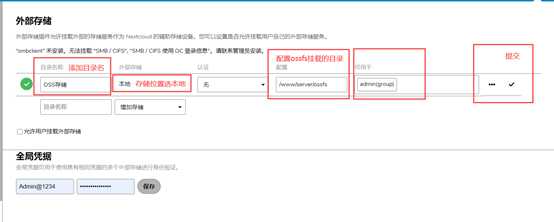
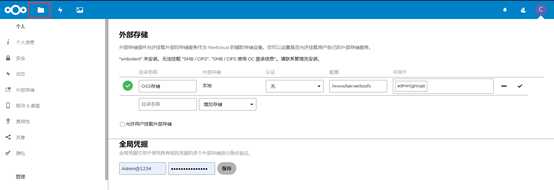
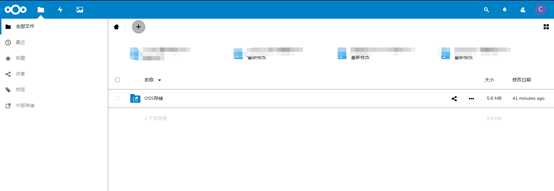
22.创建成功后,选择文件,则看到外部oss目录的添加名
标签:template ESS director ams 而且 img ima path_info code
原文地址:https://www.cnblogs.com/cable-run/p/12161812.html