标签:doc his date available meta tps cmd 核心 nss
环境介绍| 主机 | IP地址 | 服务 |
|---|---|---|
| master | 192.168.1.21 | k8s+httpd+nginx |
| node01 | 192.168.1.22 | k8s |
| node02 | 192.168.1.23 | k8s |
基于[ https://blog.51cto.com/14320361/2464655]() 的实验继续进行
Kubelet使用liveness probe(存活探针)来确定何时重启容器。例如,当应用程序处于运行状态但无法做进一步操作,liveness探针将捕获到deadlock,重启处于该状态下的容器,使应用程序在存在bug的情况下依然能够继续运行下去
Kubelet使用readiness probe(就绪探针)来确定容器是否已经就绪可以接受流量。只有当Pod中的容器都处于就绪状态时kubelet才会认定该Pod处于就绪状态。该信号的作用是控制哪些Pod应该作为service的后端。如果Pod处于非就绪状态,那么它们将会被从service的load balancer中移除。
在用户容器内执行一次命令,如果命令执行的退出码为0,则认为应用程序正常运行,其他任务应用程序运行不正常。
  livenessProbe:
    exec:
      command:
      - cat
- /home/laizy/test/hostpath/healthy将会尝试打开一个用户容器的Socket连接(就是IP地址:端口)。如果能够建立这条连接,则认为应用程序正常运行,否则认为应用程序运行不正常。
livenessProbe:
tcpSocket:
port: 8080调用容器内Web应用的web hook,如果返回的HTTP状态码在200和399之间,则认为应用程序正常运行,否则认为应用程序运行不正常。每进行一次HTTP健康检查都会访问一次指定的URL。
  httpGet: #通过httpget检查健康,返回200-399之间,则认为容器正常
    path: / #URI地址
    port: 80 #端口号
    #host: 127.0.0.1 #主机地址
    scheme: HTTP #支持的协议,http或者https
httpHeaders:’’ #自定义请求的headerinitialDelaySeconds:容器启动后第一次执行探测是需要等待多少秒。
periodSeconds:执行探测的频率。默认是10秒,最小1秒。
timeoutSeconds:探测超时时间。默认1秒,最小1秒。
successThreshold:探测失败后,最少连续探测成功多少次才被认定为成功。默认是1。对于liveness必须是1。最小值是1。
Success:Container通过了检查。
Failure:Container未通过检查。
Unknown:未能执行检查,因此不采取任何措施。1. LivenessProbe(活跃度)
[root@node02 ~]# vim livenss.yaml
kind: Pod
apiVersion: v1
metadata:
  name: liveness
  labels:
    test: liveness
spec:
  restartPolicy: OnFailure
  containers:
  - name: liveness
    image: busybox
    args:
    - /bin/sh
    - -c
    - touch /tmp/test; sleep 60; rm -rf /tmp/test; sleep 300
    livenessProbe:              #存活探测
      exec:                     #通过执行命令来检查服务是否正常
        command:                #命令模式
        - cat
        - /tmp/test
      initialDelaySeconds: 10    #pod运行10秒后开始探测
      periodSeconds: 5           #检查的频率,每5秒探测一次
该配置文件给Pod配置了一个容器。periodSeconds 规定kubelet要每隔5秒执行一次liveness probe。initialDelaySeconds 告诉kubelet在第一次执行probe之前要的等待10秒钟。探针检测命令是在容器中执行 cat /tmp/healthy 命令。如果命令执行成功,将返回0,kubelet就会认为该容器是活着的并且很健康。如果返回非0值,kubelet就会杀掉这个容器并重启它。
[root@master ~]# kubectl apply -f liveness.yaml [root@master ~]# kubectl get pod -w
Liveness活跃度探测,根据探测某个文件是否存在,来确定某个服务是否正常运行,如果存在则正常,负责,它会根据你设置的Pod的重启策略操作Pod。
ReadinessProbe探针的使用场景livenessProbe稍有不同,有的时候应用程序可能暂时无法接受请求,比如Pod已经Running了,但是容器内应用程序尚未启动成功,在这种情况下,如果没有ReadinessProbe,则Kubernetes认为它可以处理请求了,然而此时,我们知道程序还没启动成功是不能接收用户请求的,所以不希望kubernetes把请求调度给它,则使用ReadinessProbe探针。
ReadinessProbe和livenessProbe可以使用相同探测方式,只是对Pod的处置方式不同,ReadinessProbe是将Pod IP:Port从对应的EndPoint列表中删除,而livenessProbe则Kill容器并根据Pod的重启策略来决定作出对应的措施。
ReadinessProbe探针探测容器是否已准备就绪,如果未准备就绪则kubernetes不会将流量转发给此Pod。
ReadinessProbe探针与livenessProbe一样也支持exec、httpGet、TCP的探测方式,配置方式相同,只不过是将livenessProbe字段修改为ReadinessProbe。
[root@master ~]# vim readiness.yaml
kind: Pod
apiVersion: v1
metadata:
  name: readiness
  labels:
    test: readiness
spec:
  restartPolicy: Never
  containers:
  - name: readiness
    image: busybox
    args:
    - /bin/sh
    - -c
    - touch /tmp/test; sleep 60; rm -rf /tmp/test; sleep 300
    readinessProbe:
      exec:
        command:
        - cat
        - /tmp/test
      initialDelaySeconds: 10
periodSeconds: 5[root@master ~]# kubectl apply -f readiness.yaml [root@master ~]# kubectl get pod -w
(1)liveness和readiness是两种健康检查机制,k8s将两种探测采取相同的默认行为,即通过判断容器启动进程的返回值是否为零,来判断探测是否成功。
(2)两种探测配置方法完全一样,不同之处在于探测失败后的行为。
? liveness探测是根据重启策略操作容器,大多数是重启容器。
? readiness则是将容器设置为不可用,不接收Service转发的请求。
(3)两种探测方法可建议独立存在,也可以同时存在。用livensess判断是否需要重启,实现自愈;用readiness判断容器是否已经准备好对外提供服务。
[root@master ~]# vim hcscal.yaml
kind: Deployment
apiVersion: extensions/v1beta1
metadata:
  name: web
spec:
  replicas: 3
  template:
    metadata:
      labels:
        run: web
    spec:
      containers:
      - name: web
        image: httpd
        ports:
        - containerPort: 80
        readinessProbe:
          httpGet:
            scheme: HTTP   #探测的协议
            path: /healthy  #访问的目录
            port: 80
          initialDelaySeconds: 10
          periodSeconds: 5

---
kind: Service
apiVersion: v1
metadata:
  name: web-svc
spec:
  type: NodePort
  selector:
    run: web
  ports:
  - protocol: TCP
    port: 90
    targetPort: 80
    nodePort: 30321
在配置文件中,使用httpd镜像,创建出一个Pod,其中periodSeconds字段指定kubelet每5秒执行一次探测,initialDelaySeconds字段告诉kubelet延迟等待10秒,探测方式为向容器中运行的服务发送HTTP GET请求,请求8080端口下的/healthz, 任何大于或等于200且小于400的代码表示成功。任何其他代码表示失败。
host:要连接的主机名,默认为Pod IP,可以在http request head中设置host头部。
scheme: 用于连接host的协议,默认为HTTP。
path:http服务器上的访问URI。
httpHeaders:自定义HTTP请求headers,HTTP允许重复headers。
port: 容器上要访问端口号或名称。
[root@master ~]# kubectl apply -f readiness.yaml [root@master ~]# kubectl get pod -w
[root@master ~]# kubectl get pod -o wide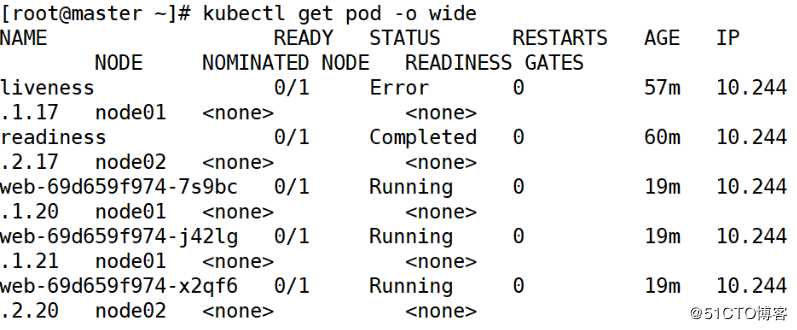
[root@master ~]# kubectl get service -o wide
[root@master ~]# curl 10.244.1.21/healthy
[root@master ~]# kubectl exec web-69d659f974-7s9bc touch /usr/local/apache2/htdocs/healthy[root@master ~]# kubectl get pod -w
[root@master ~]# vim app.v1.yaml
apiVersion: extensions/v1beta1
kind: Deployment
metadata:
  name: app
spec:
  replicas: 10
  template:
    metadata:
      labels:
        run: app
    spec:
      containers:
      - name: app
        image: busybox
        args:
        - /bin/sh
        - -c
        - sleep 10; touch /tmp/healthy; sleep 3000
        readinessProbe:
          exec:
            command:
            - cat
            - /tmp/healthy
          initialDelaySeconds: 10
periodSeconds: 5[root@master ~]# kubectl apply -f readiness.yaml --record [root@master ~]# kubectl rollout history deployment app 
[root@master ~]# kubectl get pod -w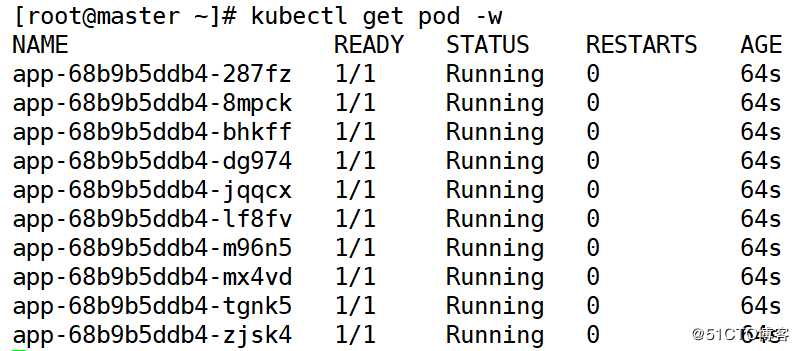
[root@master ~]# cp app.v1.yaml app.v2.yaml [root@master ~]# vim app.v2.yaml
apiVersion: extensions/v1beta1
kind: Deployment
metadata:
name: app
spec:
replicas: 10
template:
metadata:
labels:
run: app
spec:
containers:
- name: app
image: busybox
args:
- /bin/sh
- -c
- sleep 3000 #修改命令
readinessProbe:
exec:
command:
- cat
- /tmp/healthy
initialDelaySeconds: 10
periodSeconds: 5[root@master ~]# kubectl apply -f readiness.yaml --record [root@master ~]# kubectl rollout history deployment app 
[root@master ~]# kubectl get pod -w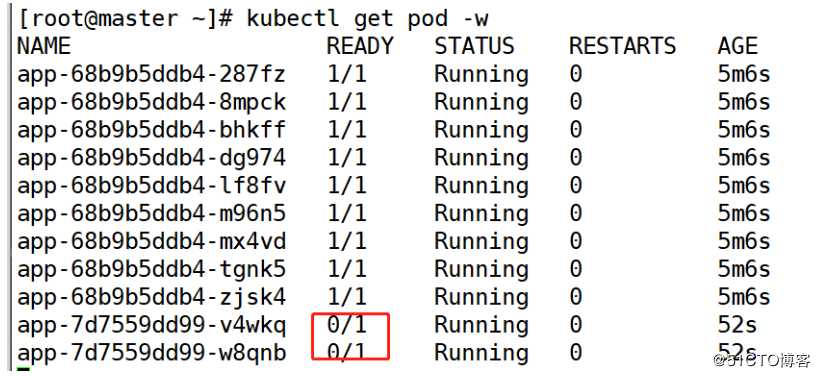
[root@master ~]# cp app.v1.yaml app.v3.yaml [root@master ~]# vim app.v2.yaml
apiVersion: extensions/v1beta1
kind: Deployment
metadata:
name: app
spec:
replicas: 10
template:
metadata:
labels:
run: app
spec:
containers:
- name: app
image: busybox
args:
- /bin/sh
- -c
- sleep 3000 #修改命令[root@master ~]# kubectl apply -f readiness.yaml --record [root@master ~]# kubectl rollout history deployment app 
[root@master ~]# kubectl get pod -w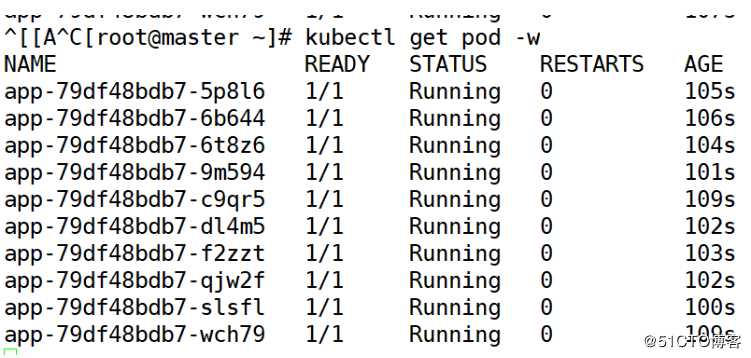
[root@master ~]# kubectl rollout undo deployment app --to-revision=2[root@master ~]# kubectl get pod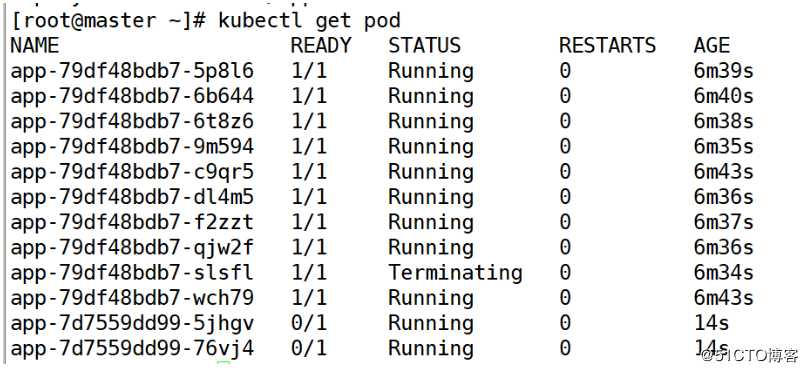
[root@master ~]# vim app.v2.yaml
apiVersion: extensions/v1beta1
kind: Deployment
metadata:
  name: app
spec:
  strategy:
    rollingUpdate:
      maxSurge: 2
      maxUnavailable: 2
  replicas: 10
  template:
    metadata:
      labels:
        run: app
    spec:
      containers:
      - name: app
        image: busybox
        args:
        - /bin/sh
        - -c
        - sleep 3000
        readinessProbe:
          exec:
            command:
            - cat
            - /tmp/healthy
          initialDelaySeconds: 10
          periodSeconds: 5
参数介绍
minReadySeconds:
Kubernetes在等待设置的时间后才进行升级
如果没有设置该值,Kubernetes会假设该容器启动起来后就提供服务了
如果没有设置该值,在某些极端情况下可能会造成服务服务正常运行maxSurge:
升级过程中最多可以比原先设置多出的POD数量
例如:maxSurage=1,replicas=5,则表示Kubernetes会先启动1一个新的Pod后才删掉一个旧的POD,整个升级过程中最多会有5+1个POD。maxUnavaible:
升级过程中最多有多少个POD处于无法提供服务的状态
当maxSurge不为0时,该值也不能为0
例如:maxUnavaible=1,则表示Kubernetes整个升级过程中最多会有1个POD处于无法服务的状态。
[root@master ~]# kubectl apply -f app.v2.yaml --record [root@master ~]# kubectl rollout history deployment app 
[root@master ~]# kubectl get pod -w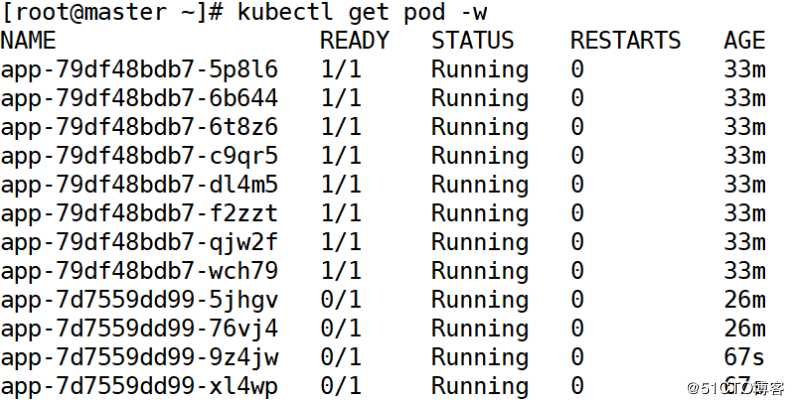
[root@master yaml]# vim nginx.yaml

kind: Deployment
apiVersion: extensions/v1beta1
metadata:
  name: web
spec:
  replicas: 2
  template:
    metadata:
      labels:
        run: web
    spec:
      containers:
      - name: readiness
        image: 192.168.1.21:5000/nginx:v1
        readinessProbe:
          exec:
            command:
            - cat
            - /usr/share/nginx/html/test
          initialDelaySeconds: 10
periodSeconds: 10[root@master ~]# kubectl apply -f nginx.yaml --record [root@master ~]# kubectl rollout history deployment web 
[root@master ~]# kubectl get pod -w
[root@master yaml]# kubectl exec -it web-864c7cf7fc-gpxq4  /bin/bash
root@web-68444bff8-xm22z:/# touch /usr/share/nginx/html/test[root@master yaml]# kubectl get pod -w
[root@master yaml]# vim nginx-svc.yaml
kind: Service
apiVersion: v1
metadata:
  name: web-svc
spec:
  type: NodePort
  selector:
    run: web
  ports:
  - protocol: TCP
    port: 90
    targetPort: 80
nodePort: 30321[root@master yaml]# kubectl apply -f nginx-svc.yaml [root@master yaml]# kubectl get pod -o wide[root@master yaml]# kubectl exec -it web-864c7cf7fc-gpxq4 /bin/bash
root@web-864c7cf7fc-gpxq4:/# echo "123">/usr/share/nginx/html/test
root@web-864c7cf7fc-gpxq4:/# exit
[root@master yaml]# kubectl exec -it web-864c7cf7fc-pcrs9 /bin/bash
root@web-864c7cf7fc-pcrs9:/# echo "321">/usr/share/nginx/html/test
root@web-864c7cf7fc-pcrs9:/# exit[root@master yaml]# kubectl get service
[root@master ~]# curl 192.168.1.21:30321/test
[root@master yaml]# vim nginx.yaml
kind: Deployment
apiVersion: extensions/v1beta1
metadata:
  name: web
spec:
  replicas: 2
  template:
    metadata:
      labels:
        run: web
    spec:
      containers:
      - name: readiness
        image: 192.168.1.21:5000/nginx:v1
        readinessProbe:
          httpGet:
            scheme: HTTP
            path: /usr/share/nginx/html/test
            port: 80
          initialDelaySeconds: 10
periodSeconds: 10[root@master yaml]# kubectl apply -f nginx.yaml [root@master yaml]# kubectl get pod -w
maxSurge:此参数控制滚动更新过程中,副本总数超过预期数的值。可以是整数,也可以是百分比,默认是1。所以现在是3台pod
[root@master yaml]# curl 192.168.1.21:30321/test
实际上readiness 和liveness 就如同字面意思。readiness 就是意思是否可以访问,liveness就是是否存活。如果一个readiness 为fail 的后果是把这个pod 的所有service 的endpoint里面的改pod ip 删掉,意思就这个pod对应的所有service都不会把请求转到这pod来了。但是如果liveness 检查结果是fail就会直接kill container,当然如果你的restart policy 是always 会重启pod。
实际上k8s提供了3中检测手段,
http get 返回200-400算成功,别的算失败
tcp socket 你指定的tcp端口打开,比如能telnet 上
cmd exec 在容器中执行一个命令 推出返回0 算成功。
每中方式都可以定义在readiness 或者liveness 中。比如定义readiness 中http get 就是意思说如果我定义的这个path的http get 请求返回200-400以外的http code 就把我从所有有我的服务里面删了吧,如果定义在liveness里面就是把我kill 了。
比如如果一个http 服务你想一旦它访问有问题我就想重启容器。那你就定义个liveness 检测手段是http get。反之如果有问题我不想让它重启,只是想把它除名不要让请求到它这里来。就配置readiness。
注意,liveness不会重启pod,pod是否会重启由你的restart policy(重启策略)控制。
参考:
https://www.jianshu.com/p/16a375199cf2
pod健康检查详解(liveness,readiness,滚动更新)
标签:doc his date available meta tps cmd 核心 nss
原文地址:https://blog.51cto.com/14320361/2466479