标签:rtm 路径 分代 row creat events comm entity 简单
节前不打烊,以此小文提前预祝大家鼠年大吉。最近和小伙伴们沟通发现,经常有系统出现证书过期的问题,究其原因主要是1. 证书后台自动 renew 了但是系统并没有及时更新 2. 因为没有邮件提醒所以忽略的证书过期。针对上述问题,目前在 Azure 平台内大部分的 PaaS 服务都已经内置了证书自动更新的能力,但对于 IaaS 服务,应为管理界面从操作系统开始都掌握在客户自己手上,所以操作系统内应用的证书更新需要客户自己来完成,那么 Azure 平台有什么好的方法可以帮助客户避免证书过期的问题。本文将介绍如何通过 Azure 平台的服务实现证书过期发现及自动更新。
证书过期预警:
Azure 平台的 Key Vault 服务提供了证书托管服务,客户可以将自己的管理的证书上传至 Key Vault 服务,然后通过设置 Issuance Policy,通过在其中设置 Lifetime Action Type 来实现证书过期邮件提醒,可参阅:https://docs.microsoft.com/en-us/azure/key-vault/about-keys-secrets-and-certificates#key-vault-certificates。
证书自动更新:
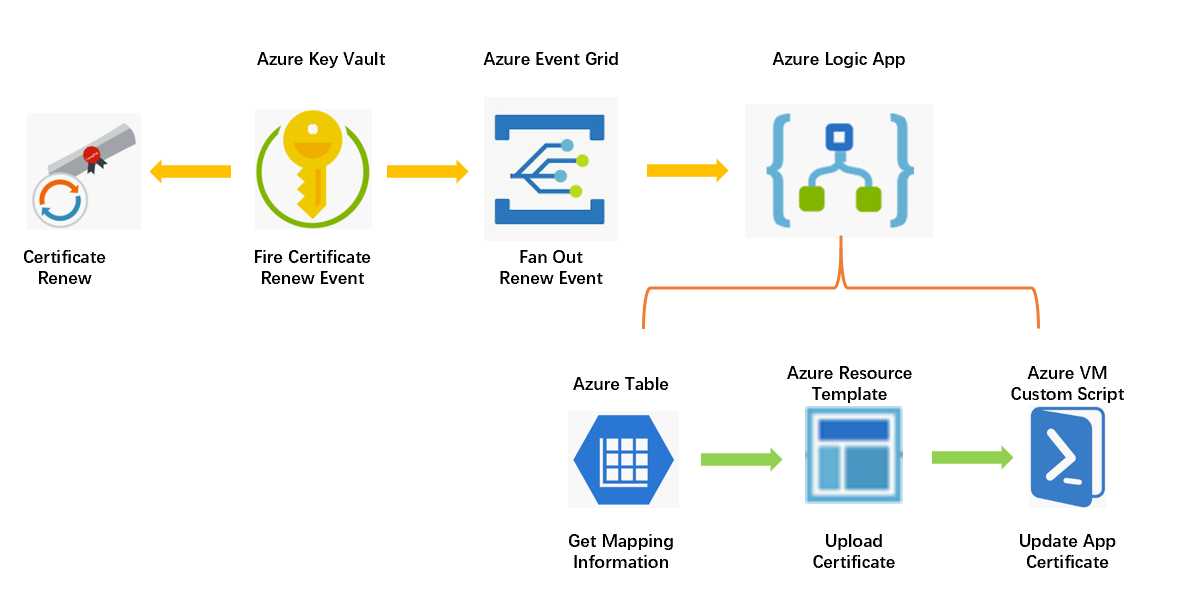
Azure 平台的 Key Vault 服务支持对自签名或支持的集成证书提供方 (DigiCert, GlobalSign) 提供自动证书 Renew 服务,借助该功能可实现无干预的证书自动续签。但是类似虚拟机 IaaS 服务内的应用服务证书更新仍然需要用户自己来处理完成。这部分的自动化可以通过 Event Grid + Logic App 来实现。Azure Event Grid 服务原生集成支持 Key Vault 服务的事件消息,当有证书续签的时候会释放证书事件消息,Logic App 通过订阅监听改证书事件消息可以实现后续证书更细的自动化流程。本文帮助大家更快上手选择了 Logic App(基本上可以是零代码),喜欢代码解决问题的同学可以考虑使用 Function 服务。本文的例子中以更新虚拟机中 Nginx 服务其中的 SSL 证书为例,在 Logic App 中通过调用 Azure Resource Management -- Resource Update 模块来将续签好的证书上传至虚拟机,这里需要强调微软云的 VM 原生的模板中已经支持证书属性,该属性可以通过指定 Azure Key Vault 中存放的证书地址实现将证书上传至虚拟机中,这样就实现了 Azure Resource Template 来自动上传证书。上传证书后再调用 Azure Resource Management -- Resource Update 来调用 VM 的 customscript extension 扩展模块,通过执行脚本来实现将上传好的续签证书来自动更新 Nginx SSL 证书存放路径的过期证书。下面我们来看一下方案的架构图:

上图中还引入了 Azure Table,主要是通过基础的 KV 服务实现多应用/多主机证书自动更新的支持,在 Azure Table 中存储 KeyVault 名称,证书名称和虚拟机的对应关系,这样当 Event Grid 中 Fire 事件后,可以通过在 Table 中查询到与该事件相关证书与什么虚拟机相关。
Logic App 里面三个模块的具体实现这里不再做详细的赘述,基本实现逻辑在上面已经介绍,大家可以参照下面的实例模板代码进行导入修改。其中资源组名称,作为初始变量,大家可以根据自己的实际环境进行调整。
{
"definition": {
"$schema": "https://schema.management.azure.com/providers/Microsoft.Logic/schemas/2016-06-01/workflowdefinition.json#",
"actions": {
"Compose_cert_template": {
"inputs": {
"osProfile": {
"secrets": [
{
"sourceVault": {
"id": "@concat(‘/subscriptions/c04b3c63-8dfe-4f98-be18-e71ff67a1f4e/resourceGroups/‘,variables(‘resourcegroupname‘),‘/providers/Microsoft.KeyVault/vaults/‘,body(‘Parse_JSON‘)?[‘vaultName‘])"
},
"vaultCertificates": [
{
"certificateUrl": "@concat(‘https://‘,body(‘Parse_JSON‘)?[‘vaultName‘],‘.vault.azure.net/secrets/‘,body(‘Parse_JSON‘)?[‘objectName ‘],‘/‘,body(‘Parse_JSON‘)?[‘version‘])"
}
]
}
]
}
},
"runAfter": {
"Initialize_vmname_variable": [
"Succeeded"
]
},
"type": "Compose"
},
"Delay": {
"inputs": {
"interval": {
"count": 30,
"unit": "Second"
}
},
"runAfter": {
"Update_Application_certificate": [
"Succeeded"
]
},
"type": "Wait"
},
"Get_entity": {
"inputs": {
"host": {
"connection": {
"name": "@parameters(‘$connections‘)[‘azuretables‘][‘connectionId‘]"
}
},
"method": "get",
"path": "/Tables/@{encodeURIComponent(‘vmcertmapping‘)}/entities(PartitionKey=‘@{encodeURIComponent(body(‘Parse_JSON‘)?[‘vaultName‘])}‘,RowKey=‘@{encodeURIComponent(body(‘Parse_JSON‘)?[‘objectName ‘])}‘)"
},
"runAfter": {
"Parse_JSON": [
"Succeeded"
]
},
"type": "ApiConnection"
},
"Initialize_resourcegroup_variable": {
"inputs": {
"variables": [
{
"name": "resourcegroupname",
"type": "string",
"value": "akvdemo"
}
]
},
"runAfter": {},
"type": "InitializeVariable"
},
"Initialize_vmname_variable": {
"inputs": {
"variables": [
{
"name": "vmname",
"type": "string",
"value": "@{body(‘Get_entity‘)?[‘vmname‘]}"
}
]
},
"runAfter": {
"Get_entity": [
"Succeeded"
]
},
"type": "InitializeVariable"
},
"Parse_JSON": {
"inputs": {
"content": "@triggerBody()?[‘data‘]",
"schema": {
"properties": {
"Id": {
"type": "string"
},
"exp": {
"type": "string"
},
"nbf": {
"type": "string"
},
"objectName ": {
"type": "string"
},
"objectType": {
"type": "string"
},
"vaultName": {
"type": "string"
},
"version": {
"type": "string"
}
},
"type": "object"
}
},
"runAfter": {
"Initialize_resourcegroup_variable": [
"Succeeded"
]
},
"type": "ParseJson"
},
"Refresh_Customextension": {
"inputs": {
"body": {
"location": "eastus",
"properties": {
"autoUpgradeMinorVersion": true,
"publisher": "Microsoft.Azure.Extensions",
"settings": {
"commandToExecute": "date",
"fileUris": []
},
"type": "CustomScript",
"typeHandlerVersion": "2.0"
}
},
"host": {
"connection": {
"name": "@parameters(‘$connections‘)[‘arm‘][‘connectionId‘]"
}
},
"method": "put",
"path": "/subscriptions/@{encodeURIComponent(‘c04b3c63-8dfe-4f98-be18-e71ff67a1f4e‘)}/resourcegroups/@{encodeURIComponent(variables(‘resourcegroupname‘))}/providers/@{encodeURIComponent(‘Microsoft.Compute‘)}/@{encodeURIComponent(concat(‘virtualMachines/‘,variables(‘vmname‘),‘/extensions/customScript‘))}",
"queries": {
"x-ms-api-version": "2019-03-01"
}
},
"runAfter": {
"Delay": [
"Succeeded"
]
},
"type": "ApiConnection"
},
"Update_Application_certificate": {
"inputs": {
"body": {
"location": "eastus",
"properties": {
"autoUpgradeMinorVersion": true,
"publisher": "Microsoft.Azure.Extensions",
"settings": {
"commandToExecute": "sh config-cert.sh",
"fileUris": [
"https://akvdemoscript.blob.core.windows.net/customscript/config-cert.sh"
]
},
"type": "CustomScript",
"typeHandlerVersion": "2.0"
}
},
"host": {
"connection": {
"name": "@parameters(‘$connections‘)[‘arm‘][‘connectionId‘]"
}
},
"method": "put",
"path": "/subscriptions/@{encodeURIComponent(‘c04b3c63-8dfe-4f98-be18-e71ff67a1f4e‘)}/resourcegroups/@{encodeURIComponent(variables(‘resourcegroupname‘))}/providers/@{encodeURIComponent(‘Microsoft.Compute‘)}/@{encodeURIComponent(concat(‘virtualMachines/‘,variables(‘vmname‘),‘/extensions/customScript‘))}",
"queries": {
"x-ms-api-version": "2019-03-01"
}
},
"runAfter": {
"Update_VM_certificate": [
"Succeeded"
]
},
"type": "ApiConnection"
},
"Update_VM_certificate": {
"inputs": {
"body": {
"location": "eastus",
"properties": "@outputs(‘Compose_cert_template‘)"
},
"host": {
"connection": {
"name": "@parameters(‘$connections‘)[‘arm‘][‘connectionId‘]"
}
},
"method": "put",
"path": "/subscriptions/@{encodeURIComponent(‘c04b3c63-8dfe-4f98-be18-e71ff67a1f4e‘)}/resourcegroups/@{encodeURIComponent(variables(‘resourcegroupname‘))}/providers/@{encodeURIComponent(‘Microsoft.Compute‘)}/@{encodeURIComponent(concat(‘virtualMachines/‘,variables(‘vmname‘)))}",
"queries": {
"x-ms-api-version": "2019-03-01"
}
},
"runAfter": {
"Compose_cert_template": [
"Succeeded"
]
},
"type": "ApiConnection"
}
},
"contentVersion": "1.0.0.0",
"outputs": {},
"parameters": {
"$connections": {
"defaultValue": {},
"type": "Object"
}
},
"triggers": {
"When_a_resource_event_occurs": {
"inputs": {
"body": {
"properties": {
"destination": {
"endpointType": "webhook",
"properties": {
"endpointUrl": "@{listCallbackUrl()}"
}
},
"filter": {
"includedEventTypes": [
"Microsoft.KeyVault.CertificateNewVersionCreated"
]
},
"topic": "/subscriptions/c04b3c63-8dfe-4f98-be18-e71ff67a1f4e/resourceGroups/akvdemo/providers/Microsoft.KeyVault/vaults/akvdemorepo"
}
},
"host": {
"connection": {
"name": "@parameters(‘$connections‘)[‘azureeventgrid‘][‘connectionId‘]"
}
},
"path": "/subscriptions/@{encodeURIComponent(‘c04b3c63-8dfe-4f98-be18-e71ff67a1f4e‘)}/providers/@{encodeURIComponent(‘Microsoft.KeyVault.vaults‘)}/resource/eventSubscriptions",
"queries": {
"x-ms-api-version": "2017-09-15-preview"
}
},
"splitOn": "@triggerBody()",
"type": "ApiConnectionWebhook"
}
}
},
"parameters": {
"$connections": {
"value": {
"arm": {
"connectionId": "/subscriptions/c04b3c63-8dfe-4f98-be18-e71ff67a1f4e/resourceGroups/akvdemo/providers/Microsoft.Web/connections/arm",
"connectionName": "arm",
"id": "/subscriptions/c04b3c63-8dfe-4f98-be18-e71ff67a1f4e/providers/Microsoft.Web/locations/eastus/managedApis/arm"
},
"azureeventgrid": {
"connectionId": "/subscriptions/c04b3c63-8dfe-4f98-be18-e71ff67a1f4e/resourceGroups/akvdemo/providers/Microsoft.Web/connections/azureeventgrid",
"connectionName": "azureeventgrid",
"id": "/subscriptions/c04b3c63-8dfe-4f98-be18-e71ff67a1f4e/providers/Microsoft.Web/locations/eastus/managedApis/azureeventgrid"
},
"azuretables": {
"connectionId": "/subscriptions/c04b3c63-8dfe-4f98-be18-e71ff67a1f4e/resourceGroups/akvdemo/providers/Microsoft.Web/connections/azuretables",
"connectionName": "azuretables",
"id": "/subscriptions/c04b3c63-8dfe-4f98-be18-e71ff67a1f4e/providers/Microsoft.Web/locations/eastus/managedApis/azuretables"
}
}
}
}
}
Azure VM 对于 Azure Key Vault 的证书原生支持,通过在 VM 描述 Template 描述属性中直接引用 Key Vault 证书路径,即可实现虚拟机对证书的上传导入, Azure Resource VM Template 示例可以参阅如下示例。
{
  "osProfile": {
    "secrets": [
      {
        "sourceVault": {
          "id": "@{keyvaultid}"
        },
        "vaultCertificates": "@{certificate secret id}"
          }
        ]
      }
    ]
  }
}
在 Logic App 中执行的 Custom Script Extension, 是通过执行已经预先上载在 Blob 服务中的脚本文件来实现应用证书更新的,这部分代码逻辑是按照 Nginx SSL 证书示例来做的,大家可以按照实际自己的应用证书路径进行修改。
#!/bin/bash

secretsname=$(find /var/lib/waagent/ -name "*.prv" | cut -c -57)
sudo cp $secretsname.crt /etc/nginx/ssl/demo.cert
sudo cp $secretsname.prv /etc/nginx/ssl/demo.prv
rm -f $secretsname.crt
rm -f $secretsname.prv
sudo service nginx restart
echo $secretsname
Azure Table 中的 Schema 非常简单,只包含一个 vmname 属性,如果大家有更复杂的 Mapping 逻辑可以按照自己的要求定义自己的 Schema。下面供大家参考。其中 PartitionKey 采用 KeyVault Name,RowKey 采用证书名称,该场景 entity 数量和访问频次都不会很多,所以这种 Partition 方式已经可以满足要求。

好了就写到这里啦,小伙伴们鼠年再见!
标签:rtm 路径 分代 row creat events comm entity 简单
原文地址:https://www.cnblogs.com/wekang/p/12218952.html