标签:结构 confirm 文件中 inf 发送消息 uri yml rate 生成
本项目使用MQ实现页面发布的技术方案如下:
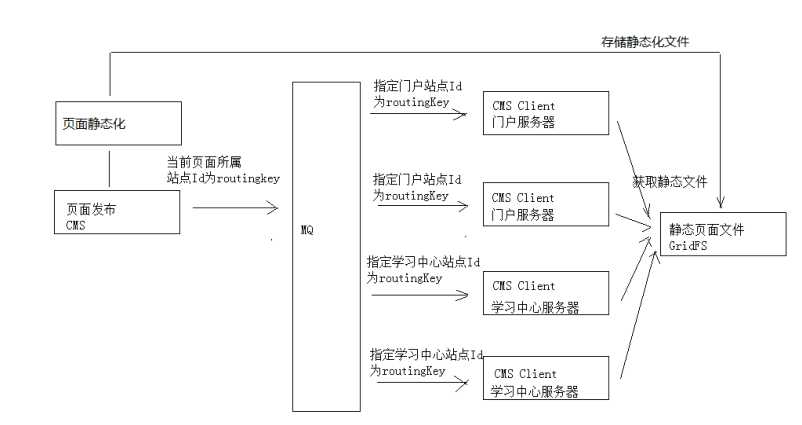
技术方案说明:
1、平台包括多个站点,页面归属不同的站点。
2、发布一个页面应将该页面发布到所属站点的服务器上。
3、每个站点服务部署cms client程序,并与交换机绑定,绑定时指定站点Id为routingKey。
指定站点id为routingKey就可以实现cms client只能接收到所属站点的页面发布消息。
4、页面发布程序向MQ发布消息时指定页面所属站点Id为routingKey,将该页面发布到它所在服务器上的cms
client。
页面发布流程图如下:
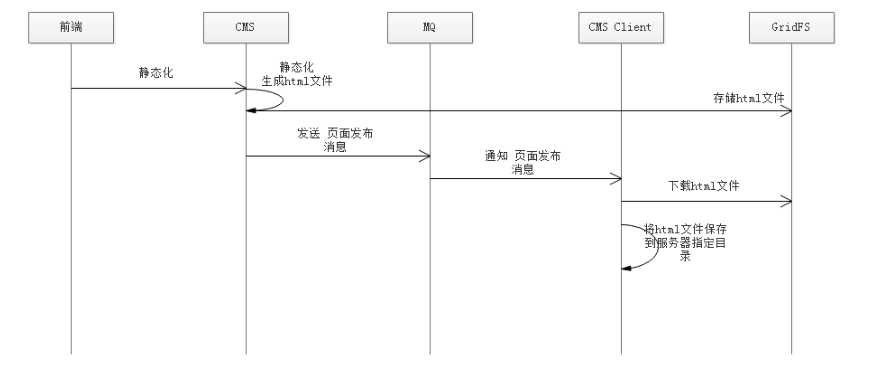
1、前端请求cms执行页面发布。
2、cms执行静态化程序生成html文件。
3、cms将html文件存储到GridFS中。
4、cms向MQ发送页面发布消息
5、MQ将页面发布消息通知给Cms Client
6、Cms Client从GridFS中下载html文件
7、Cms Client将html保存到所在服务器指定目录
功能分析:
创建Cms Client工程作为页面发布消费方,将Cms Client部署在多个服务器上,它负责接收到页面发布 的消息后从
GridFS中下载文件在本地保存。
需求如下:
1、将cms Client部署在服务器,配置队列名称和站点ID。
2、cms Client连接RabbitMQ并监听各自的“页面发布队列”
3、cms Client接收页面发布队列的消息
4、根据消息中的页面id从mongodb数据库下载页面到本地
调用 dao查询页面信息,获取到页面的物理路径,调用dao查询站点信息,得到站点的物理路径
页面物理路径=站点物理路径+页面物理路径+页面名称。
从GridFS查询静态文件内容,将静态文件内容保存到页面物理路径下。
pom.xml依赖

<?xml version="1.0" encoding="UTF‐8"?>
<project xmlns="http://maven.apache.org/POM/4.0.0"
         xmlns:xsi="http://www.w3.org/2001/XMLSchema‐instance"
         xsi:schemaLocation="http://maven.apache.org/POM/4.0.0
http://maven.apache.org/xsd/maven‐4.0.0.xsd">
    <parent>
        <artifactId>xc‐framework‐parent</artifactId>
        <groupId>com.xuecheng</groupId>
        <version>1.0‐SNAPSHOT</version>
        <relativePath>../xc‐framework‐parent/pom.xml</relativePath>
    </parent>
    <modelVersion>4.0.0</modelVersion>
    <artifactId>xc‐service‐manage‐cms‐client</artifactId>
    <dependencies>
        <dependency>
            <groupId>com.xuecheng</groupId>
            <artifactId>xc‐framework‐model</artifactId>
            <version>1.0‐SNAPSHOT</version>
        </dependency>
        <dependency>
            <groupId>org.springframework.boot</groupId>
            <artifactId>spring‐boot‐starter‐test</artifactId>
            <scope>test</scope>
        </dependency>
        <dependency>
            <groupId>org.springframework.boot</groupId>
            <artifactId>spring‐boot‐starter‐amqp</artifactId>
        </dependency>
        <dependency>
            <groupId>org.springframework.boot</groupId>
            <artifactId>spring‐boot‐starter‐data‐mongodb</artifactId>
        </dependency>
        <dependency>
            <groupId>org.apache.commons</groupId>
            <artifactId>commons‐io</artifactId>
        </dependency>
        <dependency>
            <groupId>com.alibaba</groupId>
            <artifactId>fastjson</artifactId>
        </dependency>
    </dependencies>
</project>
在resources下配置application.yml和logback-spring.xml。
application.yml的内容如下:
server:
  port: 31000
spring:
  application:
    name: xc‐service‐manage‐cms‐client
  data:
    mongodb:
      uri:  mongodb://root:123@localhost:27017
      database: xc_cms
  rabbitmq:
    host: 127.0.0.1
    port: 5672
    username: guest
    password: guest
    virtualHost: /
xuecheng:
  mq:
  #cms客户端监控的队列名称(不同的客户端监控的队列不能重复)
    queue: queue_cms_postpage_01
    routingKey: 5a751fab6abb5044e0d19ea1 #此routingKey为门户站点ID
说明:在配置文件中配置队列的名称,每个 cms client在部署时注意队列名称不要重复
@SpringBootApplication
@EntityScan("com.xuecheng.framework.domain.cms")//扫描实体类
@ComponentScan(basePackages={"com.xuecheng.framework"})//扫描common下的所有类
@ComponentScan(basePackages={"com.xuecheng.manage_cms_client"})
public class ManageCmsClientApplication {
    public static void main(String[] args) {
        SpringApplication.run(ManageCmsClientApplication.class, args);
    }
}
消息队列设置如下:
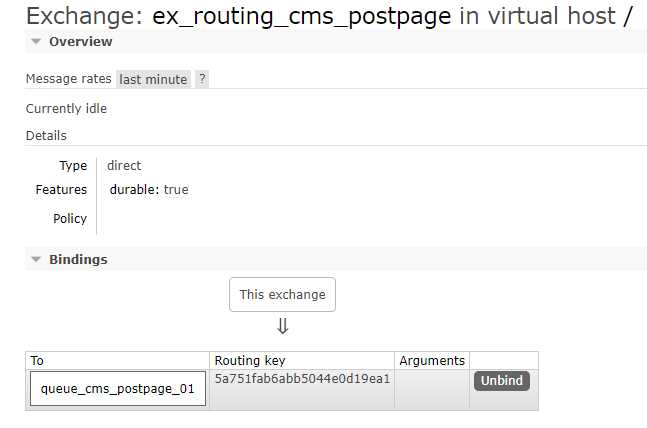
1、创建“ex_cms_postpage”交换机
2、每个Cms Client创建一个队列与交换机绑定
3、每个Cms Client程序配置队列名称和routingKey,将站点ID作为routingKey。

package com.xuecheng.manage_cms_client.config;
import org.springframework.amqp.core.*;
import org.springframework.beans.factory.annotation.Qualifier;
import org.springframework.beans.factory.annotation.Value;
import org.springframework.context.annotation.Bean;
import org.springframework.context.annotation.Configuration;
/**
 * @author Administrator
 * @version 1.0
 **/
@Configuration
public class RabbitmqConfig {
    //队列bean的名称
    public static final String QUEUE_CMS_POSTPAGE = "queue_cms_postpage";
    //交换机的名称
    public static final String EX_ROUTING_CMS_POSTPAGE="ex_routing_cms_postpage";
    //队列的名称
    @Value("${xuecheng.mq.queue}")
    public  String queue_cms_postpage_name;
    //routingKey 即站点Id
    @Value("${xuecheng.mq.routingKey}")
    public  String routingKey;
    /**
     * 交换机配置使用direct类型
     * @return the exchange
     */
    @Bean(EX_ROUTING_CMS_POSTPAGE)
    public Exchange EXCHANGE_TOPICS_INFORM() {
        return ExchangeBuilder.directExchange(EX_ROUTING_CMS_POSTPAGE).durable(true).build();
    }
    //声明队列
    @Bean(QUEUE_CMS_POSTPAGE)
    public Queue QUEUE_CMS_POSTPAGE() {
        Queue queue = new Queue(queue_cms_postpage_name);
        return queue;
    }
    /**
     * 绑定队列到交换机
     *
     * @param queue    the queue
     * @param exchange the exchange

     * @return the binding
     */
    @Bean
    public Binding BINDING_QUEUE_INFORM_SMS(@Qualifier(QUEUE_CMS_POSTPAGE) Queue queue,
@Qualifier(EX_ROUTING_CMS_POSTPAGE) Exchange exchange) {
        return BindingBuilder.bind(queue).to(exchange).with(routingKey).noargs();
    }
}
消息内容采用json格式存储数据,如下:
页面id:发布页面的id
{
    "pageId":""
}
1、使用CmsPageRepository 查询页面信息
public interface CmsPageRepository extends MongoRepository<CmsPage,String> {
}
2、使用CmsSiteRepository查询站点信息,主要获取站点物理路径
public interface CmsSiteRepository extends MongoRepository<CmsSite,String> {
}
在Service中定义保存页面静态文件到服务器物理路径方法:

package com.xuecheng.manage_cms_client.service;
import com.mongodb.client.gridfs.GridFSBucket;
import com.mongodb.client.gridfs.GridFSDownloadStream;
import com.mongodb.client.gridfs.model.GridFSFile;
import com.xuecheng.framework.domain.cms.CmsPage;
import com.xuecheng.framework.domain.cms.CmsSite;
import com.xuecheng.framework.domain.cms.response.CmsCode;
import com.xuecheng.framework.exception.ExceptionCast;
import com.xuecheng.manage_cms_client.dao.CmsPageRepository;
import com.xuecheng.manage_cms_client.dao.CmsSiteRepository;
import org.apache.commons.io.IOUtils;
import org.springframework.beans.factory.annotation.Autowired;
import org.springframework.data.mongodb.core.query.Criteria;
import org.springframework.data.mongodb.core.query.Query;
import org.springframework.data.mongodb.gridfs.GridFsResource;
import org.springframework.data.mongodb.gridfs.GridFsTemplate;
import org.springframework.stereotype.Service;
import java.io.*;
import java.util.Optional;
/**
 * @author Administrator
 * @version 1.0
 **/
@Service
public class PageService {
    @Autowired
    CmsPageRepository cmsPageRepository;
    @Autowired
    CmsSiteRepository cmsSiteRepository;
    @Autowired
    GridFsTemplate gridFsTemplate;
    @Autowired
    GridFSBucket gridFSBucket;
    //将页面html保存到页面物理路径
    public void savePageToServerPath(String pageId){
        Optional<CmsPage> optional = cmsPageRepository.findById(pageId);
        if(!optional.isPresent()){
            ExceptionCast.cast(CmsCode.CMS_PAGE_NOTEXISTS);
        }
        //取出页面物理路径
        CmsPage cmsPage = optional.get();
        //页面所属站点
        CmsSite cmsSite = this.getCmsSiteById(cmsPage.getSiteId());
        //页面物理路径
        String pagePath = cmsSite.getSitePhysicalPath() + cmsPage.getPagePhysicalPath() +
cmsPage.getPageName();
        //查询页面静态文件
        String htmlFileId = cmsPage.getHtmlFileId();
        InputStream inputStream = this.getFileById(htmlFileId);
        if(inputStream == null){
            ExceptionCast.cast(CmsCode.CMS_GENERATEHTML_HTMLISNULL);
        }
        FileOutputStream fileOutputStream = null;
        try {
            fileOutputStream = new FileOutputStream(new File(pagePath));
            //将文件内容保存到服务物理路径
            IOUtils.copy(inputStream,fileOutputStream);
        } catch (Exception e) {
            e.printStackTrace();
        }finally {
            try {
                inputStream.close();
            } catch (IOException e) {
                e.printStackTrace();
            }
            try {
                fileOutputStream.close();
            } catch (IOException e) {
                e.printStackTrace();
            }
        }
    }
    //根据文件id获取文件内容
    public InputStream getFileById(String fileId){
        try {
            GridFSFile gridFSFile =
gridFsTemplate.findOne(Query.query(Criteria.where("_id").is(fileId)));
            GridFSDownloadStream gridFSDownloadStream =
gridFSBucket.openDownloadStream(gridFSFile.getObjectId());
            GridFsResource gridFsResource = new GridFsResource(gridFSFile,gridFSDownloadStream);
            return gridFsResource.getInputStream();
        } catch (IOException e) {
            e.printStackTrace();
        }
        return null;
    }
    //根据站点id得到站点
    public CmsSite getCmsSiteById(String siteId){
        Optional<CmsSite> optional = cmsSiteRepository.findById(siteId);
        if(optional.isPresent()){
            CmsSite cmsSite = optional.get();
            return cmsSite;
        }
        return null;
    }
}
在cms client工程的mq包下创建ConsumerPostPage类,ConsumerPostPage作为发布页面的消费客户端,监听
页面发布队列的消息,收到消息后从mongodb下载文件,保存在本地。

package com.xuecheng.manage_cms_client.mq;
import com.alibaba.fastjson.JSON;
import com.xuecheng.framework.domain.cms.CmsPage;
import com.xuecheng.manage_cms_client.dao.CmsPageRepository;
import com.xuecheng.manage_cms_client.service.PageService;
import org.slf4j.Logger;
import org.slf4j.LoggerFactory;
import org.springframework.amqp.rabbit.annotation.RabbitListener;
import org.springframework.beans.factory.annotation.Autowired;
import org.springframework.stereotype.Component;
import java.util.Map;
import java.util.Optional;
/**
 * @author Administrator
 * @version 1.0
 **/
@Component
public class ConsumerPostPage {
    private static final Logger LOGGER = LoggerFactory.getLogger(ConsumerPostPage.class);
    @Autowired
    CmsPageRepository cmsPageRepository;
    @Autowired
    PageService pageService;
    @RabbitListener(queues={"${xuecheng.mq.queue}"})
    public void postPage(String msg){
        //解析消息
        Map map = JSON.parseObject(msg, Map.class);
        LOGGER.info("receive cms post page:{}",msg.toString());
        //取出页面id
        String pageId = (String) map.get("pageId");
        //查询页面信息
        Optional<CmsPage> optional = cmsPageRepository.findById(pageId);
        if(!optional.isPresent()){
            LOGGER.error("receive cms post page,cmsPage is null:{}",msg.toString());
            return ;
        }
        //将页面保存到服务器物理路径
        pageService.savePageToServerPath(pageId);
    }
}
管理员通过 cms系统发布“页面发布”的消费,cms系统作为页面发布的生产方。
需求如下:
1、管理员进入管理界面点击“页面发布”,前端请求cms页面发布接口。
2、cms页面发布接口执行页面静态化,并将静态化页面存储至GridFS中。
3、静态化成功后,向消息队列发送页面发布的消息。
1) 获取页面的信息及页面所属站点ID。
2) 设置消息内容为页面ID。(采用json格式,方便日后扩展)
3) 发送消息给ex_cms_postpage交换机,并将站点ID作为routingKey。
用户操作流程:
1、用户进入cms页面列表。
2、点击“发布”请求服务端接口,发布页面。
3、提示“发布成功”,或发布失败。
在 cms前端添加 api方法。
/*发布页面*/
export const page_postPage= id => {
  return http.requestPost(apiUrl+‘/cms/page/postPage/‘+id)
}
修改page_list.vue,添加发布按钮
<el‐table‐column label="发布" width="80">
  <template slot‐scope="scope">
    <el‐button
      size="small" type="primary" plain @click="postPage(scope.row.pageId)">发布
    </el‐button>
  </template>
</el‐table‐column>
添加页面发布事件:
postPage (id) {
  this.$confirm(‘确认发布该页面吗?‘, ‘提示‘, {
  }).then(() => {
    cmsApi.page_postPage(id).then((res) => {
      if(res.success){
        console.log(‘发布页面id=‘+id);
        this.$message.success(‘发布成功,请稍后查看结果‘);
      }else{
        this.$message.error(‘发布失败‘);
      }
    });
  }).catch(() => {
  });
},
课程管理包括如下功能需求:
1、分类管理
2、新增课程
3、修改课程
4、预览课程
5、发布课程
用户的操作流程如下:
1、进入我的课程
2、点击“添加课程”,进入添加课程界面
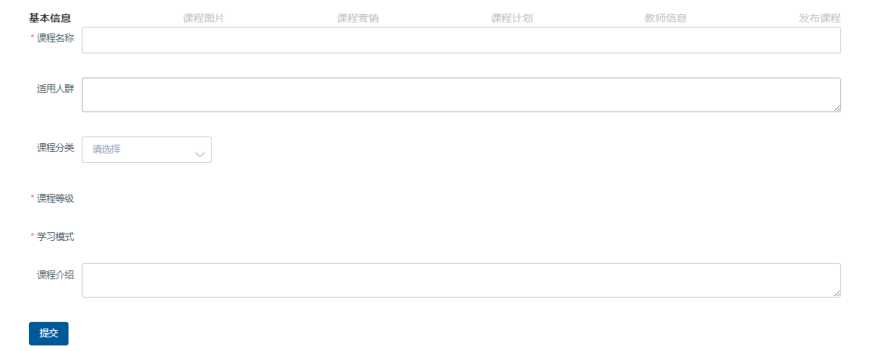
3、输入课程基本信息,点击提交
4、课程基本信息提交成功,自动进入“管理课程”界面,点击“管理课程”也可以进入“管理课程”界面
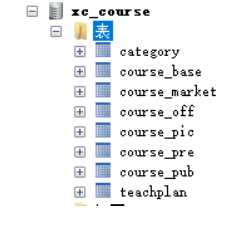
1) 创建数据库
课程管理使用MySQL数据库,创建课程管理数据库:xc_course。
导入xc_course.sql脚本
2) 数据表介绍
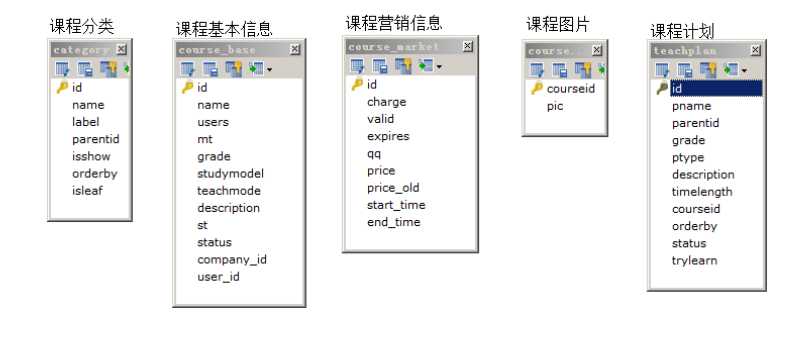
课程信息内容繁多,将课程信息分类保存在如下表中:
持久层技术介绍:
课程管理服务使用MySQL数据库存储课程信息,持久层技术如下:
1、spring data jpa:用于表的基本CRUD。
2、mybatis:用于复杂的查询操作。
3、druid:使用阿里巴巴提供的spring boot 整合druid包druid-spring-boot-starter管理连接池。
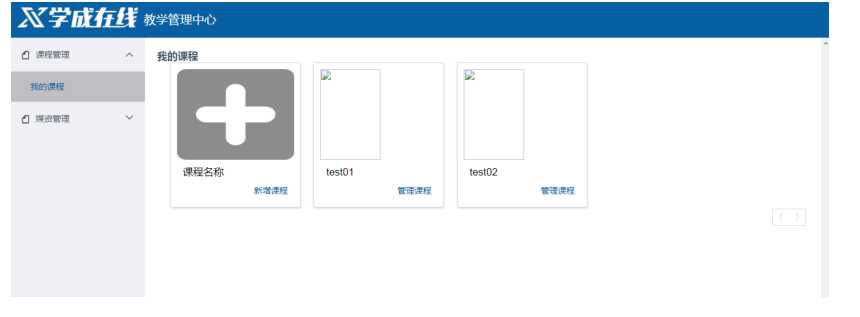

左侧显示的就是课程计划,课程计划是一个树型结构,方便扩展课程计划的级别。
在上边页面中,点击“添加课程计划”即可对课程计划进行添加操作。
点击修改可对某个章节内容进行修改。
点击删除可删除某个章节。
在course_plan.vue文件中添加tree组件的代码,进行测试:
1、组件标签
<el‐tree
      :data="data"
      show‐checkbox
      node‐key="id"
      default‐expand‐all
      :expand‐on‐click‐node="false"
      :render‐content="renderContent">
    </el‐tree>
2、数据对象
let id = 1000;
  export default {
    data() {
      return {
        data : [{
          id: 1,
          label: ‘一级 1‘,
          children: [{
            id: 4,
            label: ‘二级 1‐1‘,
            children: [{
              id: 9,
              label: ‘三级 1‐1‐1‘
            }, {
              id: 10,
              label: ‘三级 1‐1‐2‘
            }]
          }]
        }]
      }
     }
   }
课程计划是树型结构,采用表的自连接方式进行查询,sql语句如下:
SELECT
a.id one_id,
a.pname one_pname,
b.id two_id,
b.pname two_pname,
c.id three_id,
c.pname three_pname
FROM
teachplan a
LEFT JOIN teachplan b
ON a.id = b.parentid
LEFT JOIN teachplan c
ON b.id = c.parentid
WHERE a.parentid=‘0‘
AND a.courseid=‘4028e581617f945f01617f9dabc40000‘
ORDER BY a.orderby,
b.orderby,
c.orderby
1) mapper接口
@Mapper
public interface TeachplanMapper {
    public TeachplanNode selectList(String courseId);
}
2)mapper映射文件

<resultMap type="com.xuecheng.framework.domain.course.ext.TeachplanNode" id="teachplanMap" >
     <id property="id" column="one_id"/>
     <result property="pname" column="one_name"/>
     <collection property="children"
ofType="com.xuecheng.framework.domain.course.ext.TeachplanNode">
         <id property="id" column="two_id"/>
         <result property="pname" column="two_name"/>
         <collection property="children"
ofType="com.xuecheng.framework.domain.course.ext.TeachplanNode">
             <id property="id" column="three_id"/>
             <result property="pname" column="three_name"/>
         </collection>
     </collection>
 </resultMap>
 <select id="selectList" resultMap="teachplanMap" parameterType="java.lang.String" >
     SELECT
       a.id one_id,
       a.pname one_name,
       b.id two_id,
       b.pname two_name,
       c.id three_id,
       c.pname three_name
     FROM
       teachplan a LEFT JOIN teachplan b
         ON a.id = b.parentid
       LEFT JOIN teachplan c
         ON b.id = c.parentid
     WHERE  a.parentid = ‘0‘
     <if test="_parameter!=null and _parameter!=‘‘">
         and a.courseid=#{courseId}
     </if>
     ORDER BY a.orderby,
       b.orderby,
       c.orderby
</select>
创建CourseService类,定义查询课程计划方法
@Service
public class CourseService {
    @Autowired
    TeachplanMapper teachplanMapper;
    //查询课程计划
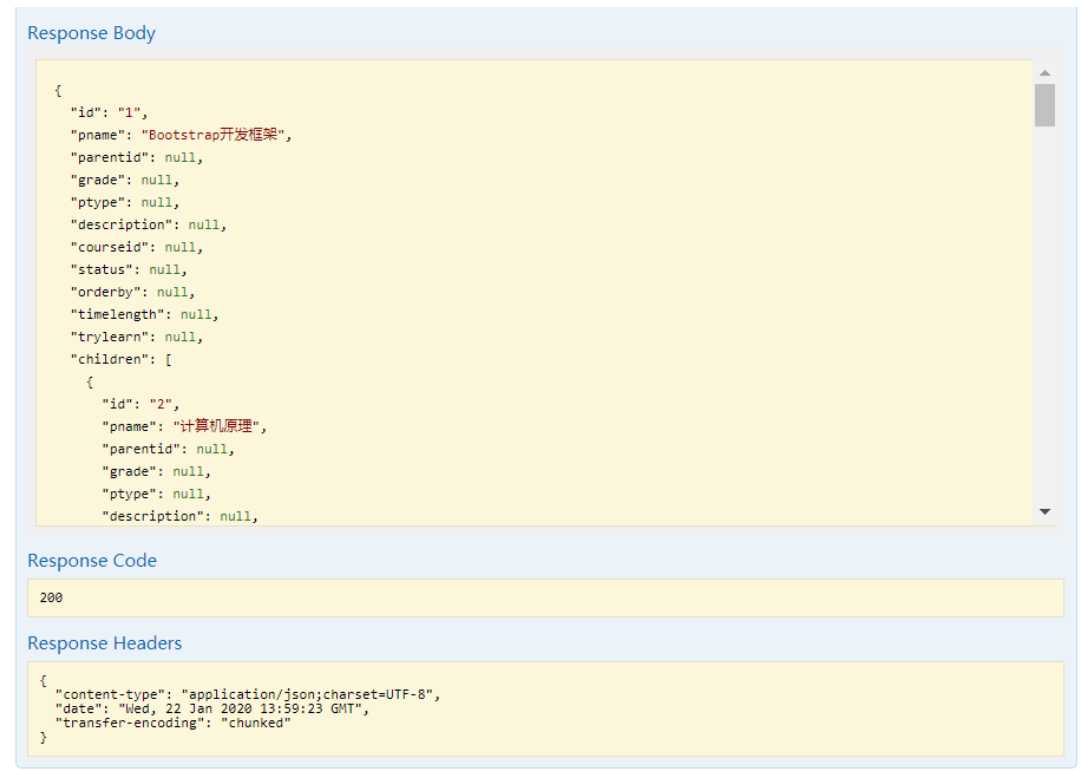
    public TeachplanNode findTeachplanList(String courseId){
        TeachplanNode teachplanNode = teachplanMapper.selectList(courseId);
        return teachplanNode;
    }
}
@RestController
@RequestMapping("/course")
public class CourseController implements CourseControllerApi {
    @Autowired
    CourseService courseService;
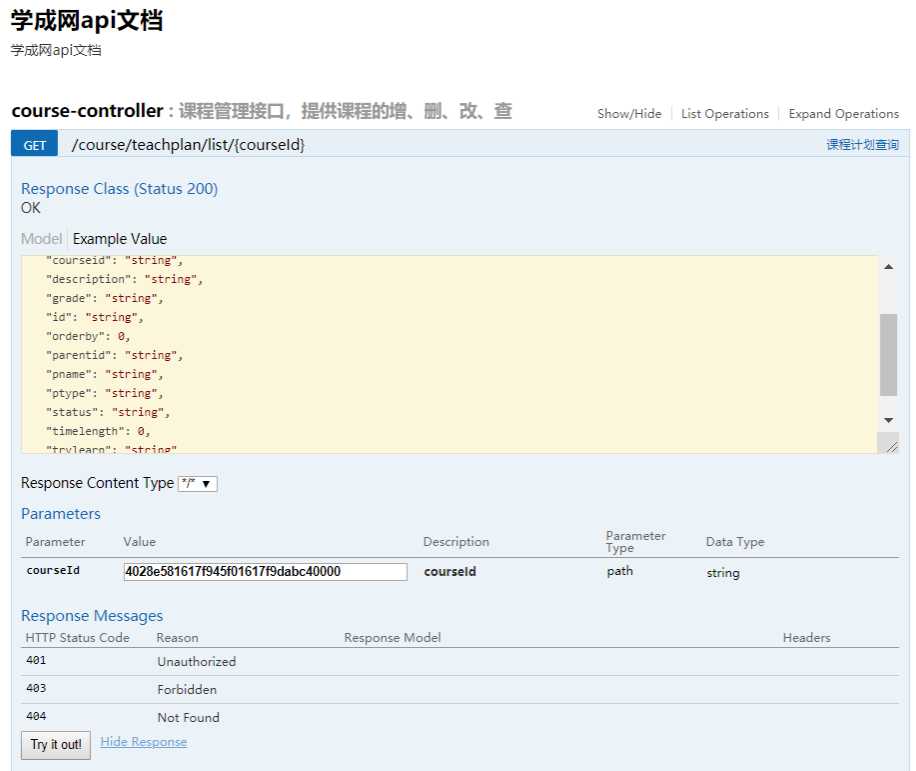
    //查询课程计划
    @Override
    @GetMapping("/teachplan/list/{courseId}")
    public TeachplanNode findTeachplanList(String courseId) {
        return courseService.findTeachplanList(courseId);
    }
}


标签:结构 confirm 文件中 inf 发送消息 uri yml rate 生成
原文地址:https://www.cnblogs.com/anan-java/p/12231382.html