标签:use maven url 完成 dir win apply ide isp
1、Maven插件的设置: Window->Preferences->Maven
(1)installations : 指定Maven核心程序的位置。默认是插件自带的Maven程序,可以改为我们自己解压的那个。
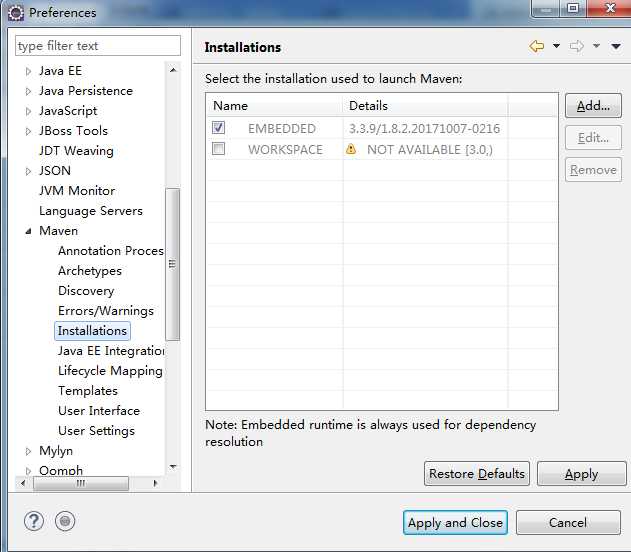
点击add:
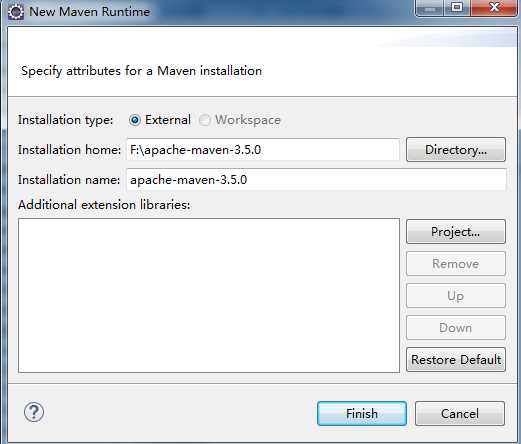
选择自己解压的maven的位置,点击finish。选择自己刚刚加入的:
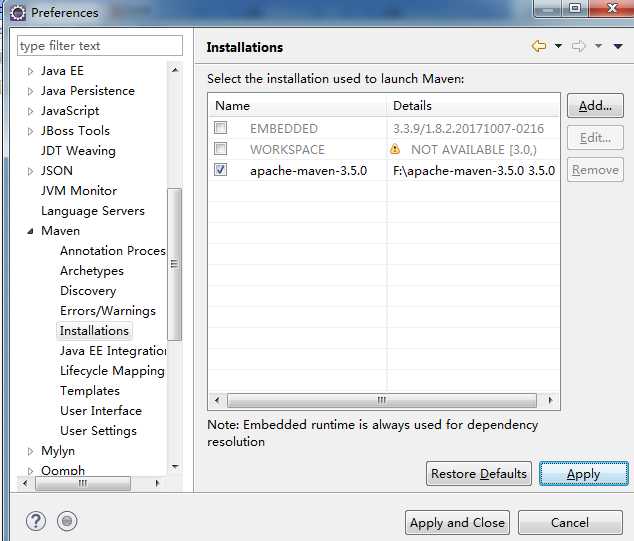
点击apply--Apply and Close。
(2)user settings : 指定Maven核心程序中 conf/settings.xml 文件的位置,进而获取本地仓库的位置。
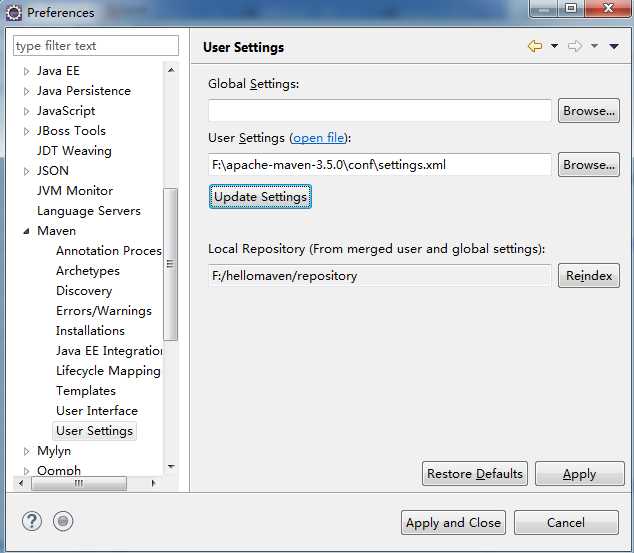
选择我们自己的maven的文件中的settings.xml(里面Local Repository是我们如下修改的位置)
可以在maven解压后的conf文件加下的settings.xml进行修改。
找到settings标签,修改:
<localRepository>F:/hellomaven/repository</localRepository>
(3)指定依赖包下载的来源:找到mirrors标签,向里面加入:
    <mirror>
      <id>alimaven</id>
      <mirrorOf>central</mirrorOf>
      <name>aliyun maven</name>
      <url>http://maven.aliyun.com/nexus/content/groups/public/</url>
    </mirror>
(4)更改java版本使的与Project facets中的保持一致:找到profiles标签,在里面插入:
    <profile>

      <id>jdk1.7</id>

      <activation>
        <activeByDefault>true</activeByDefault>
        <jdk>1.7</jdk>
      </activation>

      <properties>
        <maven.compiler.source>1.7</maven.compiler.source>
        <maven.compiler.target>1.7</maven.compiler.target>
        <maven.compiler.compilerVersion>1.7</maven.compiler.compilerVersion>
      </properties>
    </profile>
2、新建一个maven项目
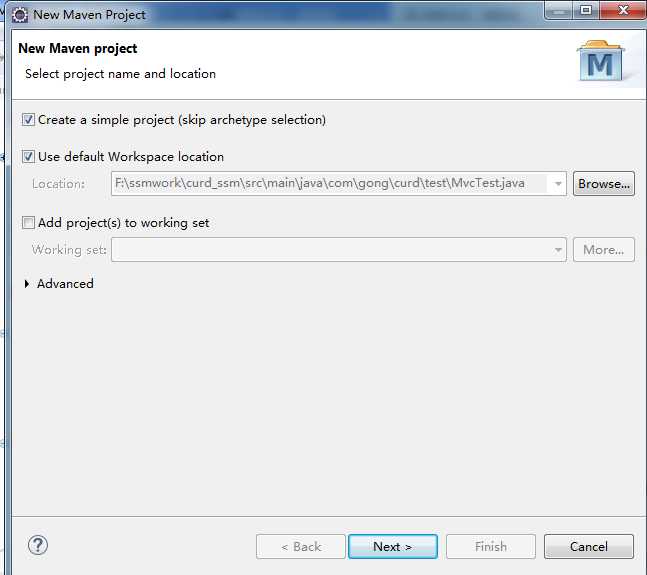
点击next:

点击finish:相关目录如下,generatorConfig.xml不是生成的,是我之后自己建的暂时不用管。
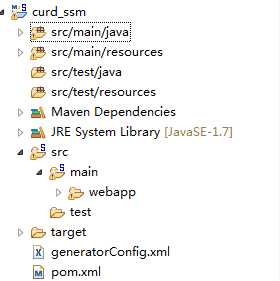
3、调整web目录结构,在项目上点右键 -> properties->Project Facets -> 把Dynamic Web Module 勾选去掉,并Apply -> 将Dynamic Web Module 重新勾选 -> 点击Further configuration available -> 修改 Content directory为src/main/webapp -> Apply 即在Maven工程上生成动态Web目录结构。(这里java版本改为1.7)
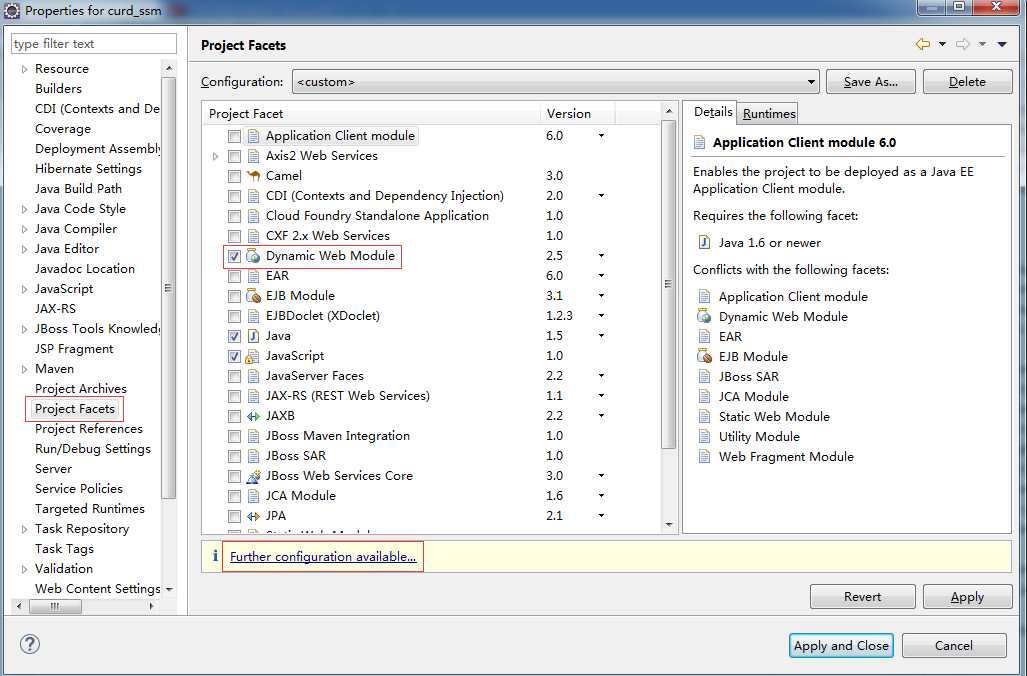
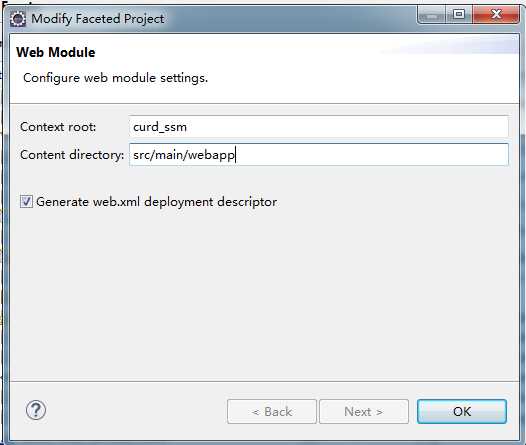
此时在src/main/webapp下才会有Dynamic Web Project相应的文件:

static是我自己之后建的,暂时不用管。
4、接下来看看pom.xml,这是maven项目的核心
<project xmlns="http://maven.apache.org/POM/4.0.0" xmlns:xsi="http://www.w3.org/2001/XMLSchema-instance" xsi:schemaLocation="http://maven.apache.org/POM/4.0.0 http://maven.apache.org/xsd/maven-4.0.0.xsd">
  <modelVersion>4.0.0</modelVersion>
  <groupId>com.gong</groupId>
  <artifactId>curd_ssm</artifactId>
  <version>0.0.1-SNAPSHOT</version>
  <packaging>war</packaging>


</project>
我们可以在里面加入我们所需要的jar包,不过是以maven里面的格式,我们就一次性把所需要的包都加进去了:
<project xmlns="http://maven.apache.org/POM/4.0.0" xmlns:xsi="http://www.w3.org/2001/XMLSchema-instance" xsi:schemaLocation="http://maven.apache.org/POM/4.0.0 http://maven.apache.org/xsd/maven-4.0.0.xsd">
  <modelVersion>4.0.0</modelVersion>
  <groupId>com.gong</groupId>
  <artifactId>curd_ssm</artifactId>
  <version>0.0.1-SNAPSHOT</version>
  <packaging>war</packaging>

  <!--引入项目依赖包-->
  <dependencies>
      <!-- 分页所需 -->
    <dependency>
        <groupId>com.github.pagehelper</groupId>
        <artifactId>pagehelper</artifactId>
        <version>5.0.0</version>
    </dependency>

    <!-- https://mvnrepository.com/artifact/log4j/log4j -->
    <!-- 日志所需 -->
    <dependency>
        <groupId>log4j</groupId>
        <artifactId>log4j</artifactId>
        <version>1.2.17</version>
    </dependency>

      <!-- https://mvnrepository.com/artifact/org.mybatis.generator/mybatis-generator-core -->
      <!-- mybatis逆向工程所需 -->
    <dependency>
        <groupId>org.mybatis.generator</groupId>
        <artifactId>mybatis-generator-core</artifactId>
        <version>1.3.5</version>
    </dependency>

      <!-- https://mvnrepository.com/artifact/org.springframework/spring-webmvc -->
      <!-- springmvc所需 -->
    <dependency>
        <groupId>org.springframework</groupId>
        <artifactId>spring-webmvc</artifactId>
        <version>4.3.7.RELEASE</version>
    </dependency>

    <!-- https://mvnrepository.com/artifact/com.fasterxml.jackson.core/jackson-databind -->
    <!-- 使用json所需的 -->
    <dependency>
        <groupId>com.fasterxml.jackson.core</groupId>
        <artifactId>jackson-databind</artifactId>
        <version>2.8.8</version>
    </dependency>

    <!-- jsr303 -->
    <!-- https://mvnrepository.com/artifact/org.hibernate/hibernate-validator -->
    <!-- 验证所需 -->
    <dependency>
        <groupId>org.hibernate</groupId>
        <artifactId>hibernate-validator</artifactId>
        <version>5.4.1.Final</version>
    </dependency>

    <!-- spring-jdbc -->
    <!-- https://mvnrepository.com/artifact/org.springframework/spring-jdbc -->
    <dependency>
        <groupId>org.springframework</groupId>
        <artifactId>spring-jdbc</artifactId>
        <version>4.3.7.RELEASE</version>
    </dependency>

    <!-- https://mvnrepository.com/artifact/org.springframework/spring-test -->
    <!-- 测试spring所需 -->
    <dependency>
        <groupId>org.springframework</groupId>
        <artifactId>spring-test</artifactId>
        <version>4.3.7.RELEASE</version>
        <scope>test</scope>
    </dependency>

    <!-- https://mvnrepository.com/artifact/org.springframework/spring-aspects -->
    <!-- 面向切片编程所需 -->
    <dependency>
        <groupId>org.springframework</groupId>
        <artifactId>spring-aspects</artifactId>
        <version>4.3.7.RELEASE</version>
    </dependency>

    <!-- https://mvnrepository.com/artifact/org.mybatis/mybatis -->
    <!-- mybatis所需 -->
    <dependency>
        <groupId>org.mybatis</groupId>
        <artifactId>mybatis</artifactId>
        <version>3.4.2</version>
    </dependency>

    <!-- https://mvnrepository.com/artifact/org.mybatis/mybatis-spring -->
    <!-- mybatis整合spring所需 -->
    <dependency>
        <groupId>org.mybatis</groupId>
        <artifactId>mybatis-spring</artifactId>
        <version>1.3.1</version>
    </dependency>

    <!-- https://mvnrepository.com/artifact/c3p0/c3p0 -->
    <!-- 数据库连接池 -->
    <dependency>
        <groupId>c3p0</groupId>
        <artifactId>c3p0</artifactId>
        <version>0.9.1.2</version>
    </dependency>

    <!-- https://mvnrepository.com/artifact/mysql/mysql-connector-java -->
    <!-- mysql连接驱动 -->
    <dependency>
        <groupId>mysql</groupId>
        <artifactId>mysql-connector-java</artifactId>
        <version>5.1.41</version>
    </dependency>

    <!-- https://mvnrepository.com/artifact/jstl/jstl -->
    <!-- jstl所需 -->
    <dependency>
        <groupId>jstl</groupId>
        <artifactId>jstl</artifactId>
        <version>1.2</version>
    </dependency>

    <!-- https://mvnrepository.com/artifact/javax.servlet/javax.servlet-api -->
    <!-- 项目所需,指定scope为provided -->
    <dependency>
        <groupId>javax.servlet</groupId>
        <artifactId>javax.servlet-api</artifactId>
        <version>3.1.0</version>
        <scope>provided</scope>
    </dependency>

    <!-- https://mvnrepository.com/artifact/junit/junit -->
    <!-- 单元测试所需 -->
    <dependency>
        <groupId>junit</groupId>
        <artifactId>junit</artifactId>
        <version>4.12</version>
        <scope>test</scope>
    </dependency>

  </dependencies>

</project>
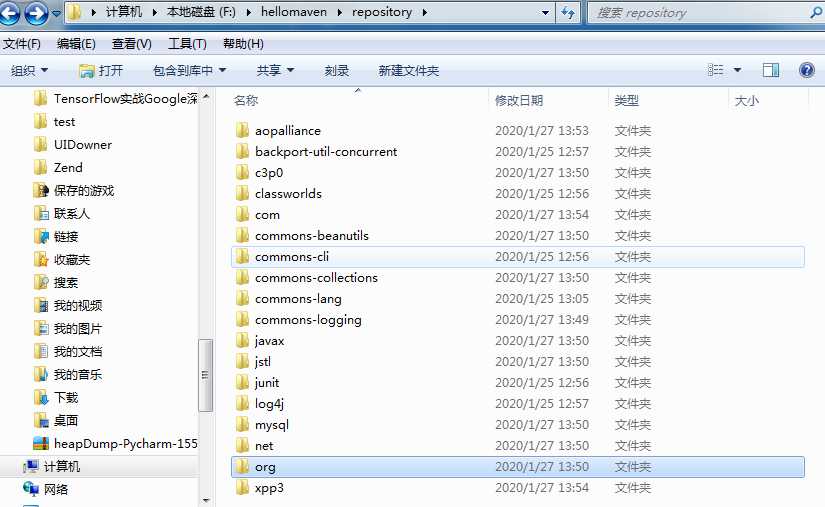
保存之后,在我们定义的依赖包存储位置会有:
综上,一个maven项目环境就搭建完成了。
标签:use maven url 完成 dir win apply ide isp
原文地址:https://www.cnblogs.com/xiximayou/p/12235936.html