标签:tensor key inf 效果 数据 span 双线性插值 符号 oat
这两天新型肺炎病例是指数上升啊!呆在家里没事干,正好想起之前FPGA大赛上有个老哥做了一个图像旋转作品,还在群里发了技术报告。无聊之下就打算学习一下,然后就顺便把平移、旋转、缩放这些几何变换都看了,最后决定把这三个综合起来写个“旋转傻乌龟”的动画。先是用OpenCV内置函数实现了下,感觉不过瘾,又自己写了一遍。老规矩,还是把学过的、做过的东西记录下来!
旋转傻乌龟,效果就是将一只乌龟在窗口中同时进行平移、缩放和旋转,由于最后看起来样子比较傻,因此得名“旋转傻乌龟”。
效果视频:
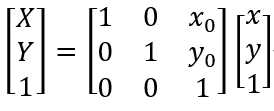
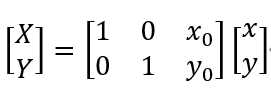
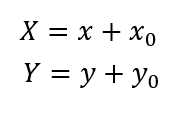
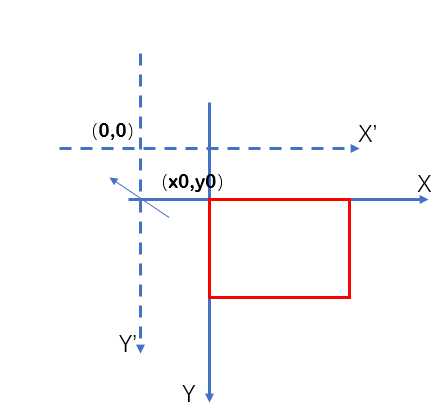
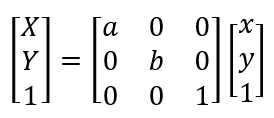
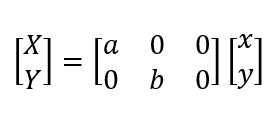
上图中的三种表示方法第二种是OpenCV要求的方式,但第一种形式表示起来更具统一性,因此我更倾向于第一种。但无论哪一种,都能展开成第三种的形式。第三种非常直观的反映了平移,只是需要注意正负号的选取——在编程中,图像一般以左上角为(0,0)点。这也就是说,建立坐标系的时候,X轴以右正方向,Y轴以下为正方向。以上矩阵表示将图像向右平移x0,向下平移y0,也可以认为是将坐标系向左平移x0,向上平移y0。平移可以形象地表示如下:
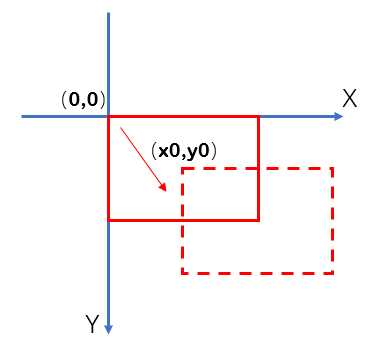
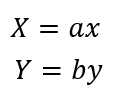
缩放最容易理解,就是将横纵坐标乘以缩放比例。由于我们以左上角为坐标系原点,所以左上角点的位置并不会变化。


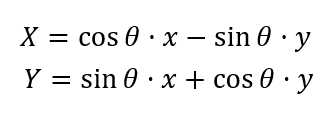
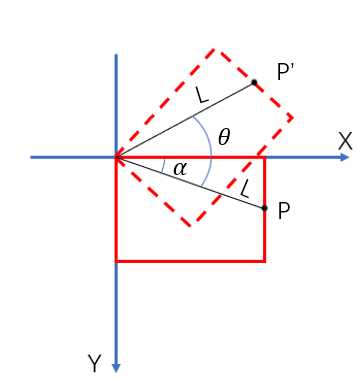
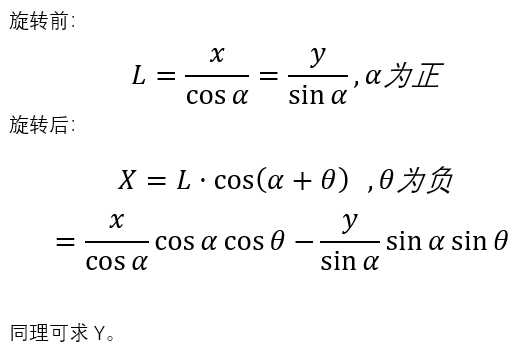
在本文中,规定顺时针方向旋转,θ为正;逆时针旋转,θ为负。旋转前后的坐标关系推导也不难,如下图所示,旋转前先求出旋转半径L,旋转后根据L求出坐标。
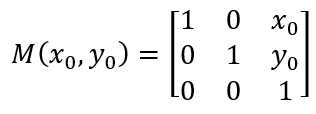
为了之后表述的简洁,我们将这三节中的矩阵分别用特定符号简记:
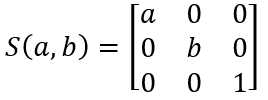

有了以上的基础,我们就可以研究更加复杂的变换。例如我们想以任一点(x0,y0)为中心旋转,而我们推导的R(θ)只适用于以坐标系原点为中心旋转。因此,我们可以将图像向上平移x0,向左平移y0,使(x0,y0)点平移到坐标系原点;然后再旋转,旋转完后再向下平移x0,向右平移y0回到原来位置,这一过程可用三个基础基础矩阵表示成如下形式,注意三个矩阵顺序不能调换。

方法同1.4节的旋转,可以表示为下面形式。除此之外,还可以在此基础上进行旋转平移,只要在左边依次乘上相应矩阵即可。

OpenCV提供了仿射变换函数warpAffine。在输入参数中,M表示变换矩阵,可以是平移、旋转和缩放矩阵等;dsize是输入图像的大小;flags是插值方式,一般采用默认的双线性插值。

至于M的获取,平移矩阵只能自己构造;二旋转矩阵可以由函数getRotationMatrix2D得到。输入参数中,center表示旋转中心的坐标;angle为旋转角度,逆时针为正;scale是缩放比例。可见这个函数同时包揽了旋转和缩放的功能。

我的思路是,用正弦函数生成一系列轨迹点,乌龟每到达一个轨迹点,就旋转一定角度,缩放一定比例,而轨迹点的跟踪就是乌龟中心的平移。根据之前的说的原理,我们先让整个图像绕自身中心旋转和缩放,缩放后的乌龟应该是在整个图像的中间,为了让它中心和轨迹重合,就使用平移变换,此时平移的距离应该是path-center。整个过程的代码如下:
 1 import cv2
 2 import numpy as np
 3 import time
 4
 5 img = cv2.imread(‘image/turtle.jpg‘)
 6 size = img.shape[:-1]
 7 cv2.namedWindow(‘img‘)
 8
 9 #平移矩阵
10 def GetMoveMatrix(x,y):
11     M = np.zeros((2, 3), dtype=np.float32)
12
13     M.itemset((0, 0), 1)
14     M.itemset((1, 1), 1)
15     M.itemset((0, 2), x)
16     M.itemset((1, 2), y)
17
18     return M
19
20 if __name__ == ‘__main__‘:
21
22     # shape和坐标是颠倒的
23     center_x = size[1]/2
24     center_y = size[0]/2
25     #计时
26     start_time = time.time()
27
28     for x in np.linspace(0,2*np.pi,100):
29         #角度、缩放
30         angle = -360*x/2/np.pi
31         scale = 0.2+0.2*np.sin(x)
32         #轨迹
33         path_x = x*50+100
34         path_y = (np.sin(x)+1)*100+100
35         #旋转、平移矩阵
36         M1 = cv2.getRotationMatrix2D((center_x, center_y), angle, scale)
37         M2 = GetMoveMatrix(path_x-center_x,path_y-center_y)
38         #仿射变换
39         rotate = cv2.warpAffine(img,M1,size)
40         dst = cv2.warpAffine(rotate,M2,size)
41
42         # cv2.imshow(‘img‘,dst)
43         # cv2.waitKey(1)
44     #花费125ms
45     print(time.time()-start_time)
这个自己用Python实现的话,性能就相当重要了,尤其是双线性插值,如果不优化的话,慢得简直可以让你怀疑人生。比如,一般的是用两个for循环迭代,代码如下。在这个项目里,这个函数执行一次需要花费1.4s的时间。所以不优化的话,这只乌龟真的是名副其实了!
 1 def InterLinearMap(img,size,mapx,mapy):
 2
 3     dst = np.zeros(img.shape,dtype=np.uint8)
 4
 5     for row in range(size[0]):
 6         for col in range(size[1]):
 7
 8             intx = np.int32(mapx.item(row,col))
 9             inty = np.int32(mapy.item(row,col))
10             partx = mapx.item(row,col)-intx
11             party = mapy.item(row,col)-inty
12             resx = 1-partx
13             resy = 1-party
14
15             if party==0 and partx==0:
16                 result=img[inty,intx]
17             else:
18                 result = ((img[inty,intx]*resx+img[inty,intx+1]*partx)*resy
19                           +(img[inty+1,intx]*resx+img[inty+1,intx+1]*partx)*party)
20
21             dst[row,col]=np.uint8(result+0.5)
22
23     return dst
那怎么办?网上有一些优化的方法,主要是将浮点运算转成整数运算,这个方法对于FPGA这样的逻辑器件最适合不过了——但别忘了,我现在用的是Python,整数运算实际上也会被转成浮点运算,所以这个方法显然不适用。我采用的优化是进行矩阵化,据我所知,很多编程语言只要是支持矩阵运算的,其运算都是优化过的。对于双线性插值和仿射变换,运用矩阵也是很合适,只是写起来会有点抽象。。。
首先,先把生成变换矩阵的函数写出来,代码如下。要注意numpy的三角函数接受的参数是弧度制。
 1 #缩放矩阵
 2 def GetResizeMatrix(scalex,scaley):
 3     M = np.zeros((3,3),dtype=np.float32)
 4
 5     M.itemset((0,0),scalex)
 6     M.itemset((1,1),scaley)
 7     M.itemset((2,2),1)
 8
 9     return M
10 #平移矩阵
11 def GetMoveMatrix(x,y):
12     M = np.zeros((3, 3), dtype=np.float32)
13
14     M.itemset((0, 0), 1)
15     M.itemset((1, 1), 1)
16     M.itemset((2, 2), 1)
17     M.itemset((0, 2), x)
18     M.itemset((1, 2), y)
19
20     return M
21 #旋转矩阵
22 def GetRotationMatrix(angle):
23     M = np.zeros((3, 3), dtype=np.float32)
24
25     M.itemset((0, 0), np.cos(angle))
26     M.itemset((0, 1), -np.sin(angle))
27     M.itemset((1, 0), np.sin(angle))
28     M.itemset((1, 1), np.cos(angle))
29     M.itemset((2, 2), 1)
30
31     return M
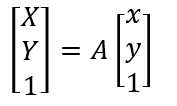
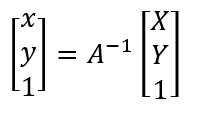
接下来写仿射变换函数,输入参数为图片数据、变换矩阵和输入图片的大小。这里应该要有逆向思维——现在我要得到变换后的图片,就是要求各坐标位置上的色彩,而色彩取样自变换前图像上的一点(这点的坐标可能不是整数),也就是说我们要将变换后的坐标映射到变换前的坐标。再来看之前的公式(下图左,为了方便,将变换矩阵合成为一个矩阵A),现在我们已知的是左边部分,而要求的映射是等式右边的XY,因此我们将A拿到左边,得到另一个公式(下图右),并依据这个公式,写出仿射变换函数。
 1 def WarpAffine(img,Mat,size):
 2
 3     rows = size[0]
 4     cols = size[1]
 5     #生成矩阵[X Y 1]
 6     ones = np.ones((rows, cols), dtype=np.float32)
 7     #gridx/gridy -> shape(rows,cols)
 8     gridx,gridy= np.meshgrid(np.arange(0, cols),np.arange(0, rows))
 9     #dst -> shape(3,rows,cols)
10     dst = np.stack((gridx, gridy, ones))
11
12     #求逆矩阵 M -> shape(3,3)
13     Mat = np.linalg.inv(Mat)
14     #获得矩阵[x,y,1] -> shape(3,rows,cols)
15     src = np.tensordot(Mat,dst,axes=[[-1],[0]])
16
17     #mapx/mapy -> shape(rows,cols)
18     mapx = src[0]#坐标非整数
19     mapy = src[1]#坐标非整数
20     #仿射出界的设为原点
21     flags = (mapy > rows - 2) + (mapy < 0) + (mapx > cols - 2) + (mapx < 0)
22     mapy[flags] = 0
23     mapx[flags] = 0
24     #双线性插值
25
26     result = InterLinearMap(img, mapx, mapy)
27
28     return result
再解决双线性插值,关于该算法的原理挺简单的,读者可以网上查找(提一点,理解双线性插值时可以想象3D模型,Z轴为灰度值)。对于该函数,借鉴一下remap函数,输入参数设两个map,分别表示x,y的映射。map的大小跟图片大小相同,也就是说,一共有rows*cols点需要插值,除了用两个for迭代,我们也可以将rows和cols作为矩阵的两个额外维度,表示样本数。计算的话,利用矩阵的点乘代替凌乱的长算式,显得很简洁,公式如下:

代码如下,经测试,执行一次该函数,花费时间为45ms,这要比原来的1.4s快多了(实在不知道该怎么进一步优化了,mxy、img下表索引、求和各花了15ms)
def InterLinearMap(img,mapx,mapy):

    #(rows,cols)
    inty = np.int32(mapy)
    intx = np.int32(mapx)
    nxty = 1+inty
    nxtx = 1+intx
    #(rows,cols)
    party = mapy - inty
    partx = mapx - intx
    resy = 1-party
    resx = 1-partx

    #(4,rows,cols)
    mxy = np.stack((resy*partx,resy*resx,partx*party, resx*party))
    mxy = np.expand_dims(mxy,axis=-1)

    #(4,rows,cols,3)
    mf = np.stack((img[inty,nxtx],img[inty,intx],img[nxty,nxtx],img[nxty,intx]))

    #res -> shape(rows,cols,3)
    res = np.sum(mxy*mf,axis=0)
    res = np.uint8(res+0.5)

    return res
综上,给出完整代码:
import cv2
import numpy as np

img = cv2.imread(‘image/turtle.jpg‘)
size = img.shape[:-1]
cv2.namedWindow(‘img‘)

#缩放矩阵
def GetResizeMatrix(scalex,scaley):
    M = np.zeros((3,3),dtype=np.float32)

    M.itemset((0,0),scalex)
    M.itemset((1,1),scaley)
    M.itemset((2,2),1)

    return M
#平移矩阵
def GetMoveMatrix(x,y):
    M = np.zeros((3, 3), dtype=np.float32)

    M.itemset((0, 0), 1)
    M.itemset((1, 1), 1)
    M.itemset((2, 2), 1)
    M.itemset((0, 2), x)
    M.itemset((1, 2), y)

    return M
#旋转矩阵
def GetRotationMatrix(angle):
    M = np.zeros((3, 3), dtype=np.float32)

    M.itemset((0, 0), np.cos(angle))
    M.itemset((0, 1), -np.sin(angle))
    M.itemset((1, 0), np.sin(angle))
    M.itemset((1, 1), np.cos(angle))
    M.itemset((2, 2), 1)

    return M

def InterLinearMap(img,mapx,mapy):

    #(rows,cols)
    inty = np.int32(mapy)
    intx = np.int32(mapx)
    nxty = 1+inty
    nxtx = 1+intx
    #(rows,cols)
    party = mapy - inty
    partx = mapx - intx
    resy = 1-party
    resx = 1-partx

    #(4,rows,cols)
    mxy = np.stack((resy*partx,resy*resx,partx*party, resx*party))
    mxy = np.expand_dims(mxy,axis=-1)

    #(4,rows,cols,3)
    mf = np.stack((img[inty,nxtx],img[inty,intx],img[nxty,nxtx],img[nxty,intx]))

    #res -> shape(rows,cols,3)
    res = np.sum(mxy*mf,axis=0)
    res = np.uint8(res+0.5)

    return res


def WarpAffine(img,Mat,size):

    rows = size[0]
    cols = size[1]
    #生成矩阵[X Y 1]
    ones = np.ones((rows, cols), dtype=np.float32)
    #gridx/gridy -> shape(rows,cols)
    gridx,gridy= np.meshgrid(np.arange(0, cols),np.arange(0, rows))
    #dst -> shape(3,rows,cols)
    dst = np.stack((gridx, gridy, ones))

    #求逆矩阵 M -> shape(3,3)
    Mat = np.linalg.inv(Mat)
    #获得矩阵[x,y,1] -> shape(3,rows,cols)
    src = np.tensordot(Mat,dst,axes=[[-1],[0]])

    #mapx/mapy -> shape(rows,cols)
    mapx = src[0]#坐标非整数
    mapy = src[1]#坐标非整数
    #仿射出界的设为原点
    flags = (mapy > rows - 2) + (mapy < 0) + (mapx > cols - 2) + (mapx < 0)
    mapy[flags] = 0
    mapx[flags] = 0
    #双线性插值

    result = InterLinearMap(img, mapx, mapy)

    return result


if __name__ == ‘__main__‘:

    center_x = size[1]/2
    center_y = size[0]/2

    for x in np.linspace(0,2*np.pi,100):

        angle = 360*x/2/np.pi
        scale = 0.2+0.2*np.sin(x)

        path_x = x*50+100
        path_y = (np.sin(x)+1)*100+100

        M = GetMoveMatrix(path_x,path_y)@GetRotationMatrix(x)            @GetResizeMatrix(scale,scale)@GetMoveMatrix(-center_x,-center_y)

        dst = WarpAffine(img,M,size)
        cv2.imshow(‘img‘,dst)
        cv2.waitKey(1)
标签:tensor key inf 效果 数据 span 双线性插值 符号 oat
原文地址:https://www.cnblogs.com/kensporger/p/12236869.html