标签:archive 默认端口 browser 安装脚本 eval else installer with 密钥
为了避免漫长的等待,镜像源选择国内的清华镜像源,镜像源地址:https://mirrors.tuna.tsinghua.edu.cn/anaconda/archive/

我选择最新版本5.3.1,执行如下命令下载:
wget https://mirrors.tuna.tsinghua.edu.cn/anaconda/archive/Anaconda3-5.3.1-Linux-x86_64.sh

yum -y groupinstall "Development tools"
yum -y install bzip2
![]()
3.1 执行命令
bash Anaconda3-5.3.1-Linux-x86_64.sh
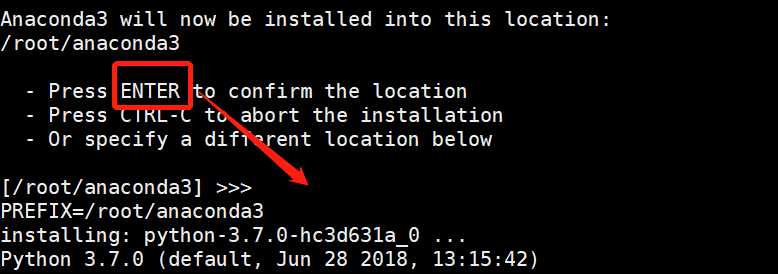
3.2 ENTER确认

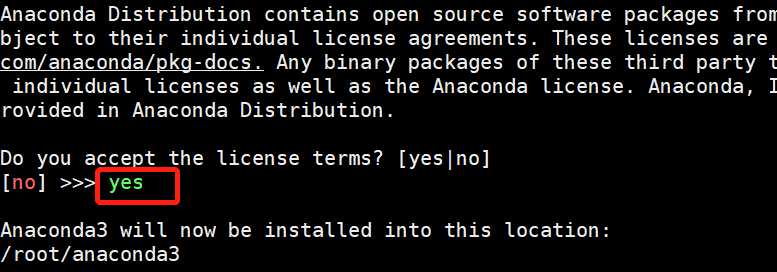
3.3 接受协议

3.4 确认安装路径,我选择默认路径 /root/anaconda3

3.5 同意将Anaconda3安装信息写入配置文件,如果不同意后续需手动添加

3.6 不安装VSCode

注:如果在上述3.5步中选择了同意则跳过此步
将以下内容添加到 /root/.bashrc
# Source global definitions
if [ -f /etc/bashrc ]; then
        . /etc/bashrc
fi
# added by Anaconda3 5.3.1 installer
# >>> conda init >>>
# !! Contents within this block are managed by ‘conda init‘ !!
__conda_setup="$(CONDA_REPORT_ERRORS=false ‘/root/anaconda3/bin/conda‘ shell.bash hook 2> /dev/null)"
if [ $? -eq 0 ]; then
    eval "$__conda_setup"
else
    if [ -f "/root/anaconda3/etc/profile.d/conda.sh" ]; then
        . "/root/anaconda3/etc/profile.d/conda.sh"
        CONDA_CHANGEPS1=false conda activate base
    else
        export PATH="/root/anaconda3/bin:$PATH"
    fi
fi
unset __conda_setup
# <<< conda init <<<

使环境配置生效 source ~/.bashrc
检验 python、pip 版本

pip install ipython jupyter notebook
注:anaconda 已经集成 jupyter 故无需执行以上命令
jupyter notebook --generate-config --allow-root
生成的配置文件在 /root/.jupyter/jupyter_notebook_config.py
打开ipython,生成sha1的密码
from notebook.auth import passwd
passwd()
#输入密码
#output sha1:***********************.
openssl req -x509 -nodes -days 365 -newkey rsa:4096 -keyout jkey.key -out jcert.pem
vim /root/.jupyter/jupyter_notebook_config.py
配置内容如下
#就是刚才passwd()指令生成的密钥复制过来
c.NotebookApp.password = ‘sha1:<your-sha1-hash-value>‘
#服务运行的端口,我这里就是默认端口
c.NotebookApp.port = 8888
#修改为0.0.0.0可以任意远程IP访问
c.NotebookApp.ip = ‘0.0.0.0‘
#默认不打开浏览器
c.NotebookApp.open_browser = False
c.NotebookApp.certfile = ‘/root/anaconda3/bin/jcert.pem‘
c.NotebookApp.keyfile = ‘/root/anaconda3/bin/jkey.key‘
jupyter notebook --allow-root
浏览器输入http://ip:8888验证

输入生成sha1密码时输入的密码登录

所有的安装和基本的设置都已经完成!
Centos7安装 Anaconda + jupyter notebook
标签:archive 默认端口 browser 安装脚本 eval else installer with 密钥
原文地址:https://www.cnblogs.com/keh123000/p/12250414.html