标签:style blog http io color ar 使用 java sp
在Java中,我们用1个.java文件就可以描述清楚一个类;在OC中,一般用2个文件来描述一个类:
1> .h:类的声明文件,用于声明成员变量、方法。类的声明使用关键字@interface和@end。
注意:.h中的方法只是做一个声明,并不对方法进行实现。也就是说,只是说明一下方法名、方法的返回值类型、方法接收的参数类型而已,并不会编写方法内部的代码。
2> .m:类的实现文件,用于实现.h中声明的方法。类的实现使用关键字@implementation和@end。
1> 方法的声明和实现,都必须以 + 或者 - 开头
2> 在.h中声明的所有方法作用域都是public类型,不能更改
成员变量的常用作用域有3种:
1> @public 全局都可以访问
2> @protected 只能在类内部和子类中访问
3> @private 只能在类内部访问
比Java少了一种作用域:包权限作用域,原因很明显:OC没有包名的概念。
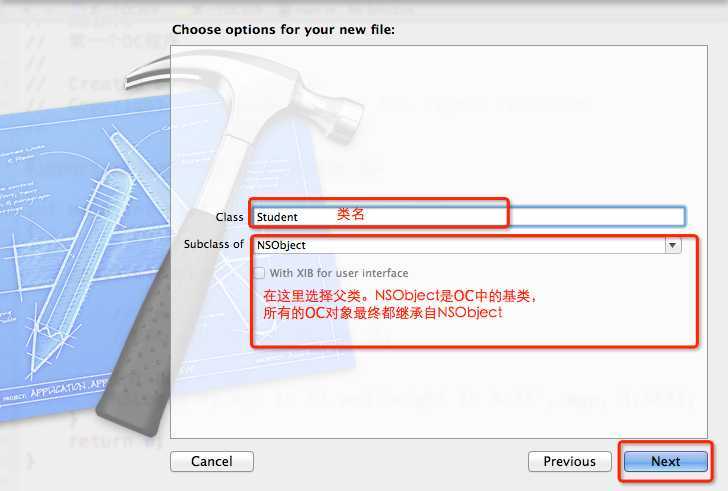
1.右击项目文件夹或者文件,选择"New File"

2.选择Cocoa的"Objective-C class"

3.输入类名和选择父类

这里的类名为Student,父类是NSobject
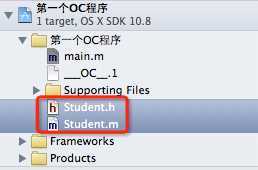
4.创建完毕后,项目中多了两个文件

* Student.h是类的声明文件,Student.m是类的实现文件
* 默认情况下,这2个文件的文件名跟类名一致
* 编译器只会编译.m文件,并不会编译.h文件
1 #import <Foundation/Foundation.h>
2
3 @interface Student : NSObject
4
5 @end
1> 看第3行,OC中使用关键字@interface来声明一个类,@interface后面紧跟着类名Student。
2> 类名Student后面的冒号":"表示继承,即第3行代码的意思是Student继承自NSObject。
3> 因为NSObject被声明在Foundation.h中,所以在第1行用#import包含了Foundation.h文件。
4> 第5行的@end表示类的声明结束了。@interface和@end是配套使用的。
1 #import "Student.h"
2
3 @implementation Student
4
5 @end
1> 看第3行,OC中使用关键字@implementation来实现一个类。@implementation后面紧跟的类名,表示究竟要实现哪一个类。
2> 因为Student这个类是声明在Student.h中的,所以在第1行用#import包含了Student.h文件。如果你不包含Student.h,第3行代码肯定报错,因为它根本不知道Student是个什么鬼东西。
3> 第5行的@end表示类的实现结束了。@implementation和@end是配套使用的。
正常情况下,我们都是把成员变量定义在头文件中,也就是类的声明文件(.h)中
1 #import <Foundation/Foundation.h>
2
3 @interface Student : NSObject {
4     int age; // 年龄
5 }
6
7 @end
1> 第4行定义了一个int类型的成员变量age,age的默认作用域是@protected,即可以在Student类内部和子类中访问
2> 成员变量必须写在大括号{ }里面
接下来给Student增加几个不同作用域的成员变量
 1 #import <Foundation/Foundation.h>
 2
 3 @interface Student : NSObject {
 4     int age; // 年龄
 5
 6     @public
 7     int no; // 学号
 8     int score; // 成绩
 9
10     @protected
11     float height; // 身高
12
13     @private
14     float weight; // 体重
15 }
16
17 @end
一共有5个成员变量,其中
@public作用域的有:no、score
@protected作用域的有:age、height
@private作用域的有:weight
前面我们定义了一个成员变量age,它的作用域是@protected,外界不能直接访问它。为了保证面向对象数据的封装性,我们可以提供age的get方法和set方法,让外界间接访问age。接下来在Student中添加age的get方法和set方法。
 1 #import <Foundation/Foundation.h>
 2
 3 @interface Student : NSObject {
 4     int age; // 年龄
 5
 6     @public
 7     int no; // 学号
 8     int score; // 成绩
 9
10     @protected
11     float height; // 身高
12
13     @private
14     float weight; // 体重
15 }
16
17 // age的get方法
18 - (int)age;
19
20 // age的set方法
21 - (void)setAge:(int)newAge;
22
23 @end
1> 第18行声明了age的get方法,方法名就叫做age,OC建议get方法的名字跟成员变量保持一致(如果是在Java中,就应该叫做getAge)
2> 第18行最面的 - 表示这是一个动态方法( + 则表示静态方法)。age前面的(int)表示方法的返回值为int类型,方法的返回值和参数类型都需要用小括号()包住
3> 第21行声明了age的set方法,前面的 - 表示动态方法,(void)表示方法没有返回值
4> 在OC方法中,一个冒号:对应一个参数。由于第21行age的set方法接收一个int类型的参数,参数名为newAge,所以(int)newAge前面有一个冒号:
5> 一定要记住:一个冒号:对应一个参数,而且冒号:也是方法名的一部分。因此第21行set方法的方法名是setAge:,而不是setAge
再加大一下难度,假如增加一个方法可以同时设置age和height,那么就应该这样写:
1 - (void)setAge:(int)newAge andHeight:(float)newHeight;
* 这个方法是动态方法、没有返回值,接收2个参数,所以有2个冒号:
* 这个方法的方法名是setAge:andHeight:
* 其实andHeight是可以省略的,它只是为了让方法名念起来通顺一点,也让(float)newHeight前面的冒号:不那么孤单
前面已经在Student.h中声明了3个方法,接下来一一实现它们
 1 #import "Student.h"
 2
 3 @implementation Student
 4
 5 // age的get方法
 6 - (int)age {
 7     // 直接返回成员变量age
 8     return age;
 9 }
10
11 // age的set方法
12 - (void)setAge:(int)newAge {
13     // 将参数newAge赋值给成员变量age
14     age = newAge;
15 }
16
17 // 同时设置age和height
18 - (void)setAge:(int)newAge andHeight:(float)newHeight {
19     age = newAge;
20     height = newHeight;
21 }
22 @end
第6行对age方法进行了实现,第12行对setAge:方法进行了实现,第18行对setAge:andHeight:方法进行了实现
如果是在Java中,一个Student.java文件就可以搞定成员变量和方法
 1 public class Student {
 2     protected int age;
 3     protected float height;
 4
 5     public int no;
 6     public int score;
 7
 8     private float weight;
 9
10     /**
11      * age的get方法
12      */
13     public int getAge() {
14         return age;
15     }
16
17     /**
18      * age的set方法
19      */
20     public void setAge(int newAge) {
21         age = newAge;
22     }
23
24     /**
25      * 同时设置age和height
26      */
27     public void setAgeAndHeight(int newAge, float newHeight) {
28         age = newAge;
29         height = newHeight;
30     }
31 }
前面已经定义了一个Student类,成员变量和方法都有了,接下来看一下怎么使用这个类创建对象。
由于OC程序的入口点是main函数,所以在main.m文件中演示Student类的使用。
先上完整代码
 1 #import <Foundation/Foundation.h>
 2 #import "Student.h"
 3
 4 int main(int argc, const char * argv[])
 5 {
 6     @autoreleasepool {
 7         Student *stu = [[Student alloc] init];
 8
 9         [stu release];
10     }
11     return 0;
12 }
因为要用到Student这个类,所以在第2行包含了它的头文件
#import "Student.h"
1)调用Student类的静态方法alloc分配存储空间
Student *stu = [Student alloc];
+ (id)alloc;
可以看到,它的返回值类型是id,这个id代表任何指针类型,你可以暂时理解为:id可以代表任何OC对象,类似于NSObject *。
2)调用Student对象的构造方法init进行初始化
前面调用alloc方法返回的Student对象stu是不能正常使用的,因为仅仅是分配了内存,并没有进行初始化,接下来调用对象的init方法进行初始化
stu = [stu init];
看清楚了,由于init是动态方法,所以这里使用stu变量来调用,并不是使用类名来调用。init会返回已经初始化完毕的对象,再次赋值给了stu变量。这时候的Student对象stu才能正常使用。
3)其实,我们最常见的做法是将alloc和init连起来使用:
Student *stu = [[Student alloc] init];
在main.m完整代码的第7行。
由于OC不支持垃圾回收,因此当不再使用某个对象时,需要调用对象的release方法释放此对象。我们在第9行销毁了stu对象。
[stu release];
这个release方法在这里调用一次即可,不要觉得多调用多几次,对象就会释放地干净一点,这样做会很危险,容易造成野指针错误。
1> 也可以调用静态方法new快速创建一个对象
1 Student *stu = [Student new];
2
3 [stu release];
不过我们还是习惯使用alloc和init来创建对象
2> 前面我们调用了Student的alloc、init、new方法,但是你会发现Student.h中并没有声明这些方法,为什么能够调用呢?原因很简单,这些方法都是父类NSObject的,子类当然可以调用父类的方法。
前面已经成功创建了一个Student对象,接下来访问一下它的公共变量和方法。
 1 #import <Foundation/Foundation.h>
 2 #import "Student.h"
 3
 4 int main(int argc, const char * argv[])
 5 {
 6     @autoreleasepool {
 7         Student *stu = [[Student alloc] init];
 8
 9         // 访问公共变量no
10         stu->no = 10;
11
12         // 调用setAge:方法设置变量age的值
13         [stu setAge:27];
14
15         // 调用setAge:andHeight:方法同时设置变量age和height的值
16         [stu setAge:28 andHeight:1.88f];
17
18         // 访问公共变量no
19         int no = stu->no;
20         // 调用age方法获取变量age的值
21         int age = [stu age];
22
23         // 打印no和age的值
24         NSLog(@"no is %i and age is %i", no, age);
25
26         [stu release];
27     }
28     return 0;
29 }
1.第7行创建了Student对象,第26行销毁了对象
2.第10行和第19行访问了Student对象的公共成员变量no,如果不是公共变量,不能像这样直接访问。注意访问方式:对象->成员变量
3.第13行调用了Student对象的setAge:方法,传入参数27修改了成员变量age的值
4.第16行调用了Student对象的setAge:andHeight:方法,同时修改了成员变量age和height的值
5.第21行调用了Student对象的age方法获取成员变量age的值
6.第24行输出了age和no的值,输出结果:
2013-04-06 21:54:56.221 第一个OC程序[1276:303] no is 10 and age is 28
标签:style blog http io color ar 使用 java sp
原文地址:http://www.cnblogs.com/tlios/p/4071768.html