标签:usr mount path 版本 开启 volumes 通信 persist match
StatefulSet介绍使用Deployment创建的Pod是无状态的,当挂在Volume之后,如果该Pod挂了,Replication Controller会再run一个来保证可用性,但是由于是无状态的,Pod挂了的时候与之前的Volume的关系就已经断开了,新起来的Pod无法找到之前的Pod。但是对于用户而言,他们对底层的Pod挂了没有感知,但是当Pod挂了之后就无法再使用之前挂载的磁盘了。
Pod一致性:包含次序(启动、停止次序)、网络一致性。此一致性与Pod相关,与被调度到哪个node节点无关。
稳定的次序:对于N个副本的StatefulSet,每个Pod都在[0,N)的范围内分配一个数字序号,且是唯一的。
稳定的网络:Pod的hostname模式为(statefulset名称)- (序号)。
稳定的存储:通过VolumeClaimTemplate为每个Pod创建一个PV。删除、减少副本,不会删除相关的卷。
template(模板):根据模板 创建出来的Pod,它们J的状态都是一模一样的(除了名称,IP, 域名之外)
可以理解为:任何一个Pod, 都可以被删除,然后用新生成的Pod进行替换。
mysql:主从关系。
如果把之前无状态的服务比喻为牛、羊等牲畜,因为,这些到一定时候就可以”送出“。那么,有状态就比喻为:宠物,而宠物不像牲畜一样到达一定时候“送出”,人们往往会照顾宠物的一生。
storageclass:自动创建PV
需要解决:自动创建PVC。
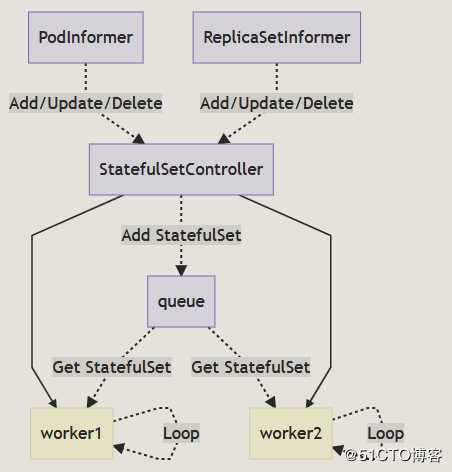
与 ReplicaSet 和 Deployment 资源一样,StatefulSet 也使用控制器的方式实现,它主要由 StatefulSetController、StatefulSetControl 和 StatefulPodControl 三个组件协作来完成 StatefulSet 的管理,StatefulSetController 会同时从 PodInformer 和 ReplicaSetInformer 中接受增删改事件并将事件推送到队列中:
控制器 StatefulSetController 会在 Run 方法中启动多个 Goroutine 协程,这些协程会从队列中获取待处理的 StatefulSet 资源进行同步,接下来我们会先介绍 Kubernetes 同步 StatefulSet 的过程。
[root@master yaml]# vim statefulset.yaml
apiVersion: v1
kind: Service
metadata:
  name: headless-svc
  labels:
    app: headless-svc
spec:
  ports:
  - port: 80
  selector:
    app: headless-pod
  clusterIP: None     #没有同一的ip
---
apiVersion: apps/v1
kind: StatefulSet
metadata:
  name: statefulset-test
spec:
  serviceName: headless-svc
  replicas: 3
  selector:
    matchLabels:
      app: headless-pod
  template:
    metadata:
      labels:
        app: headless-pod
    spec:
      containers:
      - name: myhttpd
        image: httpd
        ports:
        - containerPort: 80
Deployment : Deploy+RS+随机字符串(Pod的名称。)没有顺序的,可
以没随意替代的。
1、headless-svc :无头服务。因为没有IP地址,所以它不具备负载均衡的功能了。因为statefulset要求Pod的名称是有顺序的,每一个Pod都不能被随意取代,也就是即使Pod重建之后,名称依然不变。为后端的每一个Pod去命名。
2、statefulSet:定义具体的应用
3、volumeClaimT emplates:自动创建PVC,为后端的Pod提供专有的存储。
[root@master yaml]# kubectl apply -f statefulset.yaml [root@master yaml]# kubectl get svc
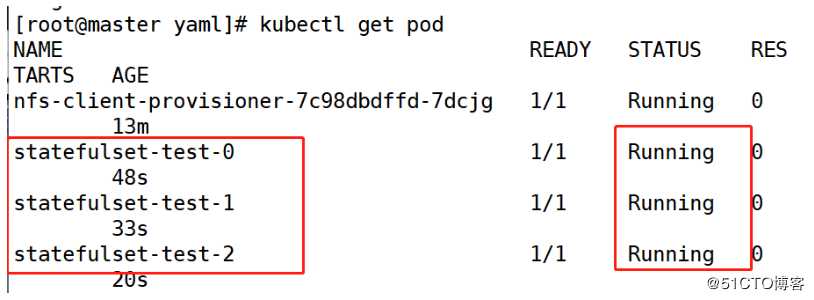
[root@master yaml]# kubectl get pod
//可看到这些pod是有顺序的
下载nfs所需安装包
[root@node02 ~]# yum -y install nfs-utils rpcbind创建共享目录
[root@master ~]# mkdir /nfsdata创建共享目录的权限
[root@master ~]# vim /etc/exports
/nfsdata *(rw,sync,no_root_squash)
开启nfs和rpcbind
[root@master ~]# systemctl start nfs-server.service
[root@master ~]# systemctl start rpcbind
测试一下
[root@master ~]# showmount -e
[root@master yaml]# vim rbac-rolebind.yaml
apiVersion: v1
kind: ServiceAccount
metadata:
name: nfs-provisioner
---
apiVersion: rbac.authorization.k8s.io/v1
kind: ClusterRole
metadata:
name: nfs-provisioner-runner
rules:
- apiGroups: [""]
resources: ["persistentvolumes"]
verbs: ["get", "list", "watch", "create", "delete"]
- apiGroups: [""]
resources: ["persistentvolumeclaims"]
verbs: ["get", "list", "watch", "update"]
- apiGroups: ["storage.k8s.io"]
resources: ["storageclasses"]
verbs: ["get", "list", "watch"]
- apiGroups: [""]
resources: ["events"]
verbs: ["watch", "create", "update", "patch"]
- apiGroups: [""]
resources: ["services", "endpoints"]
verbs: ["get","create","list", "watch","update"]
- apiGroups: ["extensions"]
resources: ["podsecuritypolicies"]
resourceNames: ["nfs-provisioner"]
verbs: ["use"]
---
kind: ClusterRoleBinding
apiVersion: rbac.authorization.k8s.io/v1
metadata:
name: run-nfs-provisioner
subjects:
- kind: ServiceAccount
name: nfs-provisioner
namespace: default #必写字段
roleRef:
kind: ClusterRole
name: nfs-provisioner-runner
apiGroup: rbac.authorization.k8s.io[root@master yaml]# kubectl apply -f rbac-rolebind.yaml [root@master yaml]# vim nfs-deployment.yaml
apiVersion: extensions/v1beta1
kind: Deployment
metadata:
name: nfs-client-provisioner
spec:
replicas: 1
strategy:
type: Recreate
template:
metadata:
labels:
app: nfs-client-provisioner
spec:
serviceAccount: nfs-provisioner
containers:
- name: nfs-client-provisioner
image: registry.cn-hangzhou.aliyuncs.com/open-ali/nfs-client-provisioner
volumeMounts:
- name: nfs-client-root
mountPath: /persistentvolumes
env:
- name: PROVISIONER_NAME
value: bdqn
- name: NFS_SERVER
value: 192.168.1.21
- name: NFS_PATH
value: /nfsdata
volumes:
- name: nfs-client-root
nfs:
server: 192.168.1.21
path: /nfsdata[root@master yaml]# kubectl apply -f nfs-deployment.yaml [root@master yaml]# kubectl get pod
[root@master yaml]# vim test-storageclass.yaml
apiVersion: storage.k8s.io/v1
kind: StorageClass
metadata:
  name: stateful-nfs
provisioner: bdqn  #通过provisioner字段关联到上述Deploy
reclaimPolicy: Retain[root@master yaml]# kubectl apply -f test-storageclass.yaml[root@master yaml]# kubectl get sc
[root@master yaml]# vim statefulset.yaml
apiVersion: v1
kind: Service
metadata:
  name: headless-svc
  labels:
    app: headless-svc
spec:
  ports:
  - port: 80
    name: myweb
  selector:
    app: headless-pod
  clusterIP: None
---
apiVersion: apps/v1
kind: StatefulSet
metadata:
  name: statefulset-test
spec:
  serviceName: headless-svc
  replicas: 3
  selector:
    matchLabels:
      app: headless-pod
  template:
    metadata:
      labels:
        app: headless-pod
    spec:
      containers:
      - image: httpd
        name: myhttpd
        ports:
        - containerPort: 80
          name: httpd
        volumeMounts:
        - mountPath: /mnt
          name: test
  volumeClaimTemplates:  #> 自动创建PVC,为后端的Pod提供专有的存储。**
  - metadata:
      name: test
      annotations:   #这是指定storageclass
        volume.beta.kubernetes.io/storage-class: stateful-nfs
    spec:
      accessModes:
        - ReadWriteOnce
      resources:
        requests:
          storage: 100Mi
在此示例中:
headless-svc 的 Service 对象,由 metadata: name 字段指示。该 Service 会定位一个名为 headless-svc 的应用,由 labels: app: headless-svc 和 selector: app: headless-pod 指示。该 Service 会公开端口 80 并将其命名为 web。而且该 Service 会控制网域并将互联网流量路由到 StatefulSet 部署的容器化应用。replicas: 3) 创建了一个名为 web 的 StatefulSet。spec: template) 指示其 Pod 标记为 app: headless-pod。template: spec) 指示 StatefulSet 的 Pod 运行一个容器 myhttpd,该容器运行版本为 httpd 映像。容器映像由 Container Registry 管理。web 端口。template: spec: volumeMounts 指定一个名为 test 的 mountPath。mountPath 是容器中应装载存储卷的路径。test。[root@master yaml]# kubectl apply -f statefulset.yaml[root@master yaml]# kubectl get pod
如果第一个pod出现了问题,后面的pod就不会生成。
[root@master yaml]# kubectl get statefulsets
[root@master yaml]# kubectl exec -it statefulset-test-0 /bin/sh
# cd /mnt
# touch testfile
# exit[root@master yaml]# ls /nfsdata/default-test-statefulset-test-0-pvc-bf1ae1d0-f496-4d69-b33b-39e8aa0a6e8d/
testfile以自己的名称创建一个名称空间,以下所有资源都运行在此空间中。用statefuset资源运行一个httpd web服务,要求3个Pod,但是每个Pod的主界面内容不一样,并且都要做专有的数据持久化,尝试删除其中一个Pod,查看新生成的Pod,总结对比与之前Deployment资源控制器控制的Pod有什么不同之处?
注意:nfs服务要开启
[root@master yaml]# vim namespace.yaml
kind: Namespace
apiVersion: v1
metadata:
name: xgp-lll #namespave的名称[root@master yaml]# kubectl apply -f namespace.yaml [root@master yaml]# kubectl get namespaces 
[root@master yaml]# vim rbac-rolebind.yaml
apiVersion: v1
kind: ServiceAccount
metadata:
  name: nfs-provisioner
  namespace: xgp-lll
---
apiVersion: rbac.authorization.k8s.io/v1
kind: ClusterRole
metadata:
  name: nfs-provisioner-runner
  namespace: xgp-lll
rules:
   -  apiGroups: [""]
      resources: ["persistentvolumes"]
      verbs: ["get", "list", "watch", "create", "delete"]
   -  apiGroups: [""]
      resources: ["persistentvolumeclaims"]
      verbs: ["get", "list", "watch", "update"]
   -  apiGroups: ["storage.k8s.io"]
      resources: ["storageclasses"]
      verbs: ["get", "list", "watch"]
   -  apiGroups: [""]
      resources: ["events"]
      verbs: ["watch", "create", "update", "patch"]
   -  apiGroups: [""]
      resources: ["services", "endpoints"]
      verbs: ["get","create","list", "watch","update"]
   -  apiGroups: ["extensions"]
      resources: ["podsecuritypolicies"]
      resourceNames: ["nfs-provisioner"]
      verbs: ["use"]
---
kind: ClusterRoleBinding
apiVersion: rbac.authorization.k8s.io/v1
metadata:
  name: run-nfs-provisioner
subjects:
  - kind: ServiceAccount
    name: nfs-provisioner
    namespace: xgp-lll
roleRef:
  kind: ClusterRole
  name: nfs-provisioner-runner
apiGroup: rbac.authorization.k8s.io[root@master yaml]# kubectl apply -f rbac-rolebind.yaml[root@master yaml]# vim nfs-deployment.yaml
apiVersion: extensions/v1beta1
kind: Deployment
metadata:
name: nfs-client-provisioner
namespace: xgp-lll
spec:
replicas: 1
strategy:
type: Recreate
template:
metadata:
labels:
app: nfs-client-provisioner
spec:
serviceAccount: nfs-provisioner
containers:
- name: nfs-client-provisioner
image: registry.cn-hangzhou.aliyuncs.com/open-ali/nfs-client-provisioner
volumeMounts:
- name: nfs-client-root
mountPath: /persistentvolumes
env:
- name: PROVISIONER_NAME
value: xgp
- name: NFS_SERVER
value: 192.168.1.21
- name: NFS_PATH
value: /nfsdata
volumes:
- name: nfs-client-root
nfs:
server: 192.168.1.21
path: /nfsdata[root@master yaml]# kubectl apply -f nfs-deployment.yaml [root@master yaml]# kubectl get pod -n xgp-lll 
[root@master yaml]# vim test-storageclass.yaml
apiVersion: storage.k8s.io/v1
kind: StorageClass
metadata:
  name: stateful-nfs
  namespace: xgp-lll
provisioner: xgp  #通过provisioner字段关联到上述Deploy
reclaimPolicy: Retain[root@master yaml]# kubectl apply -f test-storageclass.yaml[root@master yaml]# kubectl get sc -n xgp-lll
apiVersion: v1
kind: Service
metadata:
  name: headless-svc
  namespace: xgp-lll
  labels:
    app: headless-svc
spec:
  ports:
  - port: 80
    name: myweb
  selector:
    app: headless-pod
apiVersion: apps/v1
kind: StatefulSet
metadata:
  name: statefulset-test
  namespace: xgp-lll
spec:
  serviceName: headless-svc
  replicas: 3
  selector:
    matchLabels:
      app: headless-pod
  template:
    metadata:
      labels:
        app: headless-pod
    spec:
      containers:
      - image: httpd
        name: myhttpd
        ports:
        - containerPort: 80
          name: httpd
        volumeMounts:
        - mountPath: /usr/local/apache2/htdocs
          name: test
  volumeClaimTemplates:  #> 自动创建PVC,为后端的Pod提供专有的>存储。**
  - metadata:
      name: test
      annotations:   #这是指定storageclass
        volume.beta.kubernetes.io/storage-class: stateful-nfs
    spec:
      accessModes:
        - ReadWriteOnce
      resources:
        requests:
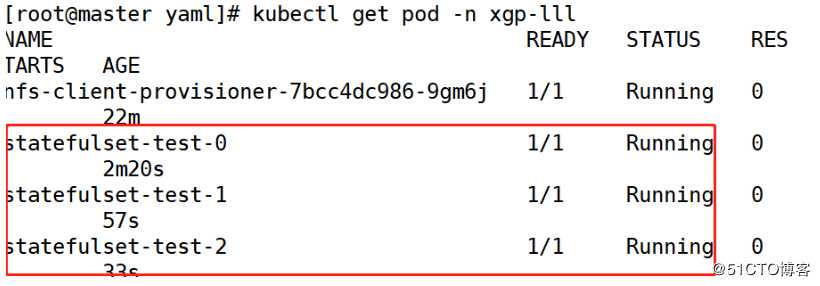
storage: 100Mi[root@master yaml]# kubectl apply -f statefulset.yaml[root@master yaml]# kubectl get pod -n xgp-lll 
第一个
[root@master yaml]# kubectl exec -it -n xgp-lll statefulset-test-0 /bin/bash
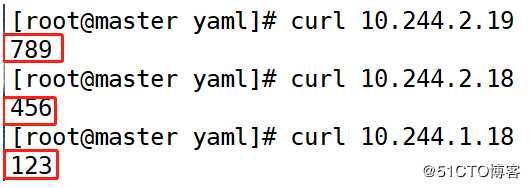
root@statefulset-test-0:/usr/local/apache2# echo 123 > /usr/local/apache2/htdocs/index.html

第二个
[root@master yaml]# kubectl exec -it -n xgp-lll statefulset-test-1 /bin/bash
root@statefulset-test-2:/usr/local/apache2# echo 456 > /usr/local/apache2/htdocs/index.html

第三个
[root@master yaml]# kubectl exec -it -n xgp-lll statefulset-test-2 /bin/bash
root@statefulset-test-1:/usr/local/apache2# echo 789 > /usr/local/apache2/htdocs/index.html
第一个
[root@master yaml]# cat /nfsdata/xgp-lll-test-statefulset-test-0-pvc-ccaa02df-4721-4453-a6ec-4f2c928221d7/index.html
123

第二个
[root@master yaml]# cat /nfsdata/xgp-lll-test-statefulset-test-1-pvc-88e60a58-97ea-4986-91d5-a3a6e907deac/index.html
456

第三个
[root@master yaml]# cat /nfsdata/xgp-lll-test-statefulset-test-2-pvc-4eb2bbe2-63d2-431a-ba3e-b7b8d7e068d3/index.html
789
标签:usr mount path 版本 开启 volumes 通信 persist match
原文地址:https://blog.51cto.com/14320361/2470549