标签:密钥 lines firewall 添加 rip ror root network prot

最近用到了虚拟机,之前虚拟机的网络配置使用的NAT配置好了,但是无论怎样设置都无法使用局域网内的其它主机访问虚拟机的服务。经过了一天的折腾,远程主机仍然连接不上虚拟机服务,后来找到原因,NAT连接模式下局域网内的其它主机通过无线网卡连接虚拟机的映射,但是虚拟机从有线网卡中传递信号返回故局域网内其它主机实现对宿主主机的虚拟机的访问使用NAT模式是不可行的,看到有些人写的NAT的配置中将虚拟机的网络适配器ip地址修改为与宿主机ip同频段的地址,这种方法虽然实现了宿主机对虚拟机的访问但是此时的虚拟机是ping不到互联网络的(因为此时虚拟机的ip是NAT模式下分发的子网ip地址,与宿主机的ip不在一个网络内,故不可以实现网络访问)。
折腾了一天的时间后断然改用桥接的方式实现局域网内主机对虚拟机的访问设置。桥接的模式就是使虚拟机和宿主机在同一ip网络内,即给虚拟机一个物理地址共享主机的无线网卡。
下面主要是桥接的设置步骤。
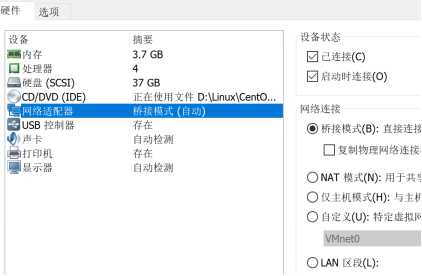
首先在虚拟机配置中更改网络模式为 桥接

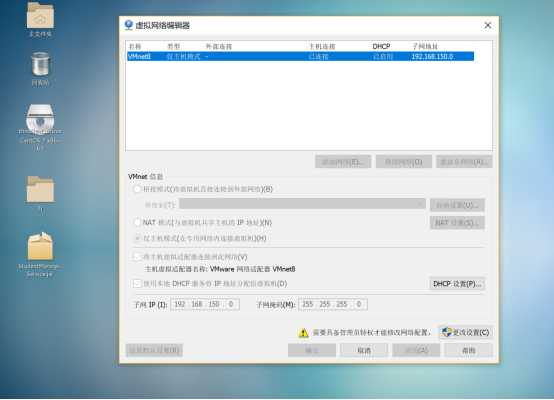
查看虚拟网络编辑器:(注意我们在NAT模式时需要设置网络编辑器,而在桥接模式上我们不需要对它进行更改,并且要确保模式中只有一种本地模式)

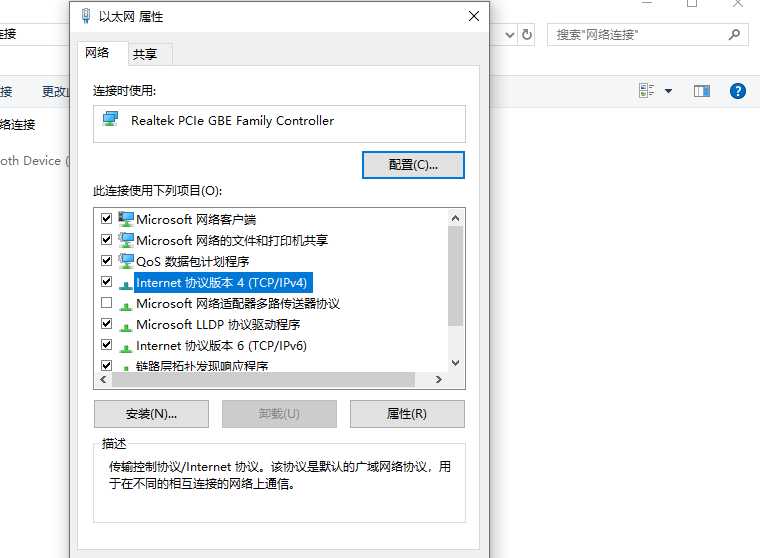
打开宿主机的网络配置,对Vmnet8(对应上图中的适配器名称)进行配置Ipv4,要保证ip地址与宿主机的ip在同一个ip频段上,但不要与宿主机ip相同,网关一定要与宿主机的网关一样,子网掩码也要与宿主机相同,一般子网掩码为255.255.255.0

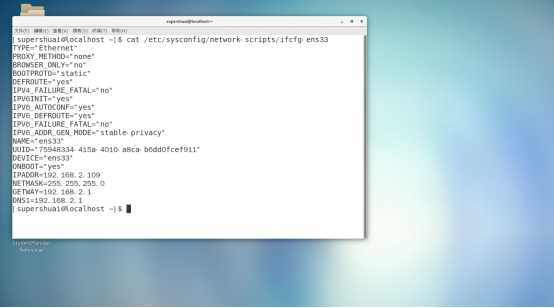
在Centos的虚拟机上设置网络,由于我是从NAT切换成桥接模式的所以我这是在NAT模式上进行的修改,BOOTPROTO=“static”静态获取ip (ip对应宿主机的ip频段但与宿主机ip地址不能一样,网关以及子网掩码与宿主机相同),当然可以设置成 BOOTPROTO=“dhcp”动态获取,并且将IPADDR及以下的设置删除掉。
另外ONBOOT要为yes。有些人的电脑中不存在ifcfg-ens33文件,使用命令cd /etc/sysconfig/network-scripts进入network-scripts文件夹内使用ls查看ifcfg-ensxxxx文件并进行如下设置。

执行命令 sudo vi /etc/sysconfig/network 点击i键进入修改模式后设置GATEWAY(网关)与主机网关相同,HOSTNAME随意设置。修改完成后Esc并使用:wq保存。

执行命令 sudo vi /etc/resolv.conf 进入后点击i键进行修改操作。内容如下:
其中nameserver与网关地址一致。修改完成后Esc并使用:wq保存。

至此所有设置完成,在终端执行ping 主机ip 可以查看通讯。
首先安装xrdp:
执行命令:yun install epel-release这个软件包会自动配置yum的软件仓库。如果你也可以不安装这个包,自行配置软件仓库也是一样的
执行命令:yun install xrdp实现对xrdp的安装
执行命令:yum install tigervnc tigervnc-server实现tigervnc的安装(远程桌面的一种实现方式)
执行命令:chcon -t bin_t /usr/sbin/xrdp
执行命令: chcon -t bin_t /usr/sbin/xrdp-sesman实现对xrdp服务的设置
执行命令:systemctl start xrdp启动xrdp服务
执行命令:systemctl enable xrdp通过systemctl enable实现xrdp服务的开机自启的设置
执行命令:netstat -antup|grep xrdp查看xrdp与xrdp-sesman的启动情况
接下来就是为防火墙添加3389的访问接口( Server远程桌面的服务端口)
执行命令:firewall-cmd --permanent --zone=public --add-port=3389/tcp
执行命令:firewall-cmd --reload
至此实现远程桌面的设置,连接远程桌面时地址为 : 你的虚拟机的ip地址:3389 输入用户名和密码登录远程桌面。
以下是安装记录打印可供参考:
[root@localhost superme]# yum install epel-release
已加载插件:fastestmirror, langpacks
Loading mirror speeds from cached hostfile
 * base: mirrors.cn99.com
 * extras: mirrors.zju.edu.cn
 * updates: mirrors.cn99.com
正在解决依赖关系
There are unfinished transactions remaining. You might consider running yum-complete-transaction, or "yum-complete-transaction --cleanup-only" and "yum history redo last", first to finish them. If those don't work you'll have to try removing/installing packages by hand (maybe package-cleanup can help).
--> 正在检查事务
---> 软件包 epel-release.noarch.0.7-11 将被 安装
--> 解决依赖关系完成

依赖关系解决

================================================================================
 Package                架构             版本            源                大小
================================================================================
正在安装:
 epel-release           noarch           7-11            extras            15 k

事务概要
================================================================================
安装  1 软件包

总下载量:15 k
安装大小:24 k
Is this ok [y/d/N]: y
Downloading packages:
警告:/var/cache/yum/x86_64/7/extras/packages/epel-release-7-11.noarch.rpm: 头V3 RSA/SHA256 Signature, 密钥 ID f4a80eb5: NOKEY
epel-release-7-11.noarch.rpm 的公钥尚未安装
epel-release-7-11.noarch.rpm                               |  15 kB   00:05
从 file:///etc/pki/rpm-gpg/RPM-GPG-KEY-CentOS-7 检索密钥
导入 GPG key 0xF4A80EB5:
 用户ID     : "CentOS-7 Key (CentOS 7 Official Signing Key) <security@centos.org>"
 指纹       : 6341 ab27 53d7 8a78 a7c2 7bb1 24c6 a8a7 f4a8 0eb5
 软件包     : centos-release-7-5.1804.el7.centos.x86_64 (@anaconda)
 来自       : /etc/pki/rpm-gpg/RPM-GPG-KEY-CentOS-7
是否继续?[y/N]:y
Running transaction check
Running transaction test
Transaction test succeeded
Running transaction
  正在安装    : epel-release-7-11.noarch                                    1/1
  验证中      : epel-release-7-11.noarch                                    1/1

已安装:
  epel-release.noarch 0:7-11

完毕!
[root@localhost superme]# yum install xrdp
已加载插件:fastestmirror, langpacks
Loading mirror speeds from cached hostfile
epel/x86_64/metalink                                     | 4.9 kB     00:00
 * base: mirrors.cn99.com
 * epel: ftp.yz.yamagata-u.ac.jp
 * extras: mirrors.zju.edu.cn
 * updates: mirrors.cn99.com
epel                                                     | 5.4 kB     00:00
epel/x86_64/updateinfo         FAILED
http://ftp.riken.jp/Linux/fedora/epel/7/x86_64/repodata/f9261eaff5918473af07052ec939c36c94dba4243ba8aab79c58d4fde90d6ae7-updateinfo.xml.bz2: [Errno 14] HTTP Error 404 - Not Found
正在尝试其它镜像。
To address this issue please refer to the below wiki article

https://wiki.centos.org/yum-errors

If above article doesn't help to resolve this issue please use https://bugs.centos.org/.

(1/3): epel/x86_64/group_gz                                |  90 kB   00:00
epel/x86_64/updateinfo         FAILED
http://epel.dionipe.id/7/x86_64/repodata/f9261eaff5918473af07052ec939c36c94dba4243ba8aab79c58d4fde90d6ae7-updateinfo.xml.bz2: [Errno 14] HTTP Error 404 - Not Found
正在尝试其它镜像。
(2/3): epel/x86_64/updateinfo                              | 1.0 MB   00:02
(3/3): epel/x86_64/primary_db                              | 6.7 MB   01:37
正在解决依赖关系
There are unfinished transactions remaining. You might consider running yum-complete-transaction, or "yum-complete-transaction --cleanup-only" and "yum history redo last", first to finish them. If those don't work you'll have to try removing/installing packages by hand (maybe package-cleanup can help).
--> 正在检查事务
---> 软件包 xrdp.x86_64.1.0.9.12-4.el7 将被 安装
--> 解决依赖关系完成

依赖关系解决

================================================================================
 Package        架构             版本                      源              大小
================================================================================
正在安装:
 xrdp           x86_64           1:0.9.12-4.el7            epel           427 k

事务概要
================================================================================
安装  1 软件包

总下载量:427 k
安装大小:2.1 M
Is this ok [y/d/N]: y
Downloading packages:
警告:/var/cache/yum/x86_64/7/epel/packages/xrdp-0.9.12-4.el7.x86_64.rpm: 头V3 RSA/SHA256 Signature, 密钥 ID 352c64e5: NOKEY
xrdp-0.9.12-4.el7.x86_64.rpm 的公钥尚未安装
xrdp-0.9.12-4.el7.x86_64.rpm                               | 427 kB   00:08
从 file:///etc/pki/rpm-gpg/RPM-GPG-KEY-EPEL-7 检索密钥
导入 GPG key 0x352C64E5:
 用户ID     : "Fedora EPEL (7) <epel@fedoraproject.org>"
 指纹       : 91e9 7d7c 4a5e 96f1 7f3e 888f 6a2f aea2 352c 64e5
 软件包     : epel-release-7-11.noarch (@extras)
 来自       : /etc/pki/rpm-gpg/RPM-GPG-KEY-EPEL-7
是否继续?[y/N]:y
Running transaction check
Running transaction test
Transaction test succeeded
Running transaction
  正在安装    : 1:xrdp-0.9.12-4.el7.x86_64                                  1/1
  验证中      : 1:xrdp-0.9.12-4.el7.x86_64                                  1/1

已安装:
  xrdp.x86_64 1:0.9.12-4.el7

完毕!
[root@localhost superme]# yum install tigervnc tigervnc-server
已加载插件:fastestmirror, langpacks
Loading mirror speeds from cached hostfile
 * base: mirrors.cn99.com
 * epel: ftp.riken.jp
 * extras: mirrors.zju.edu.cn
 * updates: mirrors.cn99.com
正在解决依赖关系
There are unfinished transactions remaining. You might consider running yum-complete-transaction, or "yum-complete-transaction --cleanup-only" and "yum history redo last", first to finish them. If those don't work you'll have to try removing/installing packages by hand (maybe package-cleanup can help).
--> 正在检查事务
---> 软件包 tigervnc.x86_64.0.1.8.0-17.el7 将被 安装
--> 正在处理依赖关系 tigervnc-icons,它被软件包 tigervnc-1.8.0-17.el7.x86_64 需要
--> 正在处理依赖关系 libfltk_images.so.1.3()(64bit),它被软件包 tigervnc-1.8.0-17.el7.x86_64 需要
--> 正在处理依赖关系 libfltk.so.1.3()(64bit),它被软件包 tigervnc-1.8.0-17.el7.x86_64 需要
---> 软件包 tigervnc-server.x86_64.0.1.8.0-17.el7 将被 安装
--> 正在检查事务
---> 软件包 fltk.x86_64.0.1.3.4-1.el7 将被 安装
---> 软件包 tigervnc-icons.noarch.0.1.8.0-17.el7 将被 安装
--> 解决依赖关系完成

依赖关系解决

================================================================================
 Package                 架构           版本                 源            大小
================================================================================
正在安装:
 tigervnc                x86_64         1.8.0-17.el7         base         241 k
 tigervnc-server         x86_64         1.8.0-17.el7         base         215 k
为依赖而安装:
 fltk                    x86_64         1.3.4-1.el7          base         560 k
 tigervnc-icons          noarch         1.8.0-17.el7         base          39 k

事务概要
================================================================================
安装  2 软件包 (+2 依赖软件包)

总下载量:1.0 M
安装大小:2.6 M
Is this ok [y/d/N]: y
Downloading packages:
(1/4): tigervnc-icons-1.8.0-17.el7.noarch.rpm              |  39 kB   00:00
(2/4): tigervnc-1.8.0-17.el7.x86_64.rpm                    | 241 kB   00:00
(3/4): fltk-1.3.4-1.el7.x86_64.rpm                         | 560 kB   00:02
(4/4): tigervnc-server-1.8.0-17.el7.x86_64.rpm             | 215 kB   00:05
--------------------------------------------------------------------------------
总计                                               172 kB/s | 1.0 MB  00:06
Running transaction check
Running transaction test
Transaction test succeeded
Running transaction
  正在安装    : fltk-1.3.4-1.el7.x86_64                                     1/4
  正在安装    : tigervnc-icons-1.8.0-17.el7.noarch                          2/4
  正在安装    : tigervnc-1.8.0-17.el7.x86_64                                3/4
  正在安装    : tigervnc-server-1.8.0-17.el7.x86_64                         4/4
  验证中      : tigervnc-server-1.8.0-17.el7.x86_64                         1/4
  验证中      : tigervnc-icons-1.8.0-17.el7.noarch                          2/4
  验证中      : fltk-1.3.4-1.el7.x86_64                                     3/4
  验证中      : tigervnc-1.8.0-17.el7.x86_64                                4/4

已安装:
  tigervnc.x86_64 0:1.8.0-17.el7      tigervnc-server.x86_64 0:1.8.0-17.el7

作为依赖被安装:
  fltk.x86_64 0:1.3.4-1.el7         tigervnc-icons.noarch 0:1.8.0-17.el7

完毕!
[root@localhost superme]# chcon -t bin_t /usr/sbin/xrdp
[root@localhost superme]# chcon -t bin_t /usr/sbin/xrdp-sesman
[root@localhost superme]# systemctl start xrdp
[root@localhost superme]# systemctl enable xrdp
Created symlink from /etc/systemd/system/multi-user.target.wants/xrdp.service to /usr/lib/systemd/system/xrdp.service.
[root@localhost superme]# systemctl status xrdp.service
● xrdp.service - xrdp daemon
   Loaded: loaded (/usr/lib/systemd/system/xrdp.service; enabled; vendor preset: disabled)
   Active: active (running) since 六 2020-02-15 14:12:21 CST; 32s ago
     Docs: man:xrdp(8)
           man:xrdp.ini(5)
 Main PID: 4480 (xrdp)
   CGroup: /system.slice/xrdp.service
           └─4480 /usr/sbin/xrdp --nodaemon

2月 15 14:12:21 localhost.localdomain systemd[1]: Started xrdp daemon.
2月 15 14:12:21 localhost.localdomain systemd[1]: Starting xrdp daemon...
2月 15 14:12:22 localhost.localdomain xrdp[4480]: (4480)(140549388200384)[IN...
2月 15 14:12:22 localhost.localdomain xrdp[4480]: (4480)(140549388200384)[IN...
2月 15 14:12:22 localhost.localdomain xrdp[4480]: (4480)(140549388200384)[IN...
2月 15 14:12:22 localhost.localdomain xrdp[4480]: (4480)(140549388200384)[IN...
Hint: Some lines were ellipsized, use -l to show in full.
[root@localhost superme]# netstat -antup|grep xrdp
tcp        0      0 0.0.0.0:3389            0.0.0.0:*               LISTEN      4480/xrdp
tcp        0      0 127.0.0.1:3350          0.0.0.0:*               LISTEN      4479/xrdp-sesman
[root@localhost superme]# firewill -cmd --permanent --zone=public --add-port=3389/tcp
bash: firewill: 未找到命令...
[root@localhost superme]# firewall -cmd --permanent --zone=public --add-port=3389/tcp
bash: firewall: 未找到命令...
[root@localhost superme]# firewall-cmd --permanent --zone=public --add-port=3389/tcp
success
[root@localhost superme]# firewall-cmd --reload
success
Centos7桥接设置网络并使用xrdp+tigervnc实现桌面远程访问
标签:密钥 lines firewall 添加 rip ror root network prot
原文地址:https://www.cnblogs.com/supershuai/p/12312750.html