标签:单元素 标识 container 算法 元素 length 完成后 mic wip
我觉得可以理解为模板,轮廓被组件建好了,内容可以填入插槽 .比如一个轮播图组件,功能完善了,图片需要通过插槽插入.
<div id="Box">
    <swiper>
        <img v-for="data in datalist">
            {{data}}
        </img>
    </swiper>
</div>
<script>
    Vue.component("swiper",{
        template:`
        <div>
        我是轮播图
        <solt></solt>   //写入<swiper>内的内容会被插入到这里
        </div>`
    })
    var a =new Vue({
        el:"#Box",
 })
</script>
所有
中内容都会插入子组件 中
特殊:具名插槽,可控制具体插入位置
<div id="Box">
    <swiper>
        <div slot="a">aaaaaaaaaaa</div> <!--插入插槽a-->
        <div slot="b">bbbbbbbbbbb</div> <!--插入插槽b-->
    </swiper>
</div>
Vue.component("swiper",{
        template:`
        <div>
        <slot name="a"></slot>
        我是轮播图
        <slot name="b"></slot>
        </div>`
})1.单元素组件过渡
<style>
        .zzh-enter-active, .zzh-leave-active{
            transition: all 1.5s;
        }
        .zzh-enter, .zzh-leave-to{
            opacity: 0;
            transform: translateX(100px);
        }
</style>
<div id="Box">
  <button @click="isshow =!isshow">click</button>
     <transition name="zzh">
        <div v-show="isshow">111111111111111111</div>
     </transition>
</div>
 data:{
            isshow:false
        }
关键帧写法
<style>
        .zzhbounce-enter-active{
            animation: bounce-in 1.5s;
        }
        .zzhbounce-leave-active{
            animation: bounce-in 1.5s reverse;
        }
        @keyframes bounce-in {
            0%{
                opacity: 0;
                transform: translateY(50px);
            }
            100%{
                opacity: 1;
                transform: translateY(0px);
            }
        }
</style>
<div id="Box">
  <button @click="isshow =!isshow">click</button>
     <transition name="zzhbounce">
        <div v-show="isshow">222222222222222222</div>
     </transition>
</div>
 data:{
            isshow:false
        }
2.多元素过渡
<transition name="zzhbounce">
    <div v-if="isshow" key="1">222222222222222222</div>
    <div v-else="isshow" key="2">222222222222222222</div>
</transition>
transition标签内元素应该是单一的,我们在这里使用if-else使其互斥,通过设置不同key值使得相同标签也会被递归算法刷新.
同样的,动态组件也可以为其设置过渡动画
 <transition name="zzhbounce" mode="out-in">
      <component :is="which"></component>
</transition>
mode="out-in"标识先离开在进来
3.列表过渡transition-group,需要提供唯一key值
举一个猫眼电影的小栗子,事先准备好了test.json,需要axios
<div id="Box">
    <ul>
       <li v-for="data in datalist">
          <h3>{{data.nm}}</h3>
          <img :src="changepath(data.img)" >
       </li>
    </ul>
</div>
 var a =new Vue({
        el:"#Box",
        data:{
            datalist:[]
        },
        methods:{
            changepath(path){
                return path.replace('w.h','170.230')
            }
        },
        mounted(){
            axios.get("test.json").then(res=>{
                console.log(res.data.coming);
                this.datalist = res.data.coming
            })
}这里并没有用过滤器,只是用了一个回调函数changepath()其中的path.replace(‘w.h‘,‘170.230‘)是因为猫眼电影处理了图片地址,由一个接口控制返回图片大小:
"http://p0.meituan.net/w.h/movie/2c109.jpg"
"http://p0.meituan.net/190.250/movie/2c109.jpg"
而使用过滤器呢?
<div id="Box">
    <ul>
       <li v-for="data in datalist">
          <h3>{{data.nm}}</h3>
          <img :src="data.img | mypath"/>
       </li>
    </ul>
</div>
<script>

Vue.filter("mypath",function(path){
        return path.replace('w.h','170.230')
    })

 var a =new Vue({
        el:"#Box",
        data:{
            datalist:[]
        },
        mounted(){
            axios.get("test.json").then(res=>{
                console.log(res.data.coming);
                this.datalist = res.data.coming
            })
        }
</script>
img :src="data.img | mypath"使用了过滤器,当执行到这里时,会自动将data.img传入用定义好的Vue.filter里的function(path) 处理 ,并用返回值替换data.img, 只是为了高级
<div id="Box">
    <swiper :key="datalist.length">
        <div class="swiper-slide" v-for="data in datalist">
            {{data}}
         <!-- <img :src="data" />       -->
        </div>
    </swiper>
</div>
Vue.component("swiper",{
   template:`
        <div class="swiper-container a">
            <div class="swiper-wrapper">
               <slot></slot>
            </div>
            <div class="swiper-pagination"></div>
        </div> `,
        mounted(){
            new Swiper ('.a', {
                //direction: 'vertical', // 垂直切换选项
                loop: true, // 循环模式选项
                autoplay:true,
            // 如果需要分页器
                pagination: {
                el: '.swiper-pagination',
            }
            })
        }
    })
    var a =new Vue({
        el:"#Box",
        data:{
            datalist:[]
        },
        methods:{
            changepath(path){
                return path.replace('w.h','170.230')
            }
        },
        mounted(){
            setTimeout(()=>{
                axios.get("test.json").then(res=>{
   this.datalist = ["11111","22222","33333"] //数据输入位置
            },100)})
          }
}) <div id="Box">
<div v-hello="'yellow'">111111</div>
<div v-hello="'red'">222222</div>
<div v-hello="mycolor">3333333</div>
</div>
<script>
Vue.directive("hello",{
inserted(el,bind){
//指令的生命周期,当插入父节点时执行
console.log("charu");
//el可以拿到底层dom
console.log(el);
//等号后面输入的值是bind.value
console.log(bind.value);
//两者结合上色,一次性,上完就改不了了,要借助update
el.style.background=bind.value
},
update(el,bind){
//指令的生命周期,当内容更新时执行
el.style.background=bind.value
}
})
var a =new Vue({
el:"#Box",
data:{
mycolor:"red"
}
})
</script>有了指令,可以尝试做一下指令轮播
<div id="box">
        <div class="swiper-container a">
        <div class="swiper-wrapper">
     <div class="swiper-slide" v-for="(data,index) in list"
            v-swipe="{index:index,length:list.length}">
                {{data}}
        </div>
        </div>
        <!-- 如果需要分页器 -->
        <div class="swiper-pagination"></div>
        </div>
</div>
<script>
        Vue.directive("swipe",{
            inserted(el,bind){
                if(bind.value.index==bind.value.length-1){
                new Swiper ('.a', {
                //direction: 'vertical', // 垂直切换选项
                loop: true, // 循环模式选项
                autoplay:true,
                 // 如果需要分页器
                pagination: {
                el: '.swiper-pagination',
            }
            })}}
        })

    new Vue({
        el:"#box",
        data:{
            list:[]
        },
        mounted(){
           setTimeout(()=>{
               this.list=["111","222","333"]
           },100)}})
</script>使用单文件组件和脚手架可以很简单的构建Vue组件
安装完成后,按shift加右键在项目文件夹打开power shell,通过 vue create 项目名来新建一个项目,或者输入vue ui 通过图形化界面新建项目。完成后在vscode项目文件夹新建终端,输入:
npm run serve服务启动成功后,通过浏览器访问,即可看到初始页面。
在main.js中可以看出,入口通过使用 import App from ‘./App.vue‘,将 所有样式、逻辑都在App.vue中引入了。于是我们去编写App.vue,基本语法如下:
<template>
  <div>
    hello world
    <input type="text" ref="mytext">
    <button @click="click_add()">add</button>
    <ul>
      <li v-for="data in datalist" :key="data">
          {{data}}
      </li>
    </ul>
  </div>
</template>

<script>
//ES6导出
export default {
  data(){
    return{
      datalist:[]
    }
  },
  methods:{
    click_add(){
      console.log("add");
      this.datalist.push( this.$refs.mytext.value)
    }
  }
}
</script>

<style lang="scss">
ul{
  list-style: none;
  padding-left: 0%;
  li{
   background-color: yellowgreen;
  }
}
</style>
当在多个组件中定义style时,通常使用scoped限定作用域为自己,防止样式相互影响。
<style lang="scss" scoped> //scoped局部作用域,当前样式只影响自己通过npm run lint 格式化代码
通过npm run build 转换代码,成为一般html,css文件
反向代理,解决跨域
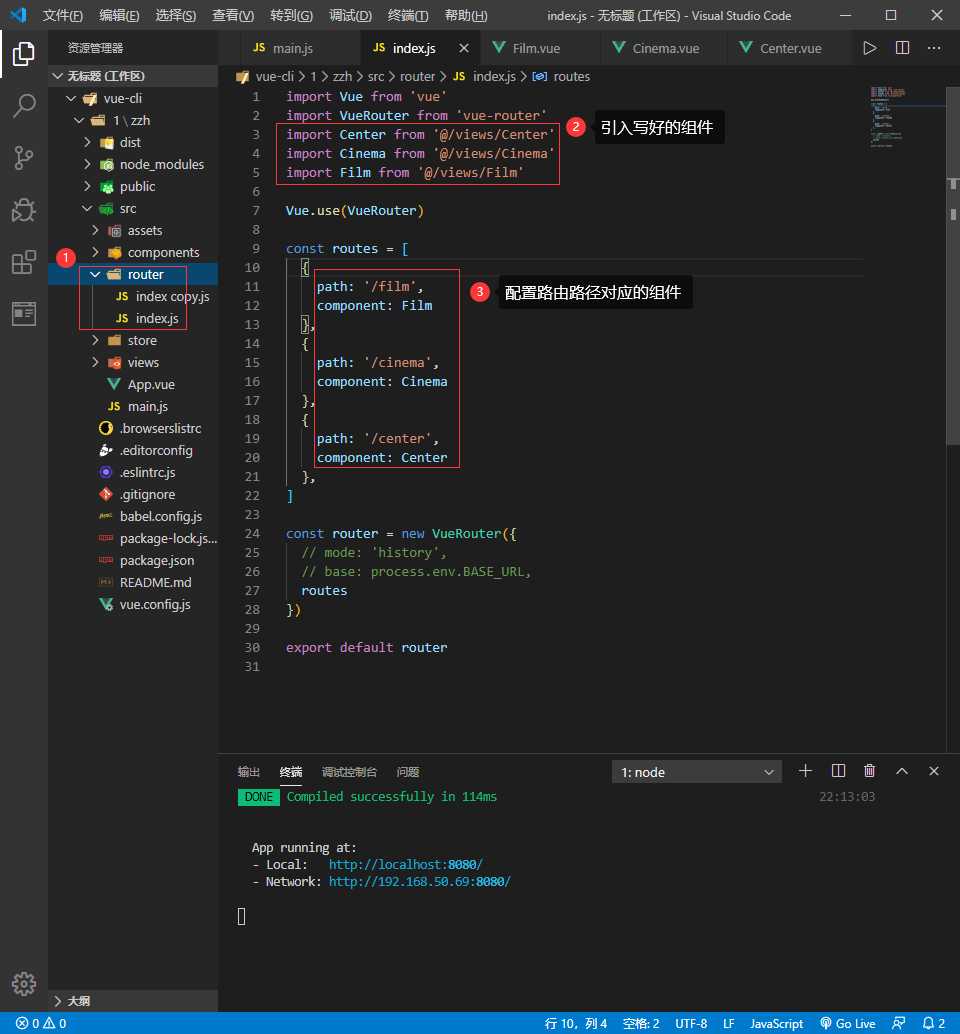
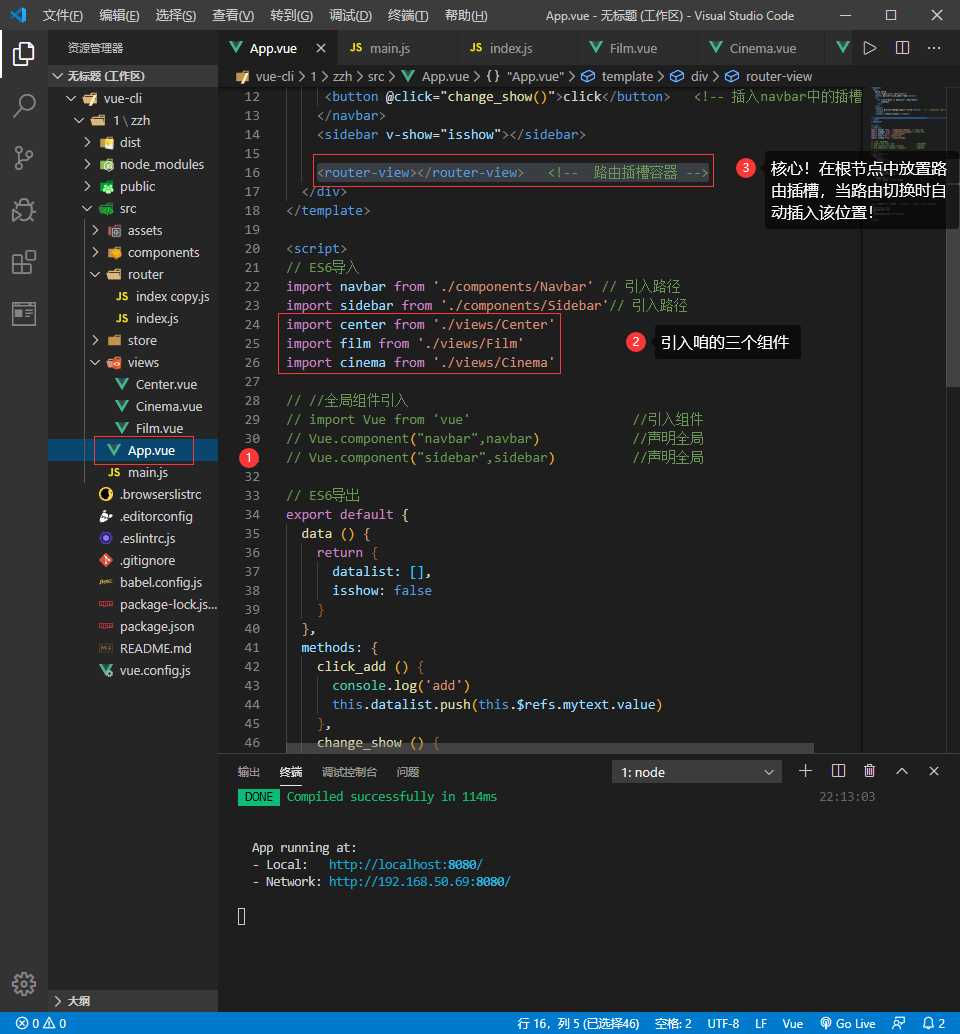
路由容器(插槽):
1.配置router文件夹下的index.js文件,重要部分如下:

2.在views中自己写3个组件,分别为Film\Center\Cinema
3.在APP中添加路由插槽,引入自定义的组件

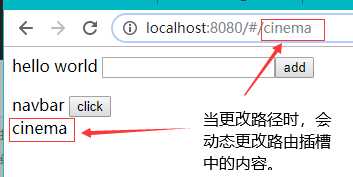
4.这时就可以通过控制路径动态控制插槽内容啦~

在此基础上,我们可以优化一下
因为谁会智障到去改路径啊0-0
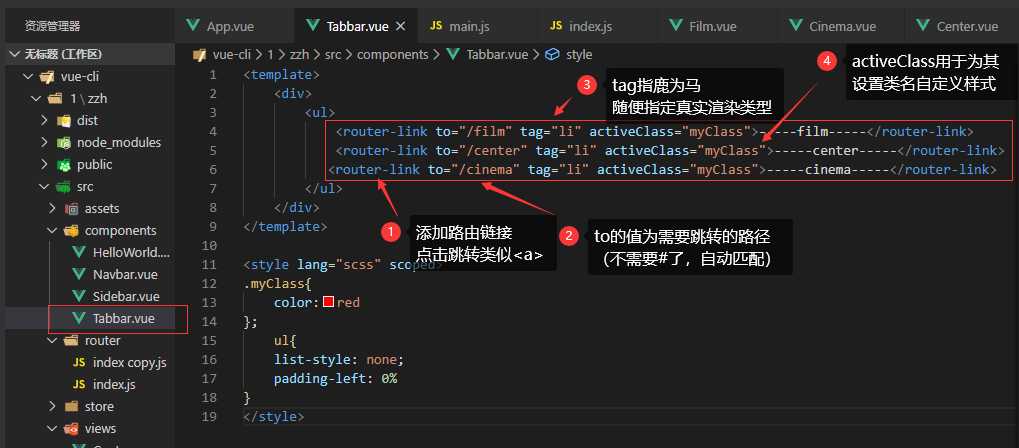
5.在components文件夹下新建一个组件Tabbar:

新建好后在APP中引入该组件,然后使用就好啦~结果就是一个点中时高亮的标签切换bar~
标签:单元素 标识 container 算法 元素 length 完成后 mic wip
原文地址:https://www.cnblogs.com/beibingji/p/12343667.html