标签:group png class 使用 sch 服务 password 构建 ima
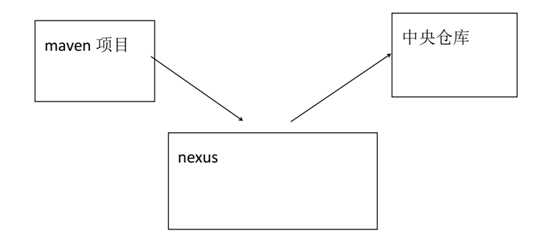
公司所有开发成员没有外网,通过局域网连接 nexus 私服,由私服连接外网。
把项目发布到私服.其他人员从私服下载。
3.1 nexus-2.10-1bundle.zip 解压到任意非中文目录中
3.2进入 nexus-2.10-1\bin\jsw\indows-x86-4(对应自己系统)

以windows64系统为例
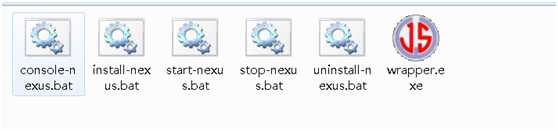
instal-nexus.bat 安装服务
star-nexus.bat 开启服务
stop-nexus.bat 停止服务
unistal-nexus.bat 卸载服务
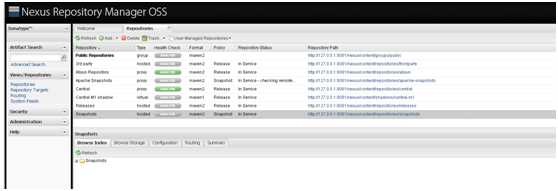
3.3 登录后台
在浏览器输入 htp:/localhost:8081/nexus
默认端口8081
默认用户名admin
默认密码admin123
若需调整可配置nexus-2.10-1\conf\exus.proerties
4.1修改maven 的 setings.xml
<?xml version="1.0" encoding="UTF-8"?>
<settings>
    <localRepository>G:\tool\m2\myrepository</localRepository>
    <mirrors>

        <mirror>
            <id>nexus-releases</id>
            <mirrorOf>*</mirrorOf>
            <url>http://localhost:8081/nexus/content/groups/public</url>
        </mirror>
        <mirror>
            <id>nexus-snapshots</id>
            <mirrorOf>*</mirrorOf>
            <url>http://localhost:8081/nexus/content/repositories/apache-snapshots/
            </url>
        </mirror>
    </mirrors>


    <profiles>
        <profile>
            <id>jdk-1.7</id>
            <activation>
                <activeByDefault>true</activeByDefault>
                <jdk>1.7</jdk>
            </activation>
            <properties>
                <maven.compiler.source>1.7</maven.compiler.source>
                <maven.compiler.target>1.7</maven.compiler.target>
                <maven.compiler.compilerVersion>1.7</maven.compiler.compilerVersion>
            </properties>
        </profile>


        <profile>
            <id>nexusTest</id>
            <repositories>
                <repository>
                    <id>local-nexus</id>
                    <url>http://127.0.0.1:8081/nexus/content/groups/public/</url>
                    <releases>
                        <enabled>true</enabled>
                    </releases>
                    <snapshots>
                        <enabled>true</enabled>
                    </snapshots>
                </repository>
            </repositories>
        </profile>


    </profiles>


    <activeProfiles> <!--激活 id为 nexusTest的 profile -->
        <activeProfile>nexusTest</activeProfile>
    </activeProfiles>
    <servers>
        <server>
            <id>releases</id>
            <username>admin</username>
            <password>admin123</password>
        </server>
        <server>
            <id>snapshots</id>
            <username>admin</username>
            <password>admin123</password>
        </server>
    </servers>
</settings>
G:\tool\m2\myrepository 存放本地仓库位置
http://127.0.0.1:8081 Nexus服务器ip及端口
admin/ admin123 Nexus服务器登录用户名和密码
5.1 pom.xml 中配置私服路径
<project xmlns="http://maven.apache.org/POM/4.0.0" xmlns:xsi="http://www.w3.org/2001/XMLSchema-instance"
    xsi:schemaLocation="http://maven.apache.org/POM/4.0.0 http://maven.apache.org/xsd/maven-4.0.0.xsd">
    <modelVersion>4.0.0</modelVersion>
    <groupId>com.bjsxt</groupId>
    <artifactId>test</artifactId>
    <version>0.0.1-SNAPSHOT</version>

    <distributionManagement>
        <repository>
            <id>releases</id>
            <url>http://localhost:8081/nexus/content/repositories/releases</url>
        </repository>
        <snapshotRepository>
            <id>snapshots</id>
            <url>http://localhost:8081/nexus/content/repositories/snapshots</url>
        </snapshotRepository>
    </distributionManagement>

</project>
5.2 在 setings.xml 中配置连接私服仓库的用户名和密码
<servers>
        <server>
            <id>releases</id>
            <username>admin</username>
            <password>admin123</password>
        </server>
        <server>
            <id>snapshots</id>
            <username>admin</username>
            <password>admin123</password>
        </server>
    </servers>
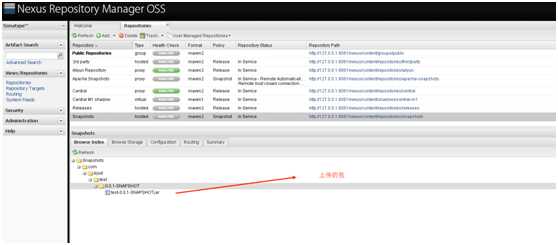
5.3 右键项目-> run as 输入 deploy
添加到项目后,后台可查询到对应包
标签:group png class 使用 sch 服务 password 构建 ima
原文地址:https://www.cnblogs.com/hzcjd/p/12347172.html