标签:多个 混合 drivers 电源管理 语言 步骤 isolation ifconf free
一、AWS Serverless 服务近些年 AWS 非常推崇无服务器模式,自从2014年 Lambda 发布之后,无服务器大受欢迎,随之 2017 年推出 AWS Fargate 服务,应用于自家的容器服务平台 ECS。在 2019 年,EKS 也相继支持 AWS Fargate。
现在,更多的用户使用无服务器计算来构建应用程序,AWS 旨在打造让用户无需担心基础设施的预置或管理问题。开发人员可以使用 AWS Fargate 将其代码封装为无服务器容器,或使用 AWS Lambda 封装为无服务器函数。无服务器的低运营开销特点,这将继续对计算的未来发挥关键作用。
随着用户越来越广泛采用无服务器技术,AWS 认识到现行虚拟化技术还未同步发展,以针对此类事件驱动性,有时又呈短暂性特点的工作负载进行优化。AWS 认为需要构建特别针对无服务器计算设计的虚拟化技术。这种技术需要既能提供基于硬件虚拟化的虚拟机安全性边界,同时又能保持容器和函数较小的封装型号和敏捷性。

现在的技术环境下,容器具有快速启动时间和高密度,VM 可以对硬件虚拟化,具有更好的安全性,并对工作负载具有更好的隔离性。容器和 VM 的特性现在还不可兼得。
AWS 开源了 Firecracker,一种利用 KVM 的新虚拟化技术,专门用于创建和管理多租户容器以及基于函数的服务。你可以在几分之一秒内在非虚拟化环境中启动轻量级微虚拟机(microVM),充分利用传统虚拟机提供的安全性和工作负载隔离,同时兼具容器的资源效率。
Firecracker 是一种采用基于 Linux 内核的虚拟机 (KVM) 技术的开源虚拟机监控程序(VMM)。Firecracker 允许您创建微型虚拟机,即 microVM。Firecracker 坚持精简主义的设计原则,它仅包含运行安全、轻量的虚拟机所需的组件。在设计过程的各个环节,AWS 依据安全性、速度和效率要求来优化 Firecracker。例如,仅启动相对较新的 Linux 内核,并且仅启动使用特定配置选项集编译的内核(内核编译配置选项超过 1000 种)。此外,不支持任何类型的图形卡或加速器,不支持硬件透传,不支持(大多数)老旧设备。
Firecracker 启动的内核配置极少,不依赖仿真 BIOS,不使用完整设备模式。唯一的设备是半虚拟化网卡和半虚拟化硬盘,以及单按钮键盘(复位引脚在无电源管理设备时使用)。这种极简的设备模式不仅有利于缩短开机时间(采用默认 microVM 型号的 i3.metal 实例开机时间 < 125 毫秒),同时也减少了***面,从而提高了安全性。请参阅有关 Firecracker 承诺支持以极低的开销执行容器和无服务器工作负载的更多信息。
2017 年秋,AWS 决定以 Rust 语言来编写 Firecracker,这是一种非常先进的编程语言,可保证线程和内存安全,防止缓存溢出以及可能导致安全性漏洞的许多其他类型的内存安全问题。请访问 Firecracker 设计以了解有关 Firecracker VMM 功能和架构的更多详细信息。
由于设备模型极简,内核加载过程也简单,可以实现小于 125 ms 的启动时间和更少的内存占用。Firecracker 目前支持 Intel CPU,并将于 2019 年开始支持 AMD 和 ARM,还将与 containerd 等流行的容器运行时集成。Firecracker 支持内核版本为 4.14 及更高版本的 Linux 主机和客户机操作系统。
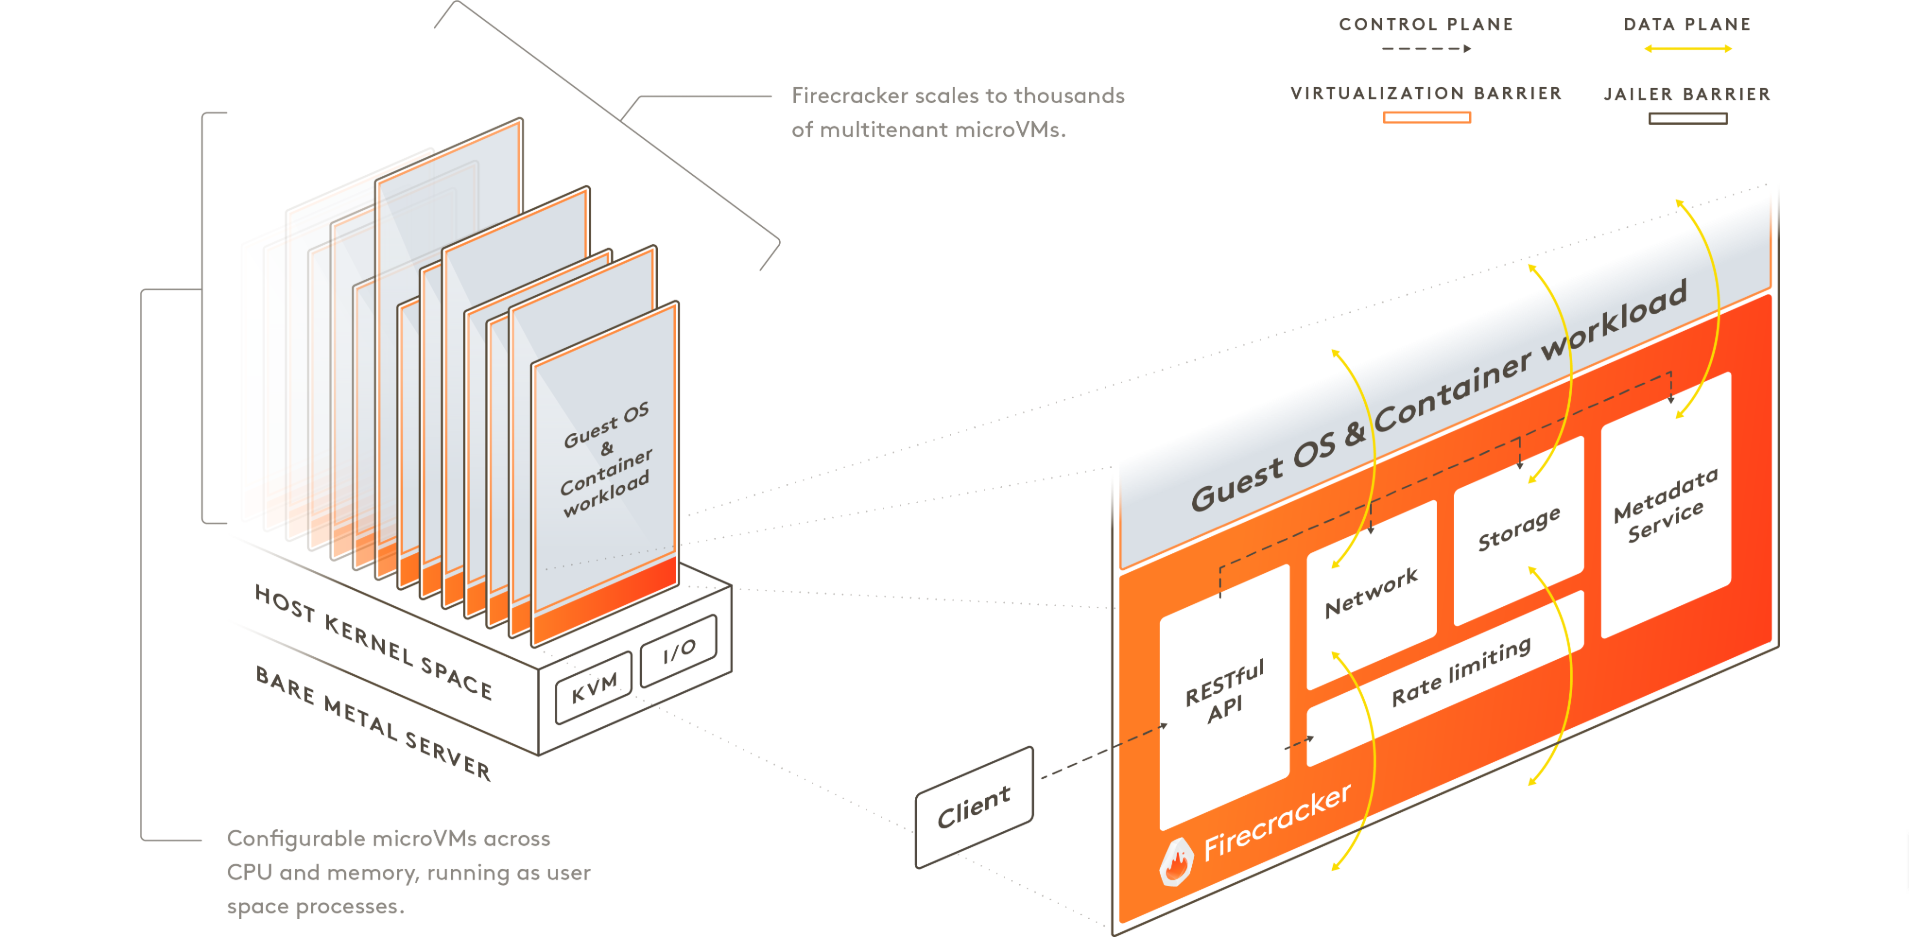
Firecracker microVM 提高了效率和利用率,内存开销极低,每 microVM 的内存开销 < 5MiB。这意味着用户可以将数千个 microVM 封装到一个虚拟机中。可以使用进程中速率限制器来实现对网络和存储资源的共享方式的精细控制,即使跨数千个 microVM 也同样可行。所有硬件计算资源可以安全地超订,从而最大化可以在主机上运行的工作负载数量。
AWS 依据如下开放源项目的指导信条开发了 Firecracker。
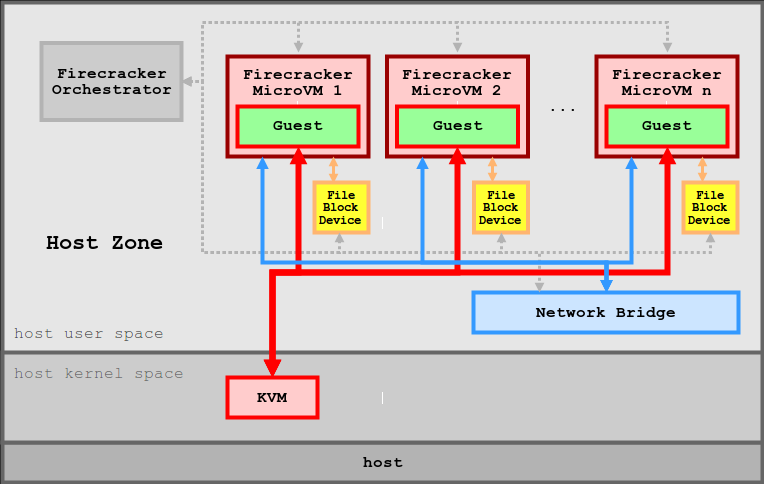
Firecracker 运行在 Linux 主机上,内核为4.14或更新内核,并且使用 Linux guest OSs (从这一点来说,称为 guest)。 启动该进程后,在发出 instanceart 命令之前,用户与 Firecracker API 交互以配置 microVM。

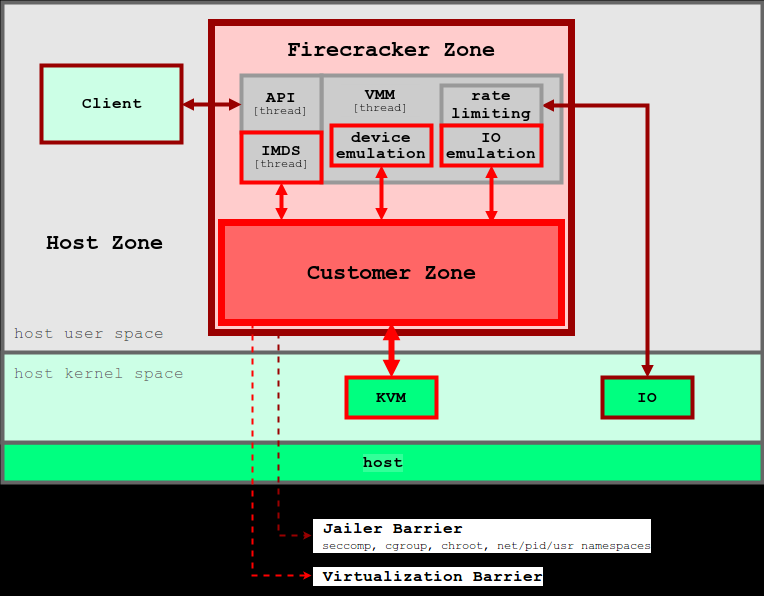
每个 Firecracker 进程封装一个且只有一个 microVM。 该进程运行以下线程: API、 VMM 和 vCPU。 Api 线程负责 Firecracker 的 API 服务器和相关的控制平面。 它永远不会在虚拟机的快速路径上。 Vmm 线程公开机器模型、最小遗留设备模型、 microVM 元数据服务(MMDS)和 VirtIO 设备仿真 Net 和 Block 设备,并提供 i / o 速率限制。 除此之外,还有一个或多个 vCPU 线程(每个客户 CPU 核心一个)。 它们是通过 KVM 创建的,并运行 KVM run 主循环。 它们在设备模型上执行同步 i / o 和存储器映射输入输出操作。


Firecracker 在用户空间中运行,使用基于 Linux 内核的虚拟机(KVM)来创建 microVM。每个 microVM 的快速启动时间和低内存开销使你可将数千个 microVM 打包到同一台机器上。这意味着每个函数或容器组都可以使用虚拟机屏障进行封装,从而使不同用户的工作负载能在同一台计算机上运行,而无需在安全性和效率之间进行权衡。Firecracker 是 QEMU 的替代品,QEMU 是一个成熟的 VMM,具有通用和广泛的功能集,可以托管各种客户操作系统。
可以通过 RESTful API 控制 Firecracker 进程,RESTful API 可以启用常见操作:例如配置 vCPU 数量或启动计算机。Firecracker 提供内置速率限制器,可精确控制同一台计算机上数千个 microVM 使用的网络和存储资源。你可以通过 Firecracker API 创建和配置速率限制器,并灵活定义速率限制器来支持突发情况或特定带宽 / 操作限制。Firecracker 还提供元数据服务,可在主机和客户机操作系统之间安全地共享配置信息。元数据服务可以使用 Firecracker API 设置。
Firecracker 现在还不能在 Kubernetes、Docker 或 Kata Container 上使用。Kata Container 是一个符合 OCI 标准的容器运行时,在基于 QEMU 的虚拟机中执行容器。Firecracker 是 QEMU 的云原生替代品,专门用于安全高效地运行容器,这是 Firecracker 和 Kata Container 以及 QEMU 之间的区别。
AWS Lambda 利用 Firecracker 作为沙箱环境的配置与运行基础,AWS 会在沙箱环境之上执行客户代码。由于Firecracker所配置的安全微虚拟机能够以最小体积实现快速配置,因此能够在不牺牲安全性水平的前提下带来出色性能。如此一来,AWS 将能够在物理硬件之上实现高资源利用率——包括对为Lambda分配及运行工作负载的具体方式进行优化,并根据活动/空闲时段以及内存利用率等因素对工作负载加以混合。
在此之前,Fargate Tasks 包含一个或者多个运行于专用 EC2 虚拟机当中的 Docker 容器,旨在确保任务间相互隔离。这些任务现在可以在 Firecracker 微虚拟机上执行,这使得 AWS 能够立足 EC2 裸机实例对 Fargate 运行时层进行更快、更高效地配置,同时在不影响任务内核级隔离能力的前提下提高工作负载密度。随着时间的推移,这还使 AWS 得以继续在运行时层内实现创新,为客户提供更好的性能表现,同时保持高安全性水平并降低运行无服务器容器架构的总体成本。
Firecracker目前运行在英特尔处理器之上,并将在2019年年内实现对 AMD 以及 ARM 处理器的支持。
用户可以在 AWS .metal 实例上运行 Firecracker,同时也可将其运行在任何其它裸机服务器之上,具体包括内部环境以及开发人员的笔记本电脑。
Firecracker 还将启用目前极具人气的容器运行时(例如 containerd )将容器作为微虚拟机进行管理。如此一来,用户的 Docker 与容器编排框架(例如 Kubernetes )将能够使用 Firecracker。
Firecracker 入门 提供了有关如何下载 Firecracker 二进制代码、以不同的选项启动 Firecracker、从源进行构建以及运行集成测试等方面的详细说明。您可以通过 Firecracker Jailer 在生产环境中运行 Firecracker。
下面我们来看如何在 AWS 云上开始使用 Firecracker(这些步骤可以在任何裸机上使用):
使用 Ubuntu 18.04.1 创建一个 i3.metal 实例。
Firecracker 在 KVM 上构建并且需要 /dev/kvm 的读/写权限。登录一个终端中的主机,然后设置该访问权限:
sudo chmod 777 /dev/kvmFirecracker 二进制不依赖任何库,You can just download the latest binary from our release page, and run it on your x86_64 or aarch64 Linux machine.
wget https://github.com/firecracker-microvm/firecracker/releases/download/v0.21.0/firecracker-v0.21.0-x86_64
chmod +x firecracker-v0.21.0-x86_64
./firecracker-v0.21.0-x86_64 --api-sock /tmp/firecracker.sock
我们通过 ps -ef 查看到 firecracker 的进程为 3501,然后查看一下其占用内存情况,发现为启动前只占用 4kb 内存。
# cat /proc/3501/status|grep VmRSS
VmRSS: 4 kB现在我们启动了一个 microVM,每个 microVM 都可以使用 REST API 来访问。在另一个终端中查询 microVM:
# curl --unix-socket /tmp/firecracker.sock "http://localhost/machine-config"
{ "vcpu_count": 1, "mem_size_mib": 128,  "ht_enabled": false,  "cpu_template": "Uninitialized" }
这将启动一个 VMM 进程并等待 microVM 配置。默认情况下,每个 microVM 将分配一个 vCPU 和 128MiB 内存,如果需要修改 vCPU 和内存大小,可以向 microVM API 发送下面的请求:
curl --unix-socket /tmp/firecracker.sock -i      -X PUT ‘http://localhost/machine-config‘     -H ‘Accept: application/json‘                -H ‘Content-Type: application/json‘          -d ‘{
        "vcpu_count": 2,
        "mem_size_mib": 4096,
        "ht_enabled": false
}‘现在此 microVM 需要使用解压后的 Linux 内核二进制代码和将用作根文件系统的 ext4 文件系统来进行配置。
下载示例内核和 rootfs:
curl -fsSL -o hello-vmlinux.bin https://s3.amazonaws.com/spec.ccfc.min/img/hello/kernel/hello-vmlinux.bin
curl -fsSL -o hello-rootfs.ext4 https://s3.amazonaws.com/spec.ccfc.min/img/hello/fsfiles/hello-rootfs.ext4
设置来宾内核:
curl --unix-socket /tmp/firecracker.sock -i     -X PUT ‘http://localhost/boot-source‘       -H ‘Accept: application/json‘               -H ‘Content-Type: application/json‘         -d ‘{
        "kernel_image_path": "./hello-vmlinux.bin",
        "boot_args": "console=ttyS0 reboot=k panic=1 pci=off"
    }‘
返回如下内容:
HTTP/1.1 204
Server: Firecracker API
Connection: keep-alive
然后设置根文件系统:
curl --unix-socket /tmp/firecracker.sock -i     -X PUT ‘http://localhost/drives/rootfs‘     -H ‘Accept: application/json‘               -H ‘Content-Type: application/json‘         -d ‘{
        "drive_id": "rootfs",
        "path_on_host": "./hello-rootfs.ext4",
        "is_root_device": true,
        "is_read_only": false
}‘配置好内核和根文件系统后,将会启动来宾虚拟机:
curl --unix-socket /tmp/firecracker.sock -i     -X PUT ‘http://localhost/actions‘           -H  ‘Accept: application/json‘              -H  ‘Content-Type: application/json‘        -d ‘{
        "action_type": "InstanceStart"
    }‘
第一个终端现在将显示一个序列 TTY,提示您登录到来宾虚拟机,我们切换到第一个终端可以看到 microVM 的整个启动过程,我们通过启动过程可以看到,启动完成大约需要 150ms,我贴在下面:
[    0.000000] Linux version 4.14.55-84.37.amzn2.x86_64 (mockbuild@ip-10-0-1-79) (gcc version 7.3.1 20180303 (Red Hat 7.3.1-5) (GCC)) #1 SMP Wed Jul 25 18:47:15 UTC 2018
[    0.000000] Command line: console=ttyS0 reboot=k panic=1 pci=off root=/dev/vda rw virtio_mmio.device=4K@0xd0000000:5
[    0.000000] x86/fpu: Supporting XSAVE feature 0x001: ‘x87 floating point registers‘
[    0.000000] x86/fpu: Supporting XSAVE feature 0x002: ‘SSE registers‘
[    0.000000] x86/fpu: Supporting XSAVE feature 0x004: ‘AVX registers‘
[    0.000000] x86/fpu: xstate_offset[2]:  576, xstate_sizes[2]:  256
[    0.000000] x86/fpu: Enabled xstate features 0x7, context size is 832 bytes, using ‘standard‘ format.
[    0.000000] e820: BIOS-provided physical RAM map:
[    0.000000] BIOS-e820: [mem 0x0000000000000000-0x000000000009fbff] usable
[    0.000000] BIOS-e820: [mem 0x0000000000100000-0x0000000007ffffff] usable
[    0.000000] NX (Execute Disable) protection: active
[    0.000000] DMI not present or invalid.
[    0.000000] Hypervisor detected: KVM
[    0.000000] tsc: Using PIT calibration value
[    0.000000] e820: last_pfn = 0x8000 max_arch_pfn = 0x400000000
[    0.000000] MTRR: Disabled
[    0.000000] x86/PAT: MTRRs disabled, skipping PAT initialization too.
[    0.000000] CPU MTRRs all blank - virtualized system.
[    0.000000] x86/PAT: Configuration [0-7]: WB  WT  UC- UC  WB  WT  UC- UC
[    0.000000] found SMP MP-table at [mem 0x0009fc00-0x0009fc0f] mapped at [ffffffffff200c00]
[    0.000000] Scanning 1 areas for low memory corruption
[    0.000000] Using GB pages for direct mapping
[    0.000000] No NUMA configuration found
[    0.000000] Faking a node at [mem 0x0000000000000000-0x0000000007ffffff]
[    0.000000] NODE_DATA(0) allocated [mem 0x07fde000-0x07ffffff]
[    0.000000] kvm-clock: Using msrs 4b564d01 and 4b564d00
[    0.000000] kvm-clock: cpu 0, msr 0:7fdc001, primary cpu clock
[    0.000000] kvm-clock: using sched offset of 125681660769 cycles
[    0.000000] clocksource: kvm-clock: mask: 0xffffffffffffffff max_cycles: 0x1cd42e4dffb, max_idle_ns: 881590591483 ns
[    0.000000] Zone ranges:
[    0.000000]   DMA      [mem 0x0000000000001000-0x0000000000ffffff]
[    0.000000]   DMA32    [mem 0x0000000001000000-0x0000000007ffffff]
[    0.000000]   Normal   empty
[    0.000000] Movable zone start for each node
[    0.000000] Early memory node ranges
[    0.000000]   node   0: [mem 0x0000000000001000-0x000000000009efff]
[    0.000000]   node   0: [mem 0x0000000000100000-0x0000000007ffffff]
[    0.000000] Initmem setup node 0 [mem 0x0000000000001000-0x0000000007ffffff]
[    0.000000] Intel MultiProcessor Specification v1.4
[    0.000000] MPTABLE: OEM ID: FC
[    0.000000] MPTABLE: Product ID: 000000000000
[    0.000000] MPTABLE: APIC at: 0xFEE00000
[    0.000000] Processor #0 (Bootup-CPU)
[    0.000000] IOAPIC[0]: apic_id 2, version 17, address 0xfec00000, GSI 0-23
[    0.000000] Processors: 1
[    0.000000] smpboot: Allowing 1 CPUs, 0 hotplug CPUs
[    0.000000] PM: Registered nosave memory: [mem 0x00000000-0x00000fff]
[    0.000000] PM: Registered nosave memory: [mem 0x0009f000-0x000fffff]
[    0.000000] e820: [mem 0x08000000-0xffffffff] available for PCI devices
[    0.000000] Booting paravirtualized kernel on KVM
[    0.000000] clocksource: refined-jiffies: mask: 0xffffffff max_cycles: 0xffffffff, max_idle_ns: 7645519600211568 ns
[    0.000000] random: get_random_bytes called from start_kernel+0x94/0x486 with crng_init=0
[    0.000000] setup_percpu: NR_CPUS:128 nr_cpumask_bits:128 nr_cpu_ids:1 nr_node_ids:1
[    0.000000] percpu: Embedded 41 pages/cpu @ffff880007c00000 s128728 r8192 d31016 u2097152
[    0.000000] KVM setup async PF for cpu 0
[    0.000000] kvm-stealtime: cpu 0, msr 7c15040
[    0.000000] PV qspinlock hash table entries: 256 (order: 0, 4096 bytes)
[    0.000000] Built 1 zonelists, mobility grouping on.  Total pages: 32137
[    0.000000] Policy zone: DMA32
[    0.000000] Kernel command line: console=ttyS0 reboot=k panic=1 pci=off root=/dev/vda rw virtio_mmio.device=4K@0xd0000000:5
[    0.000000] PID hash table entries: 512 (order: 0, 4096 bytes)
[    0.000000] Memory: 111064K/130680K available (8204K kernel code, 622K rwdata, 1464K rodata, 1268K init, 2820K bss, 19616K reserved, 0K cma-reserved)
[    0.000000] SLUB: HWalign=64, Order=0-3, MinObjects=0, CPUs=1, Nodes=1
[    0.000000] Kernel/User page tables isolation: enabled
[    0.004000] Hierarchical RCU implementation.
[    0.004000]  RCU restricting CPUs from NR_CPUS=128 to nr_cpu_ids=1.
[    0.004000] RCU: Adjusting geometry for rcu_fanout_leaf=16, nr_cpu_ids=1
[    0.004000] NR_IRQS: 4352, nr_irqs: 48, preallocated irqs: 16
[    0.004000] Console: colour dummy device 80x25
[    0.004000] console [ttyS0] enabled
[    0.004000] tsc: Detected 2299.998 MHz processor
[    0.004000] Calibrating delay loop (skipped) preset value.. 4599.99 BogoMIPS (lpj=9199992)
[    0.004000] pid_max: default: 32768 minimum: 301
[    0.004000] Security Framework initialized
[    0.004000] SELinux:  Initializing.
[    0.004187] Dentry cache hash table entries: 16384 (order: 5, 131072 bytes)
[    0.005499] Inode-cache hash table entries: 8192 (order: 4, 65536 bytes)
[    0.006697] Mount-cache hash table entries: 512 (order: 0, 4096 bytes)
[    0.008013] Mountpoint-cache hash table entries: 512 (order: 0, 4096 bytes)
[    0.009671] Last level iTLB entries: 4KB 64, 2MB 8, 4MB 8
[    0.010636] Last level dTLB entries: 4KB 64, 2MB 0, 4MB 0, 1GB 4
[    0.012005] Spectre V2 : Mitigation: Full generic retpoline
[    0.012987] Speculative Store Bypass: Vulnerable
[    0.025015] Freeing SMP alternatives memory: 28K
[    0.026799] smpboot: Max logical packages: 1
[    0.027795] x2apic enabled
[    0.028005] Switched APIC routing to physical x2apic.
[    0.030291] ..TIMER: vector=0x30 apic1=0 pin1=0 apic2=-1 pin2=-1
[    0.031291] smpboot: CPU0: Intel(R) Xeon(R) Processor @ 2.30GHz (family: 0x6, model: 0x4f, stepping: 0x1)
[    0.032000] Performance Events: unsupported p6 CPU model 79 no PMU driver, software events only.
[    0.032000] Hierarchical SRCU implementation.
[    0.032093] smp: Bringing up secondary CPUs ...
[    0.032817] smp: Brought up 1 node, 1 CPU
[    0.033456] smpboot: Total of 1 processors activated (4599.99 BogoMIPS)
[    0.034834] devtmpfs: initialized
[    0.035417] x86/mm: Memory block size: 128MB
[    0.036178] clocksource: jiffies: mask: 0xffffffff max_cycles: 0xffffffff, max_idle_ns: 7645041785100000 ns
[    0.037685] futex hash table entries: 256 (order: 2, 16384 bytes)
[    0.038868] NET: Registered protocol family 16
[    0.039717] cpuidle: using governor ladder
[    0.040006] cpuidle: using governor menu
[    0.044665] HugeTLB registered 1.00 GiB page size, pre-allocated 0 pages
[    0.045744] HugeTLB registered 2.00 MiB page size, pre-allocated 0 pages
[    0.046973] dmi: Firmware registration failed.
[    0.047770] NetLabel: Initializing
[    0.048026] NetLabel:  domain hash size = 128
[    0.048731] NetLabel:  protocols = UNLABELED CIPSOv4 CALIPSO
[    0.049639] NetLabel:  unlabeled traffic allowed by default
[    0.050631] clocksource: Switched to clocksource kvm-clock
[    0.051521] VFS: Disk quotas dquot_6.6.0
[    0.051521] VFS: Dquot-cache hash table entries: 512 (order 0, 4096 bytes)
[    0.053231] NET: Registered protocol family 2
[    0.054036] TCP established hash table entries: 1024 (order: 1, 8192 bytes)
[    0.055137] TCP bind hash table entries: 1024 (order: 2, 16384 bytes)
[    0.056156] TCP: Hash tables configured (established 1024 bind 1024)
[    0.057164] UDP hash table entries: 256 (order: 1, 8192 bytes)
[    0.058077] UDP-Lite hash table entries: 256 (order: 1, 8192 bytes)
[    0.059067] NET: Registered protocol family 1
[    0.060338] virtio-mmio: Registering device virtio-mmio.0 at 0xd0000000-0xd0000fff, IRQ 5.
[    0.061666] platform rtc_cmos: registered platform RTC device (no PNP device found)
[    0.063021] Scanning for low memory corruption every 60 seconds
[    0.064162] audit: initializing netlink subsys (disabled)
[    0.065238] Initialise system trusted keyrings
[    0.065946] Key type blacklist registered
[    0.066623] audit: type=2000 audit(1582381251.667:1): state=initialized audit_enabled=0 res=1
[    0.067999] workingset: timestamp_bits=36 max_order=15 bucket_order=0
[    0.070284] squashfs: version 4.0 (2009/01/31) Phillip Lougher
[    0.073661] Key type asymmetric registered
[    0.074318] Asymmetric key parser ‘x509‘ registered
[    0.075091] Block layer SCSI generic (bsg) driver version 0.4 loaded (major 254)
[    0.076319] io scheduler noop registered (default)
[    0.077122] io scheduler cfq registered
[    0.077799] virtio-mmio virtio-mmio.0: Failed to enable 64-bit or 32-bit DMA.  Trying to continue, but this might not work.
[    0.079660] Serial: 8250/16550 driver, 1 ports, IRQ sharing disabled
[    0.102677] serial8250: ttyS0 at I/O 0x3f8 (irq = 4, base_baud = 115200) is a U6_16550A
[    0.105548] loop: module loaded
[    0.106732] tun: Universal TUN/TAP device driver, 1.6
[    0.107583] hidraw: raw HID events driver (C) Jiri Kosina
[    0.108489] nf_conntrack version 0.5.0 (1024 buckets, 4096 max)
[    0.109523] ip_tables: (C) 2000-2006 Netfilter Core Team
[    0.110405] Initializing XFRM netlink socket
[    0.111154] NET: Registered protocol family 10
[    0.112326] Segment Routing with IPv6
[    0.112931] NET: Registered protocol family 17
[    0.113638] Bridge firewalling registered
[    0.114325] sched_clock: Marking stable (112005721, 0)->(211417276, -99411555)
[    0.115605] registered taskstats version 1
[    0.116270] Loading compiled-in X.509 certificates
[    0.117814] Loaded X.509 cert ‘Build time autogenerated kernel key: 3472798b31ba23b86c1c5c7236c9c91723ae5ee9‘
[    0.119392] zswap: default zpool zbud not available
[    0.120179] zswap: pool creation failed
[    0.120924] Key type encrypted registered
[    0.123818] EXT4-fs (vda): recovery complete
[    0.124608] EXT4-fs (vda): mounted filesystem with ordered data mode. Opts: (null)
[    0.125761] VFS: Mounted root (ext4 filesystem) on device 254:0.
[    0.126874] devtmpfs: mounted
[    0.128116] Freeing unused kernel memory: 1268K
[    0.136083] Write protecting the kernel read-only data: 12288k
[    0.138147] Freeing unused kernel memory: 2016K
[    0.140430] Freeing unused kernel memory: 584K
OpenRC init version 0.35.5.87b1ff59c1 starting
Starting sysinit runlevel

   OpenRC 0.35.5.87b1ff59c1 is starting up Linux 4.14.55-84.37.amzn2.x86_64 (x86_64)

 * Mounting /proc ...
 [ ok ]
 * Mounting /run ...
 * /run/openrc: creating directory
 * /run/lock: creating directory
 * /run/lock: correcting owner
 * Caching service dependencies ...
Service `hwdrivers‘ needs non existent service `dev‘
 [ ok ]
Starting boot runlevel
 * Remounting devtmpfs on /dev ...
 [ ok ]
 * Mounting /dev/mqueue ...
 [ ok ]
 * Mounting /dev/pts ...
 [ ok ]
 * Mounting /dev/shm ...
 [ ok ]
 * Setting hostname ...
 [ ok ]
 * Checking local filesystems  ...
 [ ok ]
 * Remounting filesystems ...
 [ ok[    0.292620] random: fast init done
 ]
 * Mounting local filesystems ...
 [ ok ]
 * Loading modules ...
modprobe: can‘t change directory to ‘/lib/modules‘: No such file or directory
modprobe: can‘t change directory to ‘/lib/modules‘: No such file or directory
 [ ok ]
 * Mounting misc binary format filesystem ...
 [ ok ]
 * Mounting /sys ...
 [ ok ]
 * Mounting security filesystem ...
 [ ok ]
 * Mounting debug filesystem ...
 [ ok ]
 * Mounting SELinux filesystem ...
 [ ok ]
 * Mounting persistent storage (pstore) filesystem ...
 [ ok ]
Starting default runlevel
[    1.088040] clocksource: tsc: mask: 0xffffffffffffffff max_cycles: 0x212733415c7, max_idle_ns: 440795236380 ns

Welcome to Alpine Linux 3.8
Kernel 4.14.55-84.37.amzn2.x86_64 on an x86_64 (ttyS0)

localhost login: 使用 root 和密码 root 登录以查看来宾虚拟机的终端:
Welcome to Alpine Linux 3.8
Kernel 4.14.55-84.37.amzn2.x86_64 on an x86_64 (ttyS0)

localhost login: root
Password:
Welcome to Alpine!

The Alpine Wiki contains a large amount of how-to guides and general
information about administrating Alpine systems.
See <http://wiki.alpinelinux.org>.

You can setup the system with the command: setup-alpine

You may change this message by editing /etc/motd.

login[855]: root login on ‘ttyS0‘
localhost:~#
您可以使用 ls / 查看文件系统:
localhost:~# ls /
bin         home        media       root        srv         usr
dev         lib         mnt         run         sys         var
etc         lost+found  proc        sbin        tmp
这时,我们再查看一下其占用内存占用 36MB。
# cat /proc/3501/status|grep VmRSS
VmRSS:     36996 kB
使用 reboot 命令终止 microVM。为了权衡效率,Firecracker 目前并未实施来宾电源管理。相反,reboot 命令会发出一个键盘复位操作以作为关机开关。
创建基本的 microVM 后,您可以添加网络接口、更多的驱动器以及继续配置 microVM。
需要在您的裸机实例上创建上千个 microVMs?
for ((i=0; i<1000; i++)); do
    ./firecracker-v0.21.0-x86_64 --api-sock /tmp/firecracker-$i.sock &
done
多个 microVM 可以配置同一个共享根文件系统,然后为每个 microVM 分配自己的读/写份额。
目前创建的 microVM 没有网络或者其他 I/O,现在我们为其配置网络,我们首先在宿主机上面为其添加一个 tap0 设备。
sudo ip tuntap add tap0 mode tapmicroVM 需要访问公网,我们这里使用 NAT,这里需要配置 iptables,首先把 iptables 规则清除,以免引起其他问题,我这里的宿主机网络接口名称为enp4s0:
sudo ip addr add 172.16.0.1/24 dev tap0
sudo ip link set tap0 up
sudo sh -c "echo 1 > /proc/sys/net/ipv4/ip_forward"
sudo iptables -t nat -A POSTROUTING -o enp4s0 -j MASQUERADE
sudo iptables -A FORWARD -m conntrack --ctstate RELATED,ESTABLISHED -j ACCEPT
sudo iptables -A FORWARD -i tap0 -o enp4s0 -j ACCEPT
现在我们可以查看创建的 tap0:
root@ip-172-31-20-74:~# ifconfig tap0
tap0: flags=4099<UP,BROADCAST,MULTICAST>  mtu 1500
        inet 172.16.0.1  netmask 255.255.255.0  broadcast 0.0.0.0
        ether fe:2d:e3:ba:09:ae  txqueuelen 1000  (Ethernet)
        RX packets 0  bytes 0 (0.0 B)
        RX errors 0  dropped 0  overruns 0  frame 0
        TX packets 0  bytes 0 (0.0 B)
        TX errors 0  dropped 0 overruns 0  carrier 0  collisions 0
如果我们一台物理机要启动多个 microVM,我们需要为每个 microVM 创建 tap# 设备,为每个 tap 设备设置 iptables NAT 规则。
在 microVM 启动之前,我们通过 microVM API 为其配置网络接口。
curl --unix-socket /tmp/firecracker.sock -i   -X PUT ‘http://localhost/network-interfaces/eth0‘   -H ‘Accept: application/json‘   -H ‘Content-Type: application/json‘   -d ‘{
      "iface_id": "eth0",
      "guest_mac": "AA:FC:00:00:00:01",
      "host_dev_name": "tap0"
}‘我们登录到 microVM 中,为其网络接口 eth0 配置 IP:
ip addr add 172.16.0.2/24 dev eth0
ip link set eth0 up
ip route add default via 172.16.0.1 dev eth0
查看网络情况。
localhost:~# ifconfig
eth0      Link encap:Ethernet  HWaddr AA:FC:00:00:00:01
          inet addr:172.16.0.2  Bcast:0.0.0.0  Mask:255.255.255.0
          inet6 addr: fe80::a8fc:ff:fe00:1/64 Scope:Link
          UP BROADCAST RUNNING MULTICAST  MTU:1500  Metric:1
          RX packets:0 errors:0 dropped:0 overruns:0 frame:0
          TX packets:6 errors:0 dropped:0 overruns:0 carrier:0
          collisions:0 txqueuelen:1000
          RX bytes:0 (0.0 B)  TX bytes:516 (516.0 B)

localhost:~# ping 8.8.8.8
PING 8.8.8.8 (8.8.8.8): 56 data bytes
64 bytes from 8.8.8.8: seq=0 ttl=47 time=1.491 ms
64 bytes from 8.8.8.8: seq=1 ttl=47 time=1.118 ms
64 bytes from 8.8.8.8: seq=2 ttl=47 time=1.136 ms当我们删掉某个 microVM 的时候,可以把其相关网络设备删除。
sudo ip link del tap0
sudo iptables -F
sudo sh -c "echo 0 > /proc/sys/net/ipv4/ip_forward"
这里只是简单的介绍了一下 Firecracker 的使用方法,关于生产环境的使用,请详细查看官方 github 文档的推荐。
参考文档:
https://github.com/firecracker-microvm/firecracker/blob/master/docs/jailer.md
https://firecracker-microvm.github.io/

AWS Lambda&Fargate 无服务底层技术是如何实现的
标签:多个 混合 drivers 电源管理 语言 步骤 isolation ifconf free
原文地址:https://blog.51cto.com/wzlinux/2473650