标签:red 效果 缩放 表达 for orm color info 顺序
SVG中DOM元素的偏移与缩放都是基于SVG元素的左上角,所以如何理解与计算SVG中元素的真实位置就比较难,下面的例子都以圆(circle)为例。
1.缩放
假定缩放的比例为s,执行缩放后,圆的圆心坐标由(cx, cy)变为(cx * s, cy * s)
2. 偏移
假定偏移的距离为(x1, y1), 执行单纯的偏移后,圆的圆心坐标由(cx, cy)变为(cx + x1, cy + y1)
3. 先偏移后缩放
先偏移后缩放的transform表达式为
transform="translate(100, 0) scale(2) "
1
则现在圆心的真实位置为(cx * s + x1, cy * s + y1)
4. 先缩放后偏移
先偏移后缩放的transform表达式为
transform="scale(2) translate(100, 0)"
1
则现在圆心的真实位置为((cx + x1) * s, (cy + y1) * s)
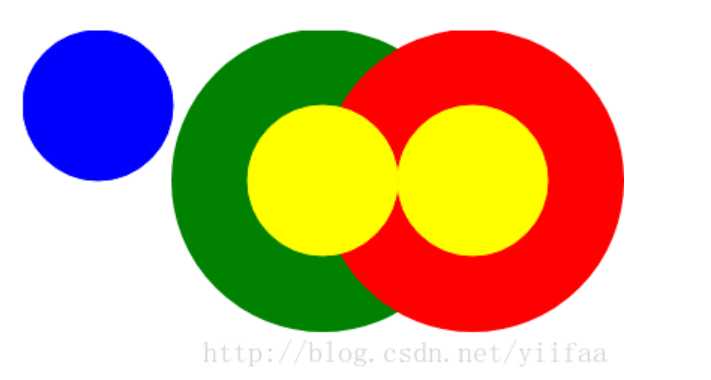
<svg width="600" height="600"> <!-- 用作参照 --> <circle cx="50" cy="50" stroke="blue" stroke-width="1" r="50" fill="blue"/> <!-- 先偏移后缩放 --> <circle cx="50" cy="50" stroke="green" stroke-width="1" r="50" fill="green" transform="translate(100, 0) scale(2) "/> <!-- 先缩放后偏移 --> <circle cx="50" cy="50" stroke="red" stroke-width="1" r="50" fill="red" transform="scale(2) translate(100, 0) "/> <!-- 用作参照,用于查看实际的圆心位置 --> <circle cx="200" cy="100" stroke="yellow" stroke-width="1" r="50" fill="yellow"/> <circle cx="300" cy="100" stroke="yellow" stroke-width="1" r="50" fill="yellow"/></svg>
实际效果如下:

一定要注意缩放与偏移的顺序,否则结果将大相径庭,另外如果想要像CSS3一样以圆心进行缩放,必须要组合使用偏移。
标签:red 效果 缩放 表达 for orm color info 顺序
原文地址:https://www.cnblogs.com/smedas/p/12482813.html