标签:col future 成功 ike iat direct oca star ebs
Let‘s Encrypt是免费证书,有效期三个月,续期成功,记录一下过程。
服务器环境: CentOS7.6、Python2.7.5
第一步:在宝塔系统将网站的SSL停用,执行续期命令: /git/letsencrypt/certbot-auto certonly --renew-by-default --email xxx@qq.com -d abc.xxx.com
执行过程:
Creating virtual environment...
Installing Python packages...
Installation succeeded.
Saving debug log to /var/log/letsencrypt/letsencrypt.log
How would you like to authenticate with the ACME CA?
- - - - - - - - - - - - - - - - - - - - - - - - - - - - - - - - - - - - - - - -
1: Nginx Web Server plugin (nginx)
2: Spin up a temporary webserver (standalone)
3: Place files in webroot directory (webroot)
- - - - - - - - - - - - - - - - - - - - - - - - - - - - - - - - - - - - - - - -
Select the appropriate number [1-3] then [enter] (press ‘c‘ to cancel): 3
Input the webroot for lingshi.xinlz.net: (Enter ‘c‘ to cancel): /mnt/vdb1/abc.xxx.com
Waiting for verification...
Cleaning up challenges
IMPORTANT NOTES:
- Congratulations! Your certificate and chain have been saved at:
/etc/letsencrypt/live/abc.xxx.com/fullchain.pem
Your key file has been saved at:
/etc/letsencrypt/live/abc.xxx.com/privkey.pem
Your cert will expire on 2020-06-17. To obtain a new or tweaked
version of this certificate in the future, simply run certbot-auto
again. To non-interactively renew *all* of your certificates, run
"certbot-auto renew"
- If you like Certbot, please consider supporting our work by:
Donating to ISRG / Let‘s Encrypt: https://letsencrypt.org/donate
Donating to EFF: https://eff.org/donate-le
==================================================
第二步: 检查当前站点的Nginx配置中对证书的引用路径是否正确

第三步:如更改过Nginx配置,则需重启服务
service nginx restart

========= 部署成功 ==================================================
过程和原理简单,但在实际实施过程,会遇到无限可能的不确定性导致失败。下面简章列出几个遇到过的问题:
1. 续期命令执行时一直停留在 Installing Python packages...
解决办法:
vim ~/.pip/pip.conf
[global]
# index-url = https://pypi.doubanio.com/simple/
#index-url=https://pypi.tuna.tsinghua.edu.cn/simple/ #清华镜像,网上99%的文章推荐这个网址,经多次测试未成功
index-url = http://mirrors.aliyun.com/pypi/simple/ #阿里云,一次成功。
[install]
#trusted-host=pypi.doubanio.com
#trusted-host=pypi.huna.tsinghua.edu.cn
trusted-host=mirrors.aliyun.com 阿里云
保存pip.conf 后重新执行续期命令即可。
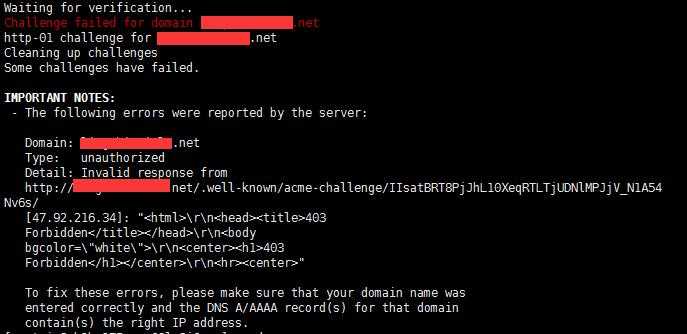
2. 提示.well-known 403错误,目录不可访问。

解决方法:在Nginx配置中增加允许访问设置:
location ~ /.well-known {
allow all;
}
标签:col future 成功 ike iat direct oca star ebs
原文地址:https://www.cnblogs.com/guo2001china/p/12529123.html