标签:type ica demo 集群 x86_64 tcp 改名 grunt 数据
前言:elasticsearch作为一个基于Lucene的分布式搜索引擎,其搜索功能的强大之处不用多说,而elasticsearch-head作为一个node项目,能够轻松管理elasticsearch的集群配置
1、下载资源包并解压安装
2、因为es在5版本后不允许root账号启动,因此需要创建一个用户
useradd es
chown -R es:es /usr/local/elasticsearch-6.2.4  对解压的目录赋予指定用户权限
3、修改es的配置文件
vim /etc/security/limits.conf
* hard nofile 65536
* soft nofile 65536   //*表示任意用户,也可以写为启动es的用户
vim /etc/security/limits.d/20-nproc.conf
* soft nproc 4096
* hard nproc 4096
root soft nproc unlimited
root hard nproc unlimited
vim /etc/sysctl.conf文件末尾添加vm.max_map_count=2621441
3、 如果想要在后台启动,可以使用./elasticsearch –d(当然要在bin目录下)
4、 Elasticsearch的多节点配置
a) 主节点配置(只有一个节点)
#集群名称
cluster.name: demon

#节点ip
network.host: 192.168.184.131         //本机ip

#节点名称
node.name: elk-1

#存放数据的位置
path.data: /data/es-data

#存放运行日志的位置
path.logs: /var/log/elasticsearch

#启动时锁定内存
bootstrap.memory_lock: true
#节点端口
http.port: 9200

#是否支持跨域
http.cors.enabled: true

# *表示支持所有域名
http.cors.allow-origin: "*"
a+) 主节点配置(存在多个节点)
#节点名称
node.name: master

#是否有主节点资格
node.master: true

#集群名称
cluster.name: elasticsearch

#节点ip
network.host: 192.168.184.131
#节点名称
node.name: elk-1

#存放数据的位置
path.data: /data/es-data

#存放运行日志的位置
path.logs: /var/log/elasticsearch

#启动时锁定内存
bootstrap.memory_lock: true
#节点端口 http.port: 9200 transport.tcp.port: 9300 #master最少多少个 discovery.zen.minimum_master_nodes: 1 #节点列表 默认端口9300,非9300需要带上端口号,自动轮询发现 discovery.zen.ping.unicast.hosts: ["192.168.184.131:9300","192.168.184.131:9301","192.168.184.131:9302"]

#是否支持跨域
http.cors.enabled: true
# *表示支持所有域名
http.cors.allow-origin: "*"
b) 子节点配置,记得拷贝整个elasticsearch文件,需要删除data目录下的文件,或者分开手动设置data目录
相关版本:Elasticsearch:6.2.4 node:10.16.0 jdk:1.8
1、 下载资源wget https://nodejs.org/dist/v10.16.0/node-v10.16.0-linux-x64.tar.xz
2、 解压tar -xf node-v10.16.0-linux-x64.tar.xz
3、 改名mv node-v10.16.0-linux-x64 nodejs
4、 建立软连接ln -s /usr/local/nodejs/bin/node /usr/local/bin
ln -s /usr/local/nodejs/bin/npm /usr/local/bin
5、 使用node –v查看node版本
1、 在git上clone资源:git clone git://github.com/mobz/elasticsearch-head.git
2、 进入elasticsearch-head目录:cd elasticsearch-head/
3、 使用npm install 进行安装
a) 安装过程出现的错误与解决办法
i. 手动安装phantomjs
ii. 报错 “error while loading shared libraries: libfontconfig.so.1: cannot open” 解决:yum -y install fontconfig-devel
报错 “Failed at the phantomjs-prebuilt@2.1.16 install scriptb)” 解决:npm install phantomjs-prebuilt@2.1.14 --ignore-scripts
4、 更新curl:yum update -y nss curl libcurl
5、 安装后出现

则大致表示成功了
6、 修改elasticsearch-head中的配置
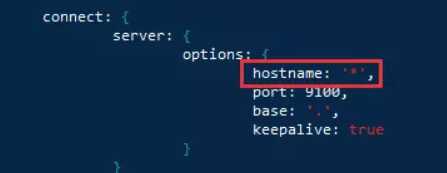
修改Gruntfile.js文件

修改_site/app.js

最后使用npm run install 命令启动,出现以下情况表示启动成功

最终效果:

参考文章:https://www.cnblogs.com/cheyunhua/p/11238489.html
https://blog.csdn.net/u013381364/article/details/102988415
ElasticSearch、ElasticSearch-head的安装和问题解决
标签:type ica demo 集群 x86_64 tcp 改名 grunt 数据
原文地址:https://www.cnblogs.com/nastynail/p/12530638.html