标签:使用 war roc 主目录 访问 deny modules cto 任务
首先简单了解一下Nginx的强大用途!
反向代理
反向代理服务器位于用户与目标服务器之间,但是对于用户而言,反向代理服务器就相当于目标服务器,即用户直接访问反向代理服务器就可以获得目标服务器的资源。同时,用户不需要知道目标服务器的地址,也无须在用户端作任何设定。反向代理服务器通常可用来作为Web加速,即使用反向代理作为Web服务器的前置机来降低网络和服务器的负载,提高访问效率。
负载均衡
负载均衡(Load Balance)其意思就是分摊到多个操作单元上进行执行,例如Web服务器、FTP服务器、企业关键应用服务器和其它关键任务服务器等,从而共同完成工作任务。
单个服务器解决不了,我们增加服务器的数量,然后将请求分发到各个服务器上面,将原先请求到单个服务器上面的情况改为将请求分发到多个服务器上,将负载分发到不同的服务器,这就是所说的负载均衡。
动静分离
为了加快网站的解析速度,可以把动态页面和静态页面由不同的服务器来解析,加快解析速度,降低单个服务器的压力。
nginx配置文件的位置: /你安装的目录/nginx/conf/nginx.conf
旧版本和新版本略有不同
#This is nginx 1.14.1
# For more information on configuration, see:
# * Official English Documentation: http://nginx.org/en/docs/
# * Official Russian Documentation: http://nginx.org/ru/docs/

user nginx;
worker_processes auto;
error_log /var/log/nginx/error.log;
pid /run/nginx.pid;

# Load dynamic modules. See /usr/share/nginx/README.dynamic.
include /usr/share/nginx/modules/*.conf;

events {
worker_connections 2048;
}

http {
log_format main ‘$remote_addr - $remote_user [$time_local] "$request" ‘
‘$status $body_bytes_sent "$http_referer" ‘
‘"$http_user_agent" "$http_x_forwarded_for" "$http_host" ‘;

sendfile on;
tcp_nopush on;
tcp_nodelay on;
keepalive_timeout 65;
types_hash_max_size 2048;

include /etc/nginx/mime.types;
default_type application/octet-stream;

# Load modular configuration files from the /etc/nginx/conf.d directory.
# See http://nginx.org/en/docs/ngx_core_module.html#include
# for more information.
include /etc/nginx/conf.d/*.conf;

server {
listen 80 default_server;
listen [::]:80 default_server;
server_name _;
root /usr/share/nginx/html;

# Load configuration files for the default server block.
include /etc/nginx/default.d/*.conf;

location / {
}

error_page 404 /404.html;
location = /40x.html {
}

error_page 500 502 503 504 /50x.html;
location = /50x.html {
}
}

# Settings for a TLS enabled server.
#
# server {
# listen 443 ssl http2 default_server;
# listen [::]:443 ssl http2 default_server;
# server_name _;
# root /usr/share/nginx/html;
#
# ssl_certificate "/etc/pki/nginx/server.crt";
# ssl_certificate_key "/etc/pki/nginx/private/server.key";
# ssl_session_cache shared:SSL:1m;
# ssl_session_timeout 10m;
# ssl_ciphers HIGH:!aNULL:!MD5;
# ssl_prefer_server_ciphers on;
#
# # Load configuration files for the default server block.
# include /etc/nginx/default.d/*.conf;
#
# location / {
# }
#
# error_page 404 /404.html;
# location = /40x.html {
# }
#
# error_page 500 502 503 504 /50x.html;
# location = /50x.html {
# }
# }
}
#This is nginx 1.16
user  nginx;
worker_processes  8;

error_log  /var/log/nginx/error.log warn;
pid        /var/run/nginx.pid;


events {
    worker_connections  1024;
}


http {
    include       /etc/nginx/mime.types;
    default_type  application/octet-stream;

    log_format  main  ‘$remote_addr - $remote_user [$time_local] "$request" ‘
                      ‘$status $body_bytes_sent "$http_referer" ‘
                      ‘"$http_user_agent" "$http_x_forwarded_for"‘;

    access_log  /var/log/nginx/access.log  main;

    sendfile        on;
    #tcp_nopush     on;

    keepalive_timeout  65;

    #gzip  on;

#    include /etc/nginx/proxy.conf;
    include /etc/nginx/conf.d/*.conf;
}
步骤1:修改nginx主目录
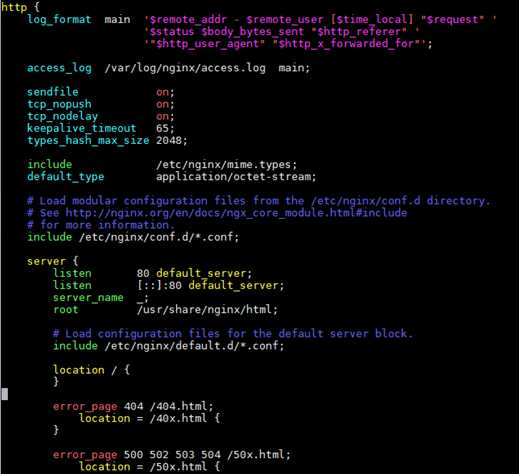
进入nginx容器,查看/etc/nginx/nginx.conf文件,本版本为1.14.1
建立/var/webroot/www目录,编辑index.html文件内容为main site!
此步骤略过!!!
查看编辑/etc/nginx/conf.d/default.conf文件,配置root指令指定主目录。
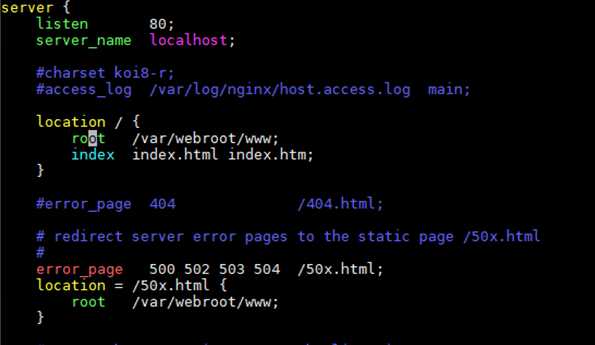
重新启动nginx服务并在主机使用浏览器访问。

步骤2:配置错误页重定向
编辑/etc/nginx/conf.d/default.conf文件,配置error_page指令指定404页面。
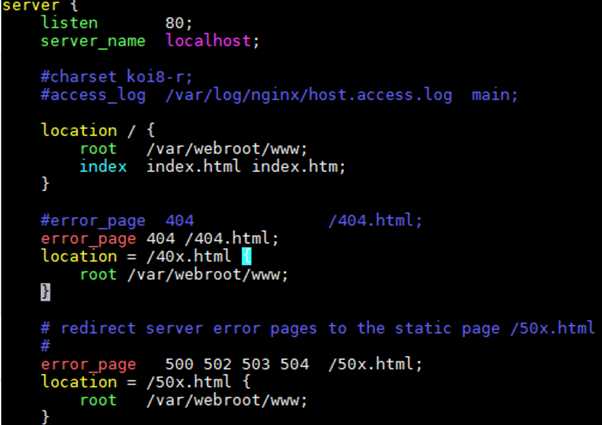
在/var/webroot/www目录,编辑404.html文件。
重新启动nginx服务并在主机使用浏览器访问不存在的资源。

编辑/etc/nginx/conf.d/default.conf文件,配置error_page 404 =200更改响应状态码。
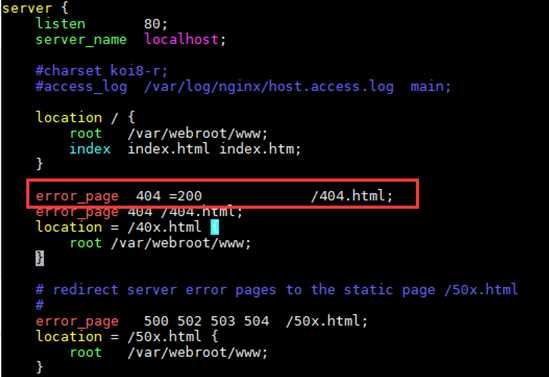
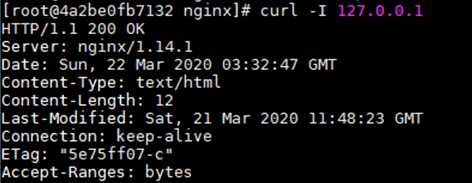
重新启动nginx服务,在主机使用浏览器访问不存在的资源并查看状态码。
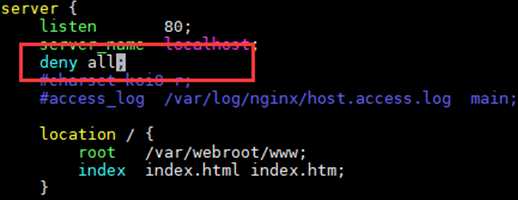
编辑/etc/nginx/conf.d/default.conf文件,在server块内增加deny all指令。
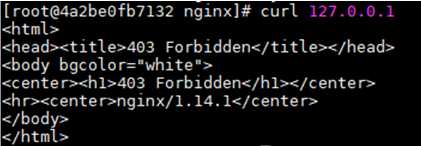
重新启动nginx服务并在主机使用浏览器访问首页。
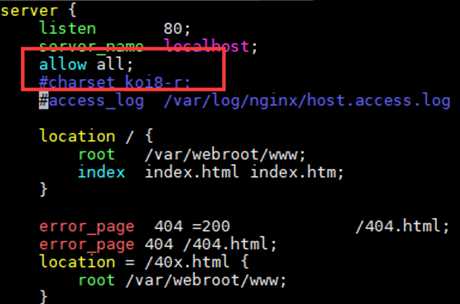
编辑/etc/nginx/conf.d/default.conf文件,在location / 块内增加allow all指令。
重新启动nginx服务并在主机使用浏览器访问首页。

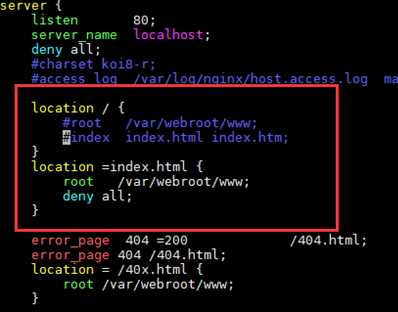
使用location =index.html精准匹配允许访问首页。

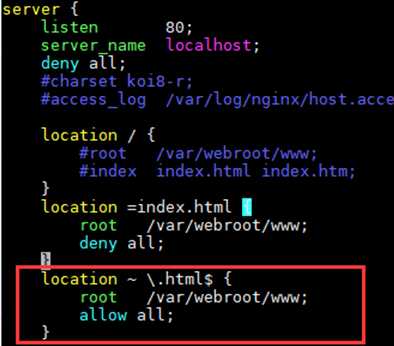
使用location ~ \.html$正则表达式匹配允许访问*.html。

OVER!
标签:使用 war roc 主目录 访问 deny modules cto 任务
原文地址:https://www.cnblogs.com/jake-jin/p/12545326.html