标签:rem mat 怎么 near 文章 frame click 动手 原理
在上一节的《SVG线条动画实现原理》一文中,了解了SVG中线动画是怎么做的。在这篇文章中,了解了怎么借助Sketch这样的制作软件绘制SVG的路径,然后借助于SVG的stroke-dasharray和stroke-dashoffset值设置为路径的长度(最好是大于其长度,可以通过.getTotalLength()获取到路径的长度),在@keframes中的100%处设置stroke-dashoffset的值为0就可以实现线条自画的一个动画效果。
原理很简单,但在上一篇文章中,看到的仅是一条路径(也就是一条线的自画效果),如果我们想对一图形进行依次自动动效呢?其实也是可以实现的。今天我们在这篇文章中就来学习一下,怎么实现。
先上个效果

扣图的活不能丢
要实现上面效果的图形,就得先要绘制出对应的一些路径效果。不过自已绘制总是蛋疼的。我在网上找了一个图:

然后可以借助对应的绘图软件的钢笔工具,根据图形描边出需要的效果。我使用的是Sketch。

这仅仅是粗略的描出来的路径,为了效果更接近于原图,我们需要再打磨一下。
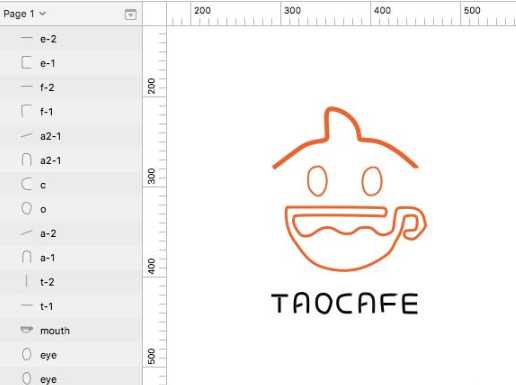
导出SVG路径
虽然看上去还有丑丑的,事实上这个时候我需要一个美女设计师来帮我。最好是手把手的能教我怎么做。期待中...(^_^)。把刚才绘制的路径,导出一个.svg文件,并把用编辑器打开。并清理不需要的代码,把这些SVG代码放置到HTML中:
<svg width="175px" height="231px" viewBox="0 0 175 231">    <path d="M4,68.5 C15.5117172,59.8043794 25.3450505,52.4710461 33.5,46.5 C45.7324243,37.5434309 59.5,39.5 63,36.5 C66.5,33.5 59.0969918,4.83258162 67,3 C74.9030082,1.16741838 97.9512056,10.8168783 99.5,32.5 C100,39.5 99.888886,35.5648143 117.5,38.5 C126.5,40 138.081405,46.841093 146,53 C155,60 163.5,67.9635628 163.5,68.5" class="header" fill="none" stroke="#FC4D04" stroke-width="5"></path>    <path d="M43,77.5 C42.3143438,85.590743 43.0597683,91.1897744 48,96 C52.9402317,100.810226 56.8631639,100.734576 60.5,94.5 C64.1368361,88.2654238 64.6123158,80.7011579 62,74 C59.3876842,67.2988421 55.8263003,65.7476499 51.5,67 C47.1736997,68.2523501 43.6856562,69.409257 43,77.5 Z" class="eye" fill="none" stroke="#FB4B08" stroke-width="2"></path>    <path d="M108,70.5 C103.173285,74.1494671 102.037015,85.8394525 105,93 C107.962985,100.160547 114.658219,100.038908 120,96 C125.341781,91.9610922 125.660258,80.637289 122.5,73 C119.339742,65.362711 112.826715,66.8505329 108,70.5 Z" class="eye" fill="none" stroke="#F84F04" stroke-width="2"></path>    <path d="M127.5,122 C128.5,122.5 132.5,114.5 127.5,113 C122.5,111.5 21,112 19.5,112 C18,112 16,134 27.5,149.5 C39,165 44.1240033,175.272736 64,180 C83.8759967,184.727264 101,182.5 120,171.5 C139,160.5 135.222169,157.621052 142.5,146 C149.777831,134.378948 148.5,122.5 151,122 C153.5,121.5 159.5,120 162.5,122 C163.932223,122.954815 164.370326,125.750806 164.258821,128.675882 C164.136763,131.877804 163.356139,135.234403 162.5,136.5 C160.861745,138.921768 151,136 150,140 C149,144 150.763923,145.975983 155.5,147 C160.236077,148.024017 161.7167,147.699962 168.5,140 C175.2833,132.300038 173.536826,132.171852 172,125 C170.463174,117.828148 166.5,115 162.5,113.5 C158.5,112 147.5,112 143,113 C138.5,114 139.185047,135.464729 136.5,138.5 C133.814953,141.535271 125,145.5 119,140 C113,134.5 113.098161,134.086447 104,134.5 C94.9018386,134.913553 96.6264124,141.5 86,141.5 C75.3735876,141.5 74,134.5 64,134.5 C54,134.5 48.8344819,143.597972 42,144 C35.1655181,144.402028 34.4270564,143.216913 30,136.5 C25.5729436,129.783087 26.5,124.5 27.5,122 C28.5,119.5 126.5,121.5 127.5,122 Z" class="mouth" fill="none" stroke="#FC4F04" stroke-width="3"></path>    <path d="M2,210 L20.5,210" class="t-1" fill="none" stroke="#020202" stroke-width="3"></path>    <path d="M11,212 L11,229" class="t-2" fill="none" stroke="#020202" stroke-width="3"></path>    <path d="M28.5,229.5 C27.5,216.833333 28.5,209.833333 31.5,208.5 C36,206.5 42,207.5 42.5,213 C42.8333333,216.666667 42.8333333,222.166667 42.5,229.5" class="a-1" fill="none" stroke="#050505" stroke-width="3"></path>    <path d="M30,222 L36.5,219.5" class="a-2" fill="none" stroke="#040404" stroke-width="3"></path>    <path d="M52.5,220.5 C51.772058,215.205876 52.5,209.5 58,208.5 C63.5,207.5 66.5,211 68,214.25 C69,216.416667 68.3333333,220.166667 66,225.5 C64.4336186,228.85813 62.266952,230.024797 59.5,229 C55.3495721,227.462804 53.227942,225.794124 52.5,220.5 Z" class="o" fill="none" stroke="#0A0A0A" stroke-width="3"></path>    <path d="M91.5,209 C81.8333333,208.666667 76.6666667,210.666667 76,215 C75,221.5 76.5,224.5 79.5,227 C81.5,228.666667 85.5,229.166667 91.5,228.5" class="c" fill="none" stroke="#020202" stroke-width="3"></path>    <path d="M100.5,229.5 C100.166667,219.5 100.333333,213.333333 101,211 C102,207.5 105,208 108.5,208 C112,208 115,210.5 115.5,214.5 C115.833333,217.166667 115.833333,222.166667 115.5,229.5" class="a2-1" fill="none" stroke="#100F0F" stroke-width="3"></path>    <path d="M102,220.5 L108.5,218.5" class="a2-1" fill="none" stroke="#100F0F" stroke-width="3"></path>    <path d="M126,228.5 C124.666667,216.833333 124.5,210.666667 125.5,210 C127,209 141,209 141,209.5" class="f-1" fill="none" stroke="#060405" stroke-width="3"></path>    <path d="M126.5,219.5 L140,219.5" class="f-2" fill="none" stroke="#060405" stroke-width="3"></path>    <path d="M164.5,209.5 C155.5,208.833333 150.5,209 149.5,210 C148,211.5 149.5,228 149.5,228.5 C149.5,228.833333 154.5,229 164.5,229" class="e-1" fill="none" stroke="#060405" stroke-width="3"></path>    <path d="M150,219 L164,219" class="e-2" stroke="#060405" stroke-width="3" fill="none"></path>
</svg>
上面的图总共有16个path路径。放到HTML中的效果如下:
接下先给所有的path加上对应的stroke-dasharray和stroke-dashoffset的值:
path {
stroke-dasharray: 3; stroke-dashoffset: 2;
}
这个时候你看到的效果如下:

添加动画
将stroke-dasharray和stroke-dashoffset值设置为路径的长度(最好是大于其长度,可以通过.getTotalLength()获取到路径的长度),在@keframes中的100%处设置stroke-dashoffset的值为0就可以实现线条自画的一个动画效果。
如查我们不分path的长短就直接使用:
path {
stroke-dasharray: 1000; stroke-dashoffset: 1000; animation: dash 2s linear both infinite;
}
@keyframes dash {
to {
stroke-dashoffset: 0; }
}
看到的效果如下:

这样的效果并不是我们所要的呀。说实话有点拙逼。这个时候我们就需要借助.getTotalLength()神器,拿到每条path的长度。写个段JavaScript代码:
let pathLength = document.querySelectorAll(‘path‘);
let ulEl = document.createElement(‘ul‘) pathLength.forEach((item, index) => {
let itemLength = Math.ceil(item.getTotalLength())
let liEl = document.createElement(‘li‘)    liEl.textContent = `path-${index + 1}: ${itemLength}`    ulEl.appendChild(liEl) }) document.body.appendChild(ulEl);
JavaScript写得比较拙,请大神指点。重要的是,我们每条path的长度拿到了,如下:
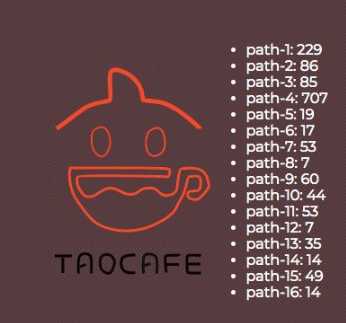
有了对应的值,那就好办了,把对应路径的stroke-dasharray和stroke-dashoffset设置其最大值:
path {
   animation: dash 2s linear both infinite;    &:nth-child(1) {        stroke-dasharray: 229;        stroke-dashoffset: 229;    }    &:nth-child(2) {        stroke-dasharray: 86;        stroke-dashoffset: 86;    }    &:nth-child(3) {        stroke-dasharray: 85;        stroke-dashoffset: 85;    }    &:nth-child(4) {        stroke-dasharray: 707;        stroke-dashoffset: 707;    }    &:nth-child(5) {        stroke-dasharray: 19;        stroke-dashoffset: 19;    }    &:nth-child(6) {        stroke-dasharray: 17;        stroke-dashoffset: 17;    }    &:nth-child(7) {        stroke-dasharray: 53;        stroke-dashoffset: 53;    }    &:nth-child(8) {        stroke-dasharray: 7;        stroke-dashoffset: 7;    }    &:nth-child(9) {        stroke-dasharray: 60;        stroke-dashoffset: 60;    }    &:nth-child(10) {        stroke-dasharray: 44;        stroke-dashoffset: 44;    }    &:nth-child(11) {        stroke-dasharray: 53;        stroke-dashoffset: 53;    }    &:nth-child(12) {        stroke-dasharray: 7;        stroke-dashoffset: 7;    }    &:nth-child(13) {        stroke-dasharray: 35;        stroke-dashoffset: 35;    }    &:nth-child(14) {        stroke-dasharray: 14;        stroke-dashoffset: 14;    }    &:nth-child(15) {        stroke-dasharray: 49;        stroke-dashoffset: 49;    }    &:nth-child(16) {        stroke-dasharray: 14;        stroke-dashoffset: 14;    } }
Oh,My God!还是不OK呀。接下继续对动画的duration和delay进行修正。借助Chrome的Animation调试工具来帮我们:
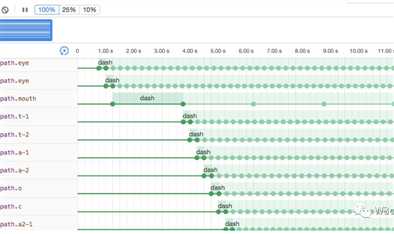
把调好的时间,对应的添加到对应的path中,动效就调整了:
为了更好的控制动效果,添加个按钮来做动画的再次播放效果:
let aniEl = document.querySelector(‘svg‘)
let aniElLast = document.querySelector(‘#last‘)
let playEl = document.querySelector(‘button‘)
/给播放按钮添加点击事件
playEl.addEventListener("click", function(){
   // 给svg元素添加类名play    aniEl.classList.add(‘play‘); }, false); aniElLast.addEventListener("webkitAnimationEnd", function(){    // 监听svg中最后一个路径path的动画结束事件,然后移除svg中的play类名    aniEl.classList.remove (‘play‘); }, false);
最终的效果如下:

点击play按钮就能看到SVG线条自画的动画效果。
总结
看到这里,你应该明白,stroke-dasharray是用来设置每段虚线的长度。而stroke-dashoffset是用来设置移动的距离。所以实际上,stroke-dashoffset的大小,以及stroke-dasharray的大小,是要根据的自己的路径去填的。
上面这些就是SVG的线条之美。当然发挥你的想象力,你做得一定会比我更好。上面示例中的CSS整得有点蛋疼,如果使用JavaScript根据path的长度来计算animation-duration和animation-delay可以更轻松一些。如果你感兴趣,不仿自己动手试试。
标签:rem mat 怎么 near 文章 frame click 动手 原理
原文地址:https://www.cnblogs.com/smedas/p/12603287.html