标签:区域 get src alt other screenx 大小 root external
导航:
1.Show Image Demo:将图像加载到PTB中,并在屏幕上显示特定时间% Clear the workspace and the screen
内容:将一张图呈现在灰色背景上2s,然后2s绿色空屏,然后图像倒置在绿色背景2s
要点提示:
Screen(‘Preference‘, ‘SkipSyncTests‘, 1) 跳过同步测试
img=imread(filename) 读取图片数据,转换为矩阵(灰度图,2维;真彩色图,3维) eg“a=imread(‘wushuang.png‘)
a/[m n]=size(m) 返回矩阵维数 a=size(m,dim) 返回特定维度
imageTexture = Screen(‘MakeTexture‘, window, Imagematrix); 将图像矩阵转换为OpenGL纹理并返回索引值,以供DrawTexture函数使用
Screen(‘DrawTexture‘, window, imageTexture, soureRect,destinationRect,rotationAngle,filterMode,globalAlpha,modulateColor); 在指定窗口绘制纹理,通过soureRect 和destinationRect参数对纹理进行缩放
参数依次为窗口指针,图像纹理指针,纹理某区域(默认为整个纹理),窗口的某个区域(默认与sourceRect对等,且显示在窗口中心),纹理旋转角度(默认为0),计算像素的颜色纸(soureRect与destinationRect不等时,0=采用最相邻像素颜色,1=线性插值),透明度(0-1间,需要BlendFunction函数支持),,颜色控制(若提供该参数,则省略globalAlpha参数,无需BlendFunction函数。控制rgb3个通道,
sca;
close all;
clearvars;

% Here we call some default settings for setting up Psychtoolbox
PsychDefaultSetup(2);

Screen(‘Preference‘, ‘SkipSyncTests‘, 1)


% Get the screen numbers
screens = Screen(‘Screens‘);

% Draw to the external screen if avaliable
screenNumber = max(screens);

% Define black and white
white = WhiteIndex(screenNumber);
black = BlackIndex(screenNumber);
grey = white / 2;
inc = white - grey;

% Open an on screen window
[window, windowRect] = PsychImaging(‘OpenWindow‘, screenNumber, grey);

% Get the size of the on screen window
[screenXpixels, screenYpixels] = Screen(‘WindowSize‘, window);

% Query the frame duration
ifi = Screen(‘GetFlipInterval‘, window);

% Get the centre coordinate of the window
[xCenter, yCenter] = RectCenter(windowRect);

% Set up alpha-blending for smooth (anti-aliased) lines
Screen(‘BlendFunction‘, window, ‘GL_SRC_ALPHA‘, ‘GL_ONE_MINUS_SRC_ALPHA‘);

% Here we load in an image from file. This one is a image of rabbits that
% is included with PTB
theImageLocation = [PsychtoolboxRoot ‘PsychDemos‘‘AlphaImageDemo‘ filesep ‘konijntjes1024x768.jpg‘];
theImage = imread(theImageLocation);

% Get the size of the image
[s1, s2, s3] = size(theImage);

% Here we check if the image is too big to fit on the screen and abort
% it is. See ImageRescaleDemo to see how to rescale an image.
if s1 > screenYpixels || s2 > screenYpixels
    disp(‘ERROR! Image is too big to fit on the screen‘);
    sca;
    return;
end

% Make the image into a texture
imageTexture = Screen(‘MakeTexture‘, window, theImage);

% Draw the image to the screen, unless otherwise specified PTB will draw
% the texture full size in the center of the screen. We first draw the
% image in its correct orientation.
Screen(‘DrawTexture‘, window, imageTexture, [], [], 0);

% Flip to the screen
Screen(‘Flip‘, window);

% Wait for two seconds
WaitSecs(2);

% Now fill the screen green
Screen(‘FillRect‘, window, [0 1 0]);

% Flip to the screen
Screen(‘Flip‘, window);

% Wait for two seconds
WaitSecs(2);

% Draw the image to the screen for a second time this time upside down and
% drawn onto our updated blue background
Screen(‘DrawTexture‘, window, imageTexture, [], [], 180);

% Flip to the screen
Screen(‘Flip‘, window);

% Wait for one second
WaitSecs(2);

% Clear the screen
sca;
2.Gabor Demo:使用PTB绘制一个标准的Gabor
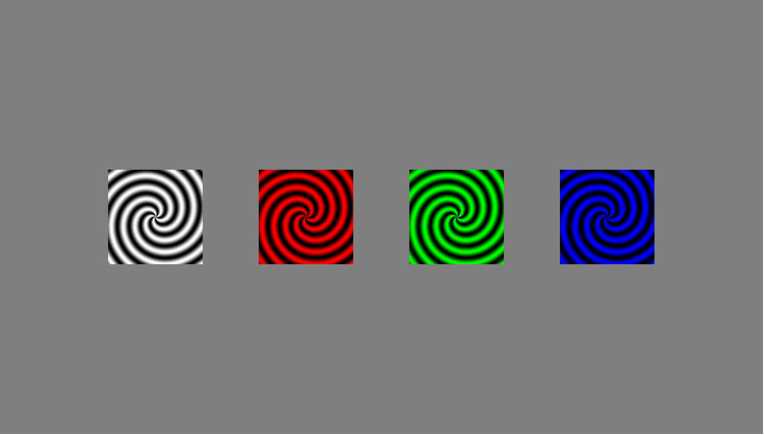
3.Spiral Texture Demo:在PTB中绘制螺旋纹理
将纹理同时绘制到屏幕上的多个位置,同时调整每个绘制的纹理颜色
Screen(‘DrawTextures‘, window, imageTexture(s), soureRect(s),destinationRect(s),rotationAngle(s),filterMode(s),globalAlpha(s),modulateColor(s)); 在窗口同时绘制多个纹理
参数依次为窗口指针,图像纹理指针数组,纹理某区域(4行*n列,默认为整个纹理),窗口的矩阵区域(4行*n列),纹理旋转角度(默认为0),计算像素的颜色纸(soureRect与destinationRect不等时,0=采用最相邻像素颜色,1=线性插值。多纹理时若采用一个值表示使用相同设置),透明度(0-1间,需要BlendFunction函数支持。可为数组,若为一个值,则表示相同设置),颜色控制(若提供该参数,则省略globalAlpha参数,无需BlendFunction函数。控制rgb3个通道,3行*n列,只有一个数组时表示相同设置)
% Get the centre coordinate of the window
[xCenter, yCenter] = RectCenter(windowRect);

% Set up alpha-blending for smooth (anti-aliased) lines
Screen(‘BlendFunction‘, window, ‘GL_SRC_ALPHA‘, ‘GL_ONE_MINUS_SRC_ALPHA‘);

% Define a simple spiral texture by defining X and Y coordinates with the   螺旋化的实现:转化为极坐标
% meshgrid command, converting these to polar coordinates and finally
% defining the spiral texture
[x, y] = meshgrid(-120:1:120, -120:1:120);
[th, r] = cart2pol(x, y);
spiral = grey + inc .* cos(r / 5 + th * 5);

% Make our sprial texure into a screen texture for drawing
spiralTexture = Screen(‘MakeTexture‘, window, spiral);

% We are going to draw four textures to show how a black and white texture
% can be color modulated upon drawing.
yPos = yCenter;
xPos = linspace(screenXpixels * 0.2, screenXpixels * 0.8, 4);

% Define the destination rectangles for our spiral textures. For this demo
% these will be the same size as out actualy texture, but this doesn‘t have
% to be the case. See: ScaleSpiralTextureDemo and CheckerboardTextureDemo.
[s1, s2] = size(x);
baseRect = [0 0 s1 s2];
dstRects = nan(4, 4);
for i = 1:4
    dstRects(:, i) = CenterRectOnPointd(baseRect, xPos(i), yPos);
end

% Color Modulation
colorMod = [1 1 1; 1 0 0; 0 1 0; 0 0 1]‘;

% Batch Draw all of the texures to screen
Screen(‘DrawTextures‘, window, spiralTexture, [],...
    dstRects, [], [], [], colorMod);

% Flip to the screen
Screen(‘Flip‘, window);
效果图
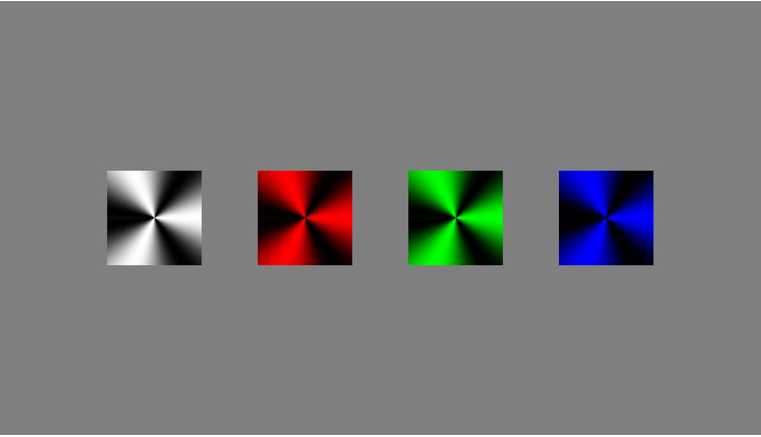
4.Pinwheel Texture Demo:风车纹理,与上述步骤大多一致(除纹理生成)
% Get the centre coordinate of the window
[xCenter, yCenter] = RectCenter(windowRect);

% Set up alpha-blending for smooth (anti-aliased) lines
Screen(‘BlendFunction‘, window, ‘GL_SRC_ALPHA‘, ‘GL_ONE_MINUS_SRC_ALPHA‘);

% Define a simple spiral texture by defining X and Y coordinates with the
% meshgrid command, converting these to polar coordinates and finally
% defining the spiral texture
[x, y] = meshgrid(-120:1:120, -120:1:120);
[th, r] = cart2pol(x, y);                                  差异之处:纹理的生成方式
wheel = grey + inc .* cos(pi * th);

% Make our sprial texure into a screen texture for drawing
spiralTexture = Screen(‘MakeTexture‘, window, wheel);

% We are going to draw four textures to show how a black and white texture
% can be color modulated upon drawing.
yPos = yCenter;
xPos = linspace(screenXpixels * 0.2, screenXpixels * 0.8, 4);

% Define the destination rectangles for our spiral textures. For this demo
% these will be the same size as out actualy texture, but this doesn‘t have
% to be the case. See: ScaleSpiralTextureDemo and CheckerboardTextureDemo.
[s1, s2] = size(x);
baseRect = [0 0 s1 s2];
dstRects = nan(4, 4);
for i = 1:4
    dstRects(:, i) = CenterRectOnPointd(baseRect, xPos(i), yPos);
end

% Color Modulation
colorMod = [1 1 1; 1 0 0; 0 1 0; 0 0 1]‘;

% Batch Draw all of the texures to screen
Screen(‘DrawTextures‘, window, spiralTexture, [],...
    dstRects, [], [], [], colorMod);

% Flip to the screen
Screen(‘Flip‘, window);
效果图:
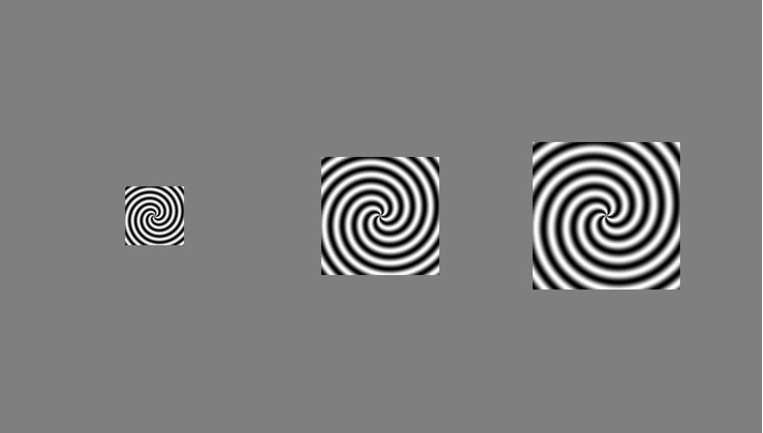
5.Scaled Spiral Texture Demo:如何在将单个纹理绘制到屏幕时,将其动态缩放为不同的大小
与第四个示例基本一致,关键在于对Screen(‘DrawTexture‘)函数中sourceRect与destionRect参数的调整与使用
% Open an on screen window
[window, windowRect] = PsychImaging(‘OpenWindow‘, screenNumber, grey);

% Get the size of the on screen window
[screenXpixels, screenYpixels] = Screen(‘WindowSize‘, window);

% Query the frame duration
ifi = Screen(‘GetFlipInterval‘, window);

% Get the centre coordinate of the window
[xCenter, yCenter] = RectCenter(windowRect);

% Set up alpha-blending for smooth (anti-aliased) lines
Screen(‘BlendFunction‘, window, ‘GL_SRC_ALPHA‘, ‘GL_ONE_MINUS_SRC_ALPHA‘);

% Define a simple spiral texture by defining cartasian X and Y coordinates
% with the meshgrid command, converting these to polar coordinates
% with cart2pol and finally defining the spiral texture
[x, y] = meshgrid(-150:1:150, -150:1:150);
[th, r] = cart2pol(x, y);
spiral = grey + inc .* cos(r / 5 + th * 5);

% Make our sprial texure into a screen texture for drawing
spiralTexture = Screen(‘MakeTexture‘, window, spiral);

% Define the destination rectangles for our spiral textures. For this demo
% we will make the left hand destination rectangle half the size of the
% texture, the middle one the same size as the texture and the right hand
% on 1.25 times the size of the texture
[s1, s2] = size(x);
baseRect = [0 0 s1 s2];
dstRects = nan(4, 3);
dstRects(:, 1) = CenterRectOnPointd(baseRect .* 0.5,...
    screenXpixels * 0.2, yCenter);
dstRects(:, 2) = CenterRectOnPointd(baseRect,...
    screenXpixels * 0.5, yCenter);
dstRects(:, 3) = CenterRectOnPointd(baseRect .* 1.25,...
    screenXpixels * 0.8, yCenter);

% Batch Draw all of the texures to screen
Screen(‘DrawTextures‘, window, spiralTexture, [], dstRects);

% Flip to the screen
Screen(‘Flip‘, window);
示意图
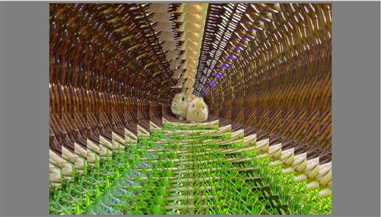
6.Scaled Image Demo:如何将图像加载到PTB中,然后在将其绘制到屏幕时动态地重新缩放多次
与上述的大体思路一致
% Open an on screen window
[window, windowRect] = PsychImaging(‘OpenWindow‘, screenNumber, grey);

% Get the size of the on screen window
[screenXpixels, screenYpixels] = Screen(‘WindowSize‘, window);

% Query the frame duration
ifi = Screen(‘GetFlipInterval‘, window);

% Get the centre coordinate of the window
[xCenter, yCenter] = RectCenter(windowRect);

% Set up alpha-blending for smooth (anti-aliased) lines
Screen(‘BlendFunction‘, window, ‘GL_SRC_ALPHA‘, ‘GL_ONE_MINUS_SRC_ALPHA‘);

% Here we load in an image from file. This one is a image of rabbits that
% is included with PTB
theImageLocation = [PsychtoolboxRoot ‘PsychDemos‘ filesep...
    ‘AlphaImageDemo‘ filesep ‘konijntjes1024x768.jpg‘];
theImage = imread(theImageLocation);

% Make the image into a texture
imageTexture = Screen(‘MakeTexture‘, window, theImage);

% Get the size of the image
[s1, s2, s3] = size(theImage);

% Get the aspect ratio of the image. We need this to maintain the aspect    获取图像的长宽比,并且在后续调整大小的时候也要维持这个长宽比,不然会
% ratio of the image when we draw it different sizes. Otherwise, if we    出现扭曲或拉伸
% don‘t match the aspect ratio the image will appear warped / stretched
aspectRatio = s2 / s1;

% We will set the height of each drawn image to a fraction of the screens        将每幅图像的高度设置为屏幕高度的一部分
% height
heightScalers = linspace(1, 0.2, 10);
imageHeights = screenYpixels .* heightScalers;
imageWidths = imageHeights .* aspectRatio;

% Number of images we will draw                                                         获取绘制的图像数量
numImages = numel(heightScalers);

% Make the destination rectangles for our image. We will draw the image                 获取目标图像的矩形
% multiple times over getting smaller on each iteration. So we need the big
% dstRects first followed by the progressively smaller ones
dstRects = zeros(4, numImages);
for i = 1:numImages
    theRect = [0 0 imageWidths(i) imageHeights(i)];
    dstRects(:, i) = CenterRectOnPointd(theRect, screenXpixels / 2,...
        screenYpixels / 2);
end

% Draw the image to the screen, unless otherwise specified PTB will draw
% the texture full size in the center of the screen.
Screen(‘DrawTextures‘, window, imageTexture, [], dstRects);

% Flip to the screen
Screen(‘Flip‘, window);
效果图
PTBtutorials—Static textures(1)
标签:区域 get src alt other screenx 大小 root external
原文地址:https://www.cnblogs.com/zxpsyneuroscience/p/12602391.html