标签:应该 undefined nec ops 因此 开始 应用程序 渲染 dstat
在元素渲染章节中,我们了解了一种更新UI界面的方法,通过调用ReactDOM.render()修改我们想要的
元素
import ReactDOM from ‘react-dom‘

class ClockCom extends React.Component{
	render(){
		return(
			<div>
				<h1>this clock component</h1>
				<h2>It is {this.props.time.toLocaleTimeString()}</h2>
			</div>
		)
	}
}
function tick(){
	ReactDOM.render(<ClockCom time={new Date()} />,document.getElementById("clock-com"))
}
setInterval(tick,1000)
在上述代码中我们封装了一个clockCom的class组件,每次组件更新时候render方法都会被调用,但只要在相同的DOM节点中渲染
仅有一个ClockCom组件的class实例被创建使用
但是在实际的React项目中一个单页面web应用ReactDOM.render通常只调用一次。那么在react
组件中,我们需要更新UI,这时我们就需要用到state了。
我们通过以下三步将date从props移动到state中
class ClockCom extends React.Component{
	construcor(props){
		super(props)
		this.state = {time:new Date()}
	}
	render(){
		return(
			<div>
				<h1>this clock component</h1>
				<h2>It is {this.state.time.toLocaleTimeString()}</h2>
			</div>
		)
	}
}
ReactDOM.render(<ClockCom />,document.getElementById(‘clock-com‘))
接下来,设置ClockCom的计时器并每秒更新它
在具有许多组件的应用程序中,当组件被销毁时,释放所占用的资源是非常重要的。当ClockCom组件第一次
被渲染到DOM中的时候,就为其设置一个计时器,这在React中被称为"挂载(mount)"
同时,当DOM中Clock组件被删除的时候,应该清除计时器,这在React中被称为"卸载(unmount)"
我们可以为class组件声明一些特殊方法,当组件挂载或卸载的时候就去执行这些方法
componentDidMount(){
}
componentWillUnmount(){
}
这些方法叫做生命周期方法
componentDidMount()方法会在组件已经被渲染到DOM中后运行,所以,最好在这里设计计时器
在componentWillUnmount()方法中,组件即将卸载,可以在这里清除定时器
完整代码如下
class ClockCom extends React.Component{
	constructor(props){
		super(props)
		this.state = {time:new Date()};
	}
	componentDidMount(){
		this.timerID = setInterval(() => this.tick(),1000)
	}
	componentWillUnmount(){
		clearInteval(this.timerID)
	}
	tick(){
		this.setState({
			time:new Date
		})
	}
	render(){
		return(
			<div>
				<h1>this clock component</h1>
				<h2>It is {this.state.time.toLocaleTimeString()}</h2>
			</div>
		)
	}
}
ReactDOM.render(<ClockCom />,document.getElementById("clock-com"))
概括一下发生了什么和这些方法的调用顺序:
ReactDOM.render()的时候,React会调用ClockCom组件的构造函数。因为ClockCom需要显示当前的时间,所以它会用一个包含当前时间的对象来初始化this.state。我们之后会更新state。ClockCom渲染输出。ClockCom的输出被插入到DOM中后,React就会调用ComponentDidMount()生命周期方法。ClockCom组件向浏览器请求设置一个计时器来每秒调用一次组件的tick()方法tick()方法。在这方法之中,ClockCom组件会通过调用setState()来计划进行一次UI更新。得益于setState()的调用,React能够知道state已经改变了,然后会重新render()方法来确定页面上该显示什么。这一次,render()方法中的this.state.time就不一样了,如此一来就会渲染输出更新过的时间。ReactClockCom组件从DOM中被移除,React就会调用componentWillUnmount()生命周期,这样计时器就停止了这样我们就实现了一个时钟的组件。从上述例子中我们来学习react的state和生命周期
state可被视为React组件中的一个集合,这个集合的内容是是该组件UI中可变状态的数据。所谓可变状态的数据,就是在当前
组件中可以被修改(或被更新)的数据。
组件中用到的一个变量应不应该作为一个组件的state,可以通过下面的4条依据进行判断
使用react经常会遇到几个组件需要共用状态数据的情况。这种情况下,我们最好将这部分共享的状态提升
至他们最近的父组件当中进行管理。react的状态提升主要就是用来处理父组件和子组件的数据传递的;他们可以
让我们的数据流动的形式是自定向下单向流动的,所有组件数据都是来自于他们的父辈组件,也都是有父辈组件来统一存储和修改,在传入子组件当中的
在react组件中,我们都需要用到数据,需要改变数据以实现刷新视图。我们知道React的数据是自顶向下单向流动
的,也就是从父组件传到子组件,组件的数据存储在props和state中,这两个属性有什么区别呢?
让我们来看下面的代码
class SetStateCom extends React.Component{
	constructor(props){
		super(props)
		this.state = {
			count:0
		}
		this.handleSomething = this.handleSomething.bind(this)
	}
	render(){
		return(
			<div>
				<button onClick={this.handleSomething}>+</button>
				<span>{this.state.count}</span>
				<button>-</button>
			</div>
		)
	}
	incremnetCount(){
		this.setState({count:this.state.count+1})

	}
	handleSomething(){
		this.incremnetCount()
		this.incremnetCount()
		this.incremnetCount()
		console.log(this.state.count)

	}
}
ReactDOM.render(<SetStateCom />,document.getElementById(‘set-state‘))
上面代码中,我们给state定义了一个count,定义了一个方法incrementCount来增加state.count的值,
给按钮绑定了一个事件handleSomething,点击执行三次incrementCount方法,但是在我们点击按钮后,执行 结果并不是
我们所设想的那样,在次点击时候,没有点击的时候,this.state.count的值是0,第一次点击的时候this.state.count的
值是1,第二次点击的时候this.state.count的值是2...这是为什么呢?
思考一下调用setState()时候发生了什么?
React首先会将你传递给setState的参数对象合并到当前state对象中,然后
会启动所谓的reconciliation,即创建一个新的React Element tree
(UI层面的对象表示),和之前的tree做比较,基于你传递给setState的对象找出发生的变化,然后更新DOM.
所以调用setState并不一定会即时更新state
考虑到性能问题,React可能会将多次setState调用批处理(batch)为一次state的更新
这又意味着什么呢?
首先,‘多次setState()调用‘的意思是在某个函数中调用了多次setState(),就像上述代码
incremnetCount(){
	this.setState({count:this.state.count+1})
	console.log(this.state.count)
}
handleSomething(){
	this.incremnetCount()
	this.incremnetCount()
	this.incremnetCount()
	console.log(this.state.count)

}
面对这种多次setState()调用的情况,为了避免重复做上述大量的工作,React并不会
真的完整调用三次‘set-state‘;相反,它会把这些部分更新打包装好,一次搞定。
在这里传递setState()的纯粹是个对象。现在,假设React每次遇到多次
setState()调用都会作上述批处理过程,即每次调用setState()时传递给他的所有对象合并为一个对象,
然后用这个对象去做真正的setState()
在JavaScript中,对象合并可以这样写
const singleObject = Object.assign(
	{},
	objectFormSetState1,
	objectFormSetState2,
	objectFormSetState3
)
这种写法叫做object组合(composition)
在JavaScript中,对象‘合并(merging)‘或者叫对象组合(composing)的工作机制如下L
如果传递给Object.assign()的多个对象有相同的键,那么最后一个对象的值会覆盖之前的
const me = {name:‘juce‘},
	  you = {name:‘coke‘},
	  we = Object.assign({},me,you);
	  we.name === ‘coke‘;//true
	  console.log(we);//{name:‘coke‘}
因为you是最后一个合并进we中的,因此you的name属性值会覆盖me的
name属性值,所以最后输出的we的name为you的name值
综上所述,如果你多次调用setState()函数,每次都传递给它一个对象,那么React就会将
这些对象合并。也就是说,基于你传进来的多个对象,React会组合出一个新对象。
如果这些对象有同名的属性,那么就会取最后一个对象的属性值
这意味着handleSomething函数的在点击时结果会是1而不是3。因为React并不会按照
setState()的调用顺序即时更新state,而是首先会将所有的对象合并到一起
需要搞清楚的是,给setState()传递对象本身是没有问题的,问题出在当你想要基于之前的state计算下一个
state值时还给setState()传递对象
正确的做法是
让函数式setState来拯救
将上面incremnetCount函数改为如下代码
incremneCount(){
	this.setState((state) => {
		return {
			count:state.count + 1
		}
	})
}
执行结果,第一次点击结果为3,和我们预想的一样
因此props和state区别就是:
state在当前组件中是可变的,满足组件UI变化的需求
props对于子组件来说是只读的
this.state.time = new Date()
只有在组件的构造函数中初始化state的时候才允许这样直接赋值;其他绝大多数时候,应该使用setState(),在本文的最后,
正确的写法如下:
this.setState({
	time:new Date()
})
react可以将多个setState调用合并成一个调用来提高性能。同时,Props的更新机制也是同理。这就是"异步更新"。
因为this.props和this.state可能是异步更新,你不应该依靠他们的值来计算下一个状态
我们不能直接通过this.state和this.props获得state和props的最新状态,但是在this.setState的时候,
state和props的最新状态可以通过一个回调函数来获得:
this.setState((preState,props) =>({
	counter:preState.quantity + 1 + props.xxx
}))
上述回调函数的第一个参数preState可捕获到最新的上一个state;第二个参数props可捕获到最新的props
当调用setState修改组件状态时,只需要传入发生改变的state,而不必组件完整的state,因为组件state的更新是一个浅合并的过程。
例如,一个组件初始化时的状态为:
this.state = {
	title:‘React‘,
	content:‘React is an wonderful Js library!‘
}
如果你只需要修改title,你应该:
this.setState({
	title:‘reactJS‘
})
React会合并新的title到原来的组件状态中,同时2保留原有的状态content,合并后的state的结果为
{
	title:‘reactJS‘,
	content:‘React is an wonderful Js library!‘
}
React官方建议把State当做是不可变对象,State中包含所有状态都应该是不可变对象
当State中的某个状态发生变化,我们应该重新创建这个状态对象而不是直接修改原来的状态。state
根据状态类型可以分为三种。
this.setState({
	num:1,
	string:‘hello‘,
	ready:true
})
class ArrayDemo extends React.Component{
	constructor(props){
		super(props)
		this.state = {
			students:[‘liman‘,‘gaoxi‘,‘huangjia‘]
		}
		this.changeStudents = this.changeStudents.bind(this)
	}
	render(){
		return(
			<div>
				<div>
					{this.state.students.map((student,i) => <div key={i}>{student}</div>)}
				</div>
				<button onClick={this.changeStudents}>改变students</button>
			</div>
		)
	}
	changeStudents(){
		this.setState({
			students:this.state.students.concat(‘xiaoqin‘)
		})
		console.log(this.state)
	}
}
ReactDOM.render(<ArrayDemo />,document.getElementById(‘array‘))
上面代码中,我们向数组中添加新的一项,如果用push,原数组会发生改变,但是在react,不会更新状态,会报错,因此使用concat来实现
使用ES6数组的扩展来实现,将上面代码改成如下
changeStudents(){
	this.setState(preState => ({
     students:preState.students.concat(‘xiaoqin‘)
   }))
	console.log(this.state)
}
从数组中截取部分作为新状态时,应使用slice方法;当从数组中过滤部分元素后,作为新状态
时,使用filter方法。不应该使用push、pop、shift、unshift、splice等方法修改数组
数组类型的状态,因为这些方法都是在原数组的基础上修改的。应当使用不会修改原数组而返回一个新数组
的方法,例如concat、slice、fliter等
当从students中截取部分元素作为新状态时候,使用数组的slice方法:
方法一:将state先赋值给另外的变量,然后使用slice创建新数组
var students = this.state.students
this.setState({
	students:students.slice(1,3)
})
方法二:使用preState、slice创建新数组
this.setState((preState)=>({
	students:preState.students.slice(1,3)
}))
当数组从students中过滤部分元素后,作为新状态时,使用数组的fliter方法
方法一:将state先赋值给另外的变量,然后使用filter创建新数组
var students = this.state.students
this.setState({
	students:students.fliter(item =>{
		return item != ‘xiaoqin‘
	})
})
方法二:使用preState、filter创建新数组
this.setState((preState)=>({
	students:preState.students.fliter((item) =>  {
		return item !=‘xiaoqin‘
	})
}))
class ObjectDemo extends React.Component{
	constructor(props){
		super()
		this.state = {
			school:{
				classNum:7,
				teacher:‘wangfayue‘,
				students:50
			}
		}
		this.changeSchool = this.changeSchool.bind(this)
	}
	render(){
		return(
			<div>
				<div>
					{Object.keys(this.state.school).map(key =>(
						<div key={key}>{key}:{this.state.school[key]}</div>
					))}
				</div>
				<button onClick={this.changeSchool}>修改对象</button>
			</div>
		)
	}
	changeSchool(){
		this.setState((preState) => ({
			school:Object.assign({},preState.school,{slogn:‘good good study day day up‘})
		}))
	}
}
ReactDOM.render(<ObjectDemo />,document.getElementById("object"))
使用ES6对象扩展语法,上面代码改为
changeSchool(){
	var slogn = ‘day day study‘
	this.setState(preState => ({
		school:{...preState.school,slogn}
	}))
}

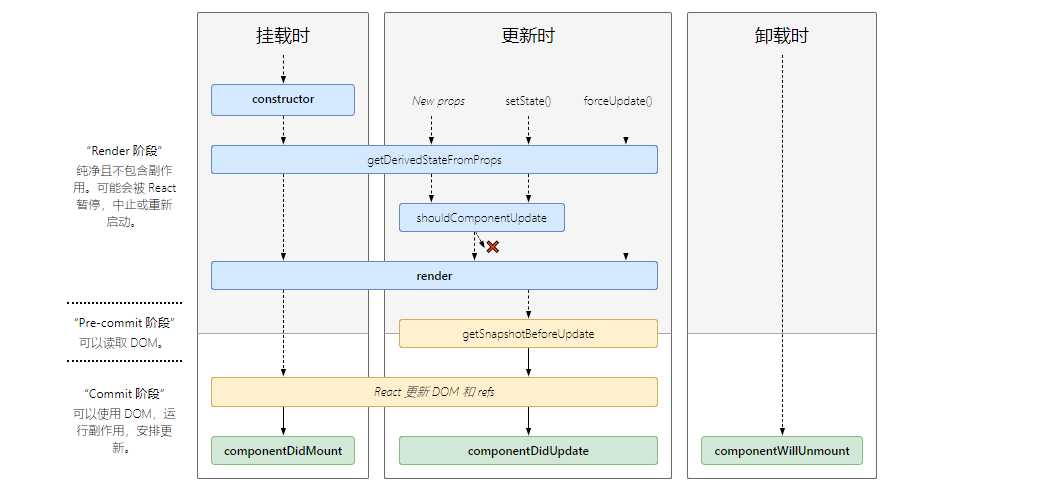
看上面的图片,我们可能理解不了什么,让我们来看下demo
class LifeCicle extends React.Component{
	constructor(props){
		super(props)
		this.state = {
			txt:‘hello world‘,
			name:‘react‘
		}
		console.log(‘constructor: ‘,this)
		this.changeTxt = this.changeTxt.bind(this)
		this.unloade = this.unloade.bind(this)
	}
	static getDerivedStateFromProps(props,state){
		console.log(props,state)
		console.log(‘getDerivedStateFromprops: ‘,this)
		return null
	}
	getSnapshotBeforeUpdate(prevProps,prevState){
		console.log(prevProps,prevState)
		console.log(‘getSnapshotBeforeUpdate: ‘,this)
		return prevProps
	}
	changeTxt(){
		this.setState({
			txt:‘hello react‘
		})
	}
	unloade(){
		ReactDOM.unmountComponentAtNode(document.getElementById(‘life-cycle‘))
	}
	render(){
		console.log(‘render: ‘,this)
		return(
			<div>
				<div>{this.props.user}</div>
				<div>{this.state.txt}</div>
				<div>{this.state.name}</div>
				<button onClick={this.changeTxt}>修改txt</button>
				<button onClick={this.unloade}>卸载组件</button>
			</div>
		)
	}
	componentDidMount(){
		console.log(‘componentDidMount: ‘ ,this)
	}
	shouldComponentUpdate(nextProps){
 		console.log(nextProps)
		console.log(‘shouldComponentUpdate: ‘,this)
		if(nextProps){
			return nextProps
		}
	}
	componentDidUpdate(){
		console.log(‘componentDidUpdate: ‘,this)
	}
	componentWillUnmount(){
		console.log(‘componentWillUnmount‘,this)
	}
}
ReactDOM.render(<LifeCicle user=‘dehenliu‘ />,document.getElementById(‘life-cycle‘))
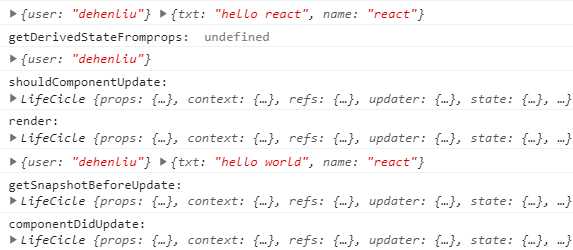
执行结果如下:
一开始没做任何操作的结果

点击修改txt按钮结果

点击卸载组件按钮结果

从上面执行结果,我们可以知道一开始就执行constructor,getDerivedStateFromProps,render,componentDidMount
函数,在点击changeTxt按钮后,更新state状态,会执行getDerivedStateFromprops,shouldComponentUpdate,render,
getSnapshotBeforeUpdate,componentDidUpdate函数,点击‘卸载组件‘后,执行componentWillUnmount,根据这些结果我们可以
将react的生命周期分为三个阶段
挂载阶段,也可以理解为组件的初始化阶段,就是将我们的组件插入到DOM中,只会发生一次,这个阶段的生命周期函数调用如下
组件构造函数,第一个被执行
如果没有显示定义它,会拥有一个默认的构造函数
如果显示定义了构造函数,我们必须在构造函数第一行执行super(props),否则我们无法在
构造函数里拿到this对象
在构造函数里,一般做两件事情
禁止在构造函数中调用setState,可以直接给state设置初始值
static getDerivedStateFromProps
一个静态方法,所以不能在这个函数里面使用this,这个函数有两个参数props和state,
分别指接收到的新参数和当前的state对象,这个函数会返回一个对象用来更新当前state
对象,如果不需要更新可以返回null
该函数会在挂载时候,接收到新的props,调用了setState和forceUpdate时被调用
react中最核心的方法,一个组件中必须要有这个方法
返回类型有一下几种
render函数是纯函数,里面只做一件事,就是返回需要渲染的东西,不应该
包含其他的业务逻辑,如数据请求,对于这些业务逻辑请移到componentDidiMount
和componentDidUpdate中
组件装载之后调用,此时,我们可以获取到DOM节点并操作,比如对canvas,svg的操作,
服务器请求,订阅都可以卸载这个里面,但是记得在componentWillUnmount中取消订阅
在componentDidMount中调用setState会触发一次额外的渲染,多调用了一次render
函数,但是用户对此没有感知,因为他是在浏览器刷新屏幕前执行的,但是我们应该在开发中
避免它,因为它会带来一定的性能问题,我们应该在constructor中初始化我们的state
对象,而不应该componentDidMount调用state方法
更新阶段,当组件的props改变了,或组件内部调用了setState或者forceUpdate发生,会发生多次
这个阶段的生命周期函数调用如下
这个方法在挂载阶段已经讲过,在更新阶段,无论我们接收到新的属性,调用了setState还是调用了forceUpdate,
这个方法都会被调用
shouldComponentUpdate(nextProprs,nextState)
有两个参数nextProps和nextState,表示新的属性和变化之后的
state,返回一个布尔值,true表示会触发重新渲染,false表示不会触发重新
渲染,默认返回true
注意当我们调用forceUpdate并不会触发此方法
因为默认返回true,也就是只要接收到新的属性和调用了setState都会触发
重新的渲染,这会带来一定的性能问题,所以我们需要将this.props与nextProps
以及this.state与nextState进行比较来决定是否返回false,来减少
重新渲染
getSnapshotBeforeUpdate(prevProps,preState)
这个方法在render之后,componentDidUpdate之前调用,有两个参数
nextProps和nextState,表示之前的属性和之前的state,这个函数有一个返回值,会作为第三个
参数传给componentDidUpdate,如果你不想要返回值,请返回null,不写的
话控制台会有警告,这个方法一定要和componentDidUpdate一起使用,否则控制台也会有警告
componentDidUpdate(prevProps, prevState, snapshot)
该方法在getSnapshotBefroeUpdate方法之后被调用,有三个参数
prevProps,prevState,snapshot,表示之前的props,之前的state和
snapshot。第三个参数是getSnapshotBefore返回的
在这个函数里我们可以操作DOM,和发起服务器请求,还可以setState,但是注意一定
要用if语句控制,否则会导致无限循环
卸载阶段,当我们组件被卸载或者销毁了
这个阶段的生命周期函数只有一个
当我们的组件被卸载或者销毁了就会调用,我们可以在这个函数里去清除一些定时器,取消网络请求,
清理无效的DOM元素等垃圾清理工作
注意不要在这个函数里去调用setState,因为组件不会重新渲染了
标签:应该 undefined nec ops 因此 开始 应用程序 渲染 dstat
原文地址:https://www.cnblogs.com/dehenliu/p/12616948.html