标签:end -o height 下载 qml position 上拉 取消 sla
来源 https://www.cnblogs.com/surfsky/p/4352898.html
设置ListView涉及到将contentsY,即视图的可见部分的顶部,设置y为委托的值。另一个更改是interactive将视图设置为false。这样可以防止视图移动。用户不能再滚动列表或更改当前Item。
contentY为列表上拉后列表左上角点距显示框左上解点的高度
listView1.height为可显示部分的高度,假设列表单元的高度为listViewCellHeight,列表个数为listViewCellCount,则最后个列表单元恰好被显示出来时的条件为 ontentY+listView1.height==listViewCellHeight*listViewCellCount
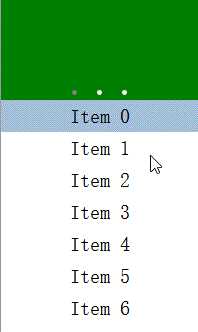
Qt qml listview下拉刷新和上拉分页主要根据contentY来判断。但要加上顶部下拉指示器、滚动条,并封装成可简单调用的组件,着实花了我不少精力:)
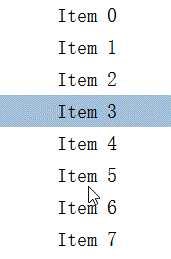
【先看效果】


【功能】
 1 下拉刷新和上拉分页逻辑
 2     /下拉刷新
 3     /上拉更多
 4     /滚动栏
 5     /工具栏半拉显隐
 6 Author: surfsky.cnblogs.com
 7 Lisence: MIT 请保留此文档声明
 8 History:
 9     init. surfsky.cnblogs.com, 2015-01
10     add initPosition property. 2015-01
【下载】
http://download.csdn.net/detail/surfsky/8516981
【调用】
控件使用非常简单,只要实现 onLoad 和 onLoadMore 事件即可,其他的和标准的ListView差不多。
 1 /**
 2 新闻示例
 3     下拉刷新
 4     上拉分页
 5     滚动轴
 6     顶部工具栏
 7     顶部工具栏自动吸附
 8     当前行高亮
 9 Author: surfsky.cnblogs.com 2015-01
10 */
11 ListViewEx{
12     id: view
13     width: 500
14     height: 800
15     pageSize: 50
16     snapHeader: true
17     initPosition: ‘header‘
18
19     // 顶部新闻图片栏
20     headerComponent: Component{
21         PageView{
22             id: pv
23             width: view.width
24             height: 100
25             clip: true
26             Rectangle{width:pv.width; height:pv.height; color: ‘green‘}
27             Rectangle{width:pv.width; height:pv.height; color: ‘yellow‘}
28             Rectangle{width:pv.width; height:pv.height; color: ‘blue‘}
29         }
30     }
31
32     // 行UI代理
33     delegate: Text {
34         id: wrapper;
35         width: parent.width;
36         height: 32;
37         font.pointSize: 15;
38         verticalAlignment: Text.AlignVCenter;
39         horizontalAlignment: Text.AlignHCenter;
40         text: content;
41         //color: ListView.view.currentIndex == index ? "white" : "#505050";
42         MouseArea {
43             anchors.fill: parent;
44             onClicked:  wrapper.ListView.view.currentIndex = index;
45         }
46     }
47
48
49     //-----------------------------------------
50     // 数据加载事件
51     //-----------------------------------------
52     onLoad:{
53         for (var i = 0 ; i < pageSize ; ++i)
54             model.append({"index": i, "content": "Item " + i})
55     }
56     onLoadMore:{
57         for (var i = pageSize*page ; i < pageSize*(page+1); ++i)
58             model.append({"index": i, "content": "Item " + i})
59     }
60 }
【核心代码】
实在太长了,截取ContentY处理部分,其他的下载了看吧
 1     //-------------------------------------
 2     // 下拉刷新和上拉分页逻辑
 3     //-------------------------------------
 4     onMovementEnded: {
 5         //console.log("movementEnded: originY:" + originY + ", contentY:" + contentY + ", reflesh:" + needReflesh + ", more:" + needLoadMore);
 6         // 刷新数据
 7         if (needReflesh){
 8             lv.headerItem.goState(‘load‘);
 9             model.reflesh();
10             needReflesh = false;
11         }
12         // 加载新数据
13         else if (needLoadMore){
14             model.loadMore();
15             needLoadMore = false;
16         }
17         else {
18             var h1 = lv.headerItem.loader.height;
19             var h2 = lv.headerItem.indicator.height;
20
21             // 头部区自动显隐(拖动过小隐藏头部,反之显示)
22             if (snapHeader){
23                 if (contentY >= -h1/3 && contentY < 0)
24                     moveToFirst();
25                 if (contentY >= -h1 && contentY < -h1/3)
26                     moveToHeader();
27             }
28             // 刷新区自动显隐
29             if (contentY >=-(h1+h2) && contentY < -h1)
30                 moveToHeader();
31         }
32     }
33     onContentYChanged: {
34         // 下拉刷新判断逻辑:已经到头了,还下拉一定距离
35         if (contentY < originY){
36             var dy = contentY - originY;
37             if (dy < -10){
38                 lv.headerItem.goState(‘ready‘);
39                 needReflesh = true;
40             }
41             else {
42                 if (pressed){
43                     //console.log(pressed);
44                     //needReflesh = false;   // 如何判断当前鼠标是否按下?如果是按下状态才能取消刷新
45                     lv.headerItem.goState(‘‘);
46                 }
47             }
48         }
49         // 上拉加载判断逻辑:已经到底了,还上拉一定距离
50         if (contentHeight>height && contentY-originY > contentHeight-height){
51             var dy = (contentY-originY) - (contentHeight-height);
52             //console.log("y: " + contentY + ", dy: " + dy);
53             if (dy > 40){
54                 needLoadMore = true;
55                 //console.log("originY:" + originY + ", contentY:" + contentY + ", height:" + height + ", contentheight:" + contentHeight);
56             }
57         }
58     }
========== End
Qt qml中listview 列表视图控件(下拉刷新、上拉分页、滚动轴)
标签:end -o height 下载 qml position 上拉 取消 sla
原文地址:https://www.cnblogs.com/lsgxeva/p/12629551.html