标签:意思 缓冲 install etc inux 单词 访问 超时 should
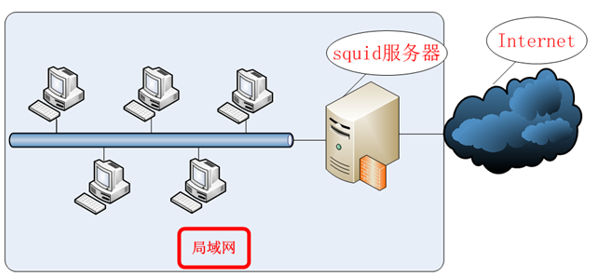
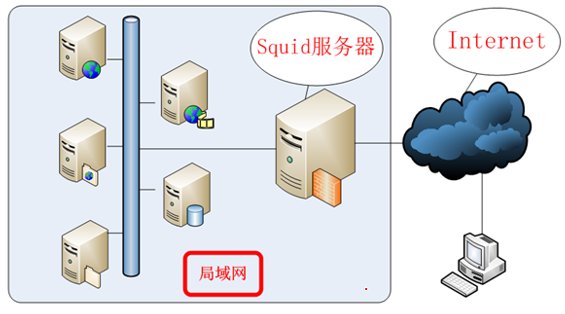
正向代理模式不仅可以让用户使用Squid代理服务器上网,还可以基于指定的IP地址、域名关键词、网站地址或下载文件后缀等信息,实现类似于访问控制列表的功能。反向代理模式可以大幅提升网站的访问速度,还可以帮助网站服务器减轻负载压力。
标准正向代理——分为标准代理模式和透明代理模式
透明正向代理
访问控制列表
反向代理
[root@linuxprobe ~]# ping www.linuxprobe.com
[root@linuxprobe ~]# yum install squid
表16-2 常用的Squid服务程序配置参数以及作用
| 参数 | 作用 |
|---|---|
| http_port 3128 | 监听的端口号 |
| cache_mem 64M | 内存缓冲区的大小 |
| cache_dir ufs /var/spool/squid 2000 16 256 | 硬盘缓冲区的大小 |
| cache_effective_user squid | 设置缓存的有效用户 |
| cache_effective_group squid | 设置缓存的有效用户组 |
| dns_nameservers IP地址 | 一般不设置,而是用服务器默认的DNS地址 |
| cache_access_log /var/log/squid/access.log | 访问日志文件的保存路径 |
| cache_log /var/log/squid/cache.log | 缓存日志文件的保存路径 |
| visible_hostname linuxprobe.com | 设置Squid服务器的名称 |
[root@linuxprobe ~]# systemctl restart squid
[root@linuxprobe ~]# systemctl enable squid
[root@linuxprobe ~]# vim /etc/squid/squid.conf
58 # Squid normally listens to port 3128
59 http_port 10000
60
http_port 10000
………………省略部分输出信息………………
[root@linuxprobe ~]# systemctl restart squid
[root@linuxprobe ~]# systemctl enable squid
 ln -s ‘/usr/lib/systemd/system/squid.service‘ ‘/etc/systemd/system/multi-user.target.wants/squid.service‘
SElinux安全子系统认为Squid服务程序使用3128端口号是理所当然的,因此在默认策略规则中也是允许的,但是现在Squid服务程序却尝试使用新的10000端口号,而该端口原本并不属于Squid服务程序应该使用的系统资源,因此还需要手动把新的端口号添加到Squid服务程序在SElinux域的允许列表中。
[root@linuxprobe ~]# semanage port -l | grep squid_port_t
squid_port_t                   tcp      3128, 3401, 4827
squid_port_t                   udp      3401, 4827
[root@linuxprobe ~]# semanage port -a -t squid_port_t -p tcp 10000
[root@linuxprobe ~]# semanage port -l | grep squid_port_t
squid_port_t                   tcp      10000, 3128, 3401, 4827
squid_port_t                   udp      3401, 4827
实验1:只允许IP地址为192.168.10.20的客户端使用服务器上的Squid服务程序提供的代理服务,禁止其余所有的主机代理请求。
[root@linuxprobe ~]# vim /etc/squid/squid.conf
1 #
2 # Recommended minimum configuration:
3 #
4
5 # Example rule allowing access from your local networks.
6 # Adapt to list your (internal) IP networks from where browsing
7 # should be allowed
8 acl localnet src 10.0.0.0/8 # RFC1918 possible internal network
9 acl localnet src 172.16.0.0/12 # RFC1918 possible internal network
10 acl localnet src 192.168.0.0/16 # RFC1918 possible internal network
11 acl localnet src fc00::/7 # RFC 4193 local private network range
12 acl localnet src fe80::/10 # RFC 4291 link-local (directly plugged) mac hines
13
14 acl SSL_ports port 443
15 acl Safe_ports port 80 # http
16 acl Safe_ports port 21 # ftp
17 acl Safe_ports port 443 # https
18 acl Safe_ports port 70 # gopher
19 acl Safe_ports port 210 # wais
20 acl Safe_ports port 1025-65535 # unregistered ports
21 acl Safe_ports port 280 # http-mgmt
22 acl Safe_ports port 488 # gss-http
23 acl Safe_ports port 591 # filemaker
24 acl Safe_ports port 777 # multiling http
25 acl CONNECT method CONNECT
26 acl client src 192.168.10.20
27 #
28 # Recommended minimum Access Permission configuration:
29 #
30 # Deny requests to certain unsafe ports
31 http_access allow client
32 http_access deny all
33 http_access deny !Safe_ports
34
[root@linuxprobe ~]# systemctl restart squid
实验2:禁止所有客户端访问网址中包含linux关键词的网站。
[root@linuxprobe ~]# vim /etc/squid/squid.conf
1 #
2 # Recommended minimum configuration:
3 #
4
5 # Example rule allowing access from your local networks.
6 # Adapt to list your (internal) IP networks from where browsing
7 # should be allowed
8 acl localnet src 10.0.0.0/8 # RFC1918 possible internal network
9 acl localnet src 172.16.0.0/12 # RFC1918 possible internal network
10 acl localnet src 192.168.0.0/16 # RFC1918 possible internal network
11 acl localnet src fc00::/7 # RFC 4193 local private network range
12 acl localnet src fe80::/10 # RFC 4291 link-local (directly plugged) mac hines
13
14 acl SSL_ports port 443
15 acl Safe_ports port 80 # http
16 acl Safe_ports port 21 # ftp
17 acl Safe_ports port 443 # https
18 acl Safe_ports port 70 # gopher
19 acl Safe_ports port 210 # wais
20 acl Safe_ports port 1025-65535 # unregistered ports
21 acl Safe_ports port 280 # http-mgmt
22 acl Safe_ports port 488 # gss-http
23 acl Safe_ports port 591 # filemaker
24 acl Safe_ports port 777 # multiling http
25 acl CONNECT method CONNECT
26 acl deny_keyword url_regex -i linux
27 #
28 # Recommended minimum Access Permission configuration:
29 #
30 # Deny requests to certain unsafe ports
31 http_access deny deny_keyword
33 http_access deny !Safe_ports
34
[root@linuxprobe ~]# systemctl restart squid
实验3:禁止所有客户端访问某个特定的网站。
[root@linuxprobe ~]# vim /etc/squid/squid.conf
24 acl Safe_ports port 777 # multiling http
25 acl CONNECT method CONNECT
26 acl deny_url url_regex http://www.linuxcool.com
27 #
28 # Recommended minimum Access Permission configuration:
29 #
30 # Deny requests to certain unsafe ports
31 http_access deny deny_url
33 http_access deny !Safe_ports
34
[root@linuxprobe ~]# systemctl restart squid
实验4:禁止员工在企业网内部下载带有某些后缀的文件。
[root@linuxprobe ~]# vim /etc/squid/squid.conf
24 acl Safe_ports port 777 # multiling http
25 acl CONNECT method CONNECT
26 acl badfile urlpath_regex -i .mp3$ .rar$
27 #
28 # Recommended minimum Access Permission configuration:
29 #
30 # Deny requests to certain unsafe ports
31 http_access deny badfile
33 http_access deny !Safe_ports
34
[root@linuxprobe ~]# systemctl restart squid
SNAT技术完成数据的转发,让客户端主机将数据交给Squid代理服务器,再由后者转发到外网中。简单来说,就是让Squid服务器作为一个中间人,实现内网客户端主机与外部网络之间的数据传输。
想让内网中的客户端主机能够访问外网,客户端主机首先要能获取到DNS地址解析服务的数据,这样才能在互联网中找到对应网站的IP地址。下面通过iptables命令实现DNS地址解析服务53端口的数据转发功能,并且允许Squid服务器转发IPv4数据包。sysctl -p命令的作用是让转发参数立即生效:
[root@linuxprobe ~]# iptables -F
[root@linuxprobe ~]# iptables -t nat -A POSTROUTING -p udp --dport 53 -o eno33554968 -j MASQUERADE
[root@linuxprobe ~]# echo "net.ipv4.ip_forward=1" >> /etc/sysctl.conf
[root@linuxprobe ~]# sysctl -p
net.ipv4.ip_forward = 1
C:\Users\linuxprobe>ping www.linuxprobe.com
正在 Ping www.linuxprobe.com [116.31.127.233] 具有 32 字节的数据:
请求超时。
请求超时。
请求超时。
请求超时。
116.31.127.233 的 Ping 统计信息:
    数据包: 已发送 = 4,已接收 = 0,丢失 = 4 (100% 丢失),
与配置DNS和SNAT技术转发相比,Squid服务程序透明代理模式的配置过程就十分简单了,只需要在主配置文件中服务器端口号后面追加上transparent单词(意思为“透明的”),然后把第62行的井号(#)注释符删除,设置缓存的保存路径就可以了。保存主配置文件并退出后再使用squid -k parse命令检查主配置文件是否有错误,以及使用squid -z命令对Squid服务程序的透明代理技术进行初始化。
[root@linuxprobe ~]# vim /etc/squid/squid.conf
………………省略部分输出信息………………
58 # Squid normally listens to port 3128
59 http_port 3128 transparent
60
61 # Uncomment and adjust the following to add a disk cache directory.
62 cache_dir ufs /var/spool/squid 100 16 256
63
………………省略部分输出信息………………
[root@linuxprobe ~]# squid -k parse
2017/04/13 06:40:44| Startup: Initializing Authentication Schemes ...
2017/04/13 06:40:44| Startup: Initialized Authentication Scheme ‘basic‘
2017/04/13 06:40:44| Startup: Initialized Authentication Scheme ‘digest‘
2017/04/13 06:40:44| Startup: Initialized Authentication Scheme ‘negotiate‘
2017/04/13 06:40:44| Startup: Initialized Authentication Scheme ‘ntlm‘
2017/04/13 06:40:44| Startup: Initialized Authentication.
………………省略部分输出信息………………
[root@linuxprobe ~]# squid -z
2017/04/13 06:41:26 kid1| Creating missing swap directories
2017/04/13 06:41:26 kid1| /var/spool/squid exists
2017/04/13 06:41:26 kid1| Making directories in /var/spool/squid/00
2017/04/13 06:41:26 kid1| Making directories in /var/spool/squid/01
2017/04/13 06:41:26 kid1| Making directories in /var/spool/squid/02
2017/04/13 06:41:26 kid1| Making directories in /var/spool/squid/03
2017/04/13 06:41:26 kid1| Making directories in /var/spool/squid/04
2017/04/13 06:41:26 kid1| Making directories in /var/spool/squid/05
2017/04/13 06:41:26 kid1| Making directories in /var/spool/squid/06
2017/04/13 06:41:26 kid1| Making directories in /var/spool/squid/07
2017/04/13 06:41:26 kid1| Making directories in /var/spool/squid/08
2017/04/13 06:41:26 kid1| Making directories in /var/spool/squid/09
2017/04/13 06:41:26 kid1| Making directories in /var/spool/squid/0A
2017/04/13 06:41:26 kid1| Making directories in /var/spool/squid/0B
2017/04/13 06:41:26 kid1| Making directories in /var/spool/squid/0C
2017/04/13 06:41:26 kid1| Making directories in /var/spool/squid/0D
2017/04/13 06:41:26 kid1| Making directories in /var/spool/squid/0E
2017/04/13 06:41:26 kid1| Making directories in /var/spool/squid/0F
[root@linuxprobe ~]# systemctl restart squid
在配置妥当并重启Squid服务程序且系统没有提示报错信息后,接下来就可以完成SNAT数据转发功能了。它的原理其实很简单,就是使用iptables防火墙管理命令把所有客户端主机对网站80端口的请求转发至Squid服务器本地的3128端口上。SNAT数据转发功能的具体配置参数如下。
[root@linuxprobe ~]# iptables -t nat -A PREROUTING  -p tcp -m tcp --dport 80 -j REDIRECT --to-ports 3128
[root@linuxprobe ~]# iptables -t nat -A POSTROUTING -s 192.168.10.0/24 -o eno33554968 -j SNAT --to 您的桥接网卡IP地址
[root@linuxprobe ~]# service iptables save
iptables: Saving firewall rules to /etc/sysconfig/iptables:[ OK ]
CDN(内容分发网络)服务的网站也可以避免这种窃取行为。如果访问开启了防护功能的网站.
使用Squid服务程序来配置反向代理服务非常简单。首先找到一个网站源服务器的IP地址,然后编辑Squid服务程序的主配置文件,把端口号3128修改为网站源服务器的地址和端口号,此时正向解析服务会被暂停(它不能与反向代理服务同时使用)。然后按照下面的参数形式写入需要反向代理的网站源服务器的IP地址信息,保存退出后重启Squid服务程序。正常网站使用反向代理服务的效果如图16-17所示。
[root@linuxprobe ~]# vim /etc/squid/squid.conf
………………省略部分输出信息………………
57
58 # Squid normally listens to port 3128
59 http_port 您的桥接网卡IP地址:80 vhost
60 cache_peer 网站源服务器IP地址 parent 80 0 originserver
61
………………省略部分输出信息………………
[root@linuxprobe ~]# systemctl restart squid
标签:意思 缓冲 install etc inux 单词 访问 超时 should
原文地址:https://www.cnblogs.com/gerenboke/p/12676967.html