标签:文件 version 参数 figure 创建 版本 nta 请求 gcc-c++
yum install gcc-c++
yum install -y pcre pcre-devel
yum install -y zlib zlib-devel
yum install -y openssl openssl-devel
tar -zxvf nginx-1.16.1.tar.gz
mkdir /var/temp/nginx -p
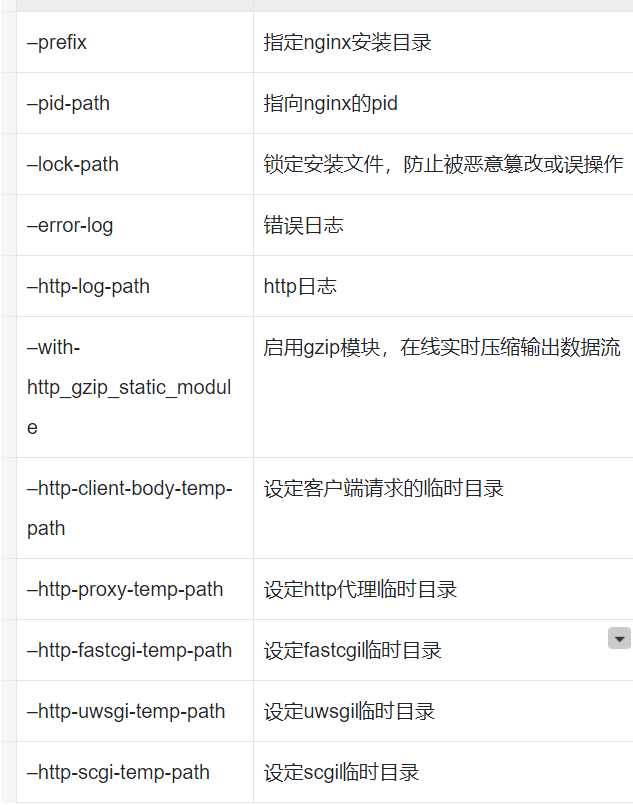
./configure \ --prefix=/usr/local/nginx \ --pid-path=/var/run/nginx/nginx.pid \ --lock-path=/var/lock/nginx.lock \ --error-log-path=/var/log/nginx/error.log \ --http-log-path=/var/log/nginx/access.log \ --with-http_gzip_static_module \ --http-client-body-temp-path=/var/temp/nginx/client \ --http-proxy-temp-path=/var/temp/nginx/proxy \ --http-fastcgi-temp-path=/var/temp/nginx/fastcgi \ --http-uwsgi-temp-path=/var/temp/nginx/uwsgi \ --http-scgi-temp-path=/var/temp/nginx/scgi
配置命令参数详解:

make编译、安装
make
make install
进入sbin目录启动nginx
./nginx

* 停止:./nginx -s stop
* 重新加载:./nginx -s reload
查看nginx版本信息:
#简略信息,只显示版本号
[root@kevin sbin]# ./nginx -v
nginx version: nginx/1.16.1

#详细信息,包括版本号,编译版本/工具(GCC),配置参数(configure arguments)。
[root@kevin sbin]# ./nginx -V
nginx version: nginx/1.16.1
built by gcc 4.8.5 20150623 (Red Hat 4.8.5-39) (GCC)
configure arguments: --prefix=/usr/local/nginx --pid-path=/var/run/nginx/nginx.pid --lock-path=/var/lock/nginx.lock --error-log-path=/var/log/nginx/error.log --http-log-path=/var/log/nginx/access.log --with-http_gzip_static_module --http-client-body-temp-path=/var/temp/nginx/client --http-proxy-temp-path=/var/temp/nginx/proxy --http-fastcgi-temp-path=/var/temp/nginx/fastcgi --http-uwsgi-temp-path=/var/temp/nginx/uwsgi --http-scgi-temp-path=/var/temp/nginx/scgi
测试nginx配置是否正确:
[root@kevin sbin]# ./nginx -t
nginx: the configuration file /usr/local/nginx/conf/nginx.conf syntax is ok
nginx: configuration file /usr/local/nginx/conf/nginx.conf test is successful

#./nginx -T 将会显示详细的配置信息(include文件也会显示)
启动、停止和重新启动nginx:
#启动
[root@kevin sbin]# ./nginx

#停止-方式一,强制停止,当前有正在处理的请求也会被关闭掉。类似于饭店要关门,即使还有客人在吃饭,直接将其赶出去。
[root@kevin sbin]# ./nginx -s stop

#停止-方式二,不再接受新的请求,处理完当前正在执行的请求后关闭。类似于饭店要关门,会等到当前店内客人吃完饭之后关门,同时不再招待新的客人。
[root@kevin sbin]# ./nginx -s quit

#重新启动/加载。当修改了配置文件后,使用该命令进行重载。
[root@kevin sbin]# ./nginx -s reload
标签:文件 version 参数 figure 创建 版本 nta 请求 gcc-c++
原文地址:https://www.cnblogs.com/monument/p/12737929.html