标签:turn sch spro value rac 中间件 简化 阻塞 bat
其实并没有标准定义。一般认为,消息中间件属于分布式系统中一个子系统,关注于数据的发送和接收,利用高效可靠的异步消息传递机制对分布式系统中的其余各个子系统进行集成。
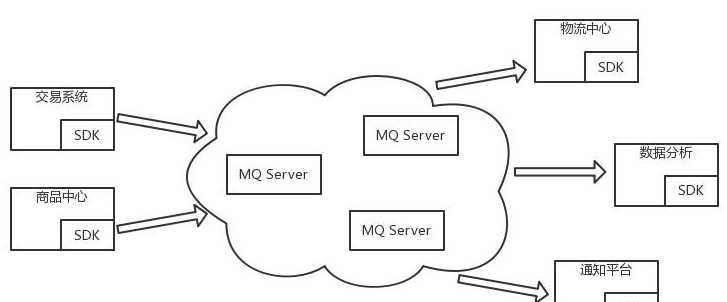
假设一个电商交易的场景,用户下单之后调用库存系统减库存,然后需要调用物流系统进行发货,如果交易、库存、物流是属于一个系统的,那么就是接口调用。但是随着系统的发展,各个模块越来越庞大、业务逻辑越来越复杂,必然是要做服务化和业务拆分的。这个时候就需要考虑这些系统之间如何交互,第一反应就是RPC(Remote Procedure Call)。系统继续发展,可能一笔交易后续需要调用几十个接口来执行业务,比如还有风控系统、短信服务等等。这个时候就需要消息中间件登场来解决问题了。
所以消息中间件主要解决分布式系统之间消息的传递,同时为分布式系统中其他子系统提供了伸缩性和扩展性。为系统带来了:
名称解释:
伸缩性,是指通过不断向集群中加入服务器的手段来缓解不断上升的用户并发访问压力和不断增长的数据存储需求。就像弹簧一样挂东西一样,用户多,伸一点,用户少,浅一点,啊,不对,缩一点。是伸缩,不是深浅。衡量架构是否高伸缩性的主要标准就是是否可用多台服务器构建集群,是否容易向集群中添加新的服务器。加入新的服务器后是否可以提供和原来服务器无差别的服务。集群中可容纳的总的服务器数量是否有限制。
扩展性,主要标准就是在网站增加新的业务产品时,是否可以实现对现有产品透明无影响,不需要任何改动或者很少改动既有业务功能就可以上线新产品。比如用户购买电影票的应用,现在我们要增加一个功能,用户买了铁血战士的票后,随机抽取用户送异形的限量周边。怎么做到不改动用户购票功能的基础上增加这个功能。熟悉设计模式的同学,应该很眼熟,这是设计模式中的开闭原则(对扩展开放,对修改关闭)在架构层面的一个原则。
RPC和消息中间件的场景的差异很大程度上在于就是“依赖性”和“同步性”。
比如短信通知服务并不是事交易环节必须的,并不影响下单流程,不是强依赖,所以交易系统不应该依赖短信服务。比如一些数据分析程序可能需要在拿到一天的总销售量,这个就只需要销售中心提供接口在需要时调用即可。
消息中间件出现以后对于交易场景可能是调用库存中心等强依赖系统执行业务,之后发布一条消息(这条消息存储于消息中间件中)。像是短信通知服务、数据统计服务等等都是依赖于消息中间件去消费这条消息来完成自己的业务逻辑。
RPC方式是典型的同步方式,让远程调用像本地调用。消息中间件方式属于异步方式。消息队列是系统级、模块级的通信。RPC是对象级、函数级通信。
相同点:都是分布式下面的通信方式。
场景说明:用户注册后,需要发注册邮件和注册短信。传统的做法有两种1.串行的方式;2.并行方式。
串行方式:将注册信息写入数据库成功后,发送注册邮件,再发送注册短信。以上三个任务全部完成后,返回给客户端。

并行方式:将注册信息写入数据库成功后,发送注册邮件的同时,发送注册短信。以上三个任务完成后,返回给客户端。与串行的差别是,并行的方式可以提高处理的时间。
假设三个业务节点每个使用50毫秒钟,不考虑网络等其他开销,则串行方式的时间是150毫秒,并行的时间可能是100毫秒。
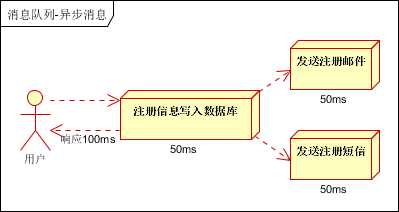
小结:如以上案例描述,传统的方式系统的性能(并发量,吞吐量,响应时间)会有瓶颈。如何解决这个问题呢?
引入消息队列,将不是必须的业务逻辑,异步处理。

按照以上约定,用户的响应时间相当于是注册信息写入数据库的时间,也就是50毫秒。注册邮件,发送短信写入消息队列后,直接返回,因此写入消息队列的速度很快,基本可以忽略,因此用户的响应时间可能是50毫秒。因此架构改变后,系统的吞吐量提高到每秒20 QPS。比串行提高了3倍,比并行提高了两倍。
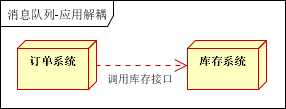
场景说明:用户下单后,订单系统需要通知库存系统。传统的做法是,订单系统调用库存系统的接口。
传统模式的缺点:
1) 假如库存系统无法访问,则订单减库存将失败,从而导致订单失败;
2) 订单系统与库存系统耦合;
如何解决以上问题呢?引入应用消息队列后的方案
订单系统:用户下单后,订单系统完成持久化处理,将消息写入消息队列,返回用户订单下单成功。
库存系统:订阅下单的消息,采用拉/推的方式,获取下单信息,库存系统根据下单信息,进行库存操作。
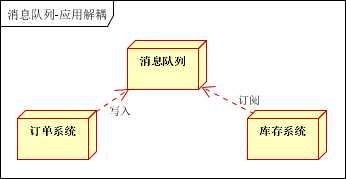
假如:在下单时库存系统不能正常使用。也不影响正常下单,因为下单后,订单系统写入消息队列就不再关心其他的后续操作了。实现订单系统与库存系统的应用解耦。
流量削峰也是消息队列中的常用场景,一般在秒杀或团抢活动中使用广泛。
应用场景:秒杀活动,一般会因为流量过大,导致流量暴增,应用挂掉。为解决这个问题,一般需要在应用前端加入消息队列:可以控制活动的人数;可以缓解短时间内高流量压垮应用。

用户的请求,服务器接收后,首先写入消息队列。假如消息队列长度超过最大数量,则直接抛弃用户请求或跳转到错误页面;秒杀业务根据消息队列中的请求信息,再做后续处理。
日志处理是指将消息队列用在日志处理中,比如Kafka的应用,解决大量日志传输的问题。架构简化如下:

日志采集客户端,负责日志数据采集,定时写入Kafka队列:Kafka消息队列,负责日志数据的接收,存储和转发;日志处理应用:订阅并消费kafka队列中的日志数据;
消息通讯是指,消息队列一般都内置了高效的通信机制,因此也可以用在纯的消息通讯。比如实现点对点消息队列,或者聊天室等。
点对点通讯:客户端A和客户端B使用同一队列,进行消息通讯。
聊天室通讯:客户端A,客户端B,客户端N订阅同一主题,进行消息发布和接收。实现类似聊天室效果。
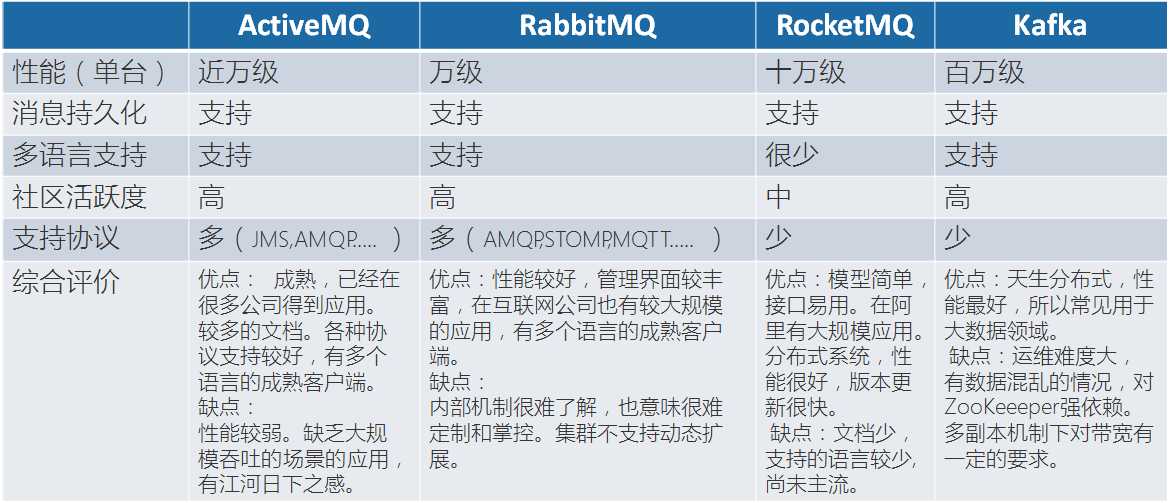
如果一般的业务系统要引入MQ,怎么选型:
用户访问量在ActiveMQ的可承受范围内,而且确实主要是基于解耦和异步来用的,可以考虑ActiveMQ,也比较贴近Java工程师的使用习惯。
RabbitMQ,但是确实erlang语言阻止了我们去深入研究和掌控,对公司而言,几乎处于不可控的状态,但是确实是开源的,有比较稳定的支持,活跃度也高。
对自己公司技术实力有绝对自信的,可以用RocketMQ 。
所以中小型公司,技术实力较为一般,技术挑战不是特别高,用ActiveMQ、RabbitMQ是不错的选择;大型公司,基础架构研发实力较强,用RocketMQ是很好的选择
如果是大数据领域的实时计算、日志采集等场景,用Kafka是业内标准的,绝对没问题,社区活跃度很高,几乎是全世界这个领域的事实性规范。
JMS(Java Messaging Service)是Java平台上有关面向消息中间件的技术规范,实际上是一套api,它便于消息系统中的Java应用程序进行消息交换,并且通过提供标准的产生、发送、接收消息的接口简化企业应用的开发,ActiveMQ而是这个规范的一个具体实现。
1)连接工厂。连接工厂负责创建一个JMS连接。
2)JMS连接。JMS连接(Connection)表示JMS客户端和服务器端之间的一个活动的连接,是由客户端通过调用连接工厂的方法建立的。
3)JMS会话。JMS会话(Session)表示JMS客户与JMS服务器之间的会话状态。JMS会话建立在JMS连接上,表示客户与服务器之间的一个会话线程。
4)JMS目的/ Broker。客户用来指定它生产的消息的目标和它消费的消息的来源的对象,一个消息中间件的实例。
5)JMS生产者和消费者。生产者(Message Producer)和消费者(Message Consumer)对象由Session对象创建,用于发送和接收消息。
消息的消费可以采用以下两种方法之一:
· 同步消费。通过调用 消费者的receive 方法从目的地中显式提取消息。receive 方法可以一直阻塞到消息到达。
· 异步消费。客户可以为消费者注册一个消息监听器,以定义在消息到达时所采取的动作。
JMS 消息由以下三部分组成:
· 消息头。每个消息头字段都有相应的getter 和setter 方法。
· 消息属性。如果需要除消息头字段以外的值,那么可以使用消息属性。
· 消息体。JMS 定义的消息类型有TextMessage、MapMessage、BytesMessage、
StreamMessage 和 ObjectMessage。ActiveMQ也有对应的实现。
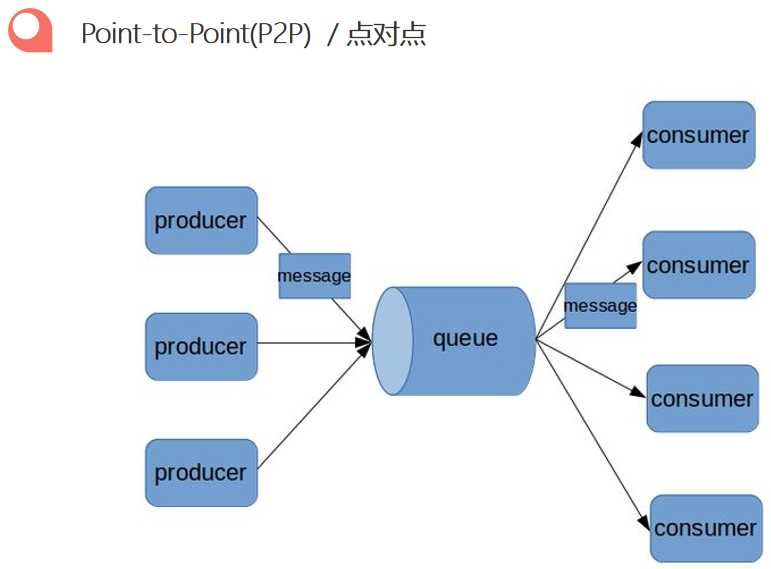
消息通过称为队列的一个虚拟通道来进行交换。队列是生产者发送消息的目的地和接受者消费消息的消息源。
每条消息通仅会传送给一个接受者。可能会有多个接受者在一个队列中侦听,但是每个队列中的消息只能被队列中的一个接受者消费。
消息存在先后顺序。一个队列会按照消息服务器将消息放入队列中的顺序,把它们传送给消费者当消息已被消费时,就会从队列头部将它们删除。
每个消息只有一个消费者(Consumer)(即一旦被消费,消息就不再在消息队列中)
发送者发送了消息之后,不管接收者有没有正在运行,它不会影响到消息被发送到队列
接收者在成功接收消息之后需向队列应答成功
如果希望发送的每个消息都应该被成功处理的话,使用这个P2P模式。
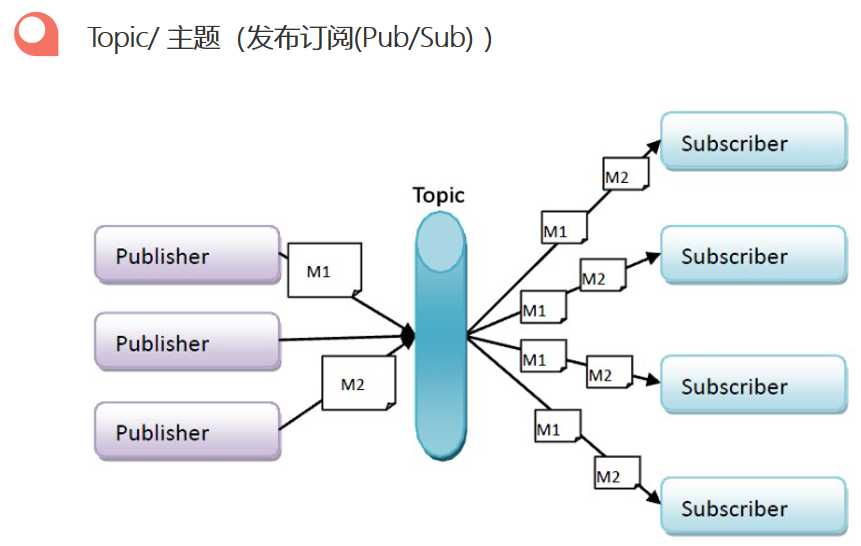
1、消息生产者(发布)将消息发布到topic中,同时有多个消息消费者(订阅)消费该消息。和点对点方式不同,发布到topic的消息会被所有订阅者消费。
3、如果你希望发送的消息可以不被做任何处理、或者被一个消息者处理、或者可以被多个消费者处理的话,那么可以采用topic模型
下载 Windows版 ActiveMQ,解压,运行bin目录下的activemq.bat即可。Linux下操作类似(进入bin目录运行./win64/activemq start启动,./activemq stop关闭)。
下载地址:http://activemq.apache.org/activemq-580-release.html
运行后在浏览器中访问http://127.0.0.1:8161/admin,即可看到ActiveMQ的管理控制台。用户名密码为admin/admin
ActiveMQ中,61616为服务端口,8161为管理控制台端口。

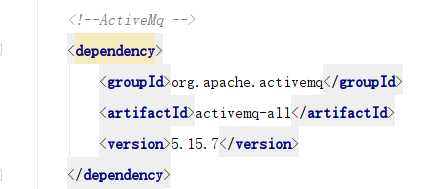
Maven配置
1、生产者
package cn.enjoyedu.usemq;

import org.apache.activemq.ActiveMQConnection;
import org.apache.activemq.ActiveMQConnectionFactory;

import javax.jms.*;

/**
 *类说明:生产者端
 */
public class JmsProducer {

    /*默认连接用户名*/
    private static final String USERNAME = ActiveMQConnection.DEFAULT_USER;
    /* 默认连接密码*/
    private static final String PASSWORD = ActiveMQConnection.DEFAULT_PASSWORD;
    /* 默认连接地址*/
    private static final String BROKEURL = ActiveMQConnection.DEFAULT_BROKER_URL;
    private static final int SENDNUM = 3;

    public static void main(String[] args) {
        /* 连接工厂*/
        ConnectionFactory connectionFactory;
        /* 连接*/
        Connection connection = null;
        /* 会话*/
        Session session;
        /* 消息的目的地*/
        Destination destination;
        /* 消息的生产者*/
        MessageProducer messageProducer;

        /* 实例化连接工厂*/
        connectionFactory = new ActiveMQConnectionFactory(USERNAME, PASSWORD, BROKEURL);
        try {
            /* 通过连接工厂获取连接*/
            connection = connectionFactory.createConnection();
            /* 启动连接*/
            connection.start();
            /* 创建session
            * 第一个参数表示是否使用事务,第二次参数表示是否自动确认*/
            session = connection.createSession(false, Session.AUTO_ACKNOWLEDGE);
            /* 创建一个名为HelloWorld消息队列*/
            //destination = session.createTopic("HelloActiveMq");
            destination = session.createQueue("HelloActiveMqQueue");
            /* 创建消息生产者*/
            messageProducer = session.createProducer(destination);
            /* 循环发送消息*/
            for(int i=0;i<SENDNUM;i++){
                String msg = "发送消息"+i+" "+System.currentTimeMillis();
                TextMessage textMessage = session.createTextMessage(msg);
                System.out.println("标准用法:"+msg);
                messageProducer.send(textMessage);
            }
        } catch (Exception e) {
            e.printStackTrace();
        }finally {
            if(connection!=null){
                try {
                    connection.close();
                } catch (JMSException e) {
                    e.printStackTrace();
                }
            }
        }
    }
}
2、消费者
package cn.enjoyedu.usemq;

import org.apache.activemq.ActiveMQConnection;
import org.apache.activemq.ActiveMQConnectionFactory;

import javax.jms.*;

/**
 *类说明:消费者端-同步接收
 */
public class JmsConsumer {
    /*默认连接用户名*/
    private static final String USERNAME = ActiveMQConnection.DEFAULT_USER;
    /* 默认连接密码*/
    private static final String PASSWORD = ActiveMQConnection.DEFAULT_PASSWORD;
    /* 默认连接地址*/
    private static final String BROKEURL = ActiveMQConnection.DEFAULT_BROKER_URL;

    public static void main(String[] args) {
        /* 连接工厂*/
        ConnectionFactory connectionFactory;
        /* 连接*/
        Connection connection = null;
        /* 会话*/
        Session session;
        /* 消息的目的地*/
        Destination destination;
        /* 消息的消费者*/
        MessageConsumer messageConsumer;
        /* 实例化连接工厂*/
        connectionFactory = new ActiveMQConnectionFactory(USERNAME,PASSWORD,BROKEURL);

        try {
            /* 通过连接工厂获取连接*/
            connection = connectionFactory.createConnection();
            /* 启动连接*/
            connection.start();
            /* 创建session*/
            session = connection.createSession(false, Session.AUTO_ACKNOWLEDGE);
            /* 创建一个名为HelloWorld消息队列*/
            //destination = session.createTopic("HelloActiveMq");
            destination = session.createQueue("HelloActiveMqQueue");
            /* 创建消息消费者*/
            messageConsumer = session.createConsumer(destination);
            Message message;
            while((message = messageConsumer.receive())!=null){
                System.out.println(((TextMessage)message).getText());
            }

        } catch (JMSException e) {
            e.printStackTrace();
        }finally {
            if(connection!=null){
                try {
                    connection.close();
                } catch (JMSException e) {
                    e.printStackTrace();
                }
            }
        }

    }
}
3、消费者-----异步
package cn.enjoyedu.usemq;

import org.apache.activemq.ActiveMQConnection;
import org.apache.activemq.ActiveMQConnectionFactory;

import javax.jms.*;

/**
 *类说明:消费者端-异步接收
 */
public class JmsConsumerAsyn {
    /*默认连接用户名*/
    private static final String USERNAME = ActiveMQConnection.DEFAULT_USER;
    /* 默认连接密码*/
    private static final String PASSWORD = ActiveMQConnection.DEFAULT_PASSWORD;
    /* 默认连接地址*/
    private static final String BROKEURL = ActiveMQConnection.DEFAULT_BROKER_URL;

    public static void main(String[] args) {
        /* 连接工厂*/
        ConnectionFactory connectionFactory;
        /* 连接*/
        Connection connection = null;
        /* 会话*/
        Session session;
        /* 消息的目的地*/
        Destination destination;
        /* 消息的消费者*/
        MessageConsumer messageConsumer;
        /* 实例化连接工厂*/
        connectionFactory = new ActiveMQConnectionFactory(USERNAME,PASSWORD,BROKEURL);

        try {
            /* 通过连接工厂获取连接*/
            connection = connectionFactory.createConnection();
            /* 启动连接*/
            connection.start();
            /* 创建session*/
            session = connection.createSession(false, Session.AUTO_ACKNOWLEDGE);
            /* 创建一个名为HelloWorld消息队列*/
            //destination = session.createTopic("HelloActiveMq");
            destination = session.createQueue("HelloActiveMqQueue");

            /* 创建消息消费者*/
            messageConsumer = session.createConsumer(destination);
            /* 设置消费者监听器,监听消息*/
            messageConsumer.setMessageListener(new MessageListener() {
                public void onMessage(Message message) {
                    try {
                        System.out.println(((TextMessage)message).getText());
                    } catch (JMSException e) {
                        e.printStackTrace();
                    }
                }
            });
        } catch (JMSException e) {
            e.printStackTrace();
        }
    }
}
connection.createSession参数解释:
第一个参数是否使用事务:当消息发送者向消息提供者(即消息代理)发送消息时,消息发送者等待消息代理的确认,没有回应则抛出异常,消息发送程序负责处理这个错误。
第二个参数消息的确认模式:
AUTO_ACKNOWLEDGE : 指定消息接收者在每次收到消息时自动发送确认。消息只向目标发送一次,但传输过程中可能因为错误而丢失消息。
CLIENT_ACKNOWLEDGE : 由消息接收者确认收到消息,通过调用消息的acknowledge()方法(会通知消息提供者收到了消息)
DUPS_OK_ACKNOWLEDGE : 指定消息提供者在消息接收者没有确认发送时重新发送消息(这种确认模式不在乎接收者收到重复的消息)。
1、增加Maven配置

2、生产者在spring的配置中增加ActiveMQ相关配置,包括命名空间
3、生产者在代码中编写发送逻辑,可以topic模式,也可queue模式
4、消费者在spring的配置中增加ActiveMQ相关配置,包括命名空间
5、消费者在代码中编写接收逻辑,可以topic模式,也可queue模式
服务端
1、applicationContext.xml
<?xml version="1.0" encoding="UTF-8"?>
<!-- 查找最新的schemaLocation 访问 http://www.springframework.org/schema/ -->
<beans xmlns="http://www.springframework.org/schema/beans"
       xmlns:context="http://www.springframework.org/schema/context"
       xmlns:xsi="http://www.w3.org/2001/XMLSchema-instance"
       xmlns:amq="http://activemq.apache.org/schema/core"
       xsi:schemaLocation="http://www.springframework.org/schema/beans
        http://www.springframework.org/schema/beans/spring-beans-4.0.xsd
        http://www.springframework.org/schema/context
        http://www.springframework.org/schema/context/spring-context-4.0.xsd
        http://activemq.apache.org/schema/core
        http://activemq.apache.org/schema/core/activemq-core-5.8.0.xsd">

     <!-- 配置扫描路径 -->
     <context:component-scan base-package="cn.enjoyedu">
         <context:exclude-filter type="annotation"
              expression="org.springframework.stereotype.Controller"/>
     </context:component-scan>

    <!-- ActiveMQ 连接工厂 -->
    <amq:connectionFactory id="amqConnectionFactory"
             brokerURL="tcp://127.0.0.1:61616" userName="" password="" />

    <!-- Spring Caching连接工厂 -->
    <!-- Spring用于管理真正的ConnectionFactory的ConnectionFactory -->
    <bean id="connectionFactory"
          class="org.springframework.jms.connection.CachingConnectionFactory">
        <property name="targetConnectionFactory" ref="amqConnectionFactory"></property>
        <property name="sessionCacheSize" value="100"></property>
    </bean>

    <!-- Spring JmsTemplate 的消息生产者 start-->
    <!-- 定义JmsTemplate的Queue类型 -->
    <bean id="jmsQueueTemplate" class="org.springframework.jms.core.JmsTemplate">
        <constructor-arg ref="connectionFactory"></constructor-arg>
        <!-- 队列模式-->
        <property name="pubSubDomain" value="false"></property>
    </bean>

    <!-- 定义JmsTemplate的Topic类型 -->
    <bean id="jmsTopicTemplate" class="org.springframework.jms.core.JmsTemplate">
        <constructor-arg ref="connectionFactory"></constructor-arg>
        <!-- 发布订阅模式-->
        <property name="pubSubDomain" value="true"></property>
    </bean>
</beans>
2、TopicSender
package cn.enjoyedu.topic;

import org.springframework.beans.factory.annotation.Autowired;
import org.springframework.beans.factory.annotation.Qualifier;
import org.springframework.jms.core.JmsTemplate;
import org.springframework.jms.core.MessageCreator;
import org.springframework.stereotype.Component;

import javax.jms.JMSException;
import javax.jms.Message;
import javax.jms.Session;
import javax.jms.TextMessage;

/**
 *类说明:topic模式发送
 */
@Component("topicSender")
public class TopicSender {

    @Autowired
    @Qualifier("jmsTopicTemplate")
    private JmsTemplate jmsTemplate;

    public void send(String queueName,final String message){
        jmsTemplate.send(queueName, new MessageCreator() {

            public Message createMessage(Session session) throws JMSException {
                TextMessage textMessage = session.createTextMessage(message);
                return textMessage;
            }
        });
    }
}
3、QueueSender
package cn.enjoyedu.queue;

import org.springframework.beans.factory.annotation.Autowired;
import org.springframework.beans.factory.annotation.Qualifier;
import org.springframework.jms.core.JmsTemplate;
import org.springframework.jms.core.MessageCreator;
import org.springframework.stereotype.Component;

import javax.jms.*;

/**
 *类说明:queue模式发送
 */
@Component("queueSender")
public class QueueSender {

    @Autowired
    @Qualifier("jmsQueueTemplate")
    private JmsTemplate jmsTemplate;

    public void send(String queueName,final String message){
        jmsTemplate.send(queueName, new MessageCreator() {
            public Message createMessage(Session session) throws JMSException {
                Message msg = session.createTextMessage(message);
                //TODO  应答
                return msg;
            }
        });
  }
}
消费端
1、applicationContext.xml
<?xml version="1.0" encoding="UTF-8"?>
<!-- 查找最新的schemaLocation 访问 http://www.springframework.org/schema/ -->
<beans xmlns="http://www.springframework.org/schema/beans"
       xmlns:context="http://www.springframework.org/schema/context"
       xmlns:xsi="http://www.w3.org/2001/XMLSchema-instance"
       xmlns:amq="http://activemq.apache.org/schema/core"
       xmlns:jms="http://www.springframework.org/schema/jms"
       xsi:schemaLocation="http://www.springframework.org/schema/beans
        http://www.springframework.org/schema/beans/spring-beans-4.0.xsd
        http://www.springframework.org/schema/context
        http://www.springframework.org/schema/context/spring-context-4.0.xsd
        http://www.springframework.org/schema/jms
        http://www.springframework.org/schema/jms/spring-jms-4.0.xsd
        http://activemq.apache.org/schema/core
        http://activemq.apache.org/schema/core/activemq-core-5.8.0.xsd">

     <!-- 配置扫描路径 -->
     <context:component-scan base-package="cn.enjoyedu">
         <context:exclude-filter type="annotation"
              expression="org.springframework.stereotype.Controller"/>
     </context:component-scan>

    <!-- ActiveMQ 连接工厂 -->
    <amq:connectionFactory id="amqConnectionFactory"
             brokerURL="tcp://127.0.0.1:61616" userName="" password="" />

    <!-- Spring Caching连接工厂 -->
    <!-- Spring用于管理真正的ConnectionFactory的ConnectionFactory -->
    <bean id="connectionFactory"
          class="org.springframework.jms.connection.CachingConnectionFactory">
        <property name="targetConnectionFactory" ref="amqConnectionFactory"></property>
        <property name="sessionCacheSize" value="100"></property>
    </bean>

    <!-- 消息消费者 start-->
    <!-- 定义Topic监听器 -->
    <jms:listener-container destination-type="topic" container-type="default"
                            connection-factory="connectionFactory" acknowledge="auto">
        <jms:listener destination="test.topic" ref="topicReceiver1"></jms:listener>
    </jms:listener-container>

    <!-- 定义Queue监听器 -->
    <jms:listener-container destination-type="queue" container-type="default"
                            connection-factory="connectionFactory" acknowledge="auto">
        <jms:listener destination="test.queue" ref="queueReceiver1"></jms:listener>
    </jms:listener-container>
    <!-- 消息消费者 end -->
</beans>
2、TopicReceiver1
package cn.enjoyedu.topic;

import org.springframework.stereotype.Component;

import javax.jms.JMSException;
import javax.jms.Message;
import javax.jms.MessageListener;
import javax.jms.TextMessage;

/**
 *类说明:
 */
@Component
public class TopicReceiver1 implements MessageListener {
    public void onMessage(Message message) {
        try {
            System.out.println(((TextMessage)message).getText());
        } catch (JMSException e) {
            e.printStackTrace();
        }
    }
}
3、QueueReceiver1
package cn.enjoyedu.queue;

import org.springframework.stereotype.Component;

import javax.jms.JMSException;
import javax.jms.Message;
import javax.jms.MessageListener;
import javax.jms.TextMessage;

/**
 *类说明:
 */
@Component
public class QueueReceiver1 implements MessageListener {

    public void onMessage(Message message) {
        try {
            String textMsg = ((TextMessage)message).getText();
            System.out.println("QueueReceiver1 accept msg : "+textMsg);
        } catch (JMSException e) {
            e.printStackTrace();
        }

    }
}
消息类型:
jmsTemplate.send(queueName, new MessageCreator() {
            public Message createMessage(Session session) throws JMSException {
                Message msg = session.createTextMessage(message);
                //TODO  应答
                return msg;
            }
        });

        //发送MapMessage
        jmsTemplate.send(queueName, new MessageCreator() {
            public Message createMessage(Session session) throws JMSException {
                MapMessage map = session.createMapMessage();
                map.setString("id", "10000");
                map.setString("name", "享学学员");
                return map;
            }
        });

        //发送ObjectMessage,被发送的实体类必须实现Serializable 接口
        jmsTemplate.send(queueName, new MessageCreator() {
            public Message createMessage(Session session) throws JMSException {
                User user = new User(10000,"享学学员");
                ObjectMessage objectMessage
                 = session.createObjectMessage(user);
                return objectMessage;
            }
        });

        //发送BytesMessage
        jmsTemplate.send(queueName, new MessageCreator() {
            public Message createMessage(Session session) throws JMSException {
                BytesMessage bytesMessage = session.createBytesMessage();
                bytesMessage.writeBytes("BytesMessage类型消息".getBytes());
                return bytesMessage;
            }
        });

        //发送StreamMessage
        jmsTemplate.send(queueName, new MessageCreator() {
            public Message createMessage(Session session) throws JMSException {
                StreamMessage streamMessage = session.createStreamMessage();
                streamMessage.writeString("享学学员");
                streamMessage.writeInt(10000);
                return streamMessage;
            }
        });
1、application.properties
spring.activemq.broker-url=tcp://localhost:61616
spring.activemq.user=admin
spring.activemq.password=admin
spring.activemq.pool.enabled=true
2、ActiveMqConfiguration
package cn.enjoyedu.config;

import org.apache.activemq.ActiveMQConnectionFactory;
import org.springframework.beans.factory.annotation.Value;
import org.springframework.context.annotation.Bean;
import org.springframework.context.annotation.Configuration;
import org.springframework.jms.annotation.EnableJms;
import org.springframework.jms.config.DefaultJmsListenerContainerFactory;
import org.springframework.jms.config.JmsListenerContainerFactory;

import javax.jms.ConnectionFactory;

/**
 * 类说明:
 */
@Configuration
@EnableJms
public class ActiveMqConfiguration {

    @Value("${spring.activemq.user}")
    private String usrName;

    @Value("${spring.activemq.password}")
    private String password;

    @Value("${spring.activemq.broker-url}")
    private String brokerUrl;

    @Bean
    public ConnectionFactory connectionFactory() {
        ActiveMQConnectionFactory connectionFactory = new ActiveMQConnectionFactory();
        connectionFactory.setBrokerURL(brokerUrl);
        connectionFactory.setUserName(usrName);
        connectionFactory.setPassword(password);
        return connectionFactory;
    }

    //topic模式需要注入这个bean
    @Bean("jmsTopicListenerContainerFactory")
    public JmsListenerContainerFactory jmsTopicListenerContainerFactory(ConnectionFactory connectionFactory) {
        DefaultJmsListenerContainerFactory factory = new DefaultJmsListenerContainerFactory();
        factory.setConnectionFactory(connectionFactory);
        factory.setPubSubDomain(true);
        return factory;
    }

}
3、queue模式下的消费者、生产者
package cn.enjoyedu.normal.queue;

import org.springframework.beans.factory.annotation.Autowired;
import org.springframework.jms.core.JmsMessagingTemplate;
import org.springframework.jms.core.JmsTemplate;
import org.springframework.jms.core.MessageCreator;
import org.springframework.stereotype.Service;

import javax.jms.*;

@Service
public class ProducerQueue {

    @Autowired
    private JmsMessagingTemplate jmsTemplate;
    @Autowired
    private JmsTemplate template;//可以做更细微的控制

    // 发送消息,destination是发送到的队列,message是待发送的消息
    public void sendMessage(Destination destination, final String message){
        jmsTemplate.convertAndSend(destination, message);
        template.send(destination, new MessageCreator() {
            @Override
            public Message createMessage(Session session)
                    throws JMSException {
                TextMessage msg = session.createTextMessage();
                msg.setText("othre information");
                return msg;
            }
        });
    }
}
package cn.enjoyedu.normal.queue;

import org.springframework.jms.annotation.JmsListener;
import org.springframework.stereotype.Component;

@Component
public class ConsumerAQueue {
    // 使用JmsListener配置消费者监听的队列,其中text是接收到的消息
    @JmsListener(destination = "springboot.queue")
    public void receiveQueue(String text){
        System.out.println(this.getClass().getName()+" receive msg:"+text);
    }
}
4、topic模式下的消费者、生产者
package cn.enjoyedu.normal.topic;

import org.springframework.beans.factory.annotation.Autowired;
import org.springframework.jms.core.JmsMessagingTemplate;
import org.springframework.stereotype.Service;

import javax.jms.Destination;

@Service
public class ProducerTopic {

    @Autowired
    private JmsMessagingTemplate jmsTemplate;

    // 发送消息,destination是发送到的队列,message是待发送的消息
    public void sendMessage(Destination destination, final String message){
        jmsTemplate.convertAndSend(destination, message);
    }
}
package cn.enjoyedu.normal.topic;

import org.springframework.jms.annotation.JmsListener;
import org.springframework.stereotype.Component;

@Component
public class ConsumerATopic {
    // 使用JmsListener配置消费者监听的队列,其中text是接收到的消息
    @JmsListener(destination = "springboot.topic",
            containerFactory = "jmsTopicListenerContainerFactory"
    )
    public void receiveTopic(String text) {
        System.out.println(this.getClass().getName()+" 收到的报文为:"+text);
    }
}
消息中间件(一)-----概述、JMS以及ActiveMQ简介
标签:turn sch spro value rac 中间件 简化 阻塞 bat
原文地址:https://www.cnblogs.com/alimayun/p/12734198.html