标签:exp daemon mes mamicode 进入容器 ip地址 现在 dex 参考
Docker入门之构建镜像、私有仓库registry、数据卷、端口映射
// 我是在opt下面创建的目录,进目录里在编写Dockerfile
mkdir apache
cd papche

// 注意:这里的文件名一定要是Dockerfile,不可以自定义
vim Dockerfile

//基于基础镜像
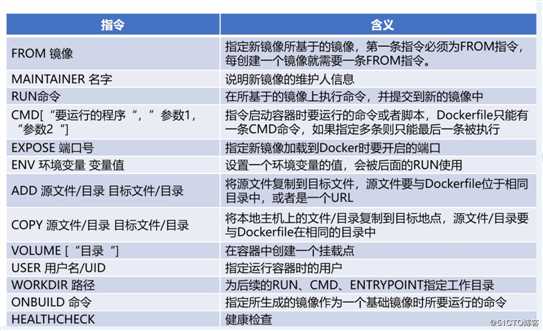
FROM centos:7
// 维护镜像的用户信息
MAINTAINER this is apache
// 镜像操作指令安装apache软件
RUN yum -y update
RUN yum -y install httpd
// 开启80端口
EXPOSE 80
// 复制网站首页文件
ADD index.html /var/www/html/index.html      // 稍后编写index.html文件放在同一目录下
// 将执行脚本复制到镜像中
ADD run.sh /run.sh      // 启动脚本放在同一目录下
RUN chmod 775 /run.sh
// 启动容器时执行脚本
CMD ["/run.sh"]vim run.sh #启动脚本
#!/bin/bash
rm -rf /run/httpd/* #清理httpd的缓存
exec /usr/sbin/apachectl -D FOREGROUND #启动apache进程echo "this is web" > index.html
docker build -t httpd:centos . (注意别忘了末尾一定要有 空格".")
? 格式:docker run -d --name 名字 -p 端口:源端口 仓库名称:[标签]
docker run -d --name wl -p 1216:80 httpd:centos 

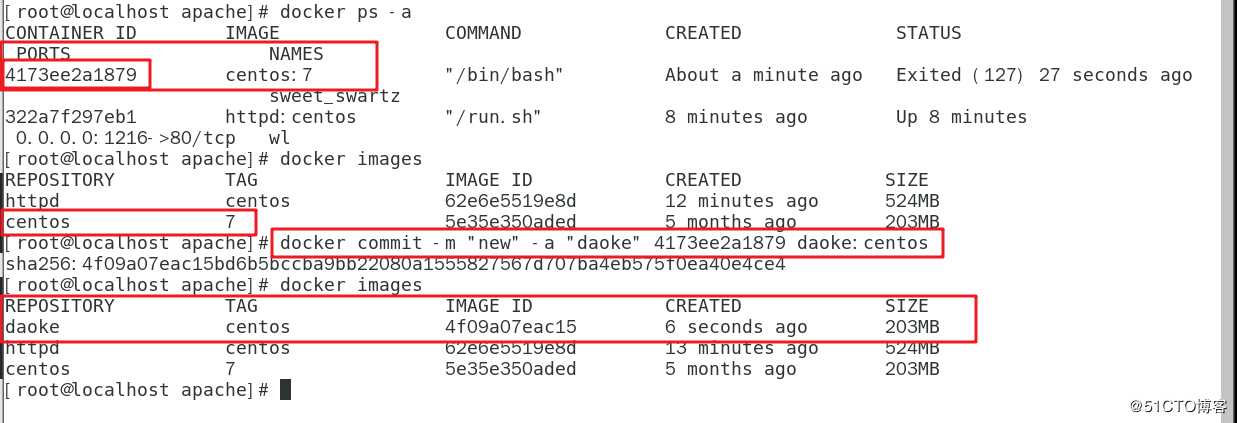
docker commit [选项] 容器ID/名称 仓库名称:[标签]
选项:  -m:说明信息
       -a:作者信息

//创建容器
docker run -it centos:7 /bin/bash

docker commit -m "new" -a "daoke" 容器ID daoke:centos
1、下载仓库镜像
docker pull registry

2、在客户终端中设置,指定私有仓库位置
vim /etc/docker/daemon.json
{
"insecure-registries": ["192.168.66.138:5000"],  #添加虚拟机的IP地址和端口
 . . .
}
systemctl restart docker

3、生成registry容器,开放5000端口
//宿主机的/data/registry自动创建挂载容器中的/tmp/registry
docker run -d -p 5000:5000 -v /data/registry:/tmp/registry registry
在这里-v 指定外部存储时会自动创建此目录。

#因为docker重启,容器关闭,需要重启
docker ps -a   #查看仓库ID号
docker start 仓库ID

4、镜像打标签docker tag 原镜像名 仓库IP:端口/镜像名
docker pull nginx

docker tag nginx:latest 192.168.66.138:5000/nginx  (必须修改)
格式:docker tag nginx:latest 私有仓库节点:端口/镜像名称

5、上传镜像
格式:docker push 仓库IP:端口/镜像名
docker push 192.168.66.138:5000/nginx

//获取私有仓库列表
[root@localhost ~]# curl -XGET http://192.168.66.138:5000/v2/_catalog
{"repositories":["nginx"]}      #显示上传成功

//删除原有的,测试私有仓库是否下载OK
docker pull 192.168.66.138:5000/nginx


# Docker 数据卷创建
docker pull centos
#宿主机目录/var/www 挂载容器中的/data1
格式:docker run -it --name 名字 -v 宿主机目录:容器内目录 仓库名称 /bin/bash
docker run -v /var/www:/data1 --name web2 -it centos /bin/bash

命令执行后自动进入容器里了
[root@202dd484fd62 /]# ls   #可以看见/data1目录
[root@202dd484fd62 /]# cd /data1
[root@202dd484fd62 data1]# touch test123

另开一个终端窗口查看是否有/var/www/test123文件。

1、现在容器里创建一个目录
docker run --name web3 -v /data1 -v /data2 -it centos /bin/bash

2、另开一个终端,新容器挂载数据卷容器web3
docker run -it --volumes-from web3 --name db1 centos /bin/bash

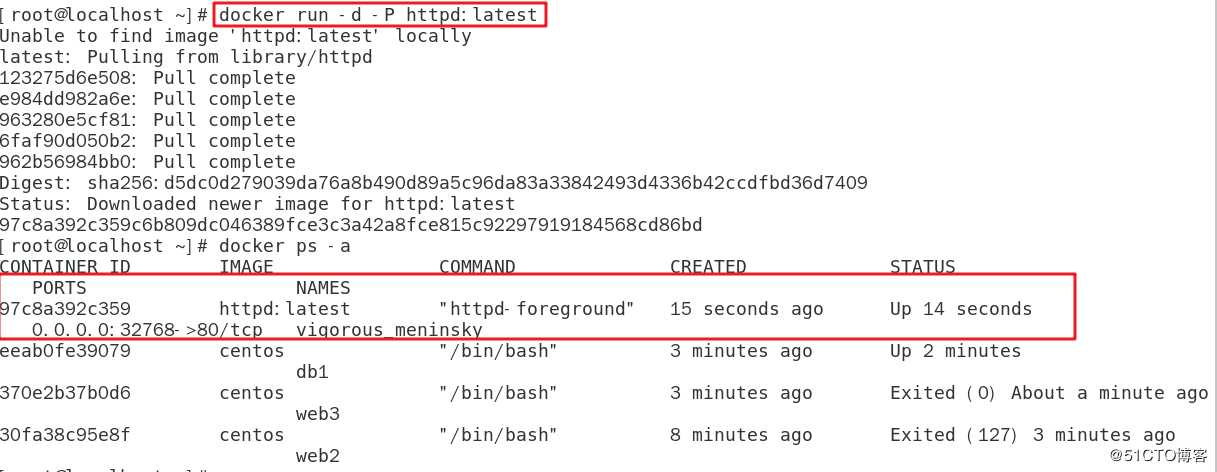
docker run -d -P httpd:latest
docker run -d -p 1234:80 httpd:latest 

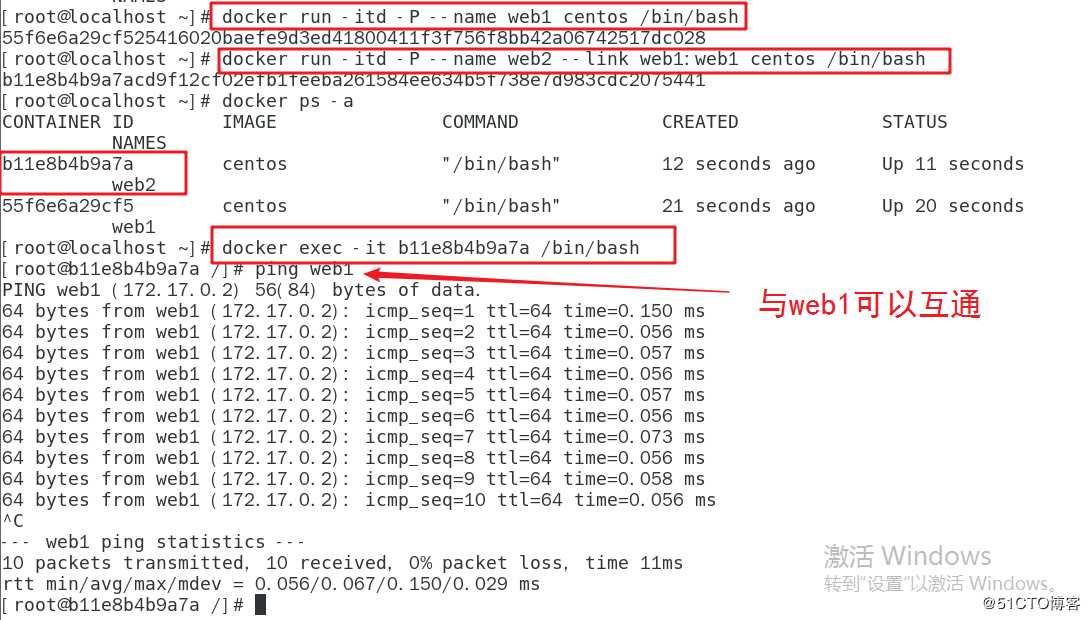
1、创建并运行容器取名web1,端口号自动映射
docker run -itd -P --name web1 centos /bin/bash

2、创建并运行容器取名web2,链接到web1和其通信
docker run -itd -P --name web2 --link web1:web1 centos /bin/bash

3、进入web2容器
docker exec -it ID号 /bin/bash
ping web1   #可以互相通信
Docker--构建镜像、私有仓库registry、数据卷、端口映射
标签:exp daemon mes mamicode 进入容器 ip地址 现在 dex 参考
原文地址:https://blog.51cto.com/14557584/2489539