标签:mss div private storage 总结 response callback tom compress
今天完成了Android端的okhttp部分,实现连接Servlet,下面做个总结。
昨天我说object转file存在问题,后来我仔细看了一下代码(之前都是照着博客写的,有些数据类型还不清楚),发现存入HashMap里的图片都是Bitmap数据类型,因此我更改了一下HashMap的结构:
private ArrayList<HashMap<String, Bitmap>> imageItem;
后面取值则变成了这样:
 1 for(HashMap<String,Bitmap>pic:imageItem){
 2                     Set<String> set=pic.keySet();
 3                     for(String key:set){
 4                         if(pic_i==0){
 5                             //跳过默认的+号图片
 6                             pic_i++;
 7                             continue;
 8                         }
 9                         //取出bitmap,转换成file,上传
10                         else if(pic_i==1){
11                             Bitmap fbm1 = pic.get(key);
12                             File dofile = doImage(fbm1);
13                             builder.addFormDataPart("image1",dofile.getName(),RequestBody.create(PNG,dofile));
14                             pic_i++;
15                         }
16                         else if(pic_i==2){
17                             Bitmap fbm2 = pic.get(key);
18                             File dofile = doImage(fbm2);
19                             builder.addFormDataPart("image2",dofile.getName(),RequestBody.create(PNG,dofile));
20                             pic_i++;
21                         }
22                         else if(pic_i==3){
23                             Bitmap fbm3 = pic.get(key);
24                             File dofile = doImage(fbm3);
25                             builder.addFormDataPart("image3",dofile.getName(),RequestBody.create(PNG,dofile));
26                             pic_i++;
27                         }
28                     }
29                 }
Bitmap转file使用单独的一个函数完成:
 1  //Bitmap转file
 2     public static File doImage(Bitmap fbitmap){
 3         ByteArrayOutputStream fbaos = new ByteArrayOutputStream();
 4         fbitmap.compress(Bitmap.CompressFormat.JPEG,100,fbaos);
 5         int options = 100;
 6         //判断是否大于20kb,是则继续压缩
 7         while(fbaos.toByteArray().length/1024>20){
 8             fbaos.reset();
 9             options-=10;
10             fbitmap.compress(Bitmap.CompressFormat.JPEG,options,fbaos);
11             long length = fbaos.toByteArray().length;
12         }
13         SimpleDateFormat format = new SimpleDateFormat("yyyyMMddHHmmss");
14         Date date = new Date(System.currentTimeMillis());
15         String filename = format.format(date);
16         File file = new File(Environment.getExternalStorageDirectory(),filename+".png");
17         //注意创建文件,否则会发生文件读取错误
18         if(!file.exists()){
19             try{
20                 file.createNewFile();
21             }catch (IOException e){
22                 e.printStackTrace();
23             }
24         }
25         try{
26             FileOutputStream fos = new FileOutputStream(file);
27             try{
28                 fos.write(fbaos.toByteArray());
29                 fos.flush();
30                 fos.close();
31             } catch (IOException e) {
32                 e.printStackTrace();
33             }
34         }catch (IOException e){
35             e.printStackTrace();
36         }
37         return file;
38     }
注意行18,一开始我是没有写这里的,但是在运行的时候报了java.io.FileNotFoundException错误,包括了未找到文件等等错误,首先是补上上面的file.createNewFile(),之后还要设置一下Android的读写权限,在AndroidManifest.xml文件中,与<application>同级的地方写入下面的代码:
1 <uses-permission android:name="android.permission.INTERNET"/>
2     <uses-permission android:name="android.permission.WRITE_EXTERNAL_STORAGE"/>
3     <uses-permission android:name="android.permission.READ_EXTERNAL_STORAGE"/>
以上是关于图片文件的设置。
接下来是okhttp的连接设置:
okhttp部分完整代码:
 1 //OKHttp
 2                 OkHttpClient client = new OkHttpClient();
 3                 MultipartBody.Builder builder = new MultipartBody.Builder();
 4                 builder.setType(MultipartBody.FORM);
 5                 builder.addFormDataPart("title",title_str);
 6                 builder.addFormDataPart("note",note_str);
 7                 builder.addFormDataPart("see",see_str);
 8
 9                 int pic_i=0;
10                 //本地Tomcat,注意不能写localhost,写本机的ip地址
11                 String URL="http://192.168.101.18:8080/CloudNote/CloudServlet";
12                 for(HashMap<String,Bitmap>pic:imageItem){
13                     Set<String> set=pic.keySet();
14                     for(String key:set){
15                         if(pic_i==0){
16                             //跳过默认的+号图片
17                             pic_i++;
18                             continue;
19                         }
20                         //取出bitmap,转换成file,上传
21                         else if(pic_i==1){
22                             Bitmap fbm1 = pic.get(key);
23                             File dofile = doImage(fbm1);
24                             builder.addFormDataPart("image1",dofile.getName(),RequestBody.create(PNG,dofile));
25                             pic_i++;
26                         }
27                         else if(pic_i==2){
28                             Bitmap fbm2 = pic.get(key);
29                             File dofile = doImage(fbm2);
30                             builder.addFormDataPart("image2",dofile.getName(),RequestBody.create(PNG,dofile));
31                             pic_i++;
32                         }
33                         else if(pic_i==3){
34                             Bitmap fbm3 = pic.get(key);
35                             File dofile = doImage(fbm3);
36                             builder.addFormDataPart("image3",dofile.getName(),RequestBody.create(PNG,dofile));
37                             pic_i++;
38                         }
39                     }
40                 }
41                 RequestBody requestBody = builder.build();
42                 Request.Builder RequestBuilder = new Request.Builder();
43                 RequestBuilder.url(URL);
44                 RequestBuilder.post(requestBody);
45                 final Request request=RequestBuilder.build();
46                 client.newCall(request).enqueue(new Callback() {
47                     @Override
48                     public void onFailure(@NotNull Call call, @NotNull IOException e) {
49                         Log.i("TRYxxx","连接失败");
50                         e.printStackTrace();
51                     }
52
53                     @Override
54                     public void onResponse(@NotNull Call call, @NotNull Response response) throws IOException {
55                         Log.i("TRYxxx","连接的消息"+response.message());
56                         if(response.isSuccessful()){
57                             Log.i("TRYxxx","连接成功获取的内容"+response.body().string());
58                             Log.i("TRYyyy",title_str);
59                             Log.i("TRYyyy",note_str);
60                             Log.i("TRYyyy",see_str);
61                         }
62                     }
63                 });
这里注意连接设置的地方是行11,我一开始是使用本地连接进行尝试,输入的是localhost:8080,但这么写是有问题的,需要把localhost改成本机的ip的地址才能连接。随后在AndroidManifest.xml文件中写入网络连接请求(上面发过一次了):
<uses-permission android:name="android.permission.INTERNET"/>
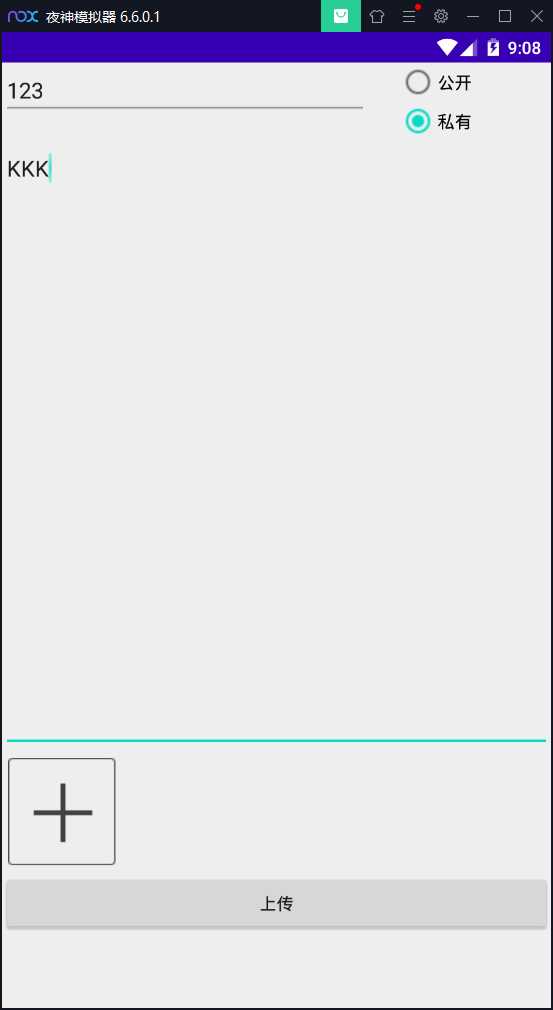
最后就是对界面的一些改动,Switch控件监听我没有使用明白,不能正确地赋值,因此我改用了RadioGroup,界面如下:

最后看看Log.i显示的效果:

后面不知道为何没有显示,但总体上是成功了。
出现问题:Servlet接收的参数为null。排查中。
标签:mss div private storage 总结 response callback tom compress
原文地址:https://www.cnblogs.com/20183711PYD/p/12770293.html