标签:demo int config imp get 注意 pip3 inpu 添加
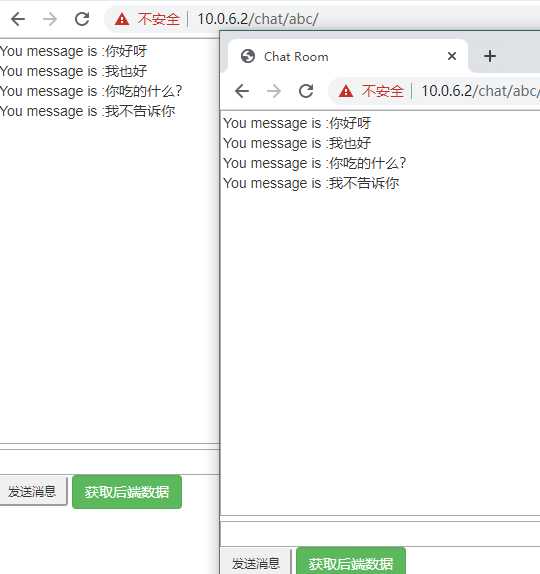
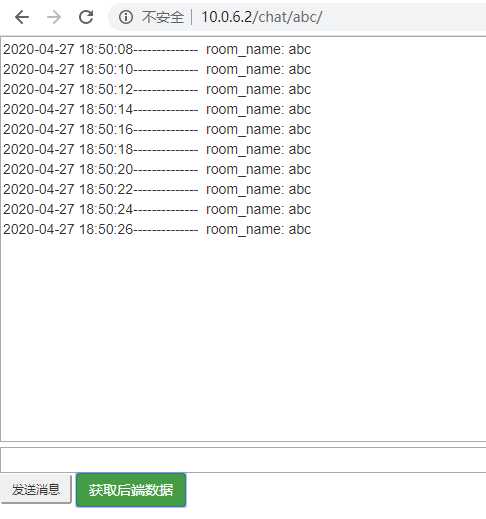
先来看一下最终的效果吧

开始聊天,输入消息并点击发送消息就可以开始聊天了

点击 “获取后端数据”开启实时推送

Channels是一个采用Django并将其功能扩展到HTTP以外的项目,以处理WebSocket,聊天协议,IoT协议等。它基于称为ASGI的Python规范构建。
它以Django的核心为基础,并在其下面分层了一个完全异步的层,以同步模式运行Django本身,但异步处理了连接和套接字,并提供了以两种方式编写的选择,从而实现了这一点。
详情请参考官方文档:https://channels.readthedocs.io/en/latest/introduction.html
ASGI 由 Django 团队提出,为了解决在一个网络框架里(如 Django)同时处理 HTTP、HTTP2、WebSocket 协议。为此,Django 团队开发了 Django Channels 插件,为 Django 带来了 ASGI 能力。
在 ASGI 中,将一个网络请求划分成三个处理层面,最前面的一层,interface server(协议处理服务器),负责对请求协议进行解析,并将不同的协议分发到不同的 Channel(频道);频道属于第二层,通常可以是一个队列系统。频道绑定了第三层的 Consumer(消费者)。
详情请参考官方文档: https://channels.readthedocs.io/en/latest/asgi.html
下边来说一下具体的实现步骤
转载请注明原文链接: https://www.cnblogs.com/Sunzz/p/12788608.html
pip3 install channels
pip3 install channels_redis
django-admin startproject mysite
python3 manage.py startapp chat
mysite/settings.py文件#注册应用 INSTALLED_APPS = [ .... ‘chat.apps.ChatConfig‘, "channels", ]
# 在文件尾部新增如下配置
#将ASGI_APPLICATION设置设置为指向该路由对象作为您的根应用程序: ASGI_APPLICATION = ‘mysite.routing.application‘ #配置Redis CHANNEL_LAYERS = { ‘default‘: { ‘BACKEND‘: ‘channels_redis.core.RedisChannelLayer‘, ‘CONFIG‘: { "hosts": [(‘10.0.6.29‘, 6379)], }, }, }
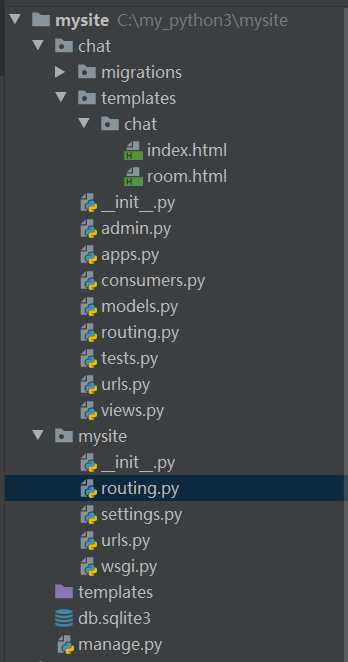
在chat目录中创建一个templates目录。在您刚刚创建的templates 目录中,创建另一个名为的目录 chat,并在其中创建一个名为的文件index.html以保存索引视图的模板
将以下代码放入chat/templates/chat/index.html
<!-- chat/templates/chat/index.html -->
<!DOCTYPE html>
<html>
<head>
    <meta charset="utf-8"/>
    <title>Chat Rooms</title>
</head>
<body>
    What chat room would you like to enter?<br>
    <input id="room-name-input" type="text" size="100"><br>
    <input id="room-name-submit" type="button" value="Enter">

    <script>
        document.querySelector(‘#room-name-input‘).focus();
        document.querySelector(‘#room-name-input‘).onkeyup = function(e) {
            if (e.keyCode === 13) {  // enter, return
                document.querySelector(‘#room-name-submit‘).click();
            }
        };

        document.querySelector(‘#room-name-submit‘).onclick = function(e) {
            var roomName = document.querySelector(‘#room-name-input‘).value;
            window.location.pathname = ‘/chat/‘ + roomName + ‘/‘;
        };
    </script>
</body>
</html>
chat/templates/chat/room.html
<!DOCTYPE html>
<html>
<head>
    <script src="https://cdn.bootcdn.net/ajax/libs/jquery/3.5.0/jquery.min.js" type="text/javascript"></script>
    <link rel="stylesheet" href="https://cdn.jsdelivr.net/npm/bootstrap@3.3.7/dist/css/bootstrap.min.css">
    <script src="https://cdn.jsdelivr.net/npm/bootstrap@3.3.7/dist/js/bootstrap.min.js"></script>
    <meta charset="utf-8"/>
    <title>Chat Room</title>
</head>
<body>
<textarea id="chat-log" cols="150" rows="30" class="text"></textarea><br>
<input id="chat-message-input" type="text" size="150"><br>
<input id="chat-message-submit" type="button" value="发送消息" class="input-sm">
<button id="get_data" class="btn btn-success">获取后端数据</button>
{{ room_name|json_script:"room-name" }}

<script>

    $("#get_data").click(function () {
        $.ajax({
            url: "{% url ‘push‘ %}",
            type: "GET",
            data: {
                "room": "{{ room_name }}",
                "csrfmiddlewaretoken": "{{ csrf_token }}"
            },
        })
    });

    const roomName = JSON.parse(document.getElementById(‘room-name‘).textContent);
    const chatSocket = new WebSocket(
        ‘ws://‘ + window.location.host
        + ‘/ws/chat/‘
        + roomName + ‘/‘
    );
    let chatSocketa = new WebSocket(
        "ws://" + window.location.host + "/ws/push/" + roomName
    );
    chatSocket.onmessage = function (e) {
        const data = JSON.parse(e.data);
        // data 为收到后端发来的数据
        //console.log(data);
        document.querySelector(‘#chat-log‘).value += (data.message + ‘\n‘);
    };
    chatSocketa.onmessage = function (e) {
        let data = JSON.parse(e.data);
        //let message = data["message"];
        document.querySelector("#chat-log").value += (data.message + "\n");
    };


    chatSocket.onclose = function (e) {
        console.error(‘Chat socket closed unexpectedly‘);
    };
    chatSocketa.onclose = function (e) {
        console.error("Chat socket closed unexpectedly");
    };
    document.querySelector(‘#chat-message-input‘).focus();
    document.querySelector(‘#chat-message-input‘).onkeyup = function (e) {
        if (e.keyCode === 13) {  // enter, return
            document.querySelector(‘#chat-message-submit‘).click();
        }
    };

    document.querySelector(‘#chat-message-submit‘).onclick = function (e) {
        const messageInputDom = document.querySelector(‘#chat-message-input‘);
        const message = messageInputDom.value;
        chatSocket.send(JSON.stringify({
            ‘message‘: message
        }));
        messageInputDom.value = ‘‘;
    };
</script>
</body>
</html>
将以下代码放入chat/views.py
# chat/views.py
from django.shortcuts import render
from django.http import JsonResponse
from channels.layers import get_channel_layer
from asgiref.sync import async_to_sync


def index(request):
    return render(request, "chat/index.html")


def room(request, room_name):
    return render(request, "chat/room.html", {"room_name": room_name})


def pushRedis(request):
    room = request.GET.get("room")
    print(room)

    def push(msg):
        channel_layer = get_channel_layer()
        async_to_sync(channel_layer.group_send)(
            room,
            {"type": "push.message", "message": msg, "room_name": room}
        )

    push("推送测试", )
    return JsonResponse({"1": 1})
在chat目录下创建一个名为的文件urls.py
# mysite/chat/urls.py
from django.urls import path
from . import views

urlpatterns = [
    path(‘‘, views.index, name=‘index‘),
   path(‘<str:room_name>/‘, views.room, name=‘room‘),
]
# mysite/urls.py

from django.contrib import admin
from django.urls import path, include
from chat.views import pushRedis

urlpatterns = [
    path(‘admin/‘, admin.site.urls),
    path("chat/", include("chat.urls")),
    path("push", pushRedis, name="push"),
]
文件chat/consumers.py
当Django接受HTTP请求时,它会查询根URLconf来查找视图函数,然后调用该视图函数来处理该请求。同样,当Channels接受WebSocket连接时,它会查询根路由配置以查找使用者,然后在使用者上调用各种功能来处理来自连接的事件。
import time
import json
from channels.generic.websocket import WebsocketConsumer, AsyncWebsocketConsumer
from asgiref.sync import async_to_sync
import redis

pool = redis.ConnectionPool(
    host="10.0.6.29",
    port=6379,
    max_connections=10,
    decode_response=True,
)
conn = redis.Redis(connection_pool=pool, decode_responses=True)


class ChatConsumer(AsyncWebsocketConsumer):
    async def connect(self, ):
        self.room_name = self.scope["url_route"]["kwargs"]["room_name"]
        self.room_group_name = "chat_%s" % self.room_name

        await self.channel_layer.group_add(
            self.room_group_name,
            self.channel_name,
        )
        await self.accept()

    async def disconnect(self, close_code):
        print("close_code: ", close_code)
        await self.channel_layer.group_discard(
            self.room_group_name,
            self.channel_name
        )

    async def receive(self, text_data=None, bytes_data=None):
        text_data_json = json.loads(text_data)
        message = text_data_json["message"]
        print("receive_message:", message)
        await self.channel_layer.group_send(
            self.room_group_name,
            {
                "type": "chat_message",
                "message": message
            }
        )

    async def chat_message(self, event):
        receive_message = event["message"]
        response_message = "You message is :" + receive_message
        await self.send(text_data=json.dumps({
            "message": response_message
        }))


class PushMessage(WebsocketConsumer):

    def connect(self):
        self.room_group_name = self.scope["url_route"]["kwargs"]["room_name"]
        async_to_sync(self.channel_layer.group_add)(
            self.room_group_name,
            self.channel_name
        )
        self.accept()

    def disconnect(self, code):
        async_to_sync(self.channel_layer.group_discard)(
            self.room_group_name,
            self.channel_name
        )

    def push_message(self, event):
        """
        主动推送
        :param event:
        :return:
        """
        print(event, type(event))
        while True:
            time.sleep(2)
            msg = time.strftime("%Y-%m-%d %H:%M:%S") + "---  room_name: %s" % event["room_name"]
            self.send(text_data=json.dumps(
                {"message": msg}
            ))
在chat目录下创建一个名为的文件routing.py
# mysite/chat/routing.py

from django.urls import re_path, path
from . import consumers

websocket_urlpatterns = [
    re_path(r"ws/chat/(?P<room_name>\w+)/$", consumers.ChatConsumer),
    path("ws/push/<room_name>", consumers.PushMessage),
]
与setting同级目录新建ws根路由文件 routing.py
from channels.routing import ProtocolTypeRouter, URLRouter
from channels.auth import AuthMiddlewareStack
import chat.routing

application = ProtocolTypeRouter({
    "websocket": AuthMiddlewareStack(
        URLRouter(
            chat.routing.websocket_urlpatterns
        )
    ),
})

python3 manage.py runserver 10.0.6.2:80
注意看,这和django是不一样的

还有另一种更稳健的启动方式
和setting同级新增文件 asgi.py
import os
import django
from channels.routing import get_default_application

os.environ.setdefault("DJANGO_SETTINGS_MODULE", "mysite.settings")
django.setup()
application = get_default_application()
启动方式为:
daphne -b 10.0.6.2 -p 80 mysite.asgi:application
daphne 在安装channel时已经自动安装好了

参考:
https://channels.readthedocs.io/en/latest/tutorial/index.html
https://blog.ernest.me/post/asgi-demonstration-realtime-blogging
标签:demo int config imp get 注意 pip3 inpu 添加
原文地址:https://www.cnblogs.com/Sunzz/p/12788608.html