标签:加密 iter png cmd windows10 地址 adp pre 模型
1、网络模型7层概述
2、网络编程三要素
3、TCP 和 UDP
4、UDP 编程
5、TCP 编程
6、使用 telnet 客户端发送数据
7、BIO 模型 循环读取客户端发送的数据
1、网络模型7层概述 <--返回目录
2、网络编程三要素 <--返回目录
A:IP地址
B:端口
C:协议
3、TCP 和 UDP <--返回目录
UDP
将数据源和目的封装成数据包中,不需要建立连接;
每个数据报的大小在限制在64k;
不需要建立连接,速度快
因无连接,是不可靠协议;
TCP
建立连接,形成传输数据的通道;
在连接中进行大数据量传输;
通过三次握手完成连接,是可靠协议;
必须建立连接,效率会稍低
4、UDP 编程 <--返回目录
package com.oy;

import java.net.DatagramPacket;
import java.net.DatagramSocket;
import java.net.InetAddress;

import org.junit.Test;

public class Demo1 {

    @Test
    public void server() throws Exception {
        // 1. 创建接收端Socket对象
        DatagramSocket ds = new DatagramSocket(10086);

        while (true) {

            // 2. 创建一个数据包(接收容器)
            byte[] bys = new byte[1024];
            DatagramPacket dp = new DatagramPacket(bys, bys.length);

            // 3. 调用Socket对象的接收方法接收数据
            ds.receive(dp); // 阻塞式

            // 3. 解析数据包,并显示在控制台
            InetAddress inetAddress = dp.getAddress();
            String ip = inetAddress.getHostAddress(); // 获取对方的ip

            byte[] bys2 = dp.getData(); // 获取数据缓冲区
            int len = dp.getLength(); // 获取数据的实际长度
            String s = new String(bys2, 0, len);

            System.out.println(ip + "传递的数据是:" + s);
        }

        // 4. 释放资源
        //ds.close();

    }

    @Test
    public void client() throws Exception {
        // 1. 创建发送端Socket对象
        DatagramSocket ds = new DatagramSocket();

        // 2. 创建数据,并把数据打包
        // DatagramPacket(byte[] buf, int length, InetAddress address, int port)
        byte[] bys = "Hello, UDP...".getBytes(); // 数据
        int length = bys.length; // 长度
        InetAddress address = InetAddress.getByName("192.168.181.1"); // IP地址对象
        int port = 10086; // 端口
        DatagramPacket dp = new DatagramPacket(bys, length, address, port);

        // 3. 调用Socket对象的发送方法发送数据包
        ds.send(dp);

        // 4. 释放资源
        ds.close();
    }
}
多线程实现聊天程序
public class ChatRoom {
    public static void main(String[] args) throws IOException {
        DatagramSocket dsSend = new DatagramSocket();
        DatagramSocket dsReceive = new DatagramSocket(12306);

        SendThread st = new SendThread(dsSend);
        ReceiveThread rt = new ReceiveThread(dsReceive);

        Thread t1 = new Thread(st);
        Thread t2 = new Thread(rt);

        t1.start();
        t2.start();
    }
}
public class ReceiveThread implements Runnable {
    private DatagramSocket ds;
    public ReceiveThread(DatagramSocket ds) {
        this.ds = ds;
    }

    @Override
    public void run() {
        try {
            while (true) {
                // 创建一个包裹
                byte[] bys = new byte[1024];
                DatagramPacket dp = new DatagramPacket(bys, bys.length);

                // 接收数据
                ds.receive(dp);

                // 解析数据
                String ip = dp.getAddress().getHostAddress();
                String s = new String(dp.getData(), 0, dp.getLength());
                System.out.println("from " + ip + " data is : " + s);
            }
        } catch (IOException e) {
            e.printStackTrace();
        }
    }
}
public class SendThread implements Runnable {
    private DatagramSocket ds;
    public SendThread(DatagramSocket ds) {
        this.ds = ds;
    }

    @Override
    public void run() {
        try {
            // 封装键盘录入数据
            BufferedReader br = new BufferedReader(new InputStreamReader(System.in));
            String line = null;
            while ((line = br.readLine()) != null) {
                if ("886".equals(line)) {
                    break;
                }

                // 创建数据并打包
                byte[] bys = line.getBytes();
                DatagramPacket dp = new DatagramPacket(bys, bys.length,
                        InetAddress.getByName("192.168.12.255"), 12306);

                // 发送数据
                ds.send(dp);
            }

            // 释放资源
            ds.close();
        } catch (IOException e) {
            e.printStackTrace();
        }
    }
}
5、TCP 编程 <--返回目录
package com.oy;

import java.io.InputStream;
import java.io.OutputStream;
import java.net.ServerSocket;
import java.net.Socket;

import org.junit.Test;

public class Demo2 {

    @Test
    public void server() throws Exception {
        // 创建接收端的Socket对象
        ServerSocket ss = new ServerSocket(8888);

        while (true) {
            // 监听客户端连接。返回一个对应的Socket对象
            Socket s = ss.accept(); // 侦听并接受到此套接字的连接。此方法在连接传入之前一直阻塞。

            // 获取输入流,读取数据显示在控制台
            InputStream is = s.getInputStream();

            byte[] bys = new byte[1024];
            int len = is.read(bys); // 阻塞式方法
            String str = new String(bys, 0, len);

            String ip = s.getInetAddress().getHostAddress();

            System.out.println("from " + ip + ", " + str);

            // 释放资源
            s.close();
            // ss.close(); //这个不应该关闭
        }
    }

    @Test
    public void client() throws Exception {
        // 创建发送端的Socket对象
        // Socket(InetAddress address, int port)
        // Socket(String host, int port)
        // Socket s = new Socket(InetAddress.getByName("192.168.181.1"), 8888);
        Socket s = new Socket("192.168.181.1", 8888);

        // 获取输出流,写数据
        OutputStream os = s.getOutputStream();
        os.write("Hello TCP...".getBytes());

        // 释放资源
        s.close();
    }
}
服务器给客户端一个反馈
@Test
public void server() throws Exception {
    // 创建接收端的Socket对象
    ServerSocket ss = new ServerSocket(8888);

    while (true) {
        // 监听客户端连接。返回一个对应的Socket对象
        Socket s = ss.accept(); // 侦听并接受到此套接字的连接。此方法在连接传入之前一直阻塞。

        // 获取输入流,读取数据显示在控制台
        InputStream is = s.getInputStream();

        byte[] bys = new byte[1024];
        int len = is.read(bys); // 阻塞式方法
        String str = new String(bys, 0, len);

        String ip = s.getInetAddress().getHostAddress();

        System.out.println("from " + ip + ", " + str);

        // 获取输出流
        OutputStream os = s.getOutputStream();
        os.write("server已经收到数据".getBytes());

        // 释放资源
        s.close();
        // ss.close(); //这个不应该关闭
    }
}

@Test
public void client() throws Exception {
    // 创建发送端的Socket对象
    Socket s = new Socket("192.168.181.1", 8888);

    // 获取输出流,写数据
    OutputStream os = s.getOutputStream();
    os.write("今天天气很好,适合睡觉".getBytes());

    // 获取输入流
    InputStream is = s.getInputStream();
    byte[] bys = new byte[1024];
    int len = is.read(bys);// 阻塞
    String client = new String(bys, 0, len);
    System.out.println("client收到server反馈: " + client);

    // 释放资源
    s.close();
}
TCP 实现文件上传
public class UploadServer {
    public static void main(String[] args) throws IOException {
        // 创建服务器端的Socket对象
        ServerSocket ss = new ServerSocket(10086);

        // 监听客户端连接
        Socket s = ss.accept();

        // 封装通道内的流
        BufferedReader br = new BufferedReader(new InputStreamReader(s.getInputStream()));
        // 封装文本文件
        BufferedWriter bw = new BufferedWriter(new FileWriter("d:/copy.txt"));

        String line = null;
        while ((line = br.readLine()) != null) {
            bw.write(line);
            bw.newLine();
            bw.flush();
        }

        bw.close();
        s.close();
    }
}
public class UploadClient {
    public static void main(String[] args) throws IOException {
        // 创建客户端Socket对象
        Socket s = new Socket("192.168.181.1", 10086);

        // 封装文本文件
        BufferedReader br = new BufferedReader(new FileReader("d:/a.txt"));
        // 封装通道内流
        BufferedWriter bw = new BufferedWriter(new OutputStreamWriter(s.getOutputStream()));

        String line = null;
        while ((line = br.readLine()) != null) {
            bw.write(line);
            bw.newLine();
            bw.flush();
        }

        // 释放资源
        br.close();
        s.close();
    }
}
6、使用 telnet 客户端发送数据 <--返回目录
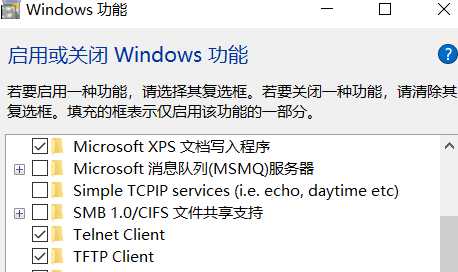
windows10 开启 telnet:
1) 控制面板\所有控制面板项\程序和功能
2) 启用或关闭 windows 功能

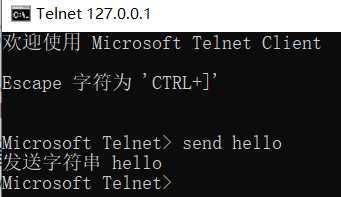
telnet 发送数据:
1) 打开 cmd, 执行 telnet 127.0.0.1 8888
2) ctrl + "]"
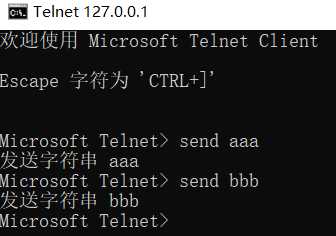
3) send 内容

7、BIO 模型 循环读取客户端发送的数据 <--返回目录
使用 BIO 模型编写一个服务器端,监听6666端口,当有客户端连接时,就启动一个线程与之通信;
要求使用线程池机制,可以连接多个客户端;
服务器可以接收客户端发送的数据(telnet 方式);
public class Demo3 {

    public static void main(String[] args) throws Exception {
        ExecutorService threadPool = Executors.newCachedThreadPool();

        ServerSocket serverSocket = new ServerSocket(6666);
        System.out.println("服务器启动了。。。");

        while (true) {
            final Socket socket = serverSocket.accept();
            System.out.println("连接到一个客户端");

            // 创建线程,与之通信
            threadPool.execute(new Runnable() {
                @Override
                public void run() {
                    handler(socket);
                }
            });

        }

    }

    /**
     * 与客户端通信
     */
    public static void handler(Socket socket) {
        try {
            // 获取输入流
            InputStream inputStream = socket.getInputStream();

            byte[] bytes = new byte[1024];
            // 循环读取客户端发送的数据
            while (true) {
                int read = inputStream.read(bytes);
                if (read != -1) {
                    System.out.println("from client: " + new String(bytes, 0, read));
                } else {
                    break;
                }
            }

        } catch (Exception e) {
            e.printStackTrace();
        } finally {
            System.out.println("关闭于 client 的连接");
            try {
                socket.close();
            } catch (Exception e) {
                e.printStackTrace();
            }
        }

    }
}
telnet 客户端连接并发送数据

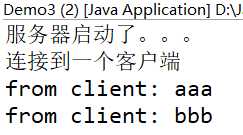
程序控制台打印:

---
标签:加密 iter png cmd windows10 地址 adp pre 模型
原文地址:https://www.cnblogs.com/xy-ouyang/p/12810694.html