标签:获取 刷新 第一个 mem lis chrome 网络 很多 完成后
goods: {
pop: page/list
new: page/list
sell: page/list
}
goods: {
pop: page1:/list[30]
new: page1/list[30]
sell: page1/list[30]
}
Better-Scroll在决定有多少区域可以滚动时, 是根据scrollerHeight属性决定
如何解决这个问题了?
如何将GoodsListItem.vue中的事件传入到Home.vue中
问题一: refresh找不到的问题
问题二: 对于refresh非常频繁的问题, 进行防抖操作
      debounce(func, delay) {
        let timer = null
        return function (...args) {
          if (timer) clearTimeout(timer)
          timer = setTimeout(() => {
            func.apply(this, args)
          }, delay)
        }
      },
【上拉加载更多数据,不是在这里上拉加载,而是在各个对应的组件中】
【步骤:1、父组件把pullUpLoad传进来; 2、pullingUp事件传给父组件(因为是在父组件中上拉加载);3、父组件中调用加载更多数据的方法;4、加载更多数据的方法中,调用finishPullUp。】
App.vue
<keep-alive exclude="Detail">
  <router-view/>
</keep-alive>
Home.vue
// activated:该钩子被 keep-alive 缓存的组件激活时调用。
activated() {
    // 进来时, 将位置设置为原来保存的位置saveY信息即可,最好回来时, 进行refresh
    this.$refs.scroll.scrollTo(0, this.saveY, 0);
    this.$refs.scroll.refresh();
},
// deactivated:该钩子被 keep-alive 缓存的组件停用时调用。
deactivated() {
    // 【离开时, 保存一个位置信息saveY.】
    this.saveY = this.$refs.scroll.getScrollY();
},
Scroll.vue
methods: {
    // 【获取纵向滚动的距离】
    getScrollY() {
        return this.scroll ? this.scroll.y : 0;
    }
}
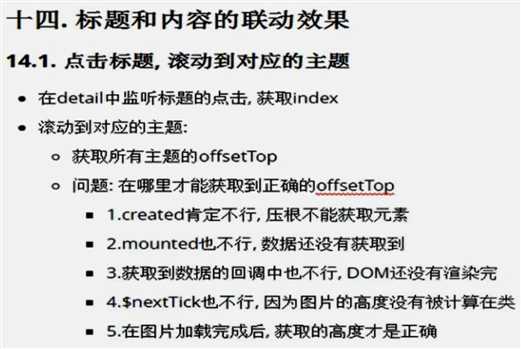
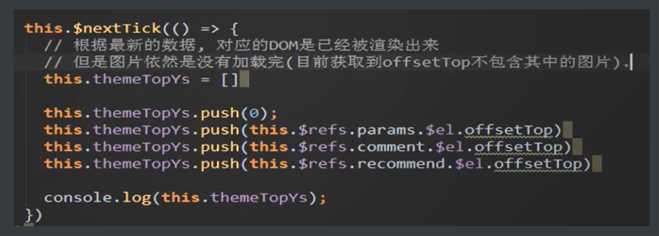
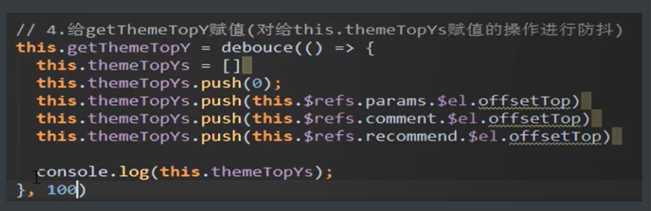
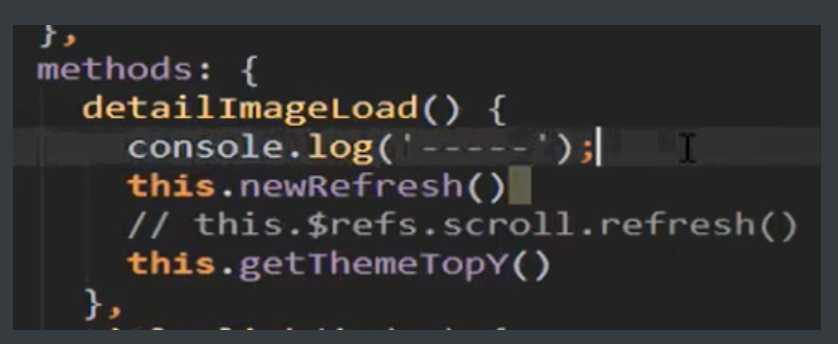
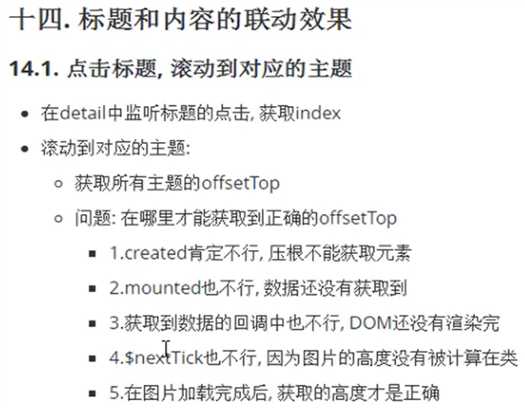
获取主题对应的offsetTop,要等图片加载完

这样写达不到防抖的效果,因为每次调用detailImageLoad,都会重新生成一个newRefresh,所以需要把newRefresh保存到data里。
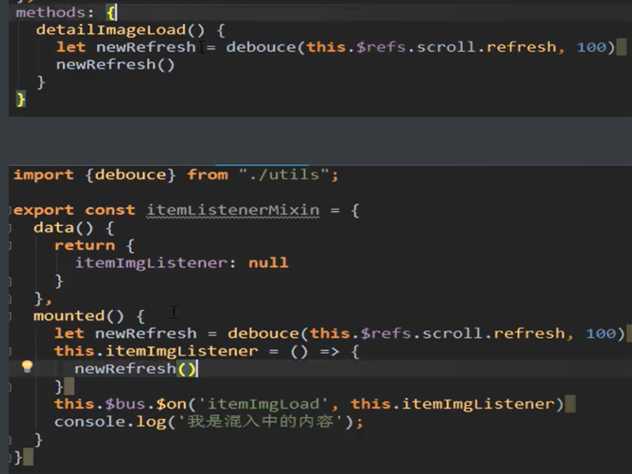
把newRefresh定义到data里,在mounted调用newRefresh(),就会只调用一次,因为这样newRefresh就不是局部变量。

等数据渲染完毕,不意味着能正确操作DOM属性
在created中定义方法
在图片加载完成的方法中调用
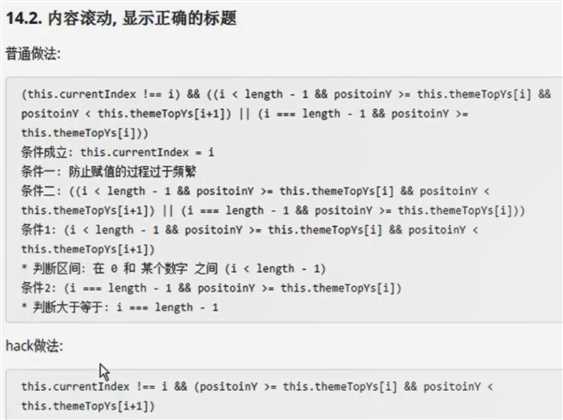
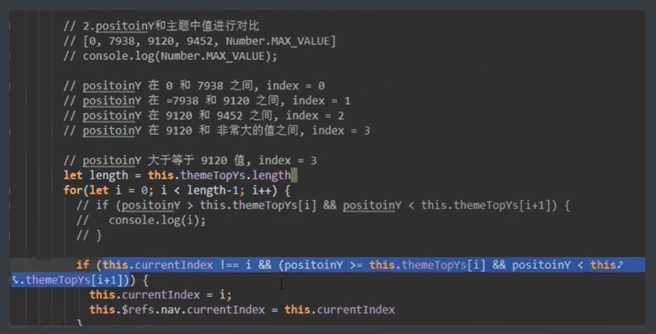
滚动位置,对应主题
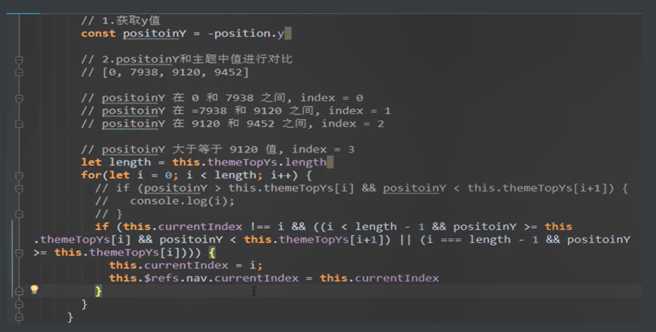
简化判断:添加最大值Number.MAX_VALUE
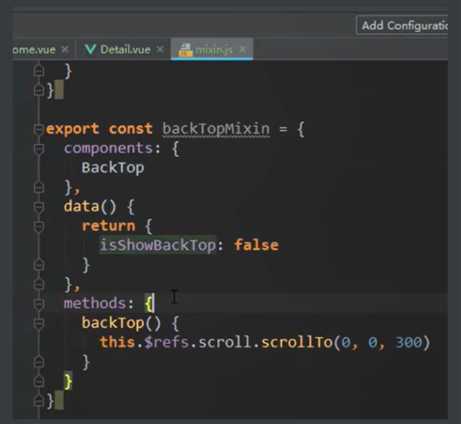
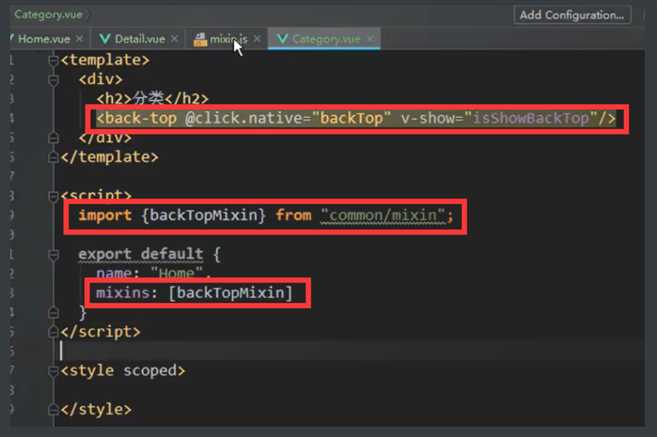
把多个组件共用的代码,抽取到mixins中,然后在组件中导入,并通过mixins注册
使用示例
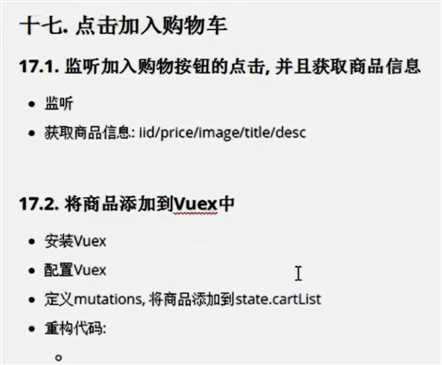
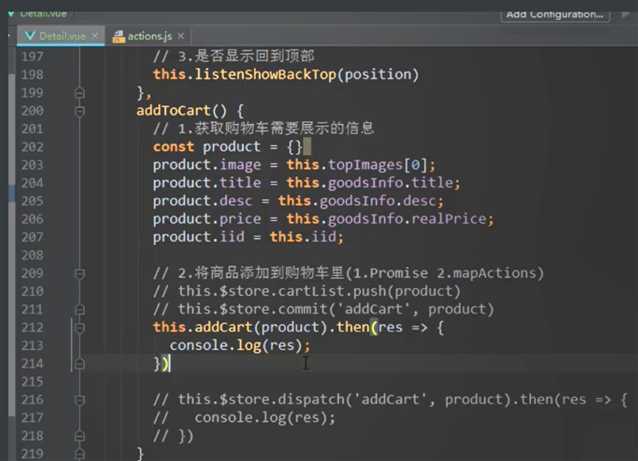
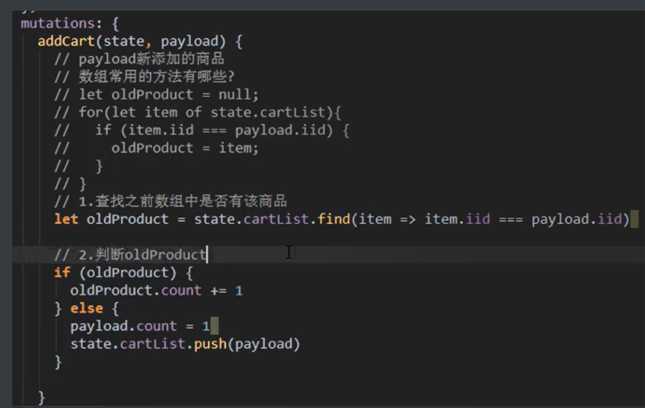
先判断cartList中,有没有iid商品,如果有,count++,如果没有,cartList添加该商品。
find() 方法返回数组中满足提供的测试函数的第一个元素的值。否则返回 undefined。
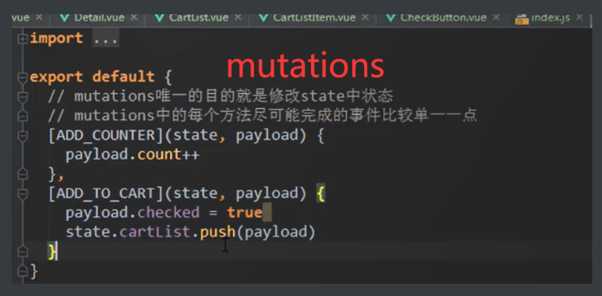
actions.js

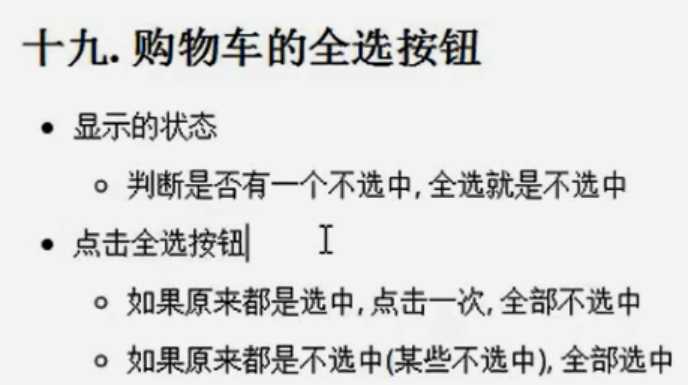
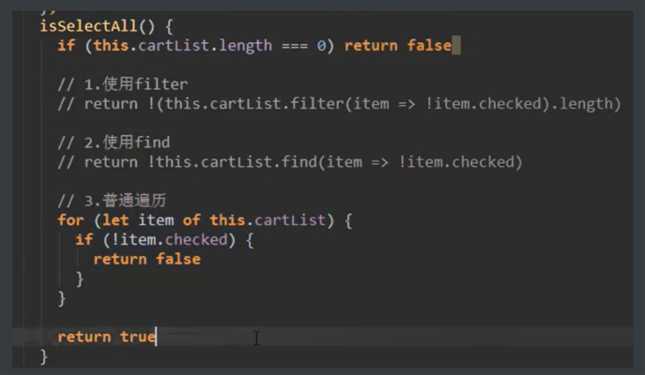
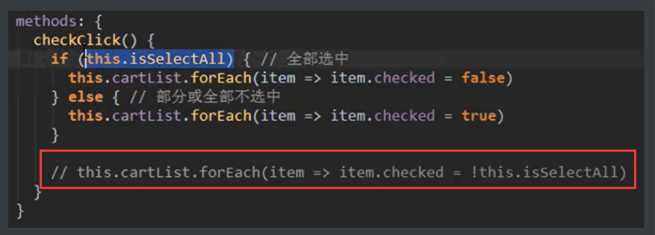
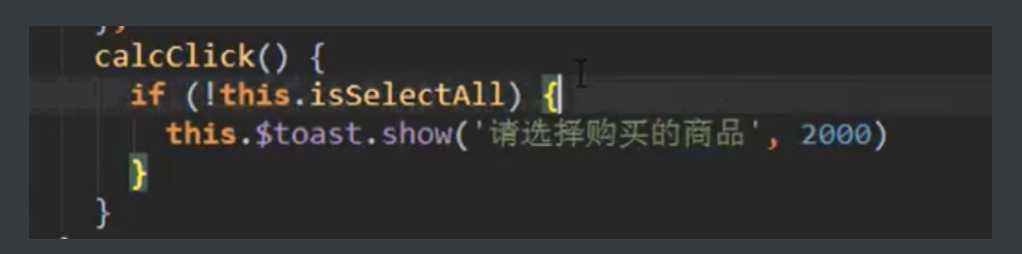
这里不能做简化,因为遍历过程中,item.checked会改变,item.checked一旦改变,就会改变isSelectedAll,导致两者的选中状态混乱。
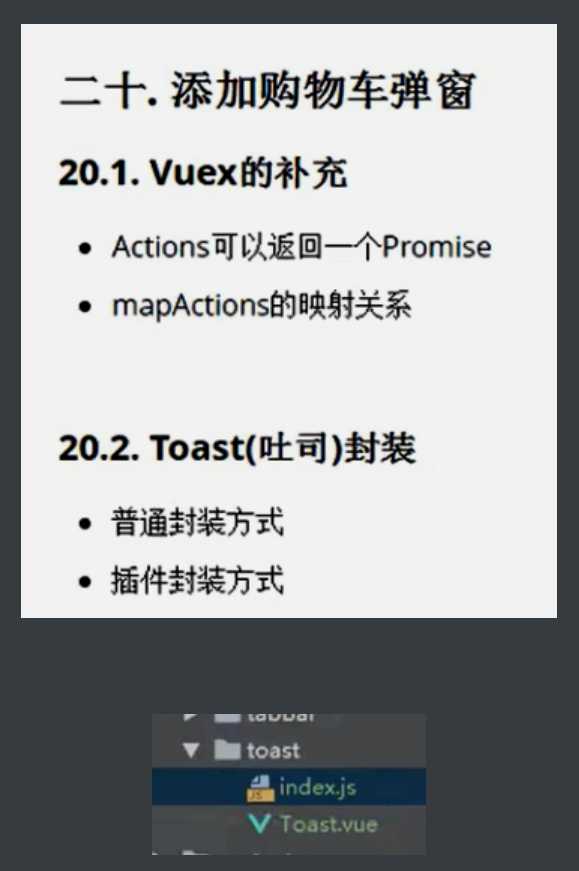
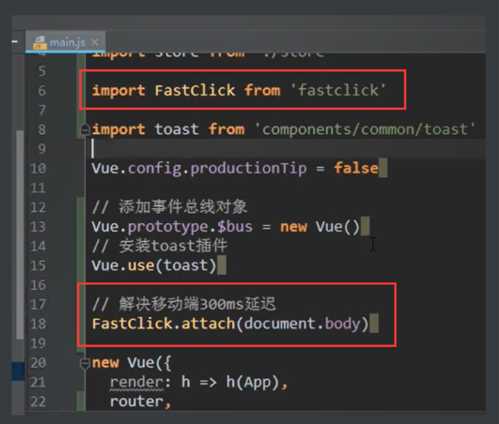
toast文件夹下的index.js
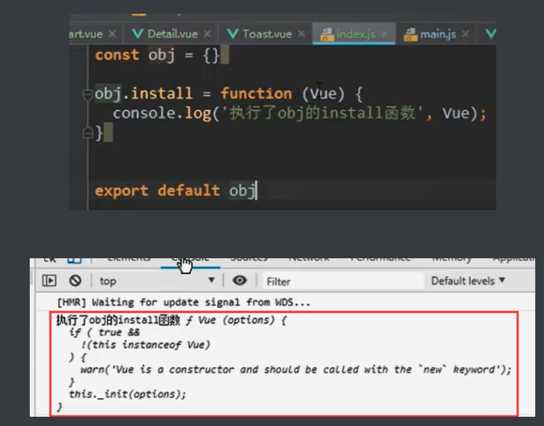
自动执行obj.install 方法,并自动传入Vue对象,所以不用在这个文件中引入Vue
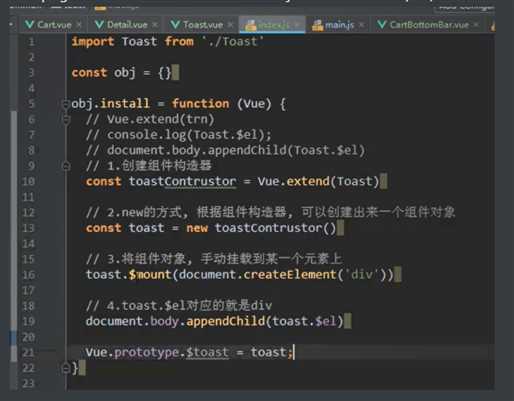
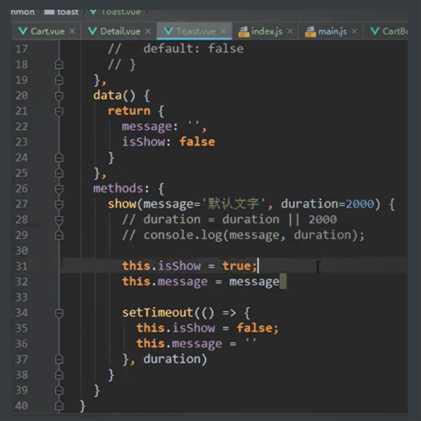
toast.vue
main.js
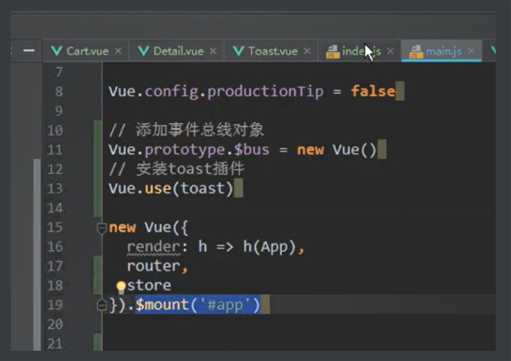
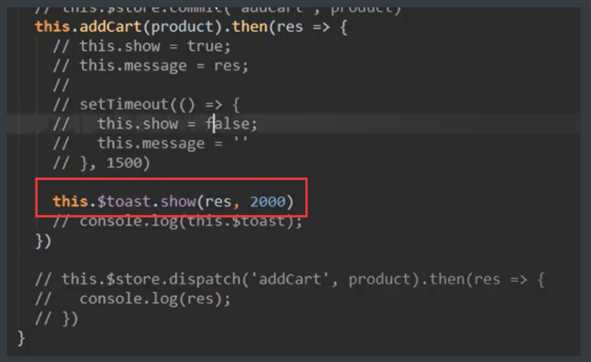
使用
/*! normalize.css v8.0.0 | MIT License | github.com/necolas/normalize.css */

/* Document
   ========================================================================== */

/**
 * 1. Correct the line height in all browsers.
 * 2. Prevent adjustments of font size after orientation changes in iOS.
 */

html {
  line-height: 1.15; /* 1 */
  -webkit-text-size-adjust: 100%; /* 2 */
}

/* Sections
   ========================================================================== */

/**
 * Remove the margin in all browsers.
 */

body {
  margin: 0;
}

/**
 * Correct the font size and margin on `h1` elements within `section` and
 * `article` contexts in Chrome, Firefox, and Safari.
 */

h1 {
  font-size: 2em;
  margin: 0.67em 0;
}

/* Grouping content
   ========================================================================== */

/**
 * 1. Add the correct box sizing in Firefox.
 * 2. Show the overflow in Edge and IE.
 */

hr {
  box-sizing: content-box; /* 1 */
  height: 0; /* 1 */
  overflow: visible; /* 2 */
}

/**
 * 1. Correct the inheritance and scaling of font size in all browsers.
 * 2. Correct the odd `em` font sizing in all browsers.
 */

pre {
  font-family: monospace, monospace; /* 1 */
  font-size: 1em; /* 2 */
}

/* Text-level semantics
   ========================================================================== */

/**
 * Remove the gray background on active links in IE 10.
 */

a {
  background-color: transparent;
}

/**
 * 1. Remove the bottom border in Chrome 57-
 * 2. Add the correct text decoration in Chrome, Edge, IE, Opera, and Safari.
 */

abbr[title] {
  border-bottom: none; /* 1 */
  text-decoration: underline; /* 2 */
  text-decoration: underline dotted; /* 2 */
}

/**
 * Add the correct font weight in Chrome, Edge, and Safari.
 */

b,
strong {
  font-weight: bolder;
}

/**
 * 1. Correct the inheritance and scaling of font size in all browsers.
 * 2. Correct the odd `em` font sizing in all browsers.
 */

code,
kbd,
samp {
  font-family: monospace, monospace; /* 1 */
  font-size: 1em; /* 2 */
}

/**
 * Add the correct font size in all browsers.
 */

small {
  font-size: 80%;
}

/**
 * Prevent `sub` and `sup` elements from affecting the line height in
 * all browsers.
 */

sub,
sup {
  font-size: 75%;
  line-height: 0;
  position: relative;
  vertical-align: baseline;
}

sub {
  bottom: -0.25em;
}

sup {
  top: -0.5em;
}

/* Embedded content
   ========================================================================== */

/**
 * Remove the border on images inside links in IE 10.
 */

img {
  border-style: none;
}

/* Forms
   ========================================================================== */

/**
 * 1. Change the font styles in all browsers.
 * 2. Remove the margin in Firefox and Safari.
 */

button,
input,
optgroup,
select,
textarea {
  font-family: inherit; /* 1 */
  font-size: 100%; /* 1 */
  line-height: 1.15; /* 1 */
  margin: 0; /* 2 */
}

/**
 * Show the overflow in IE.
 * 1. Show the overflow in Edge.
 */

button,
input { /* 1 */
  overflow: visible;
}

/**
 * Remove the inheritance of text transform in Edge, Firefox, and IE.
 * 1. Remove the inheritance of text transform in Firefox.
 */

button,
select { /* 1 */
  text-transform: none;
}

/**
 * Correct the inability to style clickable types in iOS and Safari.
 */

button,
[type="button"],
[type="reset"],
[type="submit"] {
  -webkit-appearance: button;
}

/**
 * Remove the inner border and padding in Firefox.
 */

button::-moz-focus-inner,
[type="button"]::-moz-focus-inner,
[type="reset"]::-moz-focus-inner,
[type="submit"]::-moz-focus-inner {
  border-style: none;
  padding: 0;
}

/**
 * Restore the focus styles unset by the previous rule.
 */

button:-moz-focusring,
[type="button"]:-moz-focusring,
[type="reset"]:-moz-focusring,
[type="submit"]:-moz-focusring {
  outline: 1px dotted ButtonText;
}

/**
 * Correct the padding in Firefox.
 */

fieldset {
  padding: 0.35em 0.75em 0.625em;
}

/**
 * 1. Correct the text wrapping in Edge and IE.
 * 2. Correct the color inheritance from `fieldset` elements in IE.
 * 3. Remove the padding so developers are not caught out when they zero out
 *    `fieldset` elements in all browsers.
 */

legend {
  box-sizing: border-box; /* 1 */
  color: inherit; /* 2 */
  display: table; /* 1 */
  max-width: 100%; /* 1 */
  padding: 0; /* 3 */
  white-space: normal; /* 1 */
}

/**
 * Add the correct vertical alignment in Chrome, Firefox, and Opera.
 */

progress {
  vertical-align: baseline;
}

/**
 * Remove the default vertical scrollbar in IE 10+.
 */

textarea {
  overflow: auto;
}

/**
 * 1. Add the correct box sizing in IE 10.
 * 2. Remove the padding in IE 10.
 */

[type="checkbox"],
[type="radio"] {
  box-sizing: border-box; /* 1 */
  padding: 0; /* 2 */
}

/**
 * Correct the cursor style of increment and decrement buttons in Chrome.
 */

[type="number"]::-webkit-inner-spin-button,
[type="number"]::-webkit-outer-spin-button {
  height: auto;
}

/**
 * 1. Correct the odd appearance in Chrome and Safari.
 * 2. Correct the outline style in Safari.
 */

[type="search"] {
  -webkit-appearance: textfield; /* 1 */
  outline-offset: -2px; /* 2 */
}

/**
 * Remove the inner padding in Chrome and Safari on macOS.
 */

[type="search"]::-webkit-search-decoration {
  -webkit-appearance: none;
}

/**
 * 1. Correct the inability to style clickable types in iOS and Safari.
 * 2. Change font properties to `inherit` in Safari.
 */

::-webkit-file-upload-button {
  -webkit-appearance: button; /* 1 */
  font: inherit; /* 2 */
}

/* Interactive
   ========================================================================== */

/*
 * Add the correct display in Edge, IE 10+, and Firefox.
 */

details {
  display: block;
}

/*
 * Add the correct display in all browsers.
 */

summary {
  display: list-item;
}

/* Misc
   ========================================================================== */

/**
 * Add the correct display in IE 10+.
 */

template {
  display: none;
}

/**
 * Add the correct display in IE 10.
 */

[hidden] {
  display: none;
}
@import "./normalize.css";

/*:root -> 获取根元素html*/
/* --font-size: 14px; 是css中定义变量,使用:font-size: var(--font-size) */
:root {
  --color-text: #666;
  --color-high-text: #ff5777;
  /* tint:设置整体相关的样式 */
  --color-tint: #ff8198;
  --color-background: #fff;
  --font-size: 14px;
  --line-height: 1.5;
}

*,
*::before,
*::after {
  margin: 0;
  padding: 0;
  box-sizing: border-box;
}

body {
  font-family: "Helvetica Neue",Helvetica,"PingFang SC","Hiragino Sans GB","Microsoft YaHei","微软雅黑",Arial,sans-serif;
  user-select: none; /* 禁止用户鼠标在页面上选中文字/图片等 */
  -webkit-tap-highlight-color: transparent; /* webkit是苹果浏览器引擎,tap点击,highlight背景高亮,color颜色,颜色用数值调节 */
  background: var(--color-background);
  color: var(--color-text);
  /* rem vw/vh */
  width: 100vw;
}

a {
  color: var(--color-text);
  text-decoration: none;
}


.clear-fix::after {
  clear: both;
  content: ‘‘;
  display: block;
  width: 0;
  height: 0;
  visibility: hidden;
}

.clear-fix {
  zoom: 1;
}

.left {
  float: left;
}

.right {
  float: right;
}
module.exports = {
  configureWebpack: {
    resolve: {
      alias: {
        ‘assets‘: ‘@/assets‘,
        ‘common‘: ‘@/common‘,
        ‘components‘: ‘@/components‘,
        ‘network‘: ‘@/network‘,
        ‘views‘: ‘@/views‘,
      }
    }
  }
}
<!-- DOM里要使用别名路径,前面要加~ -->
<img slot="item-icon" src="~assets/img/tabbar/home.svg" alt />
public文件夹下的index.html
<!-- <%= BASE_URL %> :表示当前文件的所在的目录,然后拼接上当前目录的favicon.ico,后端jsp会识别 -->
<link rel="icon" href="<%= BASE_URL %>favicon.ico">
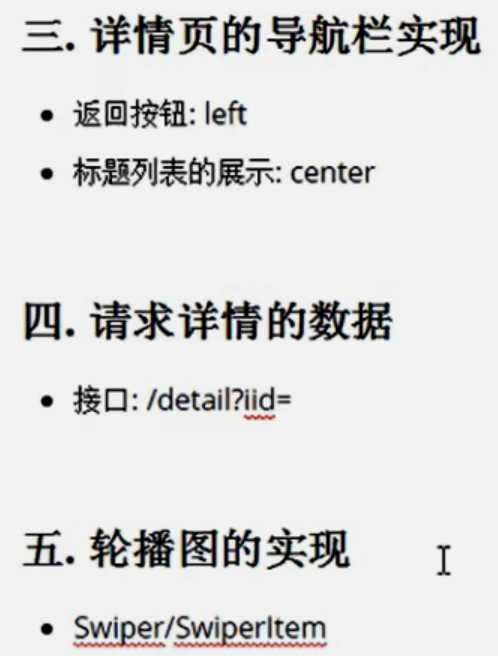
NavBar.vue
<template>
	<div class="nav-bar">
        <!-- 不能直接给<slot></slot>设置样式,而要包裹一层标签 -->
		<div class="left">
			<slot name="left"></slot>
		</div>
		<div class="center">
			<slot name="center"></slot>
		</div>
		<div class="right">
			<slot name="right"></slot>
		</div>
	</div>
</template>
Home.vue
<nav-bar class="home-nav">
    <div slot="center">购物街</div>
</nav-bar>
import axios from ‘axios‘

export function request(config) {
    // 1.创建axios的实例
    const instance = axios.create({
        // baseURL: ‘http://123.207.32.32:8000‘, http://123.207.32.32:8000/api/h8
        baseURL: ‘http://152.136.185.210:8000/api/n3‘,
        timeout: 5000
    })

    // 2.axios的拦截器
    // 2.1.请求拦截的作用
    instance.interceptors.request.use(config => {
        return config
    }, err => {
        // console.log(err);
    })

    // 2.2.响应拦截
    instance.interceptors.response.use(res => {
        return res.data
    }, err => {
        console.log(err);
    })

    // 3.发送真正的网络请求
    return instance(config)
}
使用
import { request } from "./request";

export function getHomeMultidata() {
    return request({
        url: ‘/home/multidata‘
    })
}
<template>
<div class="tab-control">
    <div v-for="(item, index) in titles" class="tab-control-item" :class="{active: index === currentIndex}" @click="itemClick(index)" :key="index">
        <span>{{item}}</span>
    </div>
</div>
</template>

<script>
export default {
    name: "TabControl",
    props: {
        titles: {
            type: Array,
            default () {
                return []
            }
        }
    },
    data() {
        return {
            currentIndex: 0
        }
    },
    methods: {
        itemClick(index) {
            this.currentIndex = index;
            this.$emit(‘tabClick‘, index)
        }
    }
}
</script>
使用
<tab-control class="tab-control" :titles="[‘流行‘, ‘新款‘, ‘精选‘]" @tabClick="tabClick" />
computed: {
    showGoods() {
        return this.goods[this.currentType].list;
    }
},
tabClick(index) {
    switch (index) {
        case 0:
            this.currentType = "pop";
            break;
        case 1:
            this.currentType = "new";
            break;
        case 2:
            this.currentType = "sell";
            break;
    }
},
home.js
export function getHomeGoods(type, page) {
    return request({
        url: ‘/home/data‘,
        params: {
            type,
            page
        }
    })
}
home.vue
data() {
    return {
        goods: {
            pop: { page: 0, list: [] },
            new: { page: 0, list: [] },
            sell: { page: 0, list: [] }
        }
},
created() {
    // 1.请求多个数据
    this.getHomeMultidata();
    // 2.请求商品数据
    this.getHomeGoods("pop");
    this.getHomeGoods("new");
    this.getHomeGoods("sell");
},
getHomeGoods(type) {
    const page = this.goods[type].page + 1;
    // 这个getHomeGoods是导入的,也就是在这里调用getHomeGoods,并传入2个参数type、page
    getHomeGoods(type, page).then(res => {
        this.goods[type].list.push(...res.data.list);
        this.goods[type].page += 1; // 修改this.goods[type].page
        this.$refs.scroll.finishPullUp();
    });
    }
<!DOCTYPE html>
<html lang="en">

<head>
    <meta charset="UTF-8">
    <title>Title</title>
    <style>
        .content {
            height: 200px;
            background-color: red;
            overflow: hidden;
        }
    </style>
</head>

<body>

    <div>
        <div class="content">
            <ul>
                <button class="btn">按钮</button>
                <li>列表数据1</li>
                <li>列表数据2</li>
                <li>列表数据3</li>
                <li>列表数据4</li>
                <li>列表数据5</li>
                <li>列表数据6</li>
                <li>列表数据7</li>
                <li>列表数据8</li>
                <li>列表数据9</li>
                <li>列表数据10</li>
                <li>列表数据11</li>
                <li>列表数据12</li>
                <li>列表数据13</li>
                <li>列表数据14</li>
                <li>列表数据15</li>
                <li>列表数据16</li>
                <li>列表数据17</li>
                <li>列表数据18</li>
                <li>列表数据19</li>
                <li>列表数据20</li>
                <li>列表数据21</li>
                <li>列表数据22</li>
                <li>列表数据23</li>
                <li>列表数据24</li>
                <li>列表数据25</li>
                <li>列表数据26</li>
                <li>列表数据27</li>
                <li>列表数据28</li>
                <li>列表数据29</li>
                <li>列表数据30</li>
                <li>列表数据31</li>
                <li>列表数据32</li>
                <li>列表数据33</li>
                <li>列表数据34</li>
                <li>列表数据35</li>
                <li>列表数据36</li>
                <li>列表数据37</li>
                <li>列表数据38</li>
                <li>列表数据39</li>
                <li>列表数据40</li>
                <li>列表数据41</li>
                <li>列表数据42</li>
                <li>列表数据43</li>
                <li>列表数据44</li>
                <li>列表数据45</li>
                <li>列表数据46</li>
                <li>列表数据47</li>
                <li>列表数据48</li>
                <li>列表数据49</li>
                <li>列表数据50</li>
                <li>列表数据51</li>
                <li>列表数据52</li>
                <li>列表数据53</li>
                <li>列表数据54</li>
                <li>列表数据55</li>
                <li>列表数据56</li>
                <li>列表数据57</li>
                <li>列表数据58</li>
                <li>列表数据59</li>
                <li>列表数据60</li>
                <li>列表数据61</li>
                <li>列表数据62</li>
                <li>列表数据63</li>
                <li>列表数据64</li>
                <li>列表数据65</li>
                <li>列表数据66</li>
            </ul>
        </div>
    </div>

    <script src="./bscroll.js"></script>
    <script>
        // 默认情况下BScroll是不可以实时的监听滚动位置
        // probe 侦测
        // 0,1都是不侦测实时的位置
        // 2: 在手指滚动的过程中侦测, 手指离开后的惯性滚动过程中不侦测.
        // 3: 只要是滚动, 都侦测.
        const bscroll = new BScroll(document.querySelector(‘.content‘), {
            probeType: 3,
            click: true,
            pullUpLoad: true
        })

        bscroll.on(‘scroll‘, (position) => {
            // console.log(position);
        })

        bscroll.on(‘pullingUp‘, () => {
            console.log(‘上拉加载更多‘);
            // 发送网络请求, 请求更多页的数据

            // 等数据请求完成, 并且将新的数据展示出来后
            setTimeout(() => {
                bscroll.finishPullUp()
            }, 2000)
        })

        document.querySelector(‘.btn‘).addEventListener(‘click‘, function () {
            console.log(‘------‘);
        })
    </script>
</body>

</html>
<template>
  <div class="wrapper" ref="aaaa">
    <div>
      <!--1.无论是否设置click:false, button都可以点击-->
      <button @click="btnClick">按钮</button>

      <!--2.必须设置click:true, 那么div才能监听点击-->
      <div @click="divClick">呵呵呵呵</div>

      <ul class="content">
        <li>分类列表1</li>
        <li>分类列表2</li>
        <li>分类列表3</li>
        <li>分类列表4</li>
        <li>分类列表5</li>
        <li>分类列表6</li>
        <li>分类列表7</li>
        <li>分类列表8</li>
        <li>分类列表9</li>
        <li>分类列表10</li>
        <li>分类列表11</li>
        <li>分类列表12</li>
        <li>分类列表13</li>
        <li>分类列表14</li>
        <li>分类列表15</li>
        <li>分类列表16</li>
        <li>分类列表17</li>
        <li>分类列表18</li>
        <li>分类列表19</li>
        <li>分类列表20</li>
        <li>分类列表21</li>
        <li>分类列表22</li>
        <li>分类列表23</li>
        <li>分类列表24</li>
        <li>分类列表25</li>
        <li>分类列表26</li>
        <li>分类列表27</li>
        <li>分类列表28</li>
        <li>分类列表29</li>
        <li>分类列表30</li>
        <li>分类列表31</li>
        <li>分类列表32</li>
        <li>分类列表33</li>
        <li>分类列表34</li>
        <li>分类列表35</li>
        <li>分类列表36</li>
        <li>分类列表37</li>
        <li>分类列表38</li>
        <li>分类列表39</li>
        <li>分类列表40</li>
        <li>分类列表41</li>
        <li>分类列表42</li>
        <li>分类列表43</li>
        <li>分类列表44</li>
        <li>分类列表45</li>
        <li>分类列表46</li>
        <li>分类列表47</li>
        <li>分类列表48</li>
        <li>分类列表49</li>
        <li>分类列表50</li>
        <li>分类列表51</li>
        <li>分类列表52</li>
        <li>分类列表53</li>
        <li>分类列表54</li>
        <li>分类列表55</li>
        <li>分类列表56</li>
        <li>分类列表57</li>
        <li>分类列表58</li>
        <li>分类列表59</li>
        <li>分类列表60</li>
        <li>分类列表61</li>
        <li>分类列表62</li>
        <li>分类列表63</li>
        <li>分类列表64</li>
        <li>分类列表65</li>
        <li>分类列表66</li>
      </ul>
    </div>
  </div>
</template>

<script>
  import BScroll from ‘better-scroll‘

  export default {
    name: "Category",
    data() {
      return {
        scroll: null
      }
    },
    // 组件创建完后调用
    mounted() {
      this.scroll = new BScroll(this.$refs.aaaa, {
        // probeType: 3,
        // pullUpLoad: true
      })

      this.scroll.on(‘scroll‘, (position) => {
        console.log(position);
      })

      this.scroll.on(‘pullingUp‘, () => {
        console.log(‘上啦加载更多‘);
      })
    },
    methods: {
      btnClick() {
        console.log(‘btnClick‘);
      },
      divClick() {
        console.log(‘divClick‘);
      }
    }
  }
</script>

<style scoped>
  .wrapper {
    height: 150px;
    background-color: red;

    overflow: hidden;
    /*overflow-y: scroll;*/
  }
</style>
BackTop.vue
<template>
  <div class="back-top">
    <img src="~assets/img/common/top.png" alt="">
  </div>
</template>

<script>
  export default {
    name: "BackTop"
  }
</script>
Scroll.vue
mounted() {
    // 2.监听滚动的位置 【根据位置,控制返回顶部按钮显示与隐藏】
    this.scroll.on(‘scroll‘, (position) => {
        // console.log(position);
        this.$emit(‘scroll‘, position)
    })
},
methods: {
    scrollTo(x, y, time = 300) {
        this.scroll.scrollTo(x, y, time)
    }
}
Home.vue
<scroll class="content" ref="scroll" :probe-type="3" @scroll="contentScroll" :pull-up-load="true" @pullingUp="loadMore">
<!-- 父子组件通信 -->
<home-swiper :banners="banners" />
<recommend-view :recommends="recommends" />
<feature-view />
<tab-control class="tab-control" :titles="[‘流行‘, ‘新款‘, ‘精选‘]" @tabClick="tabClick" />
<good-list :goods="showGoods" />
</scroll>
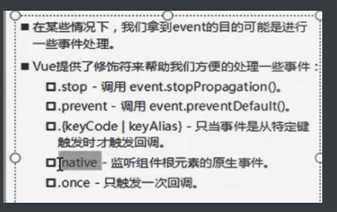
<!-- (1)这里直接监听点击组件更好,在backTop组件里监听反而麻烦;(2)组件不能直接监听点击,要加修饰符native,监听组件根元素的原生事件;(3)修饰.native修饰什么时候使用:在我们需要监听一个组件的原生事件时, 必须给对应的事件加上.native修饰符, 才能进行监听 -->
<back-top @click.native="backClick" v-show="isShowBackTop" />
<script>
methods: {
backClick() {
// 调用scroll组件的scroll的scrollTo()
this.$refs.scroll.scrollTo(0, 0);
},
// 【根据位置,控制返回顶部按钮显示与隐藏】
contentScroll(position) {
this.isShowBackTop = -position.y > 1000;
},
}
</script>
Scroll.vue
mounted() {
    // 3.监听上拉事件 【上拉加载更多数据】
    this.scroll.on(‘pullingUp‘, () => {
        this.$emit(‘pullingUp‘)
    })
},
Home.vue
<!-- 【一个组件/标签可以绑定多个事件】 -->
<scroll class="content" ref="scroll" :probe-type="3" @scroll="contentScroll" :pull-up-load="true" @pullingUp="loadMore">
    <!-- 父子组件通信 -->
    <home-swiper :banners="banners" />
    <recommend-view :recommends="recommends" />
    <feature-view />
    <tab-control class="tab-control" :titles="[‘流行‘, ‘新款‘, ‘精选‘]" @tabClick="tabClick" />
    <good-list :goods="showGoods" />
</scroll>

<script>
methods: {
    loadMore() {
        this.getHomeGoods(this.currentType);
    },
}
</script>
// 函数防抖
export function debounce(func, delay) {
    let timer = null
    return function (...args) {
        if (timer) clearTimeout(timer)
        timer = setTimeout(() => {
            func.apply(this, args)
            // console.log(‘debounce的this---‘, this)
        }, delay)
    }
}
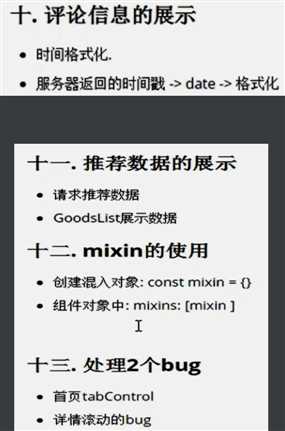
GoodsListItem.vue
methods: {
    imageLoad() {
        this.$bus.$emit("itemImageLoad");
    }
}
Home.vue
mounted() {
    // 1.图片加载完成的事件监听
    const refresh = debounce(this.$refs.scroll.refresh, 50);
    this.$bus.$on("itemImageLoad", () => {
        refresh();
    });
}
Home.vue
<template>
<div id="home" class="wrapper">
    <!-- 复制一份tab-control组件 -->
    <tab-control :titles="[‘流行‘, ‘新款‘, ‘精选‘]" @tabClick="tabClick" ref="tabControl1" class="tab-control" v-show="isTabFixed" />
    <!-- 【一个组件/标签可以绑定多个事件】 -->
    <scroll class="content" ref="scroll" :probe-type="3" @scroll="contentScroll" :pull-up-load="true" @pullingUp="loadMore">
        <!-- 父子组件通信 -->
        <home-swiper :banners="banners" @swiperImageLoad="swiperImageLoad" />
        <tab-control :titles="[‘流行‘, ‘新款‘, ‘精选‘]" @tabClick="tabClick" ref="tabControl2" />
    </scroll>
</div>
</template>

<script>
    data() {
        isTabFixed: false,
    },
    methods: {
        // 【根据位置,控制返回顶部按钮显示与隐藏】
        contentScroll(position) {
            // 2.决定tabControl是否吸顶(position: fixed)
            this.isTabFixed = -position.y > this.tabOffsetTop;
        },
    }
</script>
App.vue
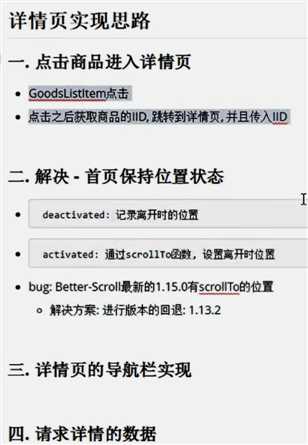
<keep-alive exclude="Detail">
  <router-view/>
</keep-alive>
Home.vue
// activated:该钩子被 keep-alive 缓存的组件激活时调用。
activated() {
    // 进来时, 将位置设置为原来保存的位置saveY信息即可,最好回来时, 进行refresh
    this.$refs.scroll.scrollTo(0, this.saveY, 0);
    this.$refs.scroll.refresh();
},
// deactivated:该钩子被 keep-alive 缓存的组件停用时调用。
deactivated() {
    // 【离开时, 保存一个位置信息saveY.】
    this.saveY = this.$refs.scroll.getScrollY();
},
Scroll.vue
methods: {
    // 【获取纵向滚动的距离】
    getScrollY() {
        return this.scroll ? this.scroll.y : 0;
    }
}
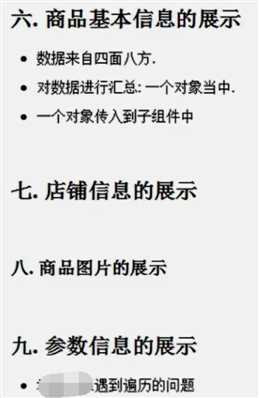
GoodsList.vue
<template>
	<div class="goods">
		<goods-list-item v-for="(item, index) in goods" :goods-item="item" :key="index" />
	</div>
</template>

<script>
	import GoodsListItem from "./GoodsListItem";

	export default {
		name: "GoodsList",
		components: {
			GoodsListItem
		},
		props: {
			goods: {
				type: Array,
				default() {
					return [];
				}
			}
		}
	};
</script>
GoodsListItem.vue
<template>
	<div class="goods-item" @click="itemClick">
		<img :src="goodsItem.show.img" alt @load="imageLoad" />
		<div class="goods-info">
			<p>{{goodsItem.title}}</p>
			<span class="price">{{goodsItem.price}}</span>
			<span class="collect">{{goodsItem.cfav}}</span>
		</div>
	</div>
</template>

<script>
	export default {
		name: "GoodsListItem",
		props: {
			goodsItem: {
				type: Object,
				default() {
					return {};
				}
			}
		},
		methods: {
			imageLoad() {
				this.$bus.$emit("itemImageLoad");
			},
			itemClick() {
				this.$router.push("/detail/" + this.goodsItem.iid);
			}
		}
	};
</script>
标签:获取 刷新 第一个 mem lis chrome 网络 很多 完成后
原文地址:https://www.cnblogs.com/jianjie/p/12994977.html