标签:df -h PFS yum lan params 移动 挂载 sign lb01
| 角色 | 外网IP(NAT) | 内网IP(LAN) | 主机名 |
|---|---|---|---|
| lb01 | eth0:10.0.0.5 | eth1:172.16.1.5 | lb01 |
| web01 | eth0:10.0.0.7 | eth1:172.16.1.7 | web01 |
| web02 | eth0:10.0.0.8 | eth1:172.16.1.8 | web02 |
| nfs | eth0:10.0.0.31 | eth1:172.16.1.31 | nfs |
| db01 | eth0:10.0.0.51 | eth1:172.16.1.51 | db01 |
#### 1.安装nginx.php (之前下载的rpm已经打包,上传上来解压就行)
[root@web01 ~]# rz
[root@web01 ~]# tar xf nginx_php.tgz
[root@web01 ~]# cd nginx_php/
[root@web01 ~/nginx_php]# rpm -ivh *

#### 2.统一用户
[root@web01 ~]# groupadd www -g 666
[root@web01 ~]# useradd www -u 666 -g 666 -s /sbin/nologin -M

# 2.1修改nginx的用户
[root@web01 ~]# vim /etc/nginx/nginx.conf
...
user www;
...
# 2.2修改php的用户
[root@web01 ~]# vim /etc/php-fpm.d/www.conf
...
user = www
group = www
....

# 3.启动php并加入开机自启
[root@web01 ~]# systemctl start nginx php-fpm
[root@web01 ~]# systemctl enable nginx php-fp

#### 4.修改配置文件
# 4.1 wordpress的配置文件
[root@web01 ~]# vim /etc/nginx/conf.d/wp.conf
server {
        listen 80;
        server_name www.wp.com;
        root /code/wordpress;
        index index.php index.html;

        location ~\.php$ {
        root /code/wordpress;
        fastcgi_pass   127.0.0.1:9000;
        fastcgi_index  index.php;
        fastcgi_param  SCRIPT_FILENAME  $document_root$fastcgi_script_name;
        include        fastcgi_params;

        }

}


# 4.2知乎的配置文件(Wecenter)
[root@web01 ~]# vim /etc/nginx/conf.d/zh.conf
server {
        listen 80;
        server_name www.zh.com;
        root /code/zh;
        index index.php index.html;

        location ~\.php$ {
        root /code/zh;
        fastcgi_pass   127.0.0.1:9000;
        fastcgi_index  index.php;
        fastcgi_param  SCRIPT_FILENAME  $document_root$fastcgi_script_name;
        include        fastcgi_params;

        }

}


# 5.创建站点目录
[root@web01 ~]# mkdir /code/{wordpress,zh} -p

# 6.检查语法
[root@web01 ~]# nginx -t

# 7.重新加载配置文件
[root@web01 ~]# nginx -s reload

# 8.配置域名解析


##### 9.上传wordpress和Wecenter(或者去网站下载)
[root@web01 ~]# rz

# 9.1解压
[root@web01 ~]# tar xf wordpress-5.0.3-zh_CN.tar.gz
[root@web01 ~]# unzip WeCenter_3-2-1.zip

# 10.把所有文件移动到站点目录下
[root@web01 ~]# mv wordpress/* /code/wordpress/
[root@web01 ~]# mv WeCenter_3-2-1/* /code/zh/

# 11.授权目录
[root@web01 ~]# chown www.www -R /code/

# 12.上传解压主题
[root@web01 ~]# cd /code/wordpress/wp-content/themes
[root@web02 /code/wordpress/wp-content/themes]# rz
[root@web02 /code/wordpress/wp-content/themes]# unzip QQ.zip

# 13.打包/code
[root@web01 ~]# tar zcf code.tgz /code/

# 14.发送/code给web02
[root@web01 ~]# scp code.tgz root@172.16.1.8:/root/

# 15.发送配置文件
[root@web01 ~]# scp /etc/nginx/conf.d/{wp,zh}.conf root@172.16.1.8:/etc/nginx/conf.d/
# 1.下载mariadb
[root@db01 ~]# yum install -y mariadb-server.x86_64
# 2.启动数据库并开机自启
[root@db01 ~]# systemctl start mariadb.service
[root@db01 ~]# systemctl enable mariadb.service
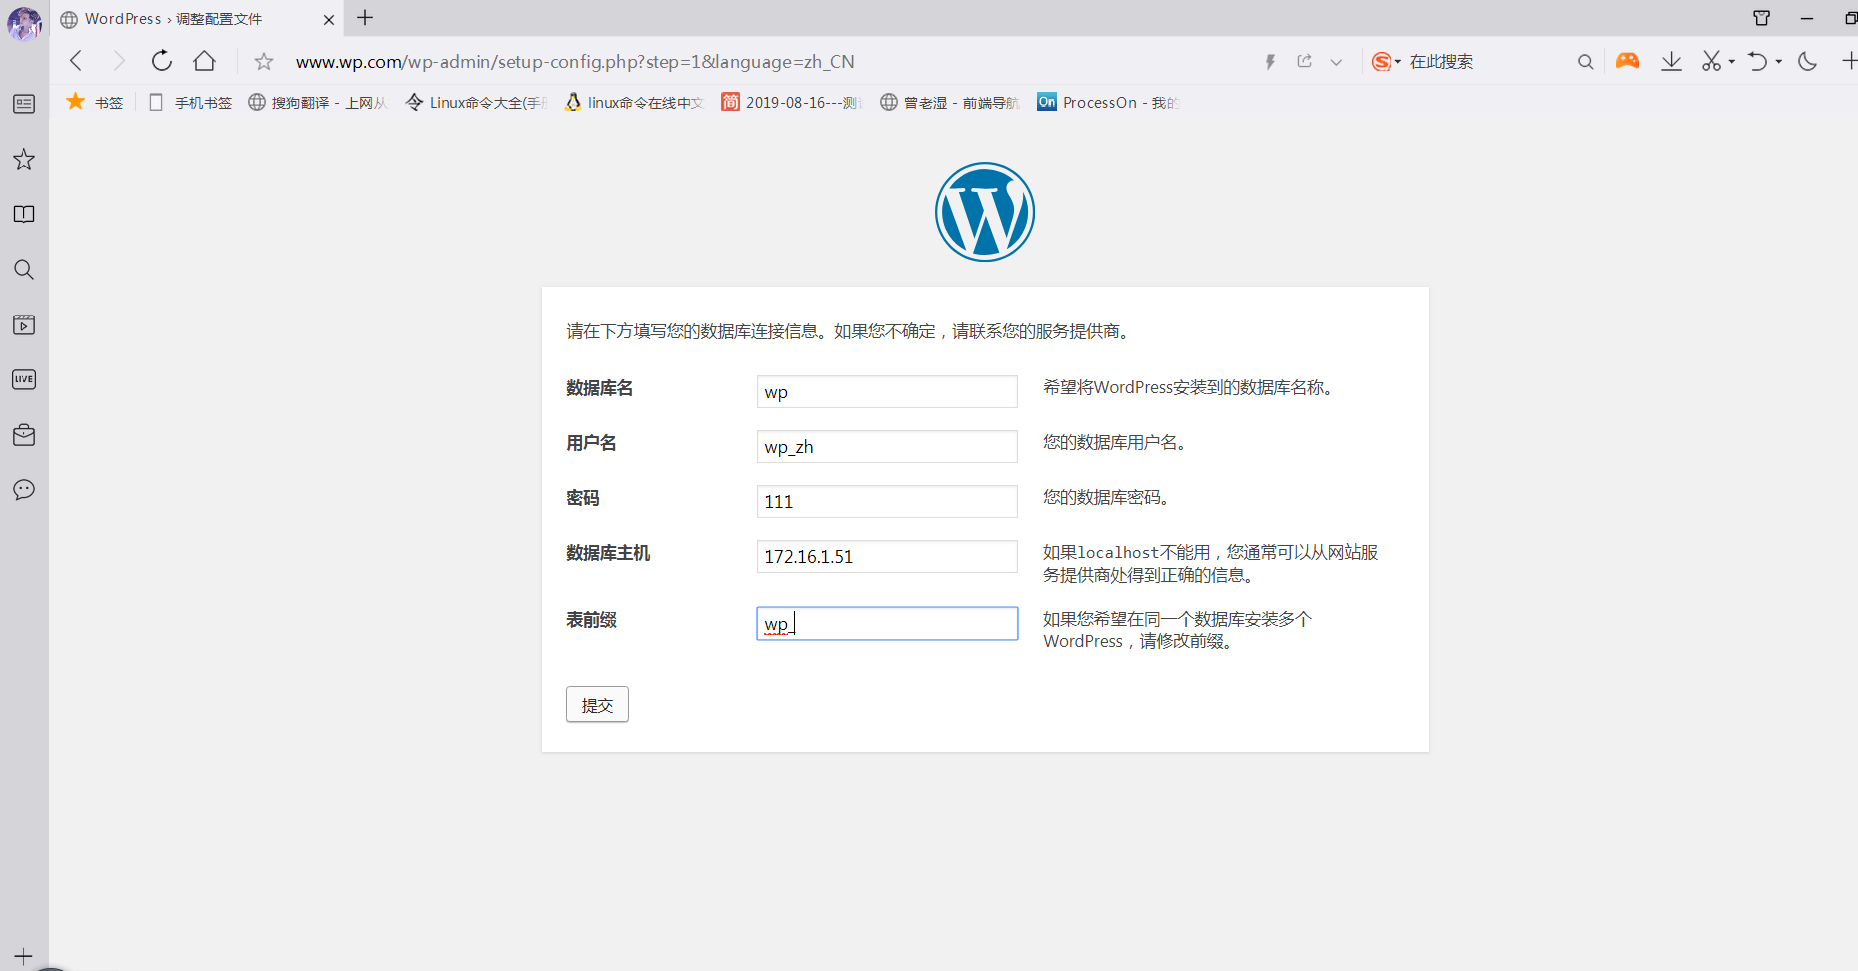
# 3.给数据库一个登入密码
[root@db01 ~]# mysqladmin -uroot password ‘123‘
# 4.登入数据库
[root@db01 ~]# mysql -uroot -p123
# 5.创建wordpress和Wecenter数据库
MariaDB [(none)]> create database wp;
MariaDB [(none)]> create database zh;
# 6.查看是否创建成功
MariaDB [(none)]> show databases;
+--------------------+
| Database |
+--------------------+
| information_schema |
| mysql |
| performance_schema |
| test |
| wp |
| zh |
+--------------------+
6 rows in set (0.00 sec)
# 7.创建用户 (所有数据库的登入用户)
MariaDB [(none)]> grant all on *.* to wp_zh@‘%‘ identified by ‘111‘;
这里是web01的域名
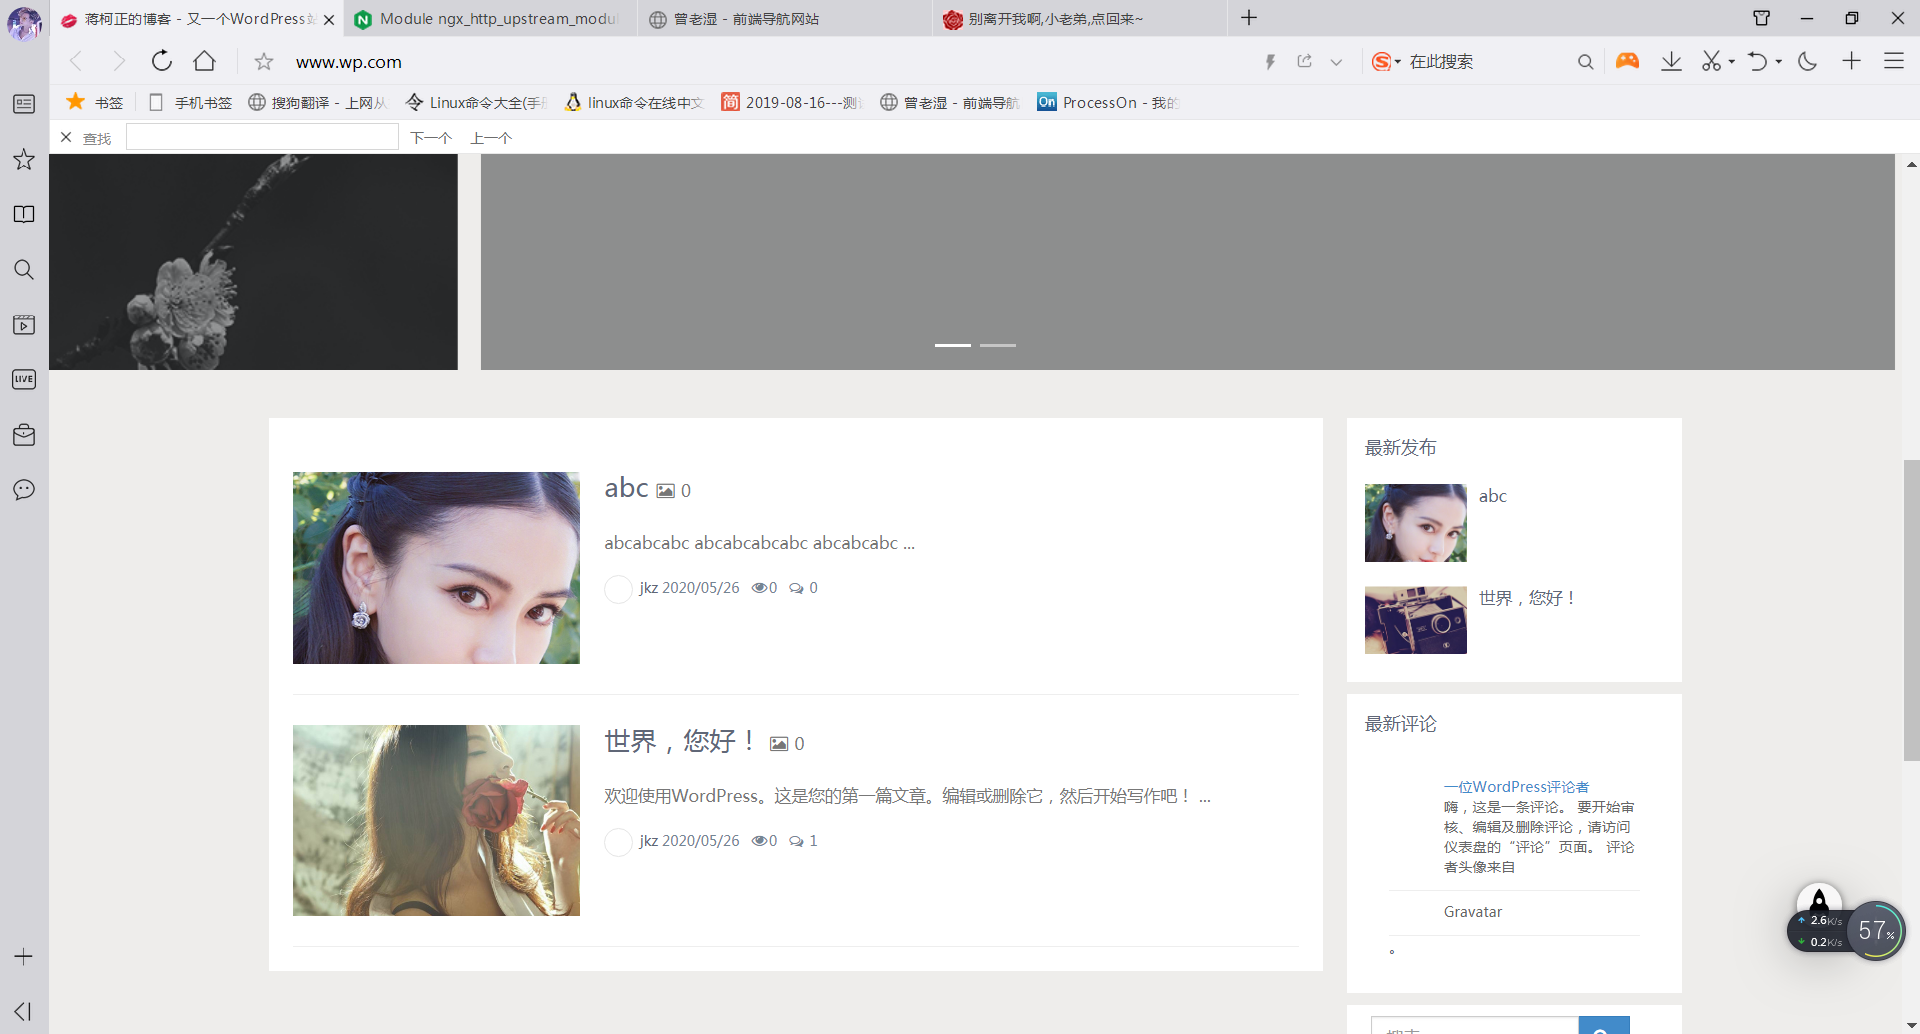
www.wp.com (wordpress)
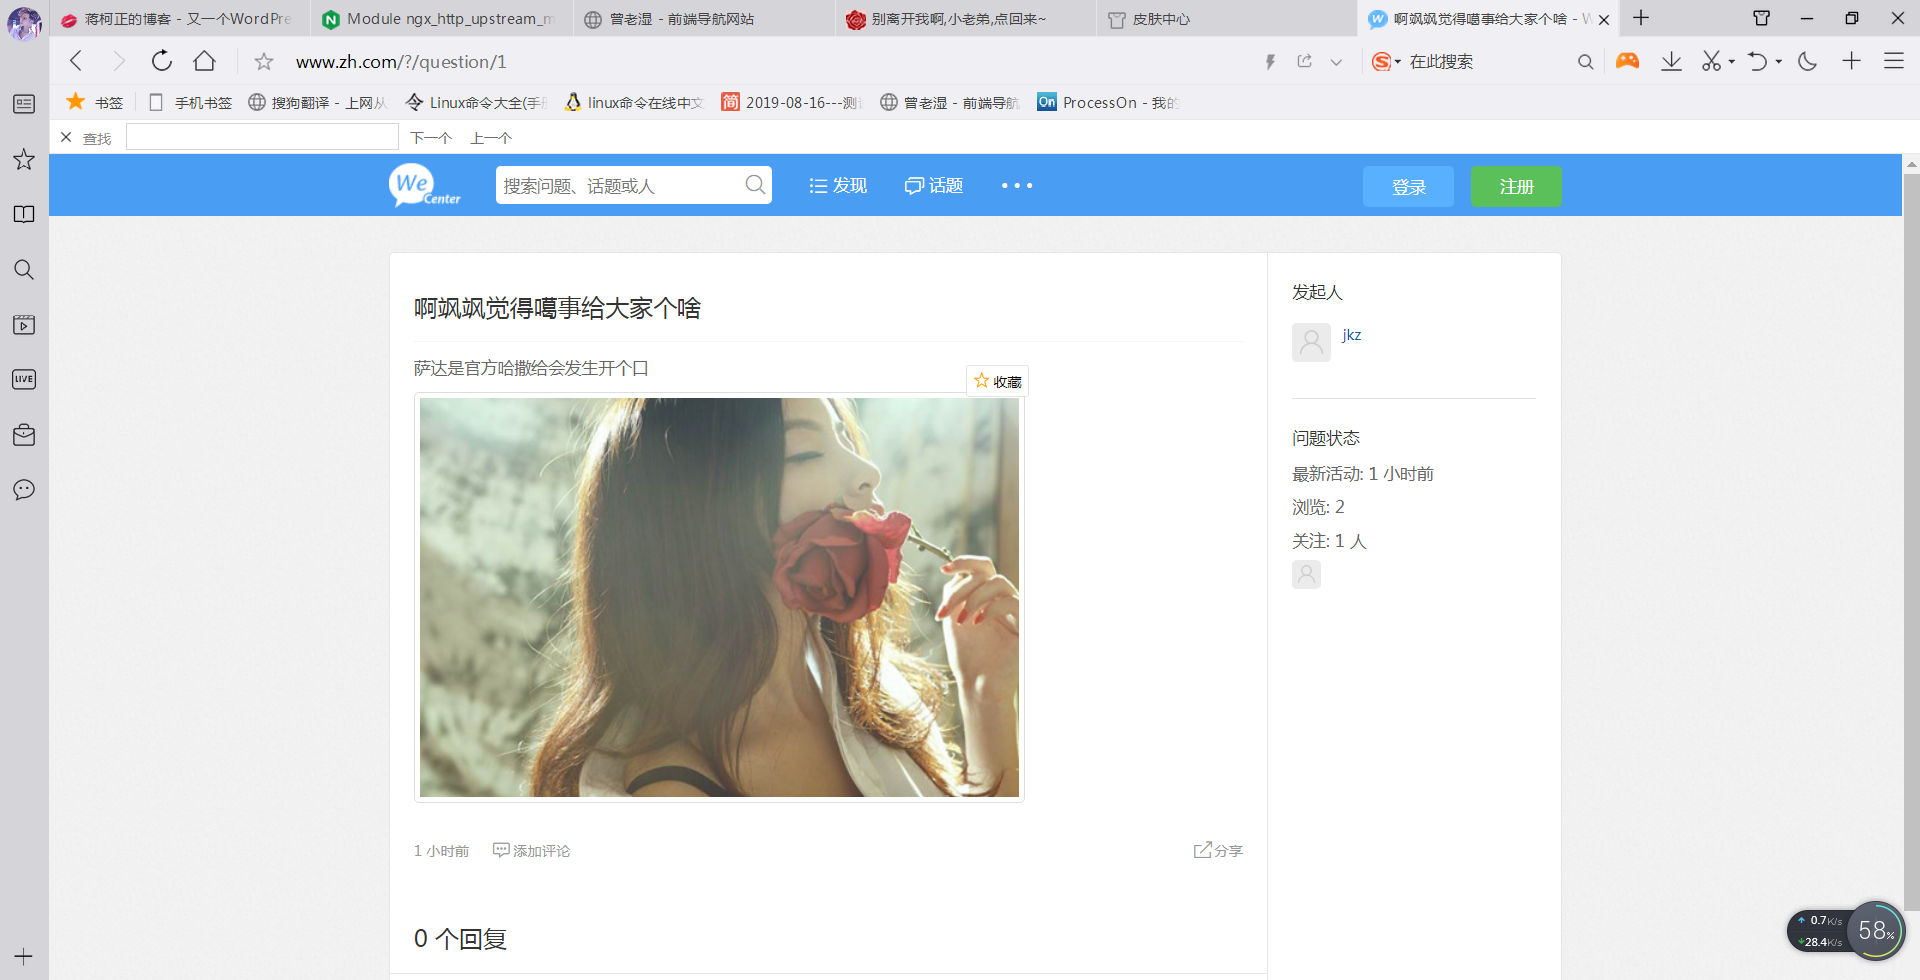
www.zh.com (Wecenter)
wordpress
Wecenter

# 1.上传和解压rpm包
[root@web02 ~]# tar xf nginx_php.tgz
[root@web02 ~]# cd nginx_php/
[root@web02 ~/nginx_php]# rpm -ivh *

# 2.解压web01发来的文件到/下
[root@web02 ~]# tar xfC code.tgz /

# 3.创建用户和用户组
[root@web02 ~]# groupadd www -g 666
[root@web02 ~]# useradd www -u 666 -g 666 -s /sbin/nologin -M

# 4.授权站点目录(本来是不用的,保险点)
[root@web02 ~]# chown www.www -R /code/

# 5.让nginx使用www用户
[root@web02 ~]# vim /etc/nginx/nginx.conf
...
user www;
...

# 6.修改php用户
[root@web02 ~]# vim /etc/php-fpm.d/www.conf
...
user = www
group = www
....

# 7.启动php并加入开机自启
[root@web02 ~]# systemctl start nginx php-fpm
[root@web02 ~]# systemctl enable nginx php-fpm
1.注释掉web01的域名解析
2.给web02域名做解析
3.登入www.wp.com www.zh.com
完全相同,已成功公用一个数据库
# 1.创建统一用户
[root@nfs ~]# groupadd www -g 666
[root@nfs ~]# useradd www -g 666 -u 666 -s /sbin/nologin -M
# 2.更改NFS的配置文件
[root@nfs ~]# vim /etc/exports
/file/zh 172.16.1.0/24(sync,rw,all_squash,anonuid=666,anongid=666)
/file/wp 172.16.1.0/24(sync,rw,all_squash,anonuid=666,anongid=666)
# 3.创建共享目录
[root@nfs ~]# mkdir /file/{wp,zh} -p
# 4.授权共享目录
[root@nfs ~]# chown www.www -R /file/
# 5.启动并开机自启nfs
[root@nfs ~]# systemctl start nfs
[root@nfs ~]# systemctl enable nfs
############# web上的操作
# 6.发送项目上的图片到共享目录上
# wordpress上的图片
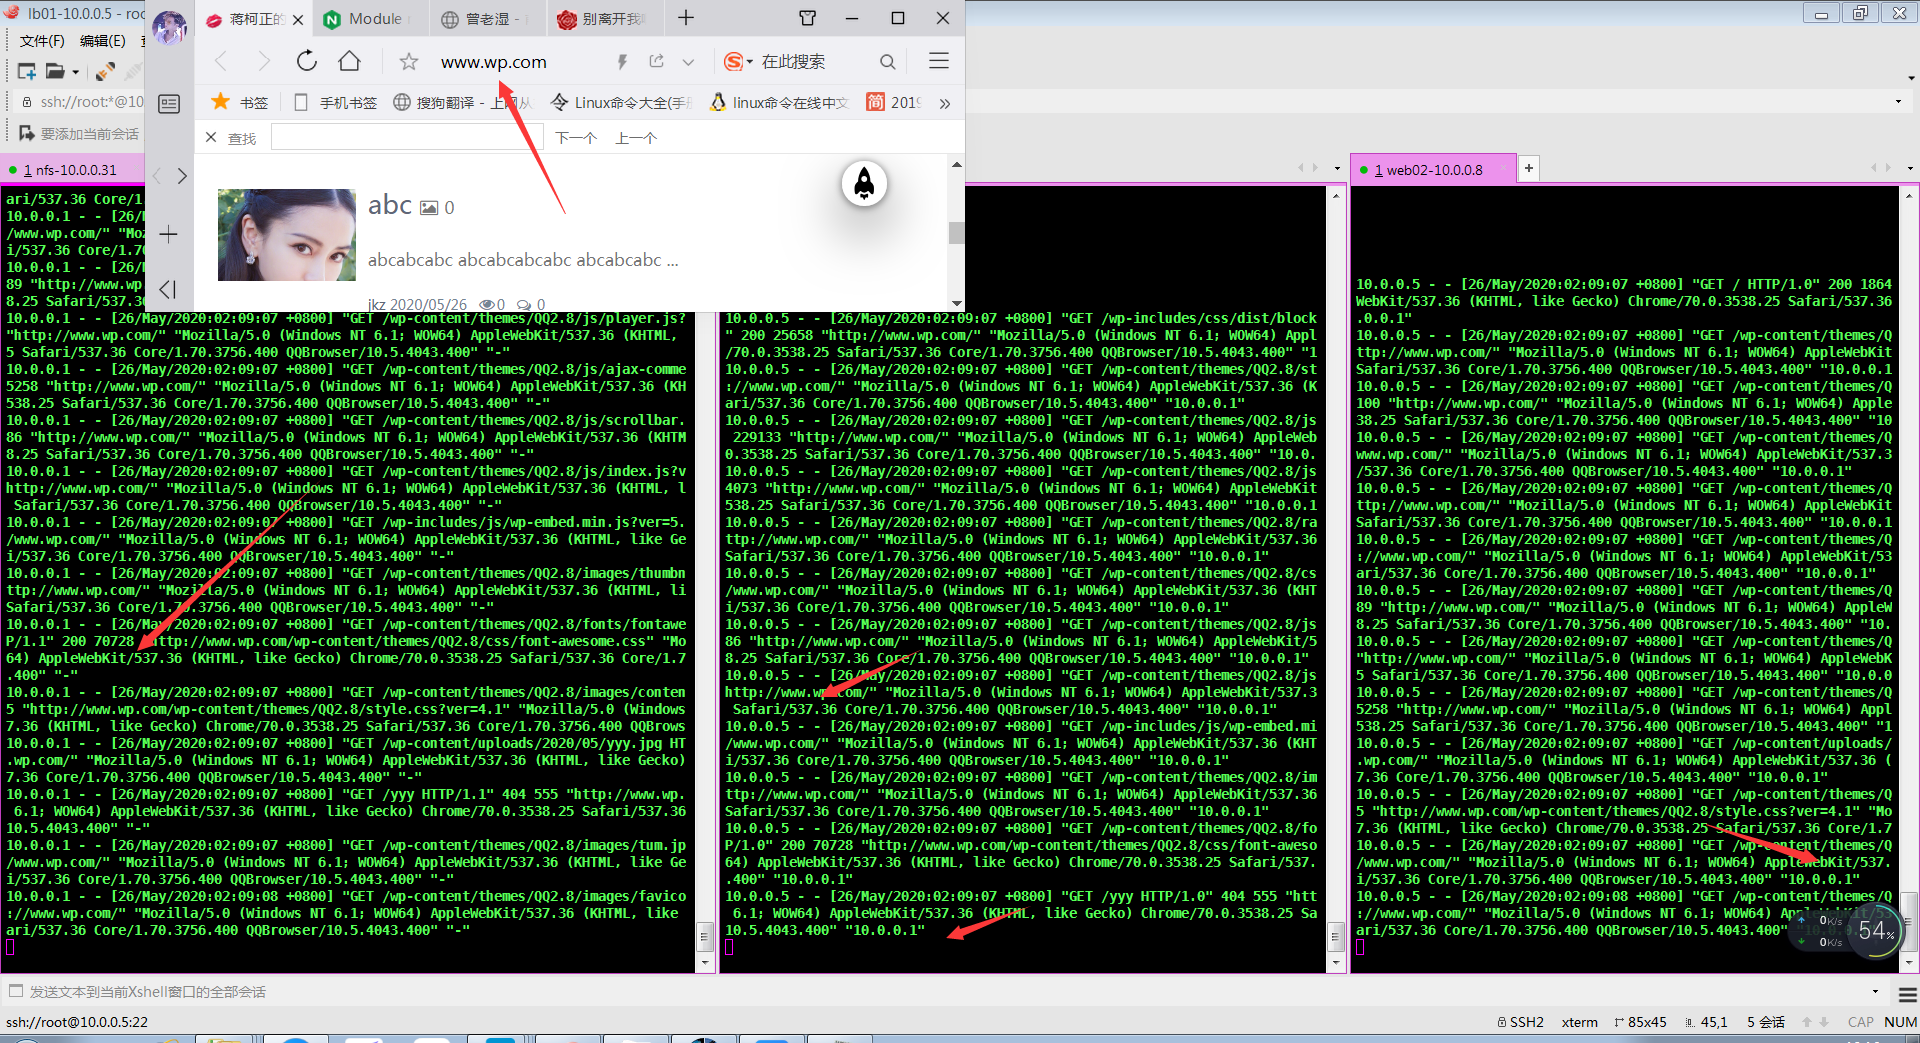
[root@web01 ~]# scp -r /code/wordpress/wp-content/uploads/* 172.16.1.31:/file/wp/
# 知乎上的图片
[root@web01 ~]# scp -r /code/zh/uploads/* 172.16.1.31:/file/zh
# 7.查看共享目录是否成功了
[root@web01 ~]# showmount -e 172.16.1.31
Export list for 172.16.1.31:
/file/wp 172.16.1.0/24
/file/zh 172.16.1.0/24
# 8.web01挂载
[root@web01 ~]# mount -t nfs 172.16.1.31:/file/zh /code/zh/uploads/
[root@web01 ~]# mount -t nfs 172.16.1.31:/file/wp /code/wordpress/wp-content/uploads/
# 9.查看
[root@web01 ~]# df -h
Filesystem Size Used Avail Use% Mounted on
/dev/sda3 19G 1.6G 17G 9% /
devtmpfs 476M 0 476M 0% /dev
tmpfs 487M 0 487M 0% /dev/shm
tmpfs 487M 7.7M 479M 2% /run
tmpfs 487M 0 487M 0% /sys/fs/cgroup
/dev/sda1 497M 120M 378M 25% /boot
tmpfs 98M 0 98M 0% /run/user/0
172.16.1.31:/file/zh 19G 1.3G 18G 7% /code/zh/uploads
172.16.1.31:/file/wp 19G 1.3G 18G 7% /code/wordpress/wp-content/uploads
# 10.web02挂载
[root@web02 ~]# mount -t nfs 172.16.1.31:/file/zh /code/zh/uploads/
[root@web02 ~]# mount -t nfs 172.16.1.31:/file/wp /code/wordpress/wp-content/uploads/
# 11.查看
[root@web02 ~]# df -h
Filesystem Size Used Avail Use% Mounted on
/dev/sda3 19G 1.6G 17G 9% /
devtmpfs 476M 0 476M 0% /dev
tmpfs 487M 0 487M 0% /dev/shm
tmpfs 487M 7.7M 479M 2% /run
tmpfs 487M 0 487M 0% /sys/fs/cgroup
/dev/sda1 497M 120M 378M 25% /boot
tmpfs 98M 0 98M 0% /run/user/0
172.16.1.31:/file/zh 19G 1.3G 18G 7% /code/zh/uploads
172.16.1.31:/file/wp 19G 1.3G 18G 7% /code/wordpress/wp-content/uploads
########### 共享图片完成
#### 安装nginx
# 1.更换nginx源
vim /etc/yum.repos.d/nginx.repo
[nginx-stable]
name=nginx stable repo
baseurl=http://nginx.org/packages/centos/$releasever/$basearch/
gpgcheck=1
enabled=1
gpgkey=https://nginx.org/keys/nginx_signing.key
module_hotfixes=true

# 2.安装nginx
[root@web01 ~]# yum install -y nginx

# 3.创建统一用户
[root@lb01 ~]# groupadd www -g 666
[root@lb01 ~]# useradd www -g 666 -u 666 -s /sbin/nologin -M

# 4.修改nginx的用户
[root@lb01 ~]# vim /etc/nginx/nginx.conf
...
user www;
...

# 5.启动nginx并开机自启
[root@lb01 ~]# systemctl start nginx
[root@lb01 ~]# systemctl enable nginx

# 6.准备Nginx负载均衡调度使用的proxy_params,把它写到文件里面去
[root@lb01 ~]# vim /etc/nginx/proxy_params

proxy_set_header Host $http_host;
proxy_set_header X-Real-IP $remote_addr;
proxy_set_header X-Forwarded-For $proxy_add_x_forwarded_for;

proxy_connect_timeout 30;
proxy_send_timeout 60;
proxy_read_timeout 60;

proxy_buffering on;
proxy_buffer_size 32k;
proxy_buffers 4 128k;

# 7.写负载均衡配置文件
#### 这个wordpress的负载均衡配置文件
[root@lb01 ~]# vim /etc/nginx/conf.d/wp_lb.conf
upstream wp_lb {
    server 10.0.0.7;
    server 10.0.0.8;
}

server {
    listen 80;
    server_name www.wp.com;
    location / {
        proxy_pass http://wp_lb;
        include proxy_params;
    }
}


#### 这是Wecenter的负载均衡配置文件
upstream zh_lb {
    server 10.0.0.7;
    server 10.0.0.8;
}

server {
    listen 80;
    server_name www.zh.com;
    location / {
        proxy_pass http://zh_lb;
        include proxy_params;
    }
}


# 8.检查语法
[root@lb01 /etc/nginx]# nginx -t

# 9.重新加载配置文件
[root@lb01 /etc/nginx]# nginx -s reload
wordpress
Wecentre
15.Nginx负载均衡与LNMP配置场景(wordpress和知乎)
标签:df -h PFS yum lan params 移动 挂载 sign lb01
原文地址:https://www.cnblogs.com/jkz1/p/13028156.html