标签:lin 图片 else pytho 相加 asp 方便 mat span
目标的真实边界(ground_truth bounding box)。
而以像素为中心生成多个大小和宽高比(aspect ratio)的边界框,称为anchor box。基于深度学习的目标检测不使用传统的滑窗生成所有的窗口作为候选区域,FasterRCNN提出的RPN网络,处理较少但准确的候选区域。锚框即可理解为某个检测点处的候选区域。
假设图像高\(h\),宽为\(w\)。以每个像素为中心,大小\(s \in (0,1]\),宽高比\(r \gt 0\)。那么锚框的宽为\(ws\sqrt{r}\),高为\(\frac{hs}{\sqrt{r}}\)。(设锚框宽高为\(x\)和\(y\)。面积\(xy=s^2\),比例\(x/y=r\),计算出来\(x=s*\sqrt{r}~~,y=\frac{s}{\sqrt{r}}\),这里的计算出的都是归一化后的宽度和高度是相对原图,因此各自乘以原图像宽度和高度。)。
设定一组大小和宽高比,\(s_1,...s_n\)和\(r_1,....r_m\)。显然有\(mn\)种组合,图像有\(wh\)个像素点,那么一共有\(whmn\)个锚框。数量太多,只关注含有\(r1\)和\(s1\)的框。即组合是\((s_1,r_k)\)和\((s_k,r_1)\),一共\(n+m-1\)个框。
一幅图像生成的anchor存放在一个数组里面,尺寸是(宽,高,anchor个数,4),弄成这种尺寸是便于可视化,如果知道某个像素点的所有anchor坐标,直接索引访问即可。
def MultiBoxPrior(featuremap, sizes=[0.75,0.5,0.25], ratios=[1,2,0.5]):
    # 生成anchor表示为 xmin ymin xmax ymax
    pairs = []
    # 组合配对m+n-1个锚框 后续使用根号r较多,因此这里直接开根号了
    for r in ratios:
        pairs.append([sizes[0], math.sqrt(r)])
    for s in sizes[1:]:
        pairs.append([s, math.sqrt(ratios[0])])
    # pairs是每一组anchor的设置
    # 对于(s,r)的锚框,对应的宽高是ws*sqrt(r)和hs/sqrt(r)
    # 返回的锚框变量y的形状(宽,高,以相同像素为中心的框个数,4) y[100,100,0,:]即为(100,100)像素位置第一个锚框坐标
    pairs = np.array(pairs)

    # 锚框的相对宽高 s*根号r 和 s/根号r
    x = pairs[:, 0] * pairs[:, 1] # s*根号r
    y = pairs[:, 0] / pairs[:, 1] # s/根号r

    # 以像素点为中心,两边的偏移量
    # 上面的x y 是anchor的宽高,下面计算的是两边的偏移,因此除以了2
    # base_anchors 中心点(0,0) 锚框的对角坐标,相对偏移
    # 如果中心像素坐标(i,j) 那么点应该是(i-x,j-y,i+x,j+y)
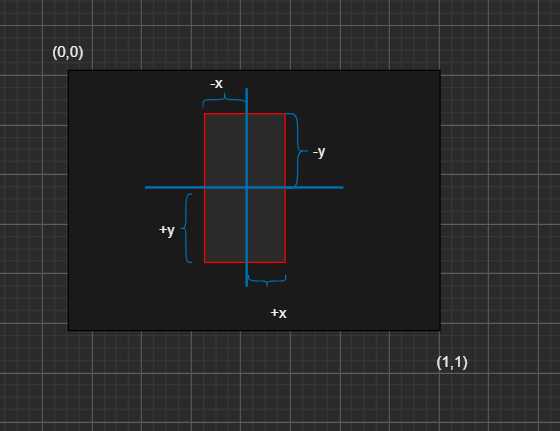
    # base_anchors每一行就是一种锚框相对中心的偏移量 -x -y +x +y
    base_anchors = np.stack([-x, -y, x, y], axis=1) / 2
    #print(base_anchors)

    h,w = featuremap.shape[-2:]  # 特征图的宽高,特征图尺寸NCHW
    # anchor_boxes尺寸如下 每一个点要有len(pairs)个锚框
    anchor_boxs = np.zeros(shape=(h,w,len(pairs),4))
    for i in range(h):
        for j in range(w):
            # 这一步是复制中心点坐标,生成多行。。便于后面与base_anchors相加
            xx = [i / w ]*len(pairs)
            yy = [j / h]*len(pairs)
            # 中心点的坐标 就是(i,j) 归一化到[0,1]
            center_ = np.stack([xx, yy, xx, yy],axis=1)
            a = center_ + base_anchors

            anchor_boxs[i,j,:,:] = a
    return anchor_boxs
生成anchor的代码如上,原理是遍历访问每一个像素点,将像素坐标与anchor的相对偏移坐标加起来就行。for循环效率有点低,但很好理解。对每一组(s,r)计算base_anchor,即相对中心点的偏移,如图所示。那么对于每一个像素点,它的anchor,直接就是像素坐标加上对应偏移即可

这样计算出来的anchor是相对坐标。还原到原图的像素坐标,只需要乘以宽或高即可。
实际上可以用numpy操作,https://zhuanlan.zhihu.com/p/115362157 这个文章里的实现更简洁。
显示某个像素点处的anchor如下。
def show_box(img,bbox,x,y):
    # 这里为了方便。。img是cv2读取的图片
    boxes = bbox[x,y,:,:]  # 获取像素坐标(x,y)处的anchor
    h, w = img.shape[0], img.shape[1]
    for box in boxes:
        # 左上的坐标
        top_x = int(box[0]*w)
        top_y = int(box[1]*h )
        # 右下的坐标
        bottom_x = int(box[2]*w)
        bottom_y = int(box[3]*h)
        # 防止越界处理一下。。
        top_x = 0 if top_x < 0 else top_x
        top_y = 0 if top_y <0 else top_y
        bottom_x = w if bottom_x > w else bottom_x
        bottom_y = h if bottom_y > h else bottom_y

        cv2.rectangle(img,(top_x,top_y),(bottom_x,bottom_y),(255,0,0),2)
    return img
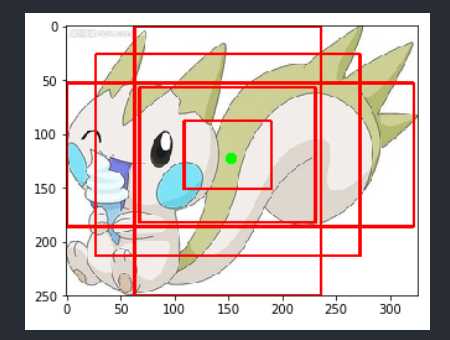
最后,测试一张图片,绘制某点的anchor。
tmp = cv2.imread("222.jpg")
# 绿色框标注一下要测试的那个像素点(155,120)处
cv2.rectangle(tmp,(150,120),(155,125),(0,255,0),3)

# MultiBoxPrior输入的是NCHW格式。这里只有一张图,是HWC,交换一下。
bbox = MultiBoxPrior(tmp.transpose(2,0,1))
print(bbox.shape)
maps = show_box(tmp,bbox,150,120)
plt.imshow(maps)
(
)
标签:lin 图片 else pytho 相加 asp 方便 mat span
原文地址:https://www.cnblogs.com/muyisun/p/13032932.html